
A fresh manicure can completely change the way I feel about an outfit, even when everything else stays exactly the same. But which shades actually look chic without feeling predictable, and how do I choose a color that works with my style? From creamy ivory and polished taupe to glossy red, soft lavender, and playful summer yellow, the right nail color can become the smallest yet most noticeable detail. I love how a beautiful shade can make simple hands look instantly more polished while still leaving plenty of room for personality. Whether I am getting ready for a weekend brunch, a vacation, or simply want a little beauty refresh, there is always a new color worth trying. So, which of these chic nail color ideas will make it onto your next manicure mood board?
Soft Ivory Almond Nails With a Clean Finish
I always come back to creamy ivory when I want my manicure to feel polished without looking overly formal. The elongated almond shape gives these nails a graceful silhouette, while the soft off white color keeps the overall effect delicate rather than stark. I love the slightly milky quality of the shade because it works beautifully against the skin and gives the hands a neat, elongated appearance.
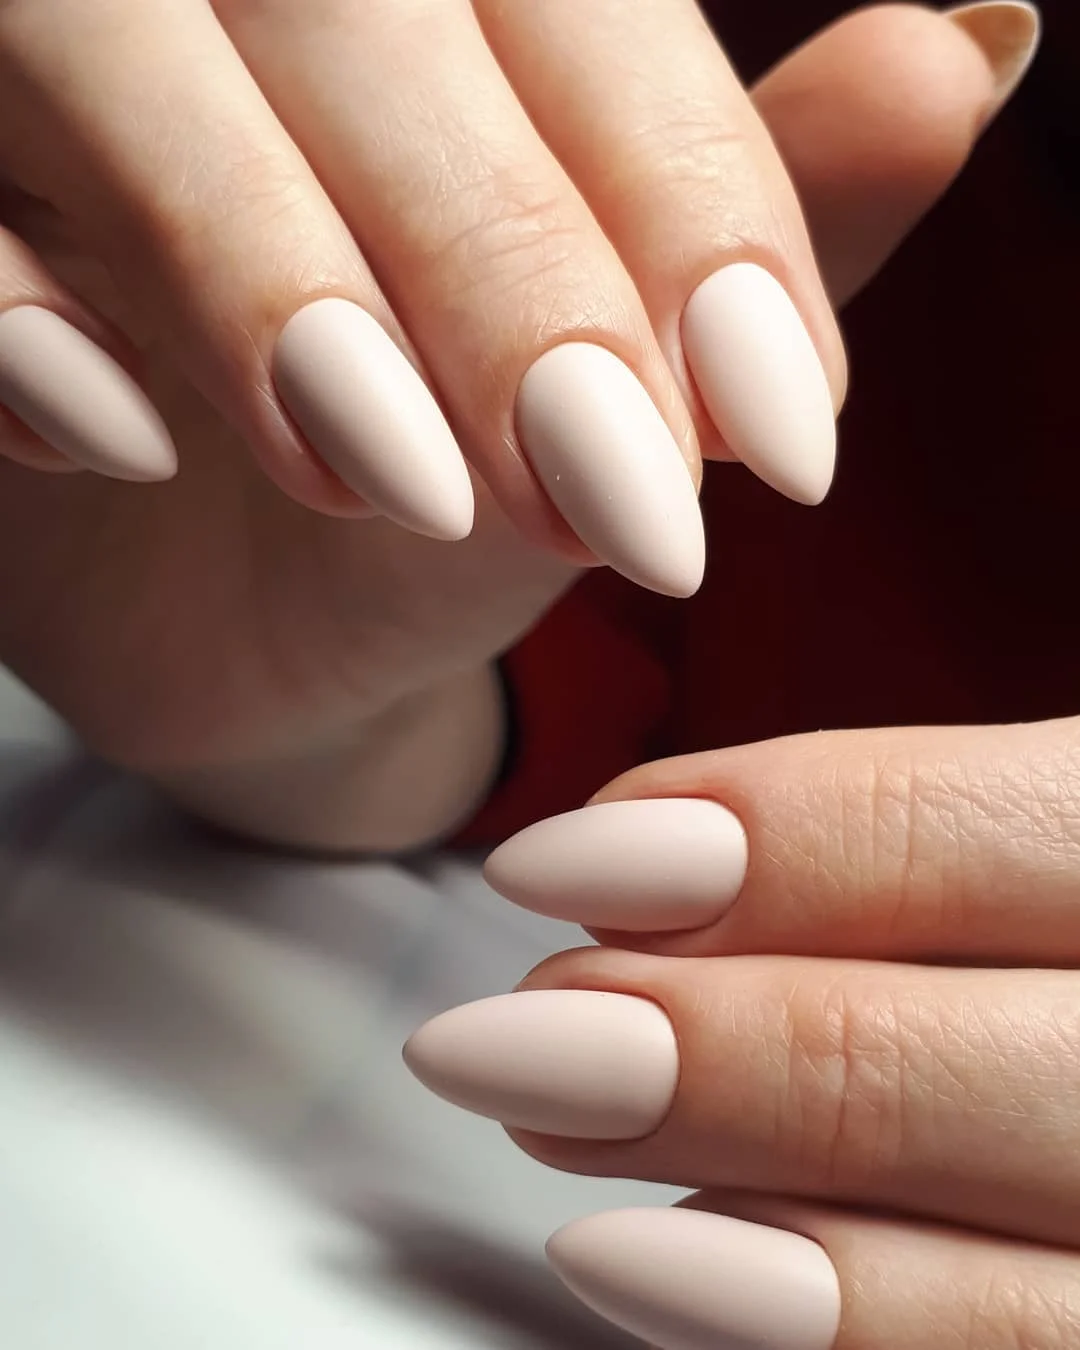
For a similar manicure, I would look for an ivory or warm milky white gel polish rather than a very cool white. OPI Funny Bunny, CND Shellac Cream Puff layered with a sheer nude, or a comparable creamy shade can create a softer result. I would also keep a fine nail file, cuticle oil, base coat, glossy top coat, and a small LED lamp nearby if I were doing the manicure with gel products.
At home, I would first shape each nail into a balanced almond, making sure the sidewalls taper gradually toward the tip. After gently preparing the nail plate, I would apply a thin base layer, followed by two very thin coats of ivory color. The trick is not to rush the polish around the cuticle. I would finish with a glossy top coat and let everything cure properly.
This is one of those manicures I could wear with almost anything. A white sundress, denim, a tailored blazer, or even a simple tank and gold jewelry all work with it. When I want my nails to quietly make my hands look elegant, this is usually the direction I take.
Midnight Plum Almond Nails With a Sparkling Sheen
Deep plum has a completely different attitude, and I love that contrast. The elongated almond shape keeps the dark color sophisticated, while tiny reflective particles add dimension instead of turning the manicure into full on glitter. The result feels almost like a twilight shade with little flashes of light appearing whenever the nails move.
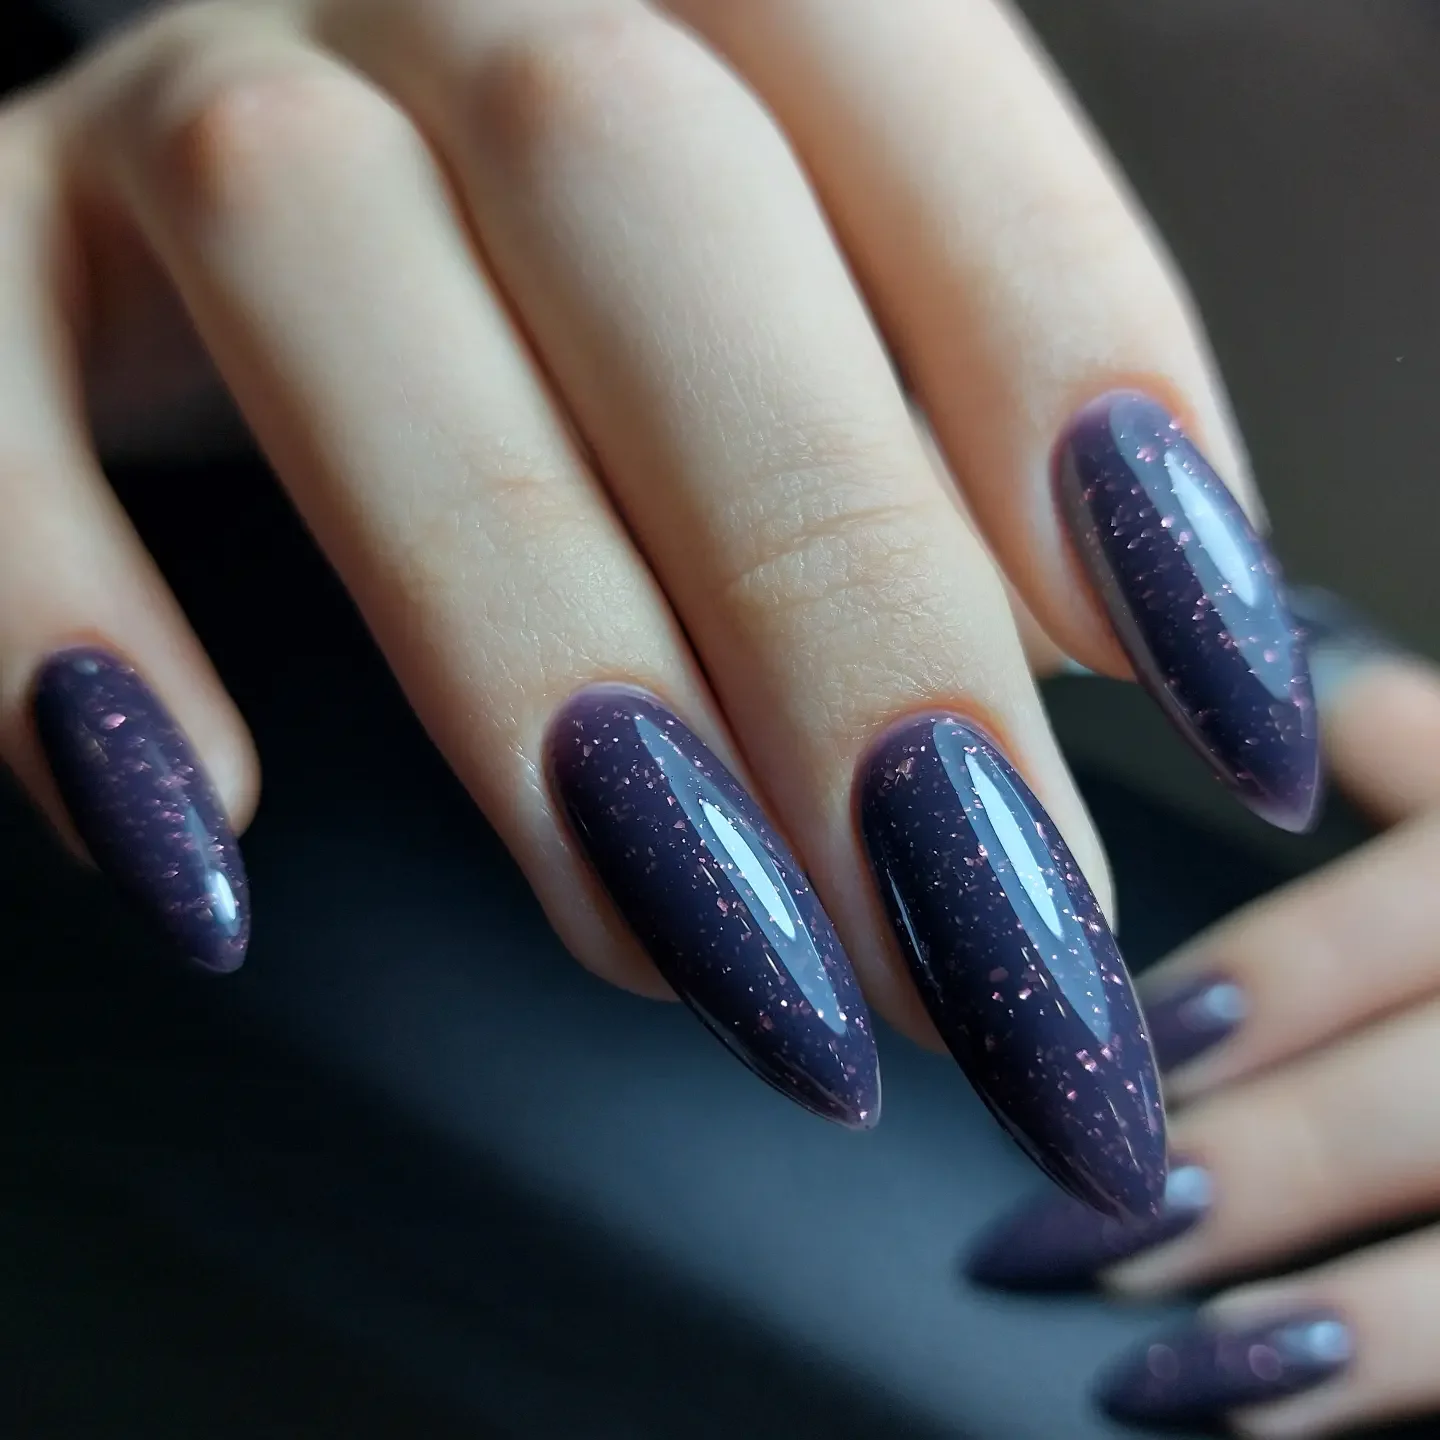
I would choose a rich plum, violet, or blue based polish with fine shimmer particles for this look. A shade similar to OPI Lincoln Park After Dark can work as a base, while a sheer violet shimmer topper can create that scattered sparkle. A glossy top coat is important here because it pulls all those tiny reflective details together.
I would shape the nails before applying color because dark polish makes uneven edges much easier to notice. Once the base coat is dry or cured, I would apply the plum shade in thin layers, allowing each one to settle before adding the next. If I wanted more sparkle, I would lightly layer shimmer rather than covering the nail with chunky glitter.
I especially like this color when summer evenings start stretching later into the night. It has enough depth for a black outfit but looks unexpectedly beautiful with denim or soft neutral clothing too. If classic red feels too predictable for your next evening manicure, this deep plum gives me that same polished confidence with a more mysterious twist.
Glossy Pink Square Nails With a Playful Pop
Glossy pink does not need elaborate decoration to make an impression. Here, the medium length square shape gives the manicure a clean, modern structure, while the saturated pink adds the fun. I like the combination because the squared tips make the playful color feel more intentional and polished.
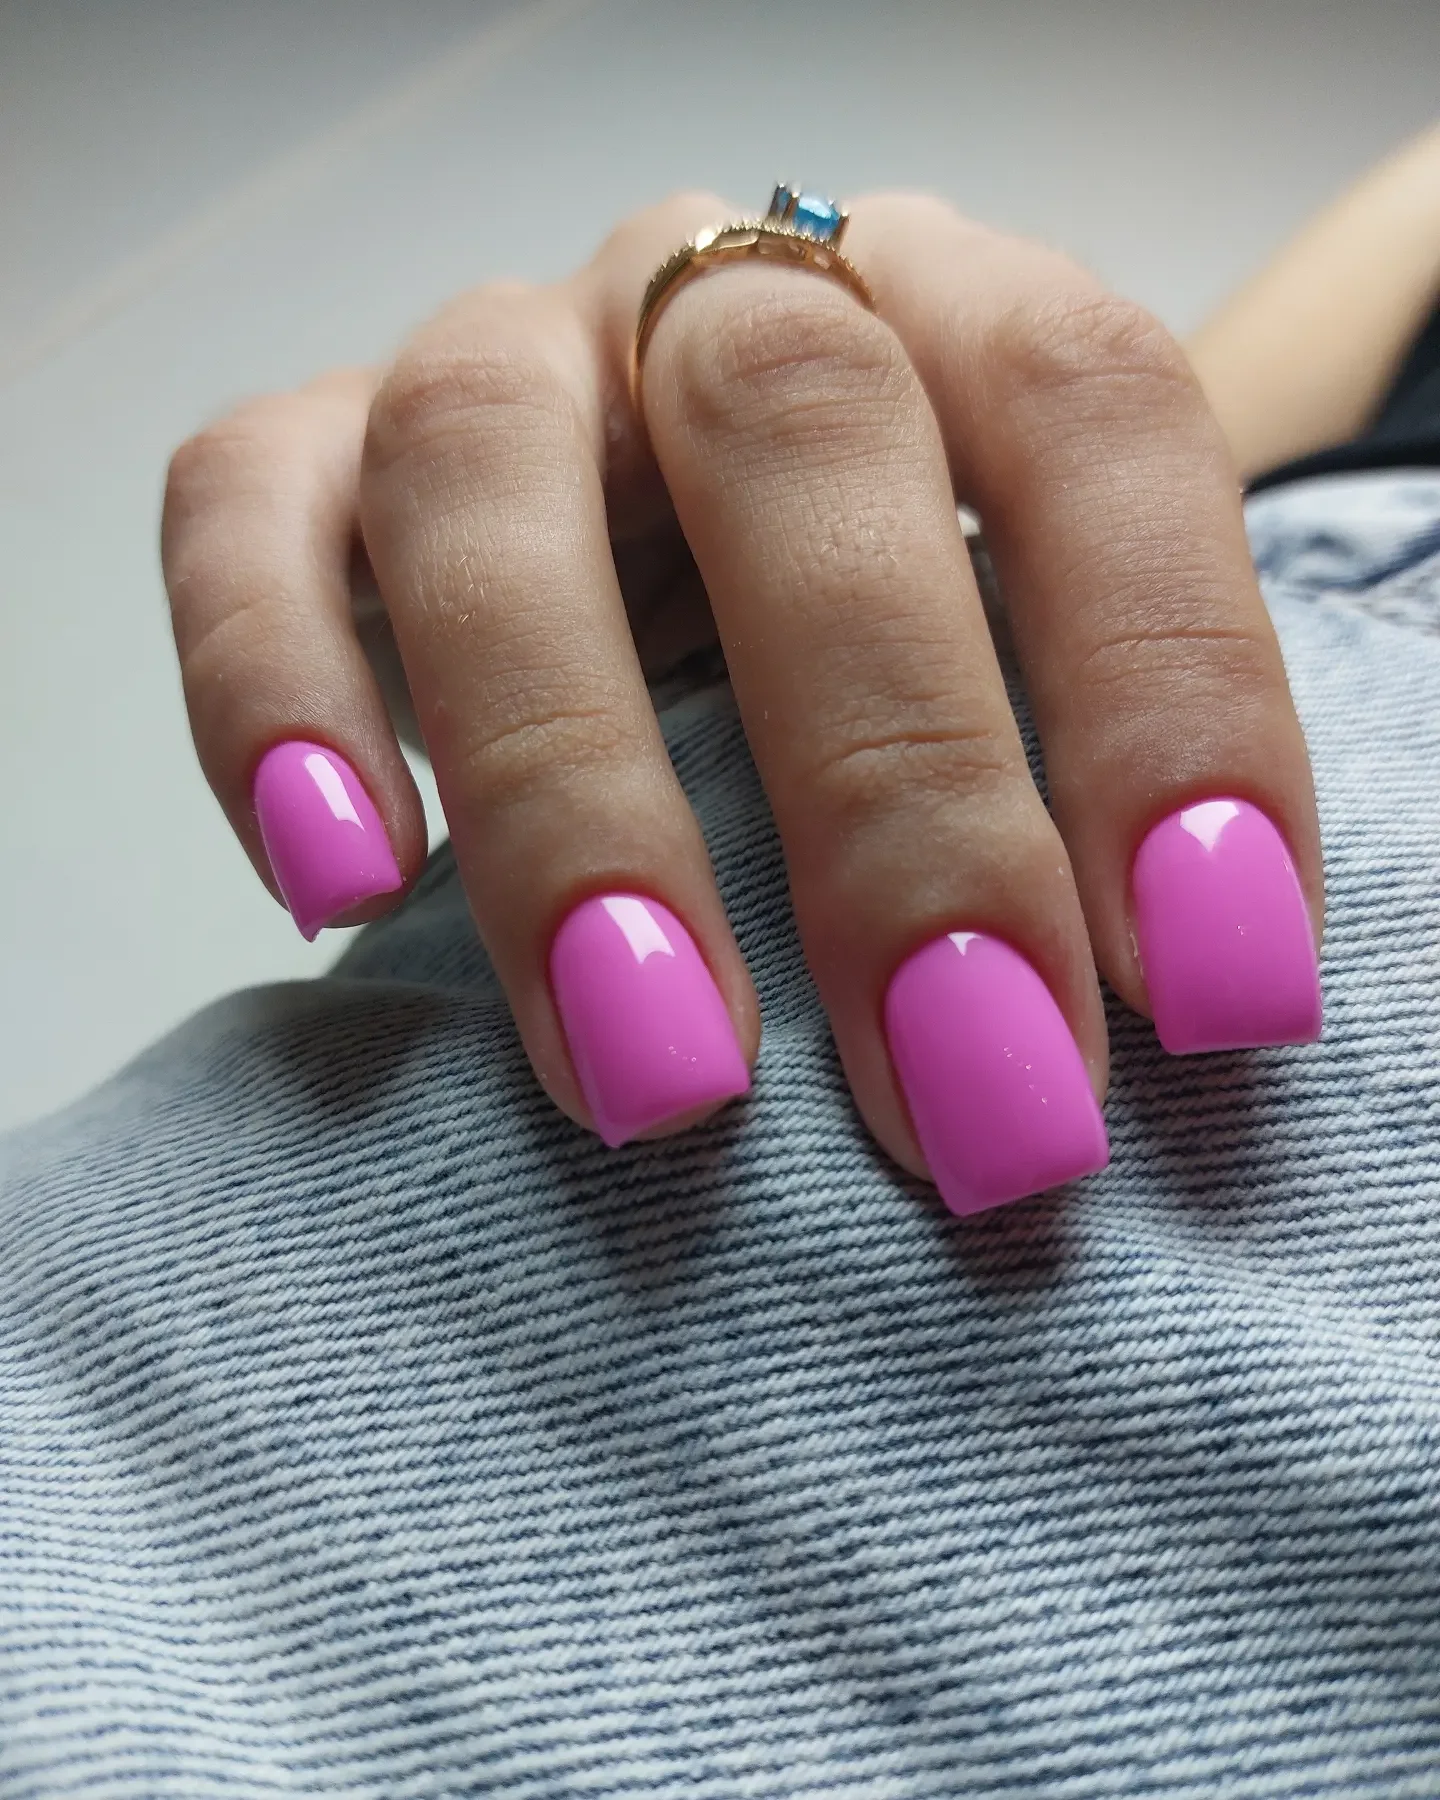
For this kind of manicure, I would reach for a vivid pink cream polish with a high shine finish. Essie Mod Square or a similarly saturated pink can give the nails that juicy color effect, while a smoothing base coat helps create an even surface. I would also use a glossy top coat because the shine is part of the look rather than an afterthought.
I would carefully refine the side edges and keep the free edge straight before applying polish. Two thin coats usually give a stronger result than one thick coat, especially with highly pigmented pink shades. I would finish by sealing the tip with top coat, then add cuticle oil once the manicure is completely set.
This is my choice when a neutral manicure feels a little too quiet. Pink instantly gives a simple summer outfit more energy, yet the clean shape keeps it from feeling childish. Add a simple ring and a glossy lip, and suddenly the whole look feels pulled together.
Classic Red Coffin Nails With Mirror Gloss
Red nails have a way of refusing to disappear. I love this version because the long coffin shape gives the traditional color a sharper, more contemporary attitude. The intense red pigment combined with a glassy finish makes every nail look smooth and almost lacquered.
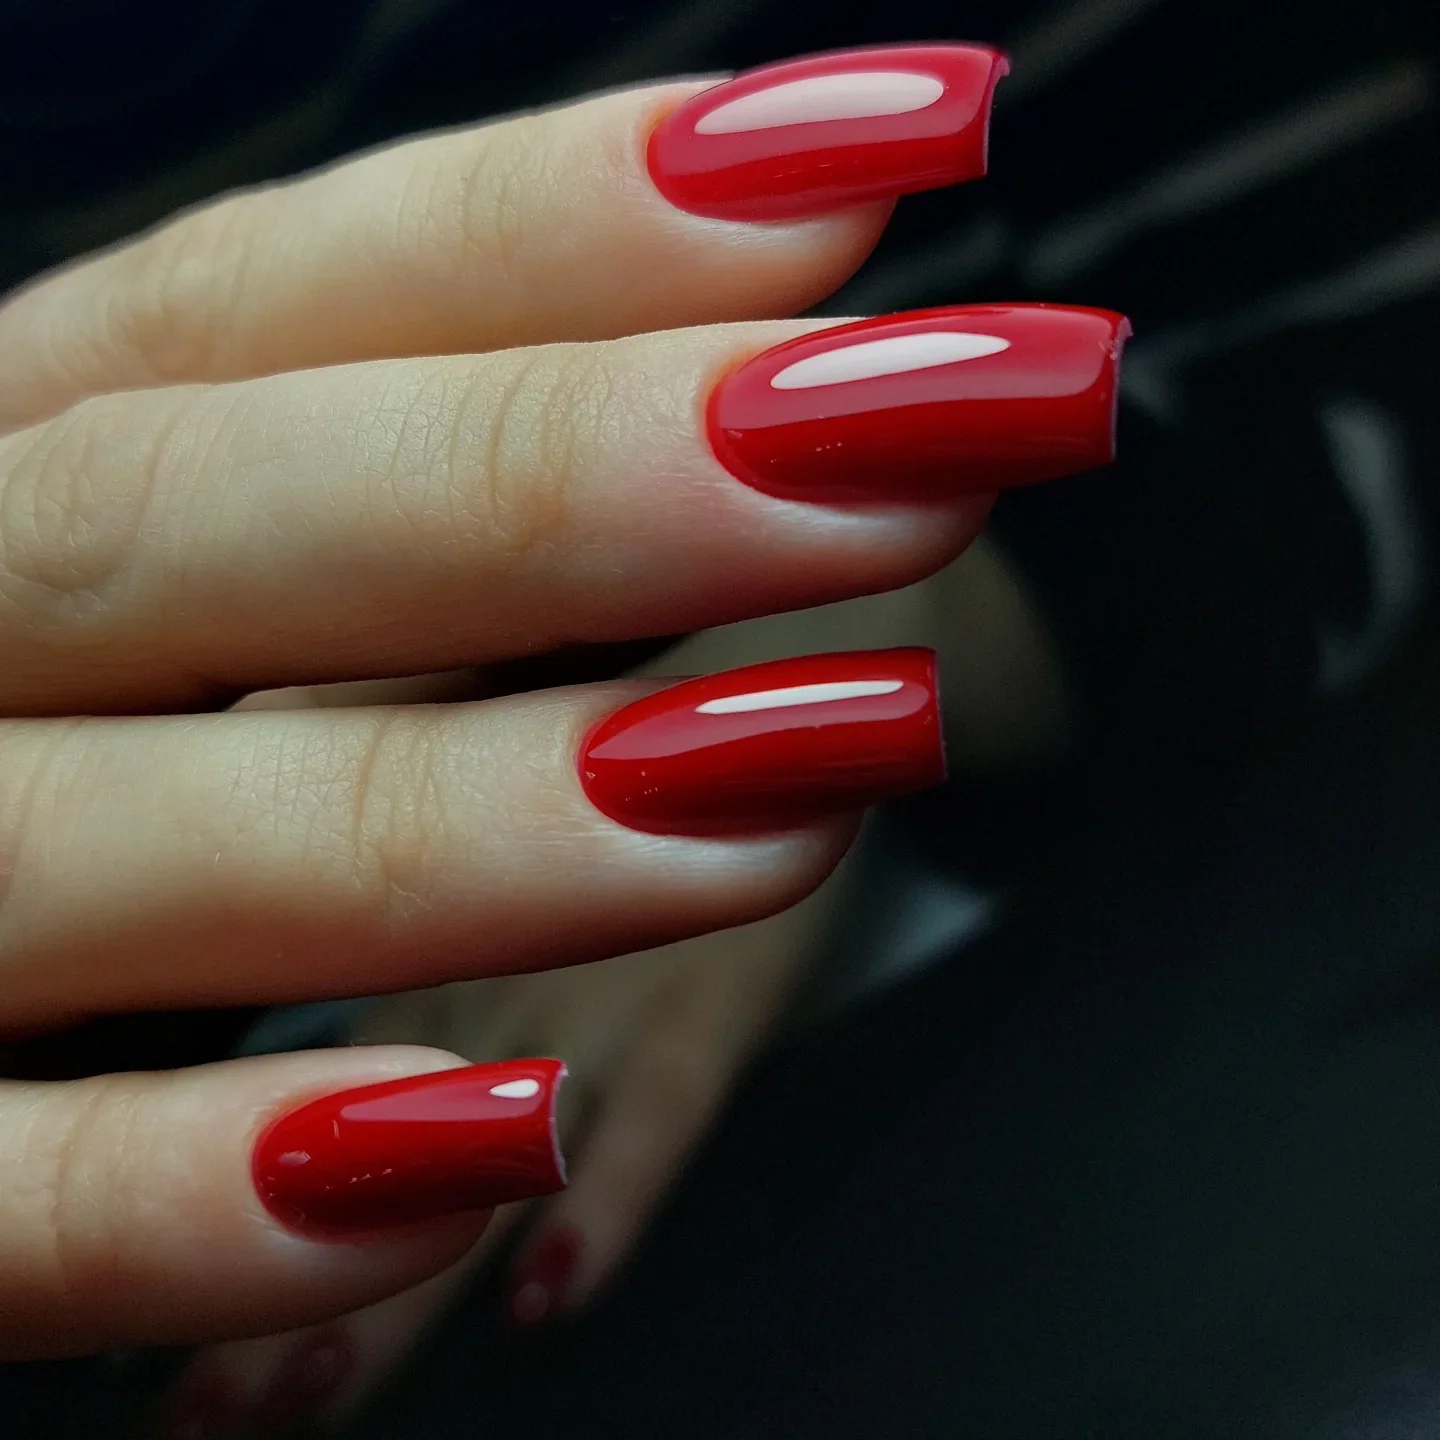
I would use a highly pigmented true red cream polish for this manicure, choosing a shade with a slightly cool or neutral undertone. OPI Big Apple Red is a classic starting point, although any saturated red with strong coverage can work. A ridge filling base and very glossy top coat will help create the smooth finish that makes this manicure so striking.
I would file the sides evenly, keeping the tip straight while gently narrowing the nail toward the free edge. After applying base coat, I would use two controlled coats of red, keeping the polish slightly away from the skin around the cuticle. Once the color is cured or dry, I would add a generous but controlled layer of glossy top coat and carefully seal the free edge.
Whenever I wear red nails, I notice how little else I need to do. A white shirt, black dress, denim, or even a simple swimsuit suddenly looks more styled. It is a tiny beauty decision with a surprisingly big payoff, especially during summer when hands are constantly on display.
Lavender Almond Nails With a Fresh Glossy Finish
Lavender is one of those shades I reach for when I want color without the intensity of a traditional bright manicure. The almond shape gives the soft purple tone an elegant frame, while the glossy finish makes the color look smooth and fresh. It has a cool, airy quality that feels particularly lovely in warm weather.
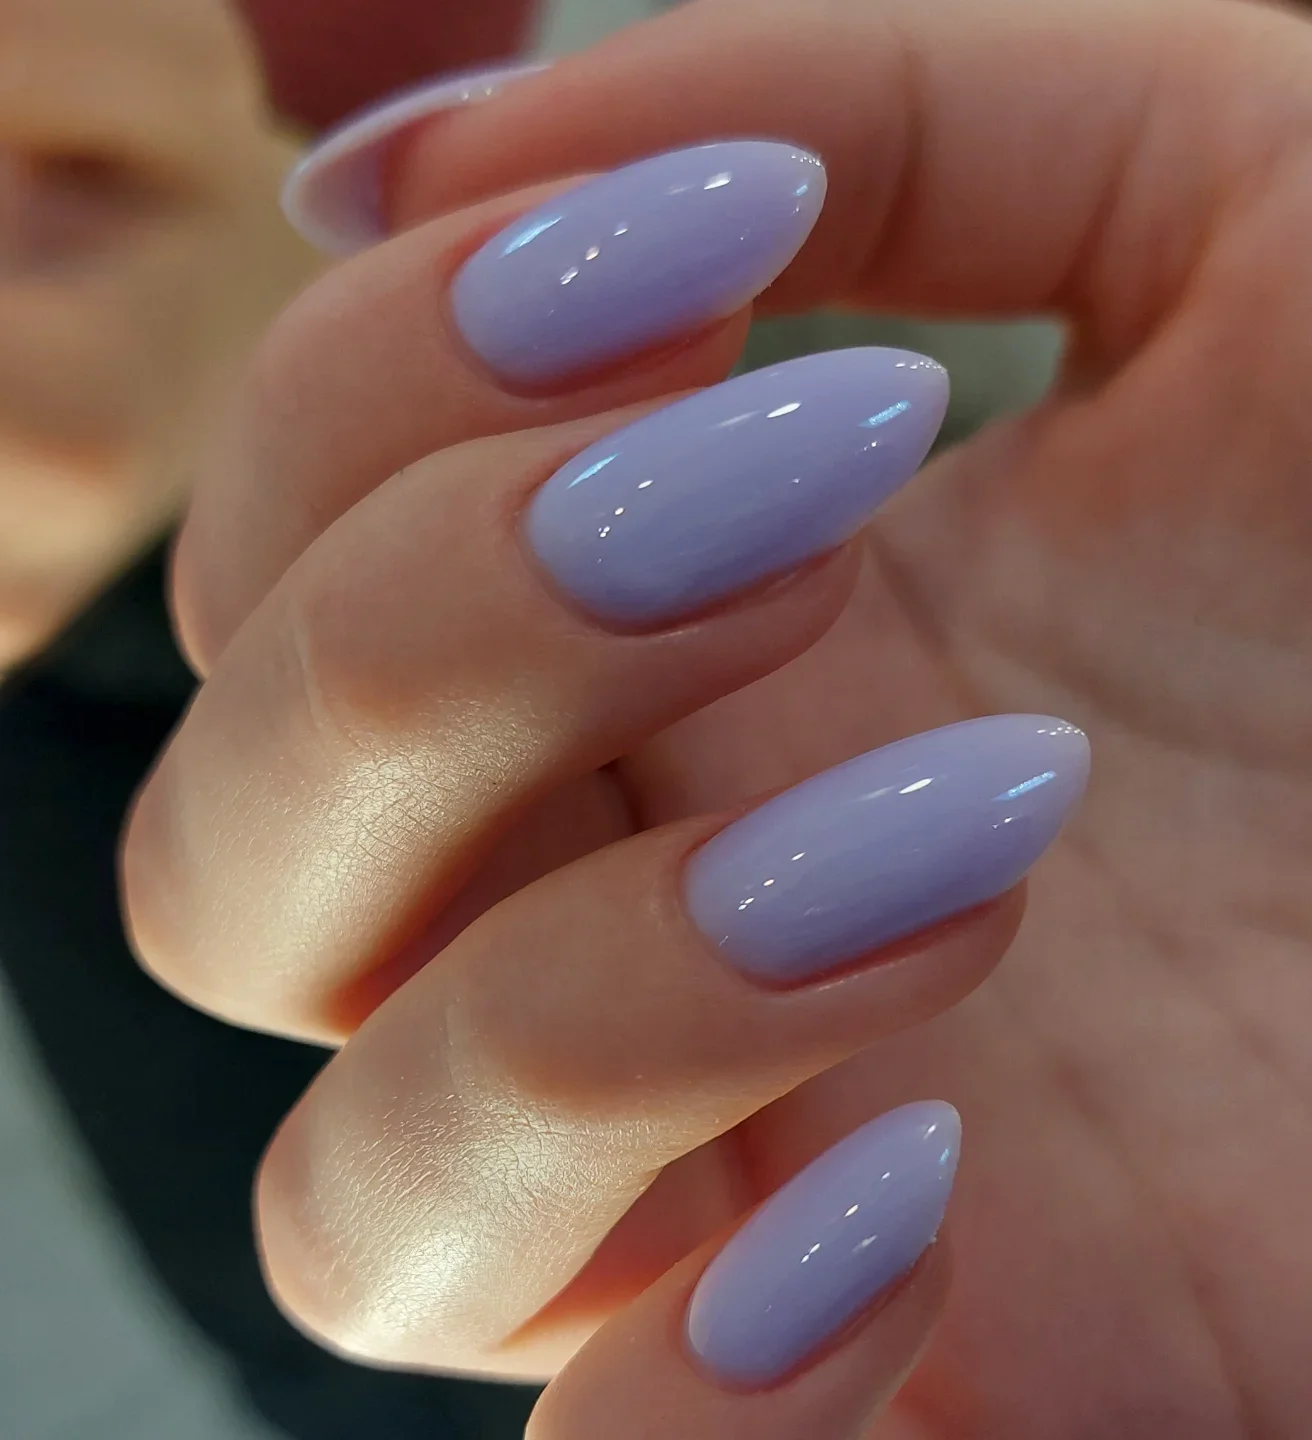
I would choose a creamy pastel lavender rather than a gray or overly blue purple. OPI Do You Lilac It? is a useful reference point, although a softer pastel version can create a more delicate result. I would pair it with a glossy top coat and a sheer base if my natural nails have visible ridges.
Pastel colors can sometimes show streaks, so I would resist the temptation to apply one heavy coat. I prefer two or even three very thin layers, allowing each layer to settle properly. Before the final top coat, I would check the sidewalls and clean any tiny imperfections with a small brush dipped in remover.
I think lavender works beautifully when I want my manicure to feel feminine but not overly sweet. It looks especially good with white, pale denim, gray, and soft neutral clothing. And honestly, there is something refreshing about seeing that cool lavender tone against sun warmed skin.
Warm Taupe Almond Nails For Effortless Elegance
Warm taupe is my definition of understated polish. The almond shape creates a long, refined line, while the brown beige color brings enough warmth to keep the manicure from feeling flat. The high shine finish gives the neutral shade a beautiful depth, almost like polished cream.
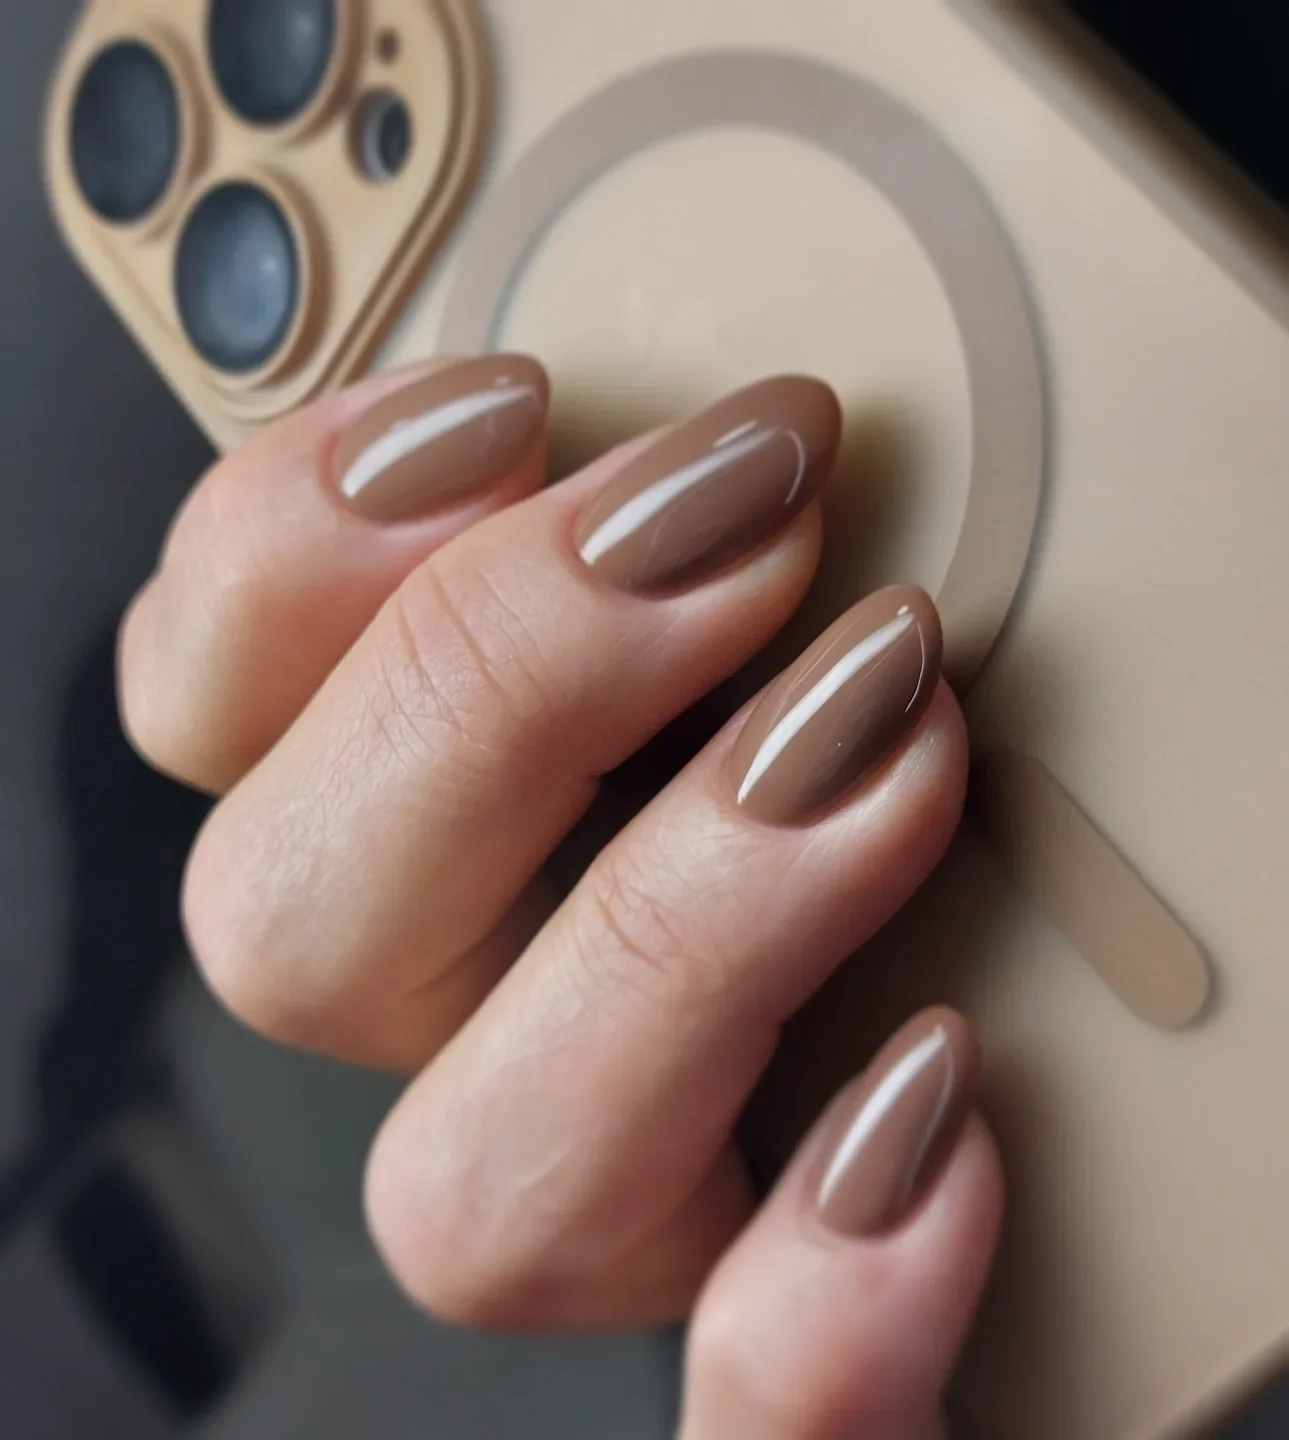
For this look, I would choose a medium taupe or warm mocha nude with a creamy formula. Essie Clothing Optional or a similar warm neutral can work beautifully, depending on the skin tone. I would keep the rest of the products simple: base coat, two thin color layers, glossy top coat, and cuticle oil.
I would begin by creating the almond shape, paying particular attention to keeping both sides symmetrical. After smoothing the nail surface, I would apply the neutral color from the center toward the sides in controlled strokes. A glossy top coat is essential because the reflective finish makes a simple taupe shade look much richer.
This is the manicure I would choose for a busy week when I want my nails to coordinate with everything without thinking about it. It works with gold jewelry, denim, tailored pieces, and summer neutrals. Sometimes the chicest choice is the one that quietly fits into your entire wardrobe.
Electric Yellow Nails With a Confident Summer Energy
Yellow becomes completely different when the shade is intense and glossy. This vivid yellow manicure has a strong visual presence, but the medium length and structured shape keep it wearable. I like the way the color turns the manicure into an accessory all by itself.
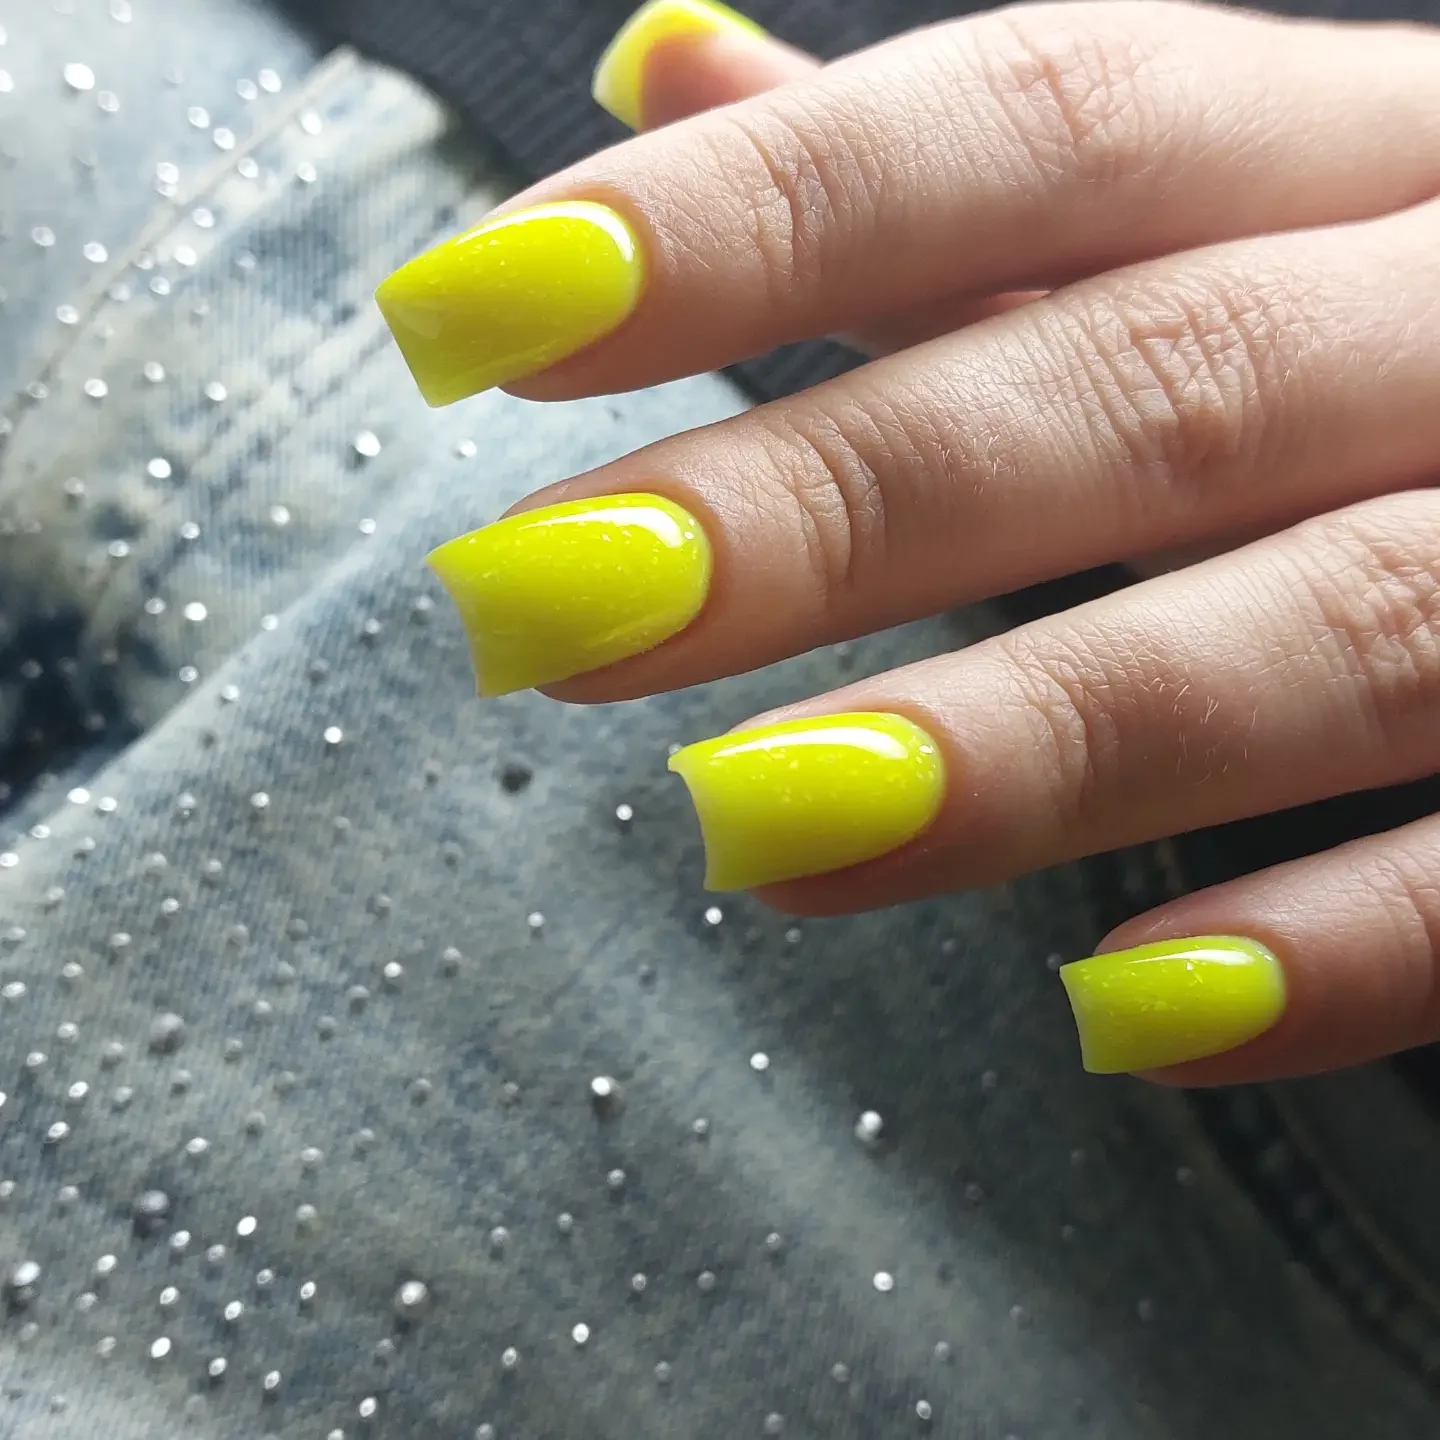
I would look for a saturated lemon yellow with a creamy finish and strong pigmentation. Shades from OPI, Essie, or CND can work depending on the exact undertone, but I would avoid a formula that becomes transparent after several coats. A white or neutral base can sometimes help very bright yellow polish appear more even, especially when the natural nail shows through.
I would keep the application particularly neat around the cuticle because vivid colors make mistakes obvious. After applying base coat, I would use thin layers and allow enough drying or curing time between them. If the yellow still looks slightly uneven, I would add another delicate coat instead of applying a thick layer that could shrink or wrinkle.
I love this kind of manicure for the middle of summer, when understated colors can suddenly feel a little too serious. Yellow looks fantastic with denim, white, black, and simple summer dresses. If you have been telling yourself that you are “not a bright nail person,” this is exactly the kind of shade that might change your mind.
Sheer Pink Almond Nails With Subtle Micro Sparkle
Soft pink becomes especially beautiful when it is almost translucent. These almond nails have a delicate blush base with tiny sparkles scattered across the surface, creating a barely there shimmer rather than obvious glitter. I love that the effect becomes more noticeable when light hits the nails, giving the manicure a soft, almost luminous quality.
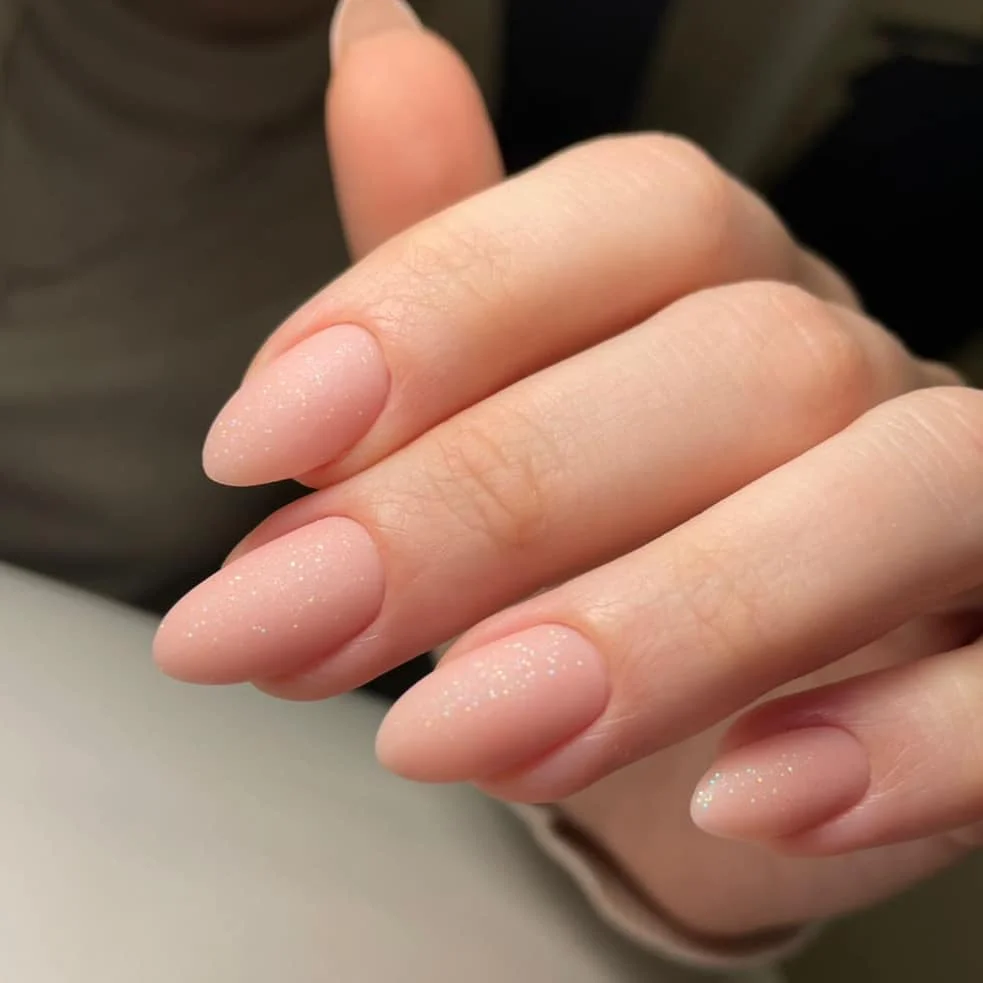
I would use a sheer blush pink or translucent nude as the base and add a fine pearl or micro shimmer topper. Essie Ballet Slippers is a classic reference for the sheer pink direction, while a very fine shimmer coat can add the extra dimension. The final finish should remain glossy and smooth rather than textured.
I would shape the nails into a soft almond before applying the color. Then I would build the sheer pink gradually, using thin coats until I get the amount of coverage I like. A light layer of micro shimmer goes over the top, followed by a clear glossy top coat to make the tiny particles look suspended beneath the surface.
This is the manicure I would choose when I want my hands to look polished but never overdone. It feels just as appropriate with an everyday outfit as it does with a special occasion look, which is probably why I keep coming back to sheer pinks. The little sparkle is the secret: subtle enough for daytime, pretty enough to notice.
Deep Navy With a Clean Moonlit Detail
I keep coming back to deep navy when I want my manicure to look sophisticated without reaching for classic black. The rounded, softly elongated shape gives this rich blue polish an elegant finish, while the small pale detail near the cuticle creates a subtle crescent effect. The high-gloss surface catches the light beautifully, making the color look almost inky in some angles and distinctly blue in others.
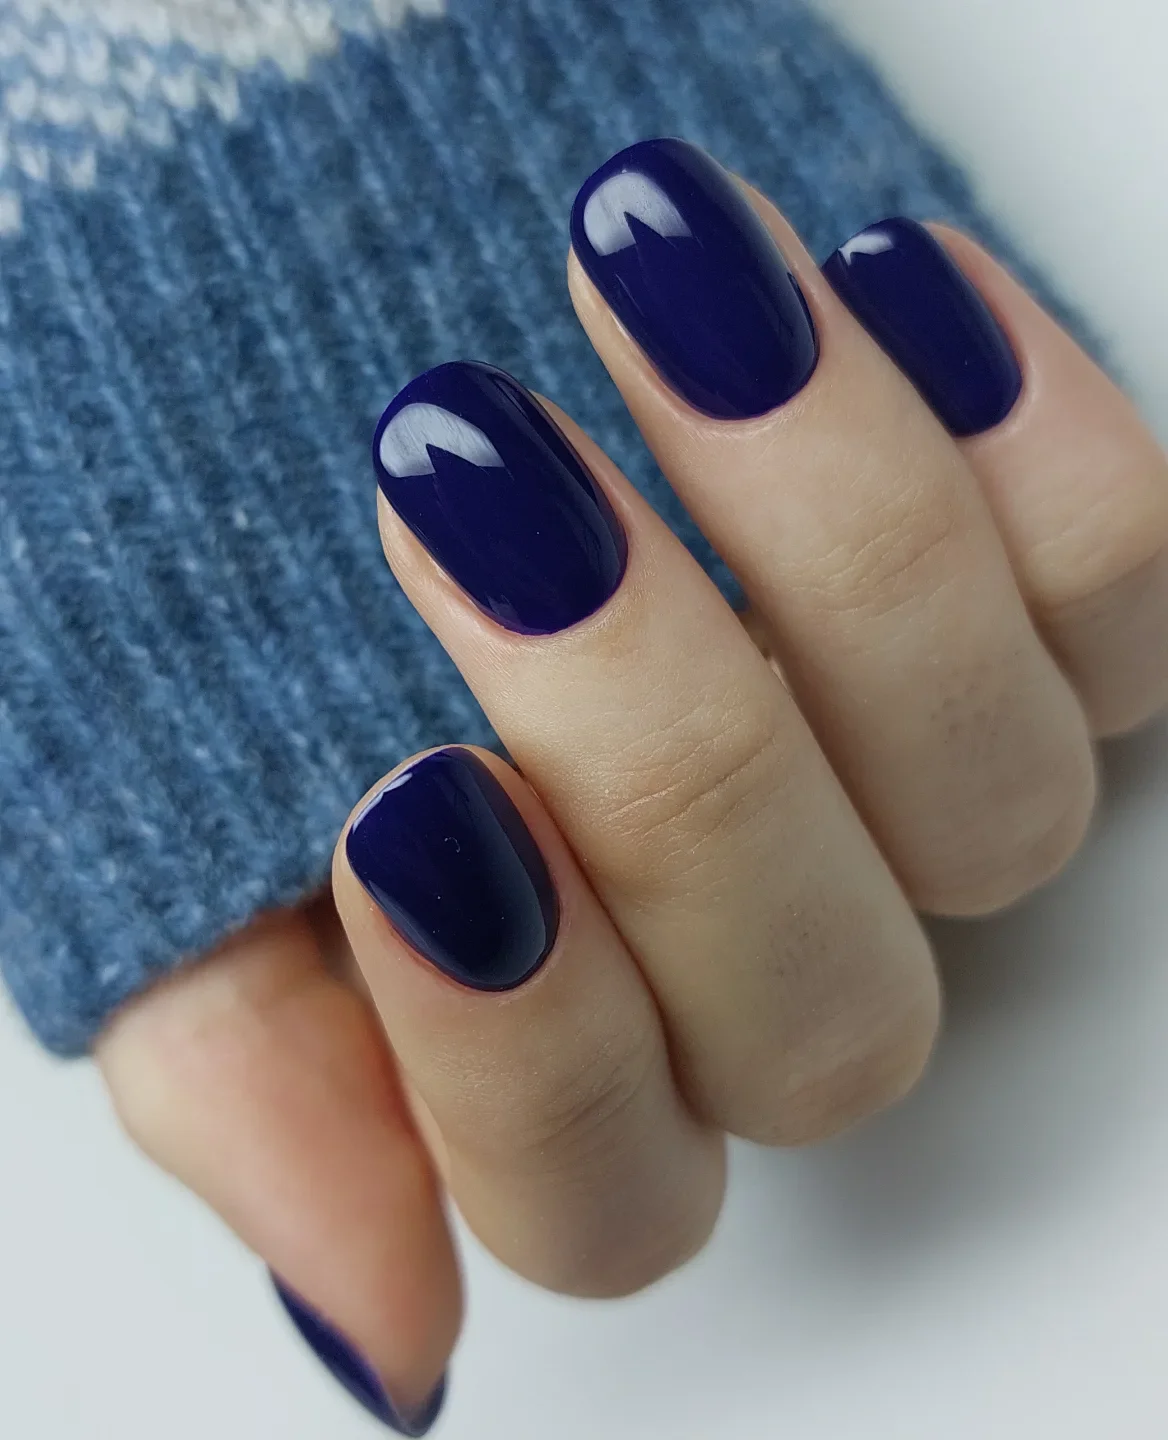
For a similar manicure, I would start with a dark navy gel polish such as OPI Midnight Mantra or a comparable blue-black shade. A sheer milky white polish can create the curved accent, while a glossy gel top coat brings everything together. I would keep the product selection simple because the color itself is doing most of the talking.
I like to shape the nails into a soft oval first, then apply a thin base coat and two carefully controlled layers of navy. After curing each layer, I would add the pale curved detail close to the cuticle using a fine nail-art brush. The trick is keeping the curve smooth and delicate rather than making it too large. One final layer of glossy top coat gives the manicure that glassy finish.
This is the kind of color I would choose when my wardrobe is full of denim, gray knits, cream tops, or tailored black pieces. It has enough depth to feel polished but doesn’t look overly severe. If black sometimes feels too intense, why not let navy take its place for a week?
Glossy Burgundy With a Hint of Gold
Burgundy has a way of making even a simple manicure feel instantly pulled together. Here, the short rounded-square nails are coated in a deep wine shade with an exceptionally glossy finish, while tiny gold accents add just enough contrast. I especially like the restrained placement because the manicure stays sophisticated rather than becoming overly decorative.
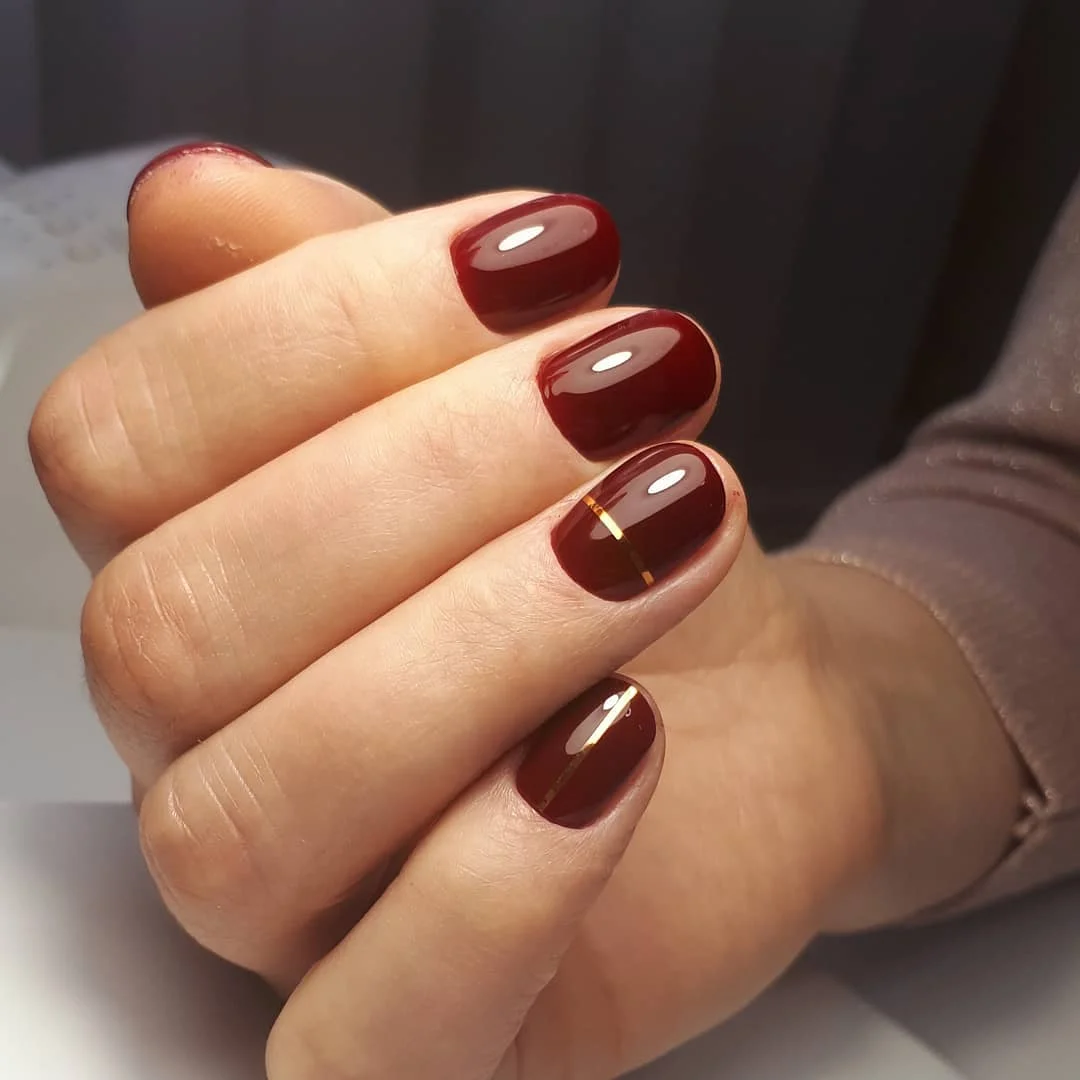
I would look for a rich burgundy cream polish with cool red and brown undertones. Essie Bordeaux, OPI Malaga Wine, or a similar wine-toned shade would create the right depth, while a very fine gold nail-art strip can provide the delicate accent. A high-shine top coat is essential here because that reflective surface is part of the look.
At home, I would shape the nails evenly and smooth the surface before applying the burgundy color in two thin coats. Once completely dry or cured, I would place a narrow gold strip vertically on selected nails rather than every nail. That small variation keeps the manicure interesting. I would finish with a generous but controlled layer of top coat, sealing the edges carefully.
I love this combination for evenings when I want my hands to look dressed up without wearing glitter everywhere. Burgundy works beautifully with black, cream, camel, chocolate, and denim, so it is surprisingly easy to wear. And that tiny flash of gold? It feels like jewelry for the fingertips.
Powder Blue With a Modern Matte Finish
Soft blue becomes surprisingly chic when the shine is taken away. These short square nails use a cool powder-blue shade with a completely matte finish, creating a clean, modern effect. The compact length keeps the color practical, while the crisp shape gives the manicure a slightly graphic quality.
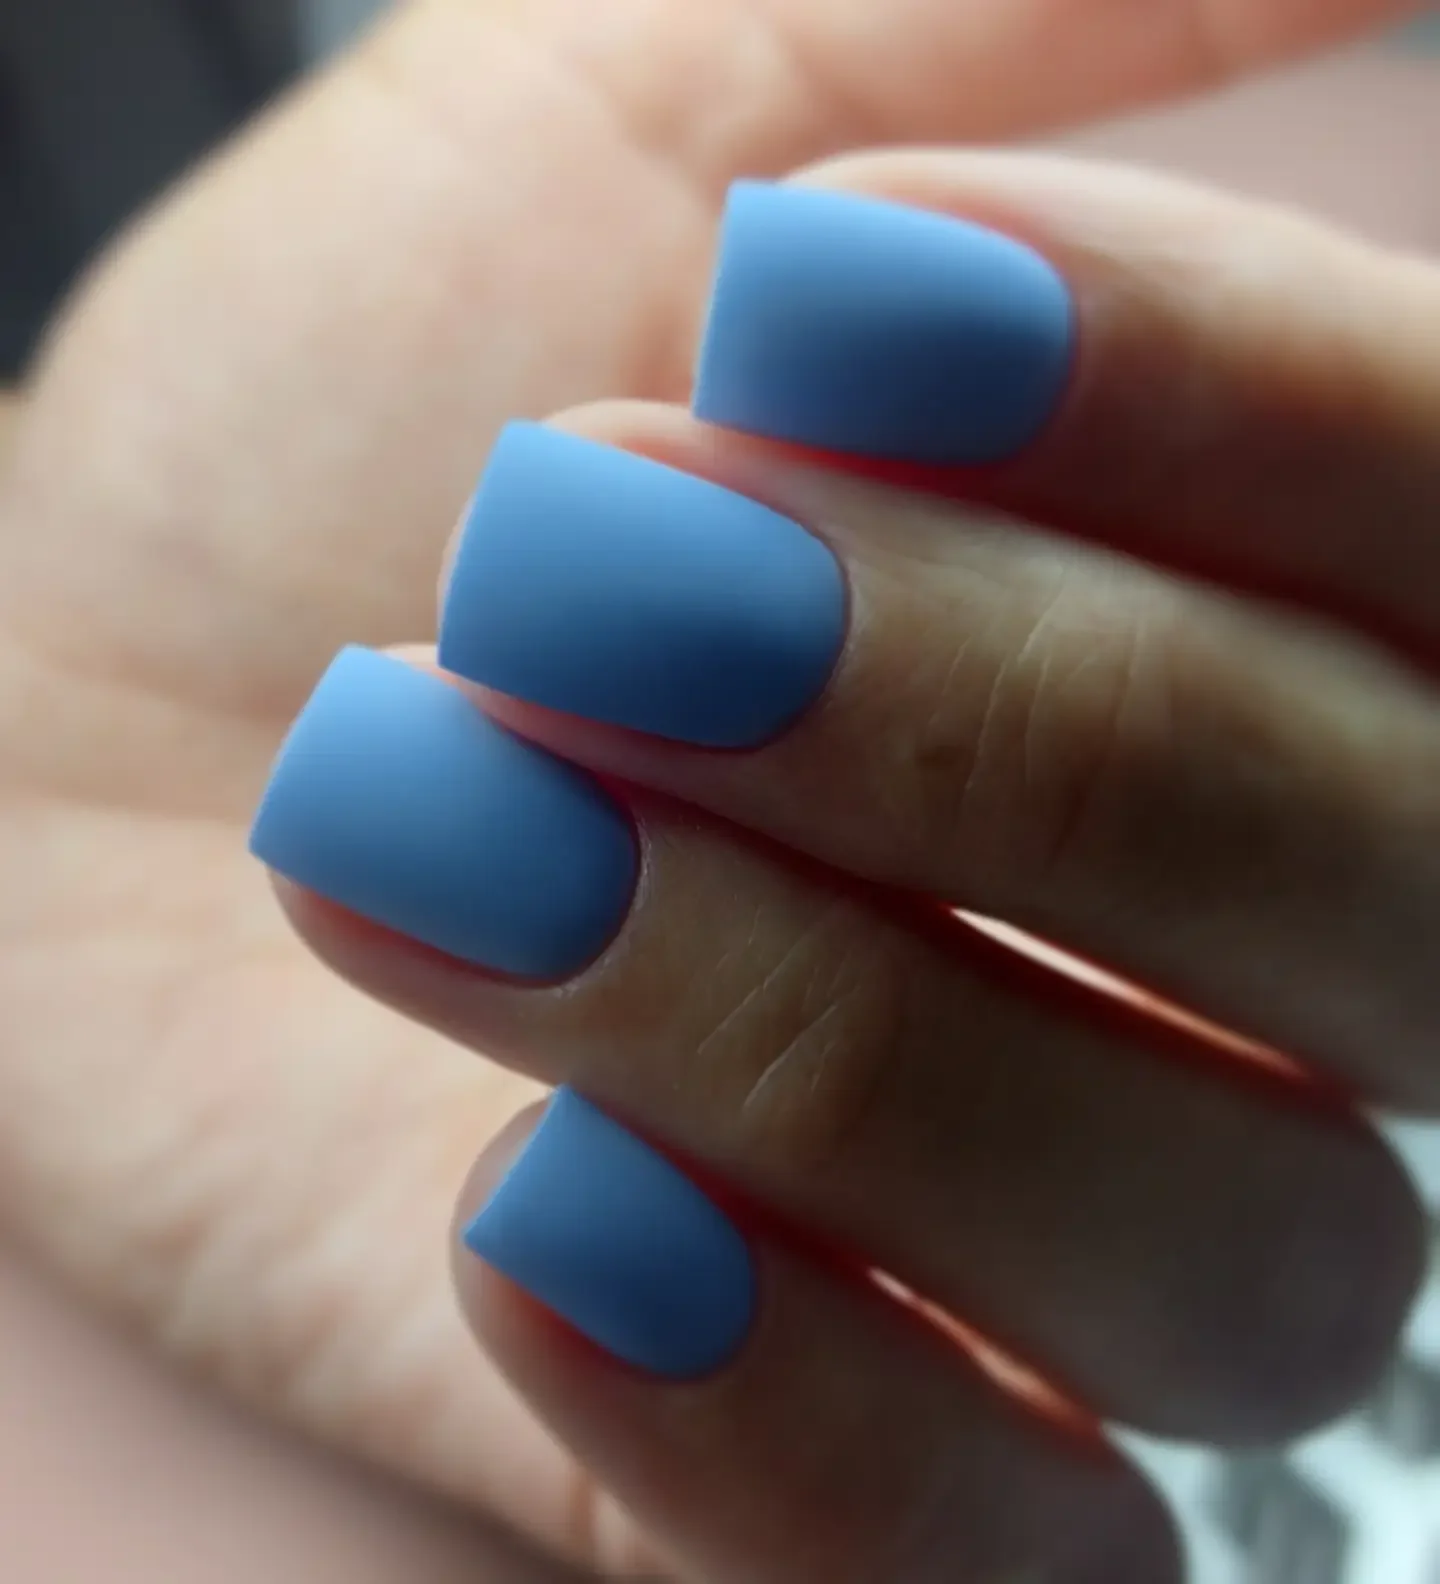
For this look, I would choose a creamy sky-blue polish rather than one with a strong shimmer. OPI It’s a Boy!, Essie Bikini So Teeny in a softer interpretation, or a comparable pastel blue can work beautifully. The important finishing product is a true matte top coat, because it transforms an ordinary pastel manicure into something much more refined.
I would file the nails into a neat short square with slightly softened corners, then apply a smoothing base coat. Two thin coats of blue should provide enough opacity without making the surface bulky. After the color has cured or dried, I would apply a matte top coat evenly across every nail and let it settle without touching the surface.
This is one of those shades I would happily wear when I want my manicure to feel fresh but not sugary. It looks especially good with white shirts, denim, soft gray, and simple silver accessories. Who says pastel nails have to look sweet? Matte texture gives this blue a completely different personality.
Champagne Taupe With a Fine Reflective Sparkle
There is something wonderfully understated about a champagne-toned glitter manicure when the shimmer is fine enough to look almost metallic. These elongated almond nails combine a muted taupe-beige base with thousands of tiny reflective particles, creating a dimensional surface that changes beautifully under light. The almond shape also gives the manicure a graceful, elongated appearance.
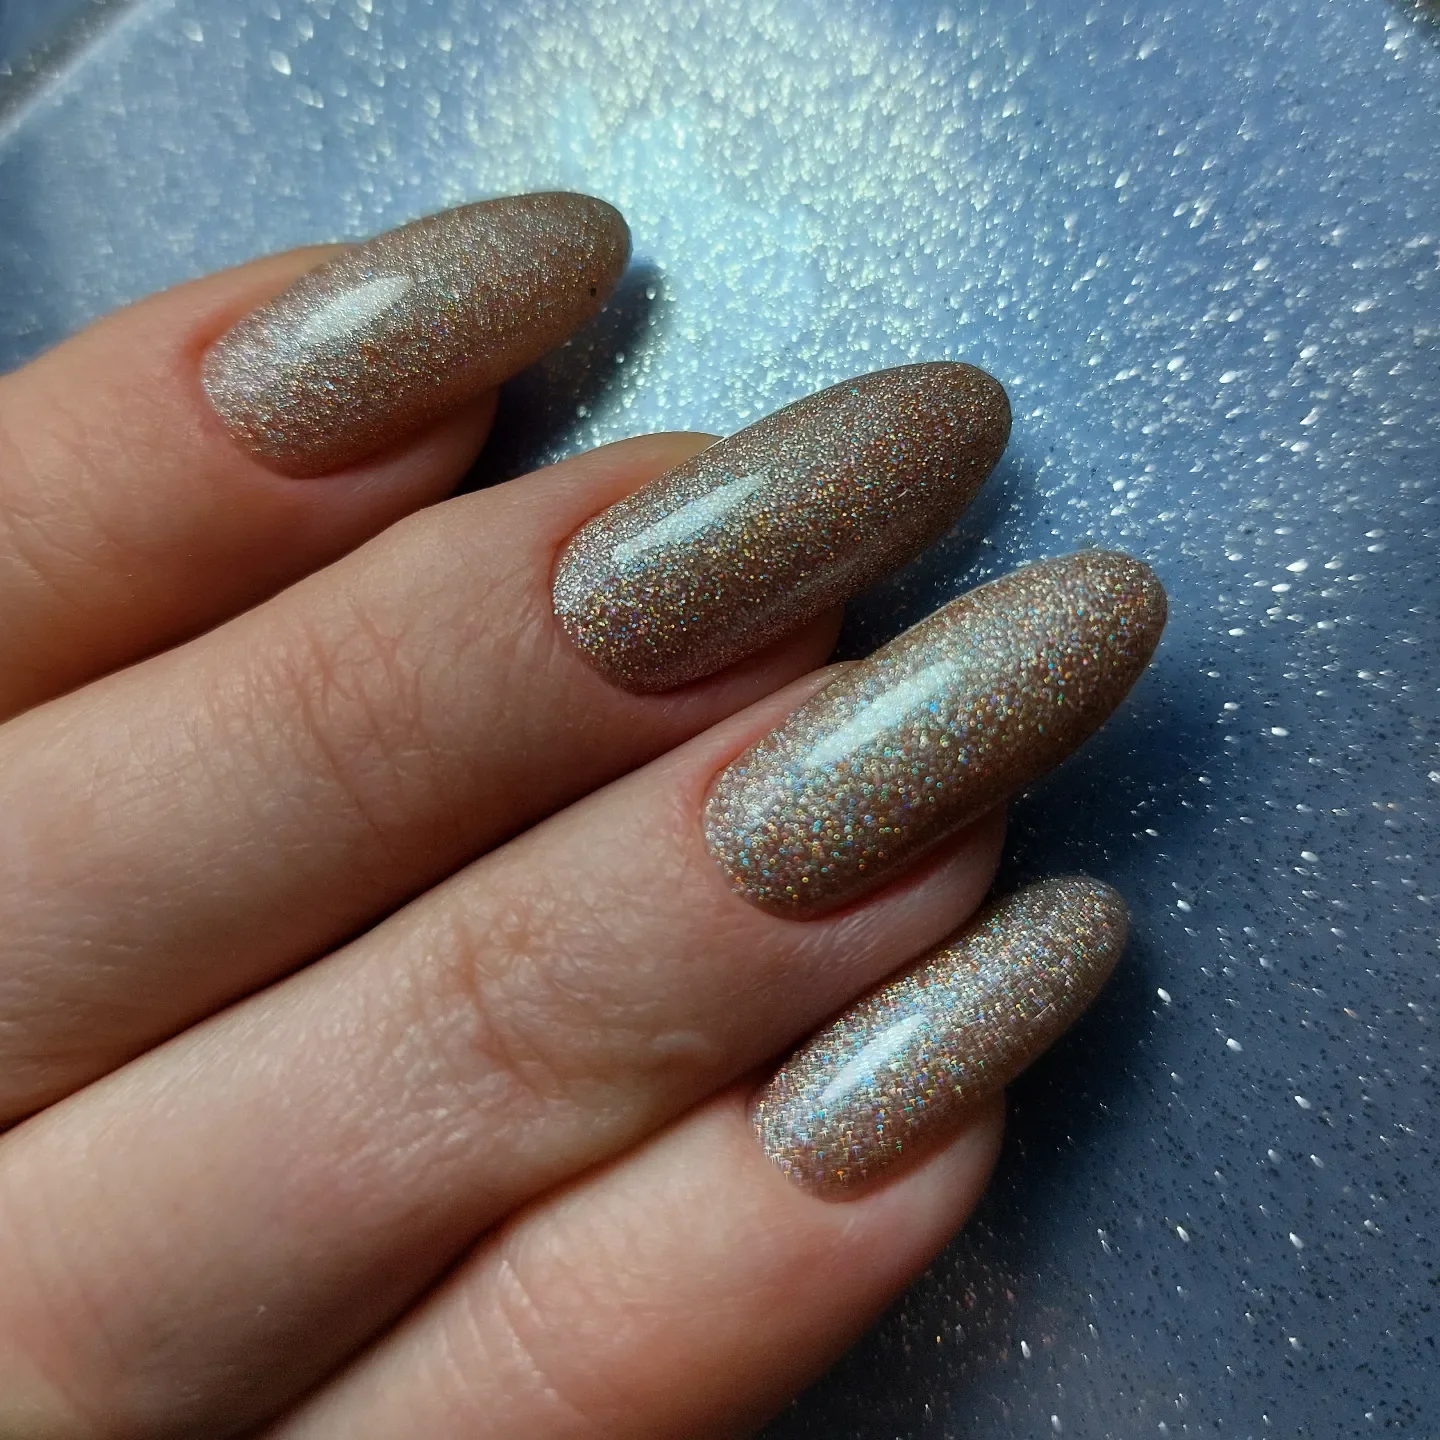
I would choose a champagne taupe or soft metallic-beige gel polish with micro-glitter rather than chunky glitter. Shades from brands such as CND, OPI, or Gelish can offer the right type of finely milled sparkle. A smooth glossy top coat will help the particles catch the light while keeping the surface sleek.
The shape is important here, so I would first create a balanced almond silhouette with matching sidewalls. After a base coat, I would apply two thin layers of the taupe shimmer, allowing each layer to cure properly if using gel. I prefer building sparkle gradually because it gives me more control over the final intensity. A glossy top coat completes the look without hiding the reflective texture.
I would wear this color when I want something neutral but still want my manicure to have a little magic. It feels especially lovely with cream sweaters, satin pieces, chocolate tones, and simple gold jewelry. The best part is that the sparkle is subtle enough for daytime but becomes much more noticeable under evening lights.
Muted Wine on Elegant Almond Nails
A muted wine shade can make almond nails look incredibly sophisticated. The elongated pointed silhouette creates a graceful line, while the matte burgundy finish softens the intensity of the color. I like the combination because it feels confident without relying on shine, glitter, or elaborate nail art.
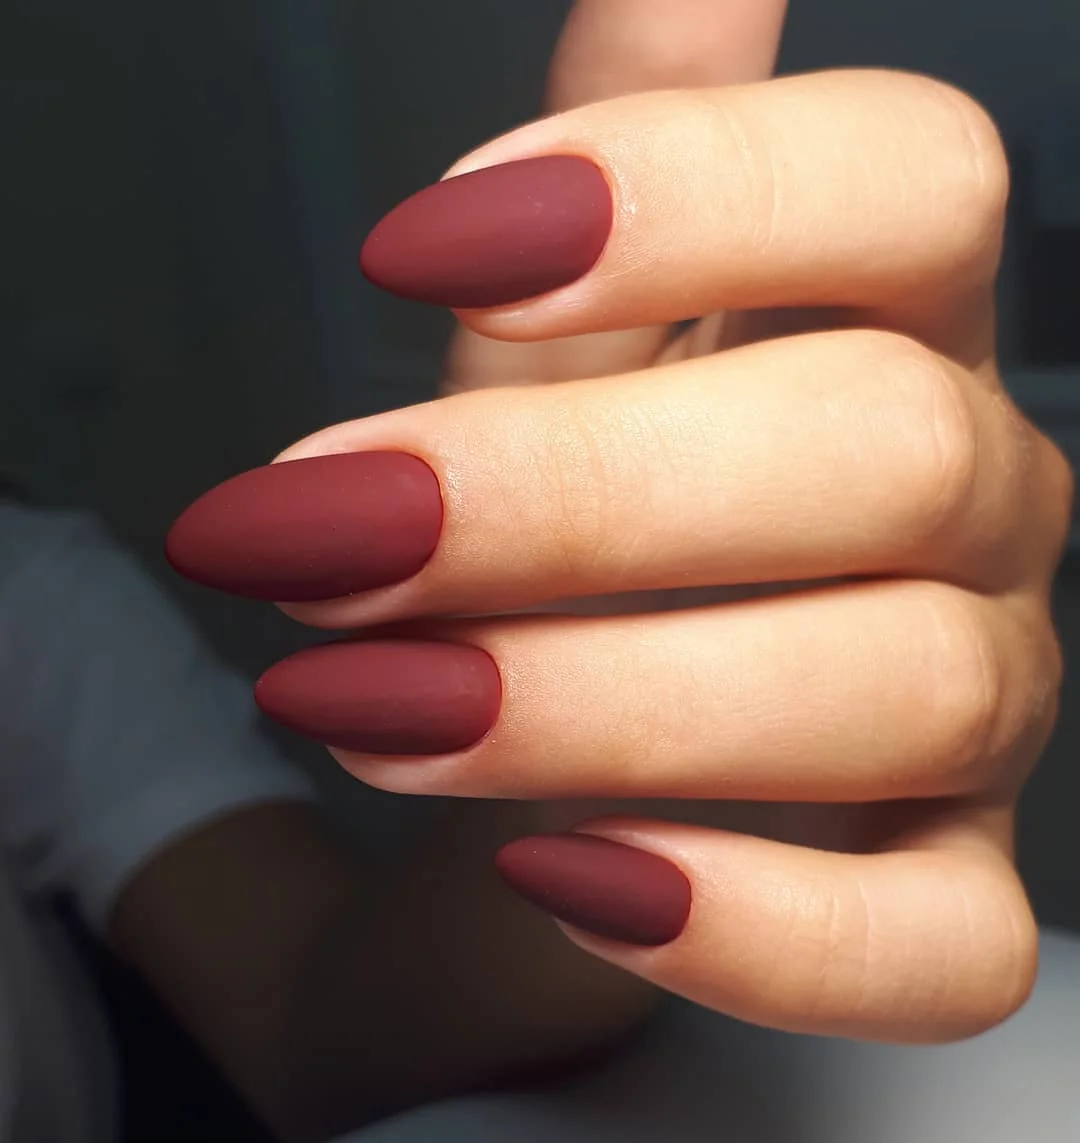
For this finish, I would reach for a deep berry-burgundy polish with a velvety matte top coat. OPI Malaga Wine or a similar wine shade can be adjusted with a matte finish to create this mood. If the natural nails are not long enough for the almond shape, a professional extension or structured gel overlay can help create the necessary length.
I would carefully file the sides toward a centered point, checking the shape from several angles so the nails stay balanced. After applying the burgundy color, I would use a matte top coat and make sure the entire surface is covered evenly. With matte manicures, I find that clean cuticle work matters even more because there is no glossy finish to distract from imperfections.
This is the burgundy manicure I would choose when I want my nails to feel sleek and a little mysterious. It pairs beautifully with black dresses, cream tailoring, denim, and dark leather accessories. Sometimes the simplest manicure is the one that makes the strongest impression.
Charcoal Black With Micro-Shimmer
Black nails can look surprisingly soft when the finish has a fine, almost powdery shimmer. These short square nails use a charcoal-black base filled with tiny reflective particles, giving the color depth without turning it into obvious glitter. The short length makes the manicure practical, while the squared edges give it a clean contemporary finish.
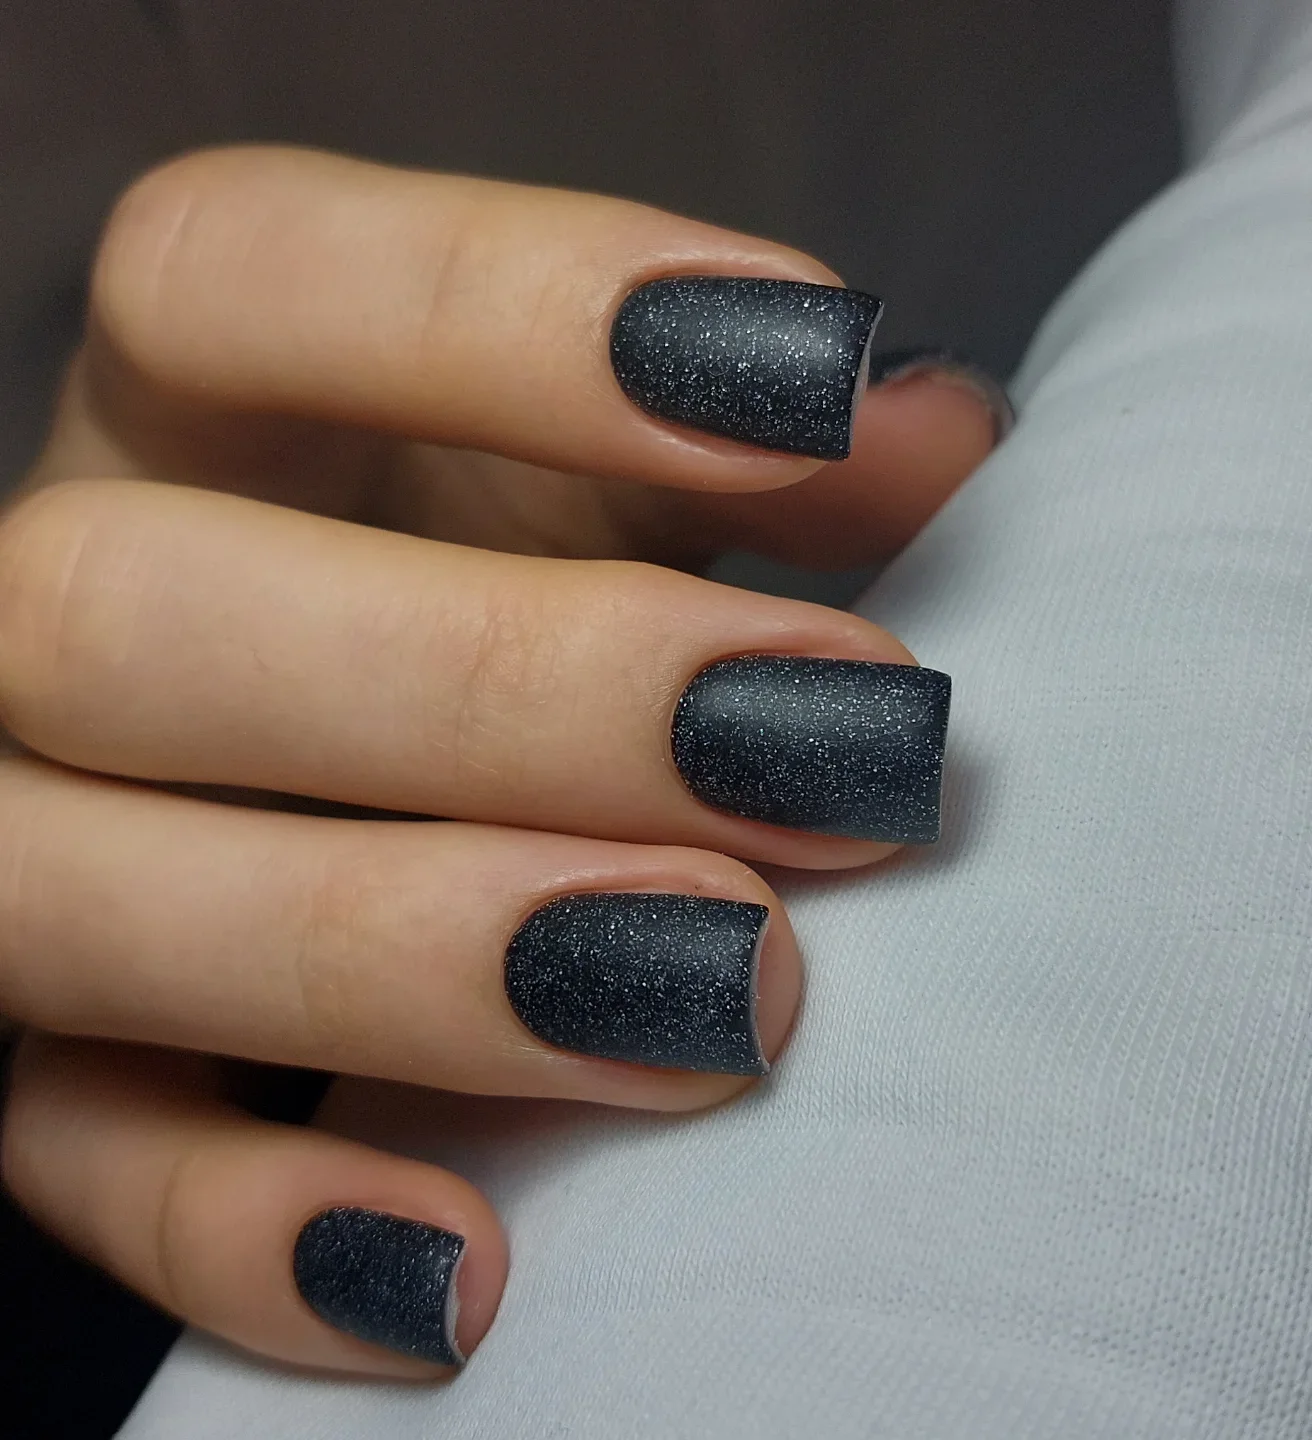
I would use a charcoal or black polish containing micro-shimmer rather than large glitter particles. A fine silver-black gel from Gelish, OPI, or another professional-quality line would work well. I would also use a smoothing base coat and a top coat designed to preserve the slightly textured appearance without making the shimmer disappear.
After shaping the nails into a short square, I would apply a thin base layer followed by two coats of the charcoal polish. I would keep the edges especially neat because dark colors make uneven application much easier to notice. Depending on the polish, I might choose a glossy or soft-satin top coat, but I would avoid anything too thick.
I like this version of black because it feels less expected. It has the attitude of a dark manicure but still catches little points of light when the hands move. For me, it is an easy choice with monochrome outfits, denim, silver jewelry, or an oversized blazer when I want the nails to quietly add some edge.
Milky White on a Crisp Square Shape
Milky white polish has earned its place as one of my favorite understated manicure colors because it makes the hands look instantly polished. These medium-length square nails have a smooth, creamy white finish with enough translucency to keep the result soft rather than stark. The straight free edge gives the manicure a clean structure without making it feel severe.
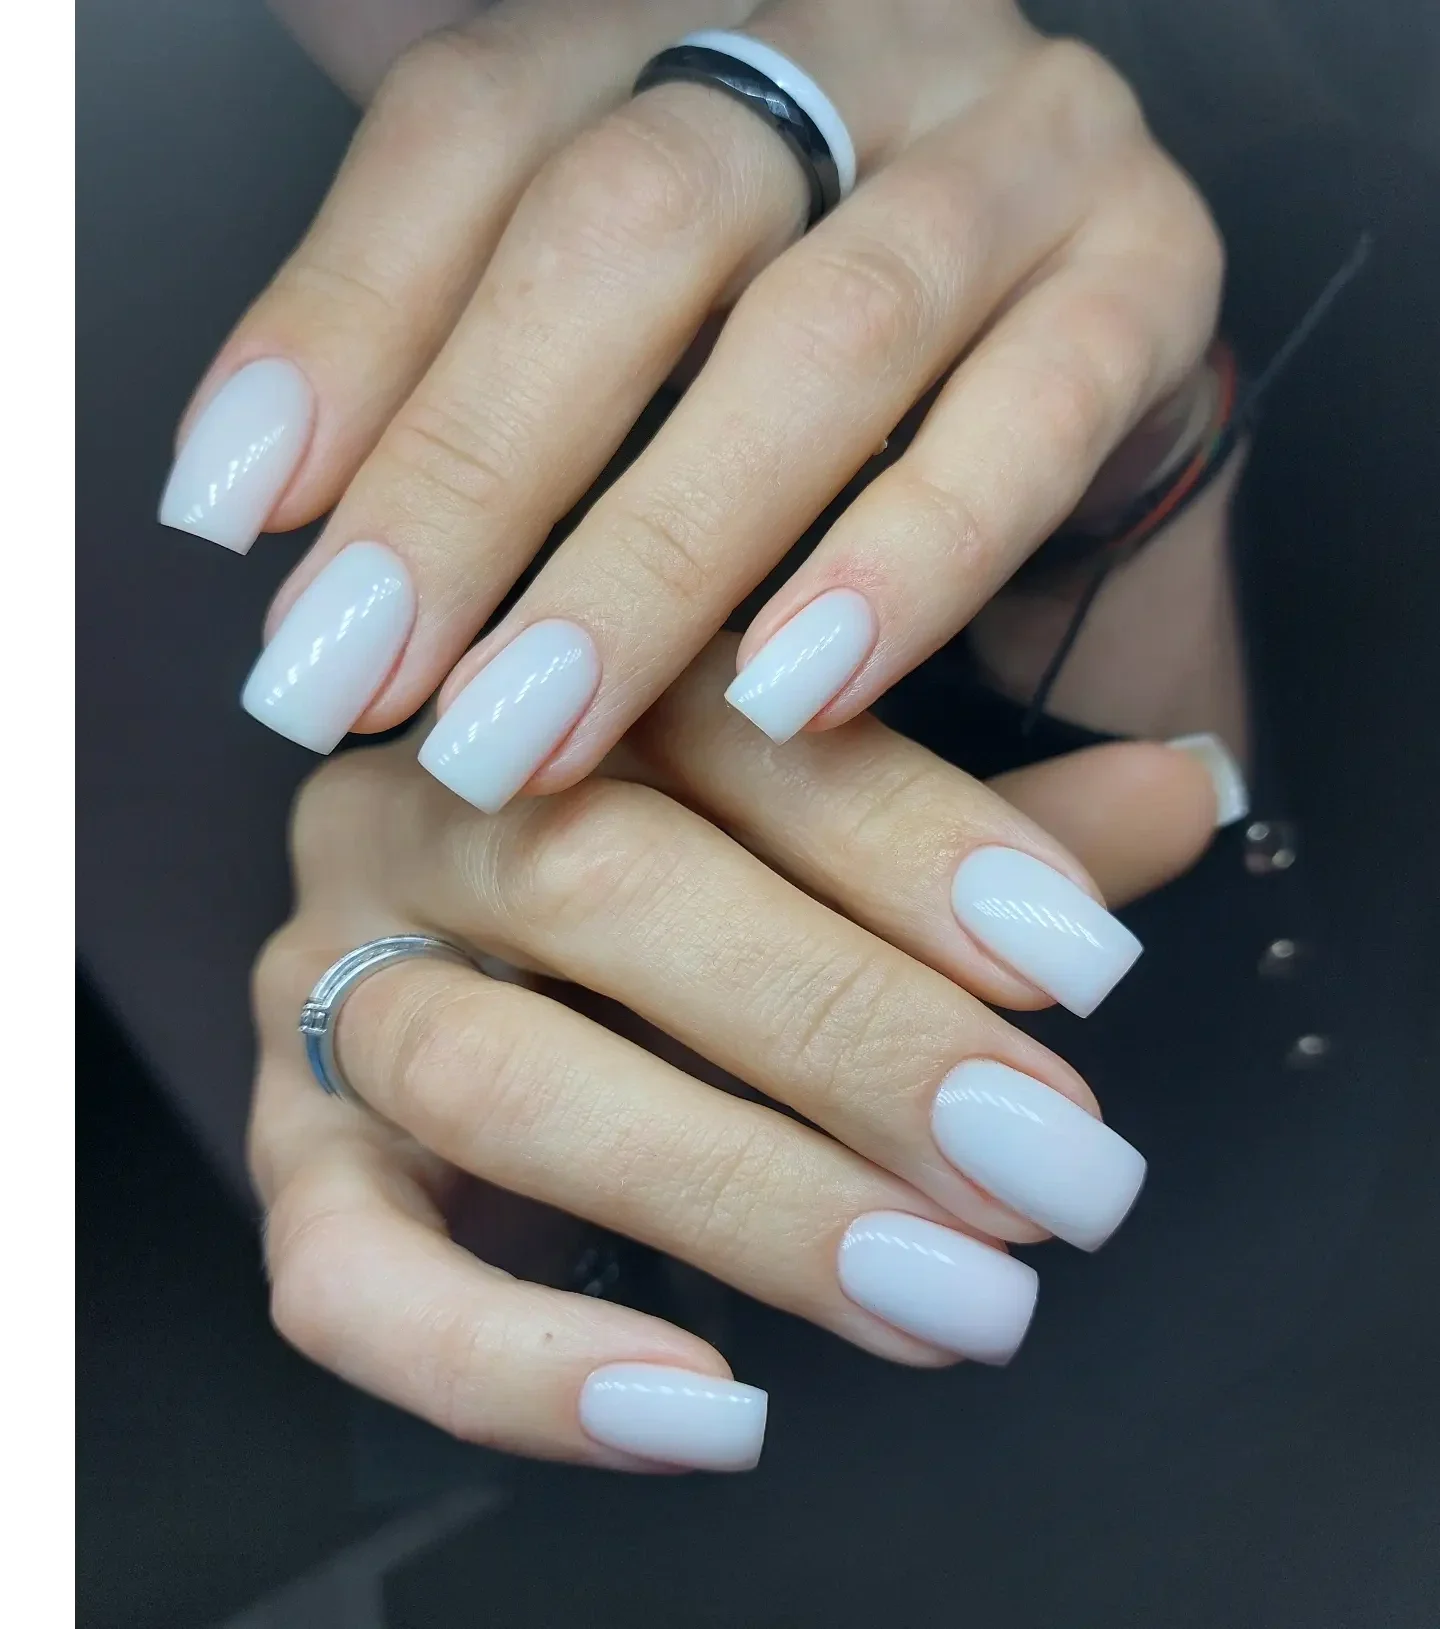
I would choose a soft white or milky gel polish instead of an opaque paper-white formula. OPI Funny Bunny, CND Shellac Cream Puff in a sheerer application, or a similar creamy shade can create this effect. A glossy top coat helps the surface look smooth and healthy while emphasizing the clean shape.
I would begin by evening out the square shape and gently softening the corners. A ridge-filling base coat can be useful if the natural nail surface is uneven because pale polish tends to reveal every little texture. I would apply two thin coats of milky white, checking the opacity after each layer, then finish with a glossy top coat.
This is the manicure I would keep saved for those moments when I cannot decide what color to wear. It works with almost everything, from jeans and a white tee to a sleek evening outfit. There is also something beautifully seasonal about it: when darker colors start appearing in the wardrobe, milky white creates a crisp little contrast.
Glossy Red for an Instant Color Lift
Nothing wakes up a manicure quite like a saturated red. These short square nails use an intense orange-red shade with a glossy finish that looks almost lacquered under the light. The compact shape keeps the color modern and wearable, while the vivid tone gives the entire manicure an unmistakable energy.
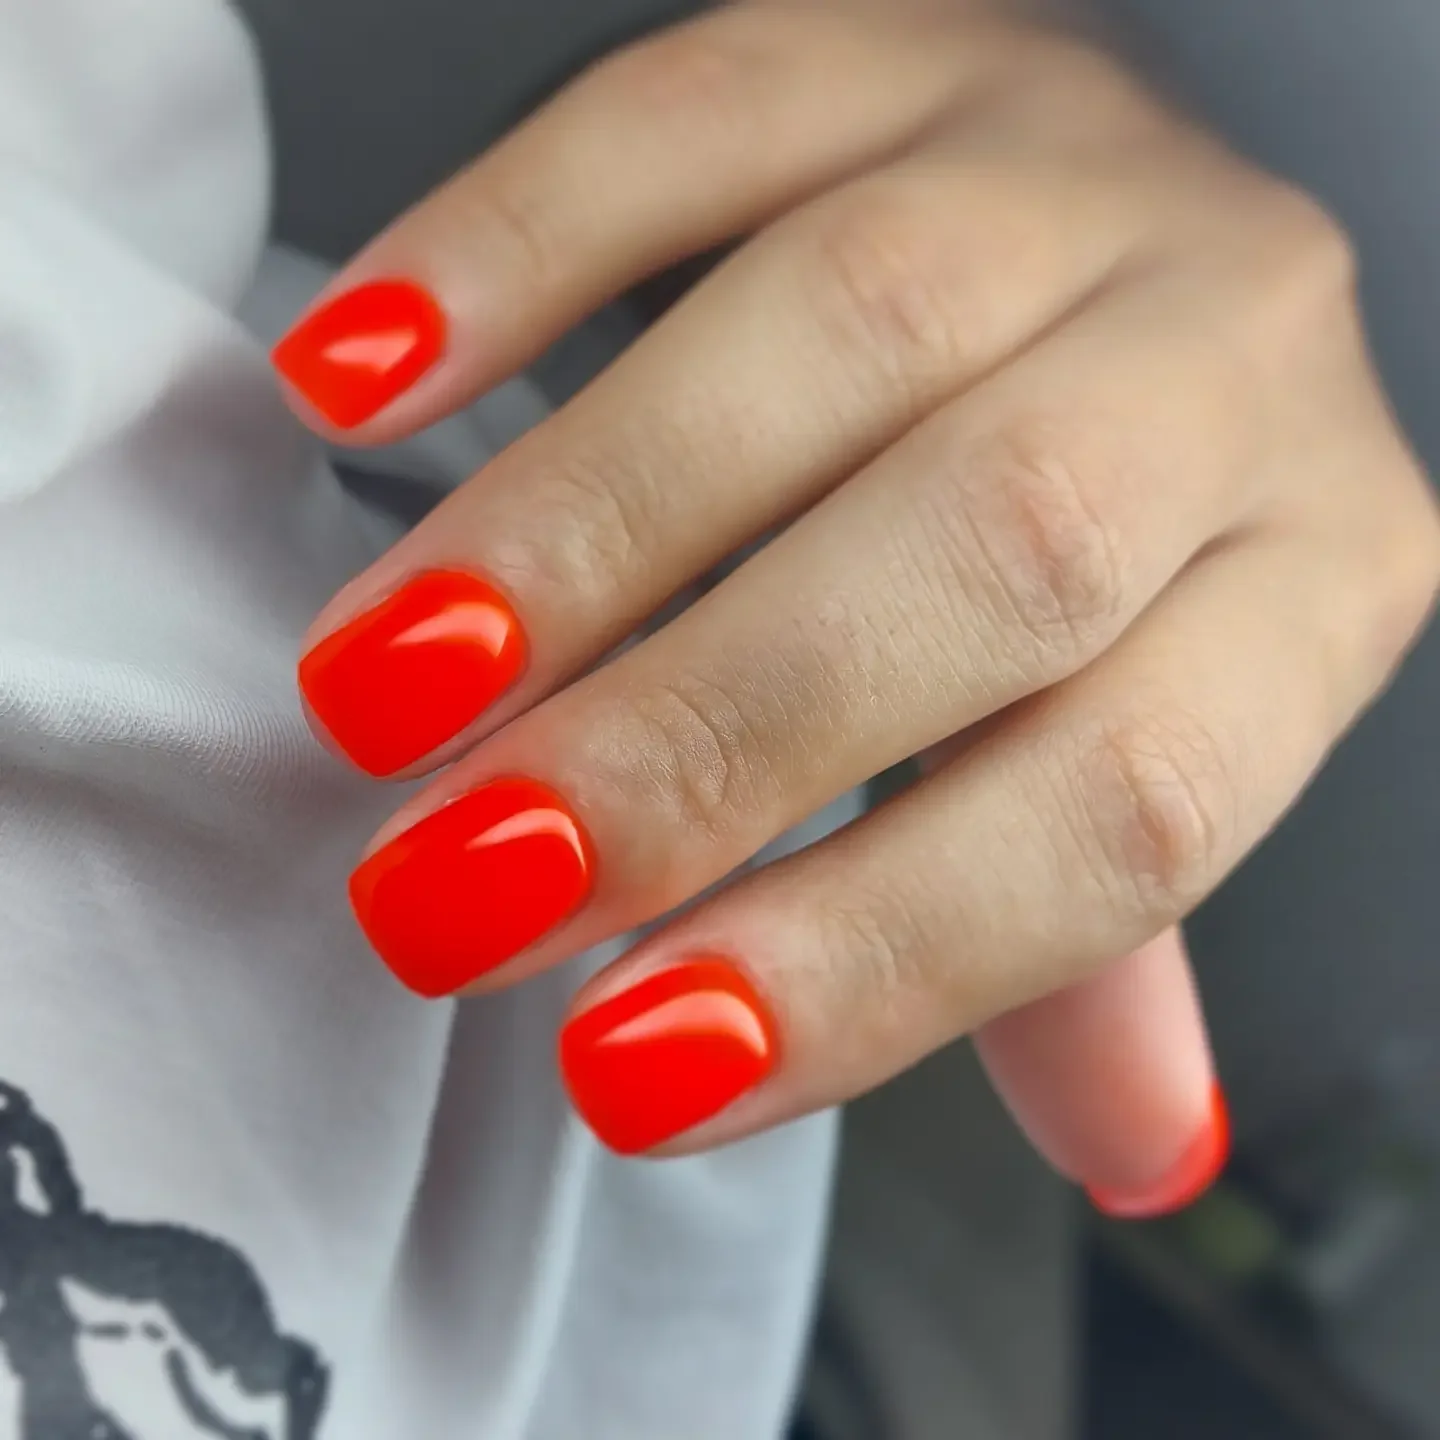
I would choose a true red with a slightly warm orange undertone rather than a blue-based crimson. OPI Big Apple Red, Essie Forever Yummy, or another highly pigmented red can create a similar effect. Because vivid red can stain the natural nail, I would never skip a quality base coat before applying the color.
I like to apply the red in two thin coats, carefully keeping the polish away from the surrounding skin. The square shape should be crisp but not overly sharp, especially on shorter nails. Once the color is completely set, I would add a high-gloss top coat and run the brush lightly across the free edge to help protect the manicure.
I always think of glossy red as the beauty equivalent of a great pair of shoes: it can rescue an otherwise simple look in seconds. I would wear it with denim, neutrals, black, or even a white sweater when I want one strong detail to do the work. If your usual manicure has been quietly blending into the background, this is your cue to turn up the volume.
Deep Wine Gloss With a Modern Negative-Space Detail
I love a deep wine manicure when I want my nails to feel polished but not predictable. The rich burgundy-red shade has almost black depth around the edges, while the high-gloss surface catches a clean reflection that makes every nail look beautifully smooth. The shape is a practical short-to-medium square with softly rounded corners, which keeps the dramatic color wearable for everyday life. What really makes this design interesting is the pale curved detail near the side of each nail, creating a sleek negative-space effect rather than relying on glitter or elaborate decoration.
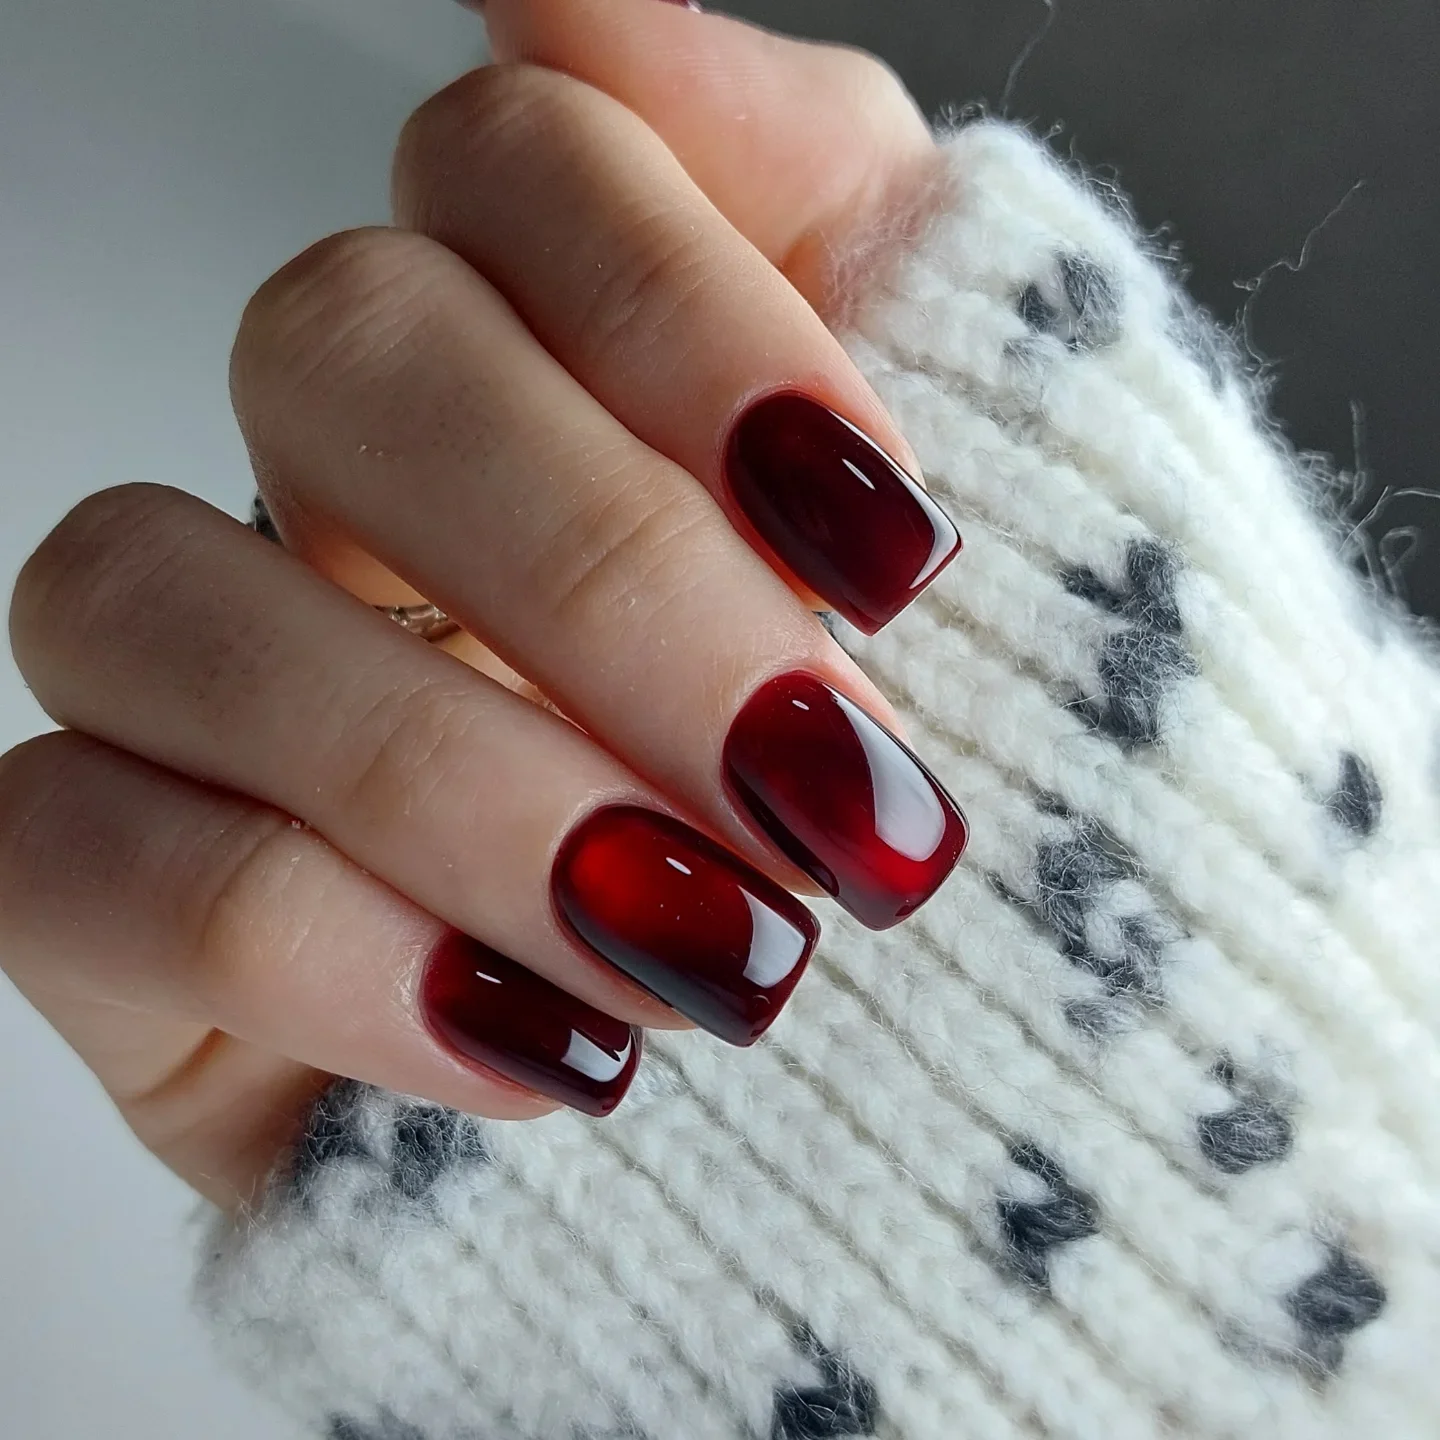
I would keep the materials surprisingly simple here: a burgundy gel polish, a sheer milky nude or translucent neutral, a fine detail brush, and a glossy top coat. A shade similar to OPI Malaga Wine or a comparable deep red-burgundy would create the right mood, although I would choose the exact color according to how warm or cool my skin looks. The neutral detail should stay soft rather than stark white because that helps the manicure retain its sophisticated feel.
When I recreate something similar at home, I start with a carefully shaped square nail and a thin base coat. After curing, I apply the burgundy color in two thin layers, allowing each layer to cure fully. Then I use a fine brush to create the curved neutral accent close to the sidewall, following the natural contour of the nail rather than trying to make a perfectly geometric shape. One generous layer of glossy top coat pulls everything together.
For me, this is the kind of manicure that works especially well when I want my nails to feel dressed up without looking overly decorated. I could wear it with a black blazer, a cream sweater, or even jeans and still feel put together. And that little flash of negative space? It gives the classic wine manicure just enough of a twist to make someone look twice.
Velvet Purple on Short Rounded Nails
Purple becomes surprisingly sophisticated when I take away the shine. This manicure uses a rich royal-plum shade across short, softly rounded nails, finished with a velvety matte surface. The color has enough blue-violet depth to feel dramatic but not so much that it becomes costume-like. I particularly like how the shorter length balances the intensity of the purple, creating a manicure that feels confident and very easy to wear.
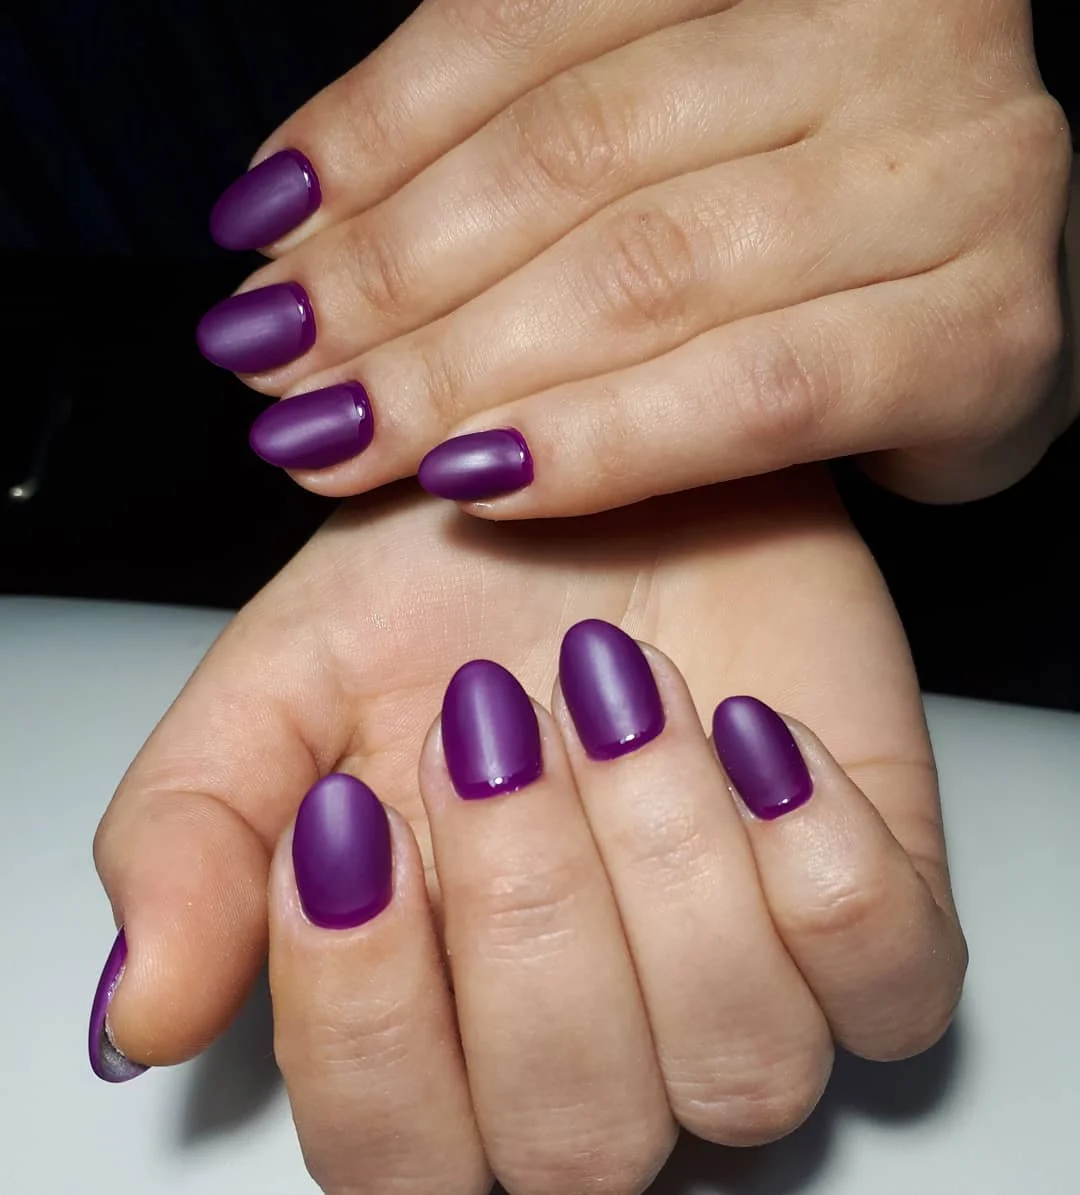
For this version, I would use a saturated purple gel polish and a quality matte top coat. OPI Do You Lilac It? is much lighter than the shade shown here, so I would look for a deeper plum or royal-purple alternative if I wanted to match the mood closely. A strengthening base coat is also useful on short natural nails because it creates a smoother canvas and helps the matte finish look even.
My favorite trick with matte manicures is to make the preparation almost obsessive. I gently shape the free edge, smooth away uneven areas, apply a thin base, and build the purple in two controlled coats. Once everything is cured, I add the matte top coat evenly from cuticle to tip. I avoid touching the surface until it has fully cured because fingerprints and oils can make a matte finish look uneven very quickly.
I would wear this color when I want something a little unexpected but still uncomplicated. Purple can sometimes feel intimidating, yet this darker version behaves almost like a neutral. In early fall, especially, I can see it looking beautiful with charcoal knits, denim, black leather, or a simple white shirt. Sometimes one saturated color is all the styling a manicure needs.
Smoky Chocolate With a Metallic Sheen
There is something incredibly chic about brown when it is given a little dimension. Here, the nails are shaped into a soft oval and covered in a deep chocolate-brown polish with a fine metallic shimmer running through the color. The result sits somewhere between espresso, dark cocoa, and antique bronze. I like that the shimmer is subtle from a distance but becomes much more noticeable when the light hits the center of the nail.
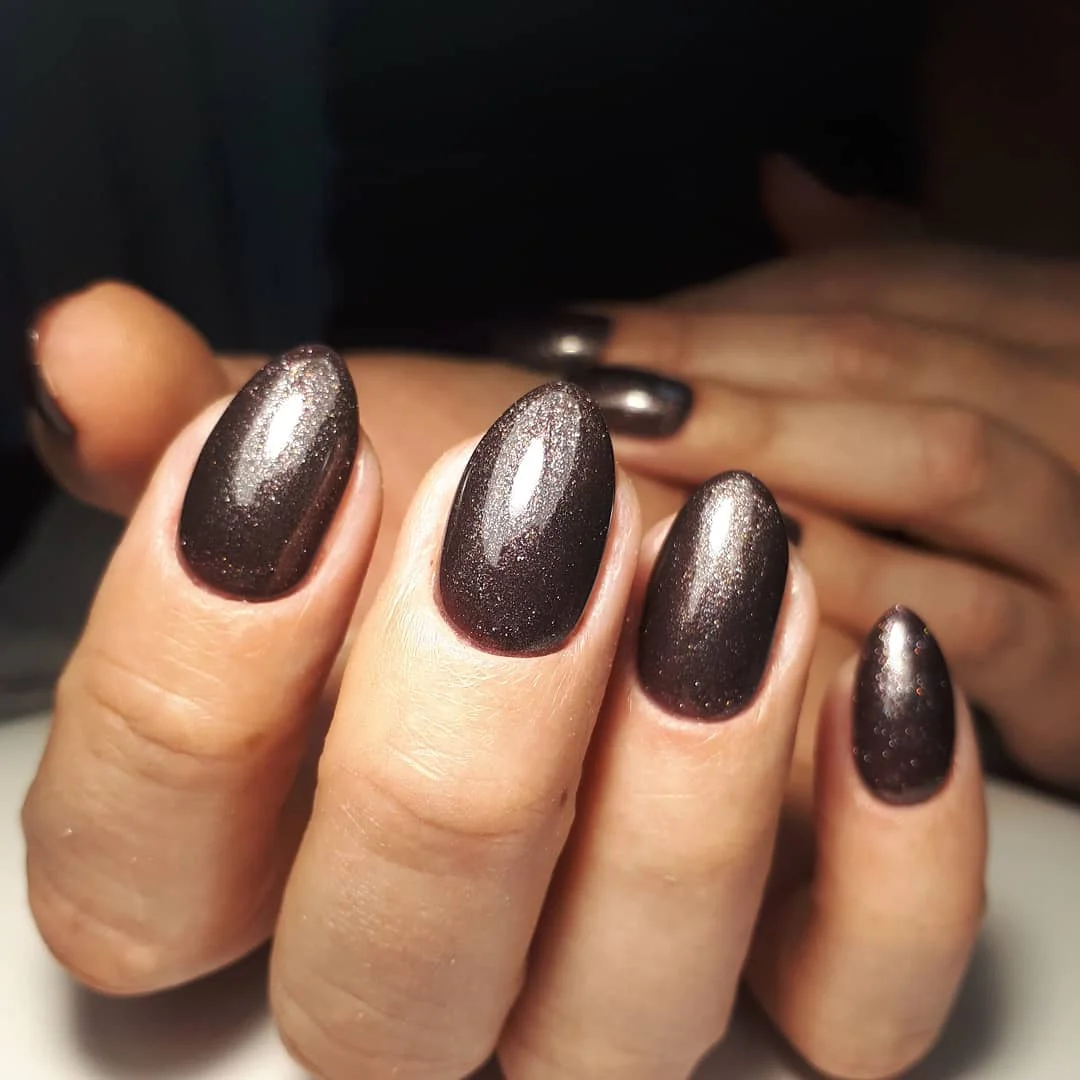
To create this effect, I would reach for a dark chocolate gel polish, a fine bronze or brown shimmer layer, and a glossy top coat. The base needs to be strongly pigmented because a watery brown can lose its richness once the metallic particles are added. I would also use a smooth oval file rather than creating sharp corners, since the rounded shape makes the dark color look softer and more elegant.
I usually build a manicure like this from the darkest layer upward. After the base coat, I apply two thin coats of chocolate polish and cure them individually. Then I add a very fine metallic layer, concentrating on an even application rather than creating obvious glitter patches. A glossy top coat is essential because it turns the tiny reflective particles into that polished, almost liquid-looking surface.
This is one of those shades I would happily keep on my nails for several weeks because it works with so many outfits. Brown has a quieter quality than black, but it still gives me that sophisticated contrast I want from a dark manicure. Add a camel coat or a cream knit and suddenly the whole look feels intentional without trying too hard.
Classic Red With a Crisp Square Finish
A glossy red manicure can still stop me in my tracks, especially when the shape is this clean. The nails are long enough to create an elegant silhouette but remain practical, with a straight square tip softened slightly at the corners. The red is saturated and glossy, leaning toward a vivid classic scarlet rather than orange-red or deep berry. There are no decorative extras here, and honestly, that is the point.
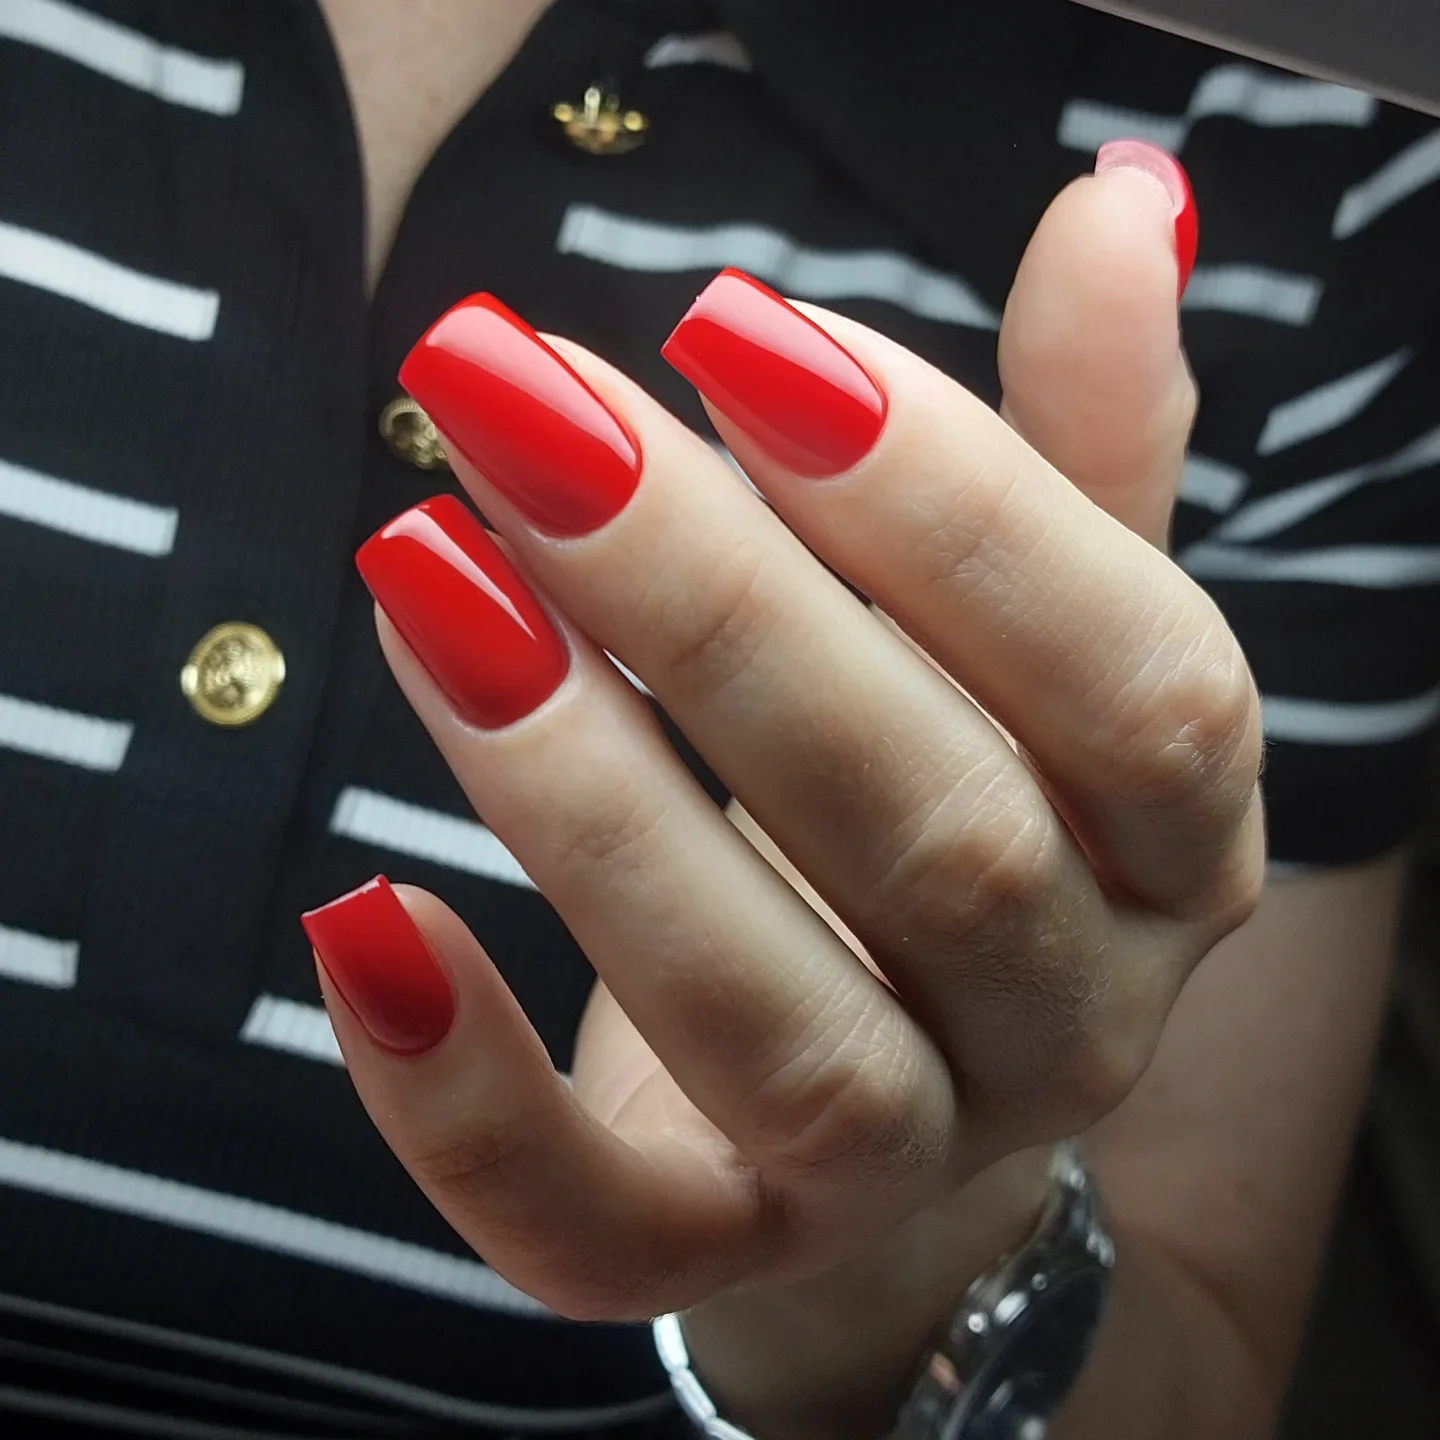
I would choose a strongly pigmented red polish that reaches full opacity in two coats. Essie Forever Yummy is a good reference for a classic red mood, while a gel version gives the manicure the longer-lasting glassy finish shown here. I would pair it with a smoothing base coat and a high-shine top coat so the surface looks completely even from every angle.
The application itself is straightforward, but red rewards precision. I first perfect the square shape and make sure the sidewalls are clean. Then I apply a thin base, two careful coats of red, and a glossy top coat, leaving a tiny margin around the cuticle rather than flooding the skin. If I get a little polish where it should not be, I clean the edge with a small brush dipped in remover before curing.
I keep coming back to red because it never really needs an explanation. It looks just as convincing with a white T-shirt as it does with an evening dress, and that versatility makes it one of my favorite manicure colors. If I were standing in front of a polish rack with absolutely no idea what to choose, this kind of red would still be an easy answer.
Cool Gray to Creamy Ivory Ombre
I adore the quiet sophistication of this color combination. The nails are long and softly almond-shaped, with a cool gray tone transitioning gradually into creamy ivory toward the opposite end. Each nail has a glossy, smooth finish that makes the gradient look almost airbrushed. The colors are close enough in intensity to blend naturally, so the manicure feels calm rather than high contrast.
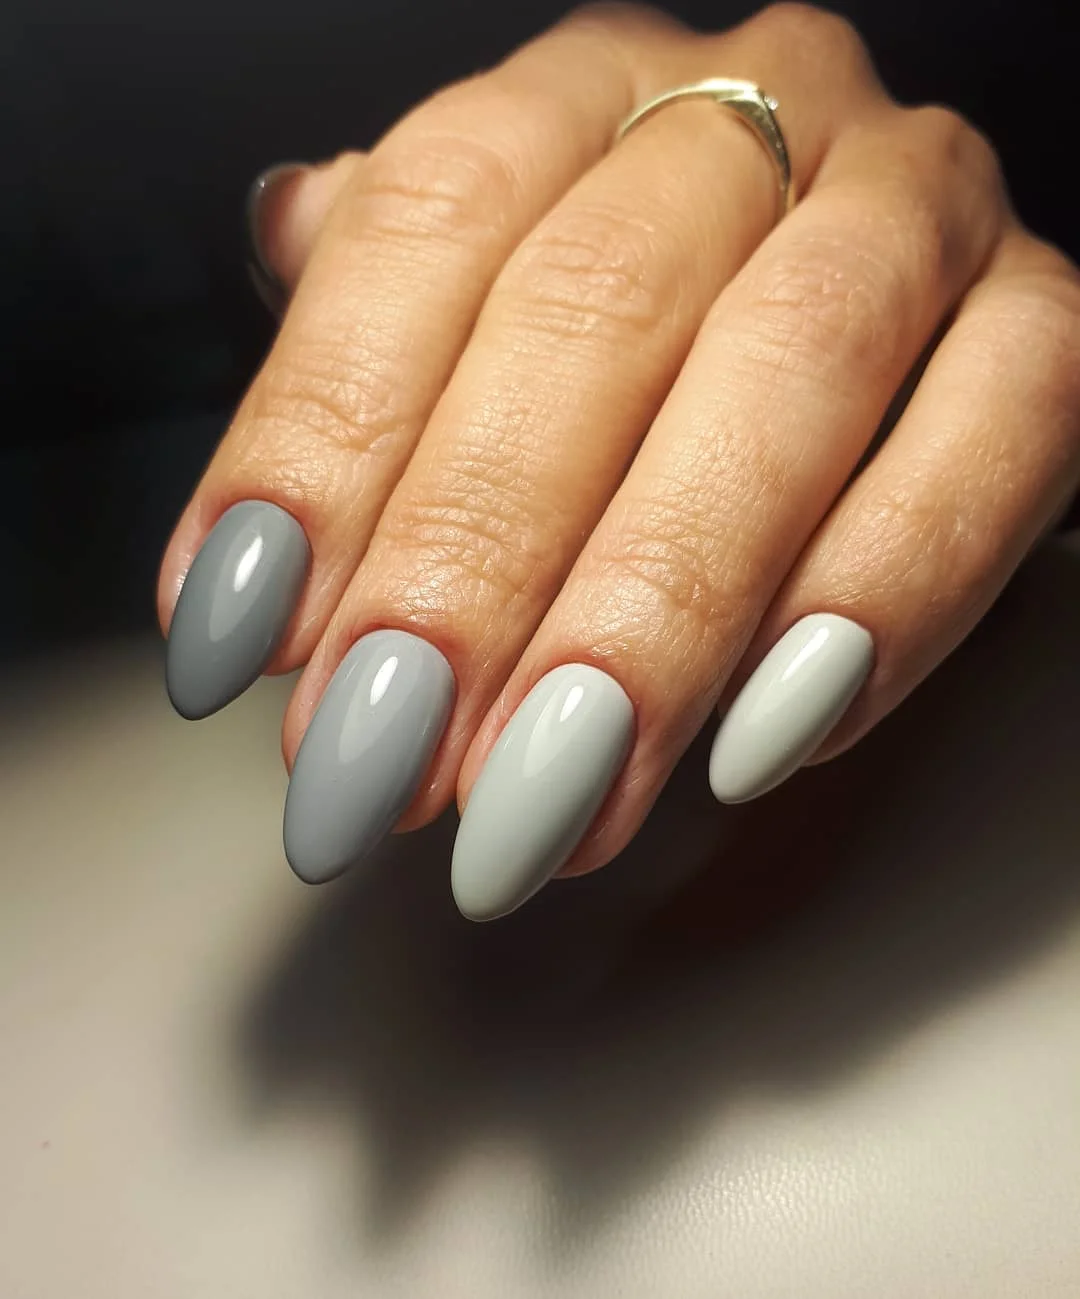
For this look, I would use a cool medium-gray gel polish, a soft ivory or creamy white, a makeup sponge or ombre brush, and a glossy top coat. The trick is choosing colors with compatible undertones. I would avoid a yellow-heavy cream next to a blue-gray because the transition could look muddy. A neutral ivory gives the gradient a cleaner, more expensive-looking finish.
I usually create an ombre by applying both shades close together and gently blending the meeting point before curing. Depending on the formula, I may repeat the process once or twice to build the color gradually. The almond shape should be finished before painting because it creates the elongated canvas that makes the gradient especially flattering. Finally, I smooth everything with a glossy top coat.
For me, this manicure is proof that subtle does not have to mean boring. It would be beautiful with a monochrome outfit, soft tailoring, or even a cozy sweater when the weather cools down. If I wanted a manicure that looked polished at work but still felt interesting enough for dinner afterward, I would absolutely consider this gray-and-ivory combination.
Soft Lilac With an Iridescent Chrome Glow
Lilac becomes much more intriguing when a pearly chrome finish is layered over it. The nails here have an elongated almond shape, and the base color moves between pale lavender and soft pastel purple. A reflective iridescent finish creates flashes of pale gold and pink depending on the angle of the light. One or two nails are kept more softly opaque, which prevents the chrome effect from becoming visually overwhelming.
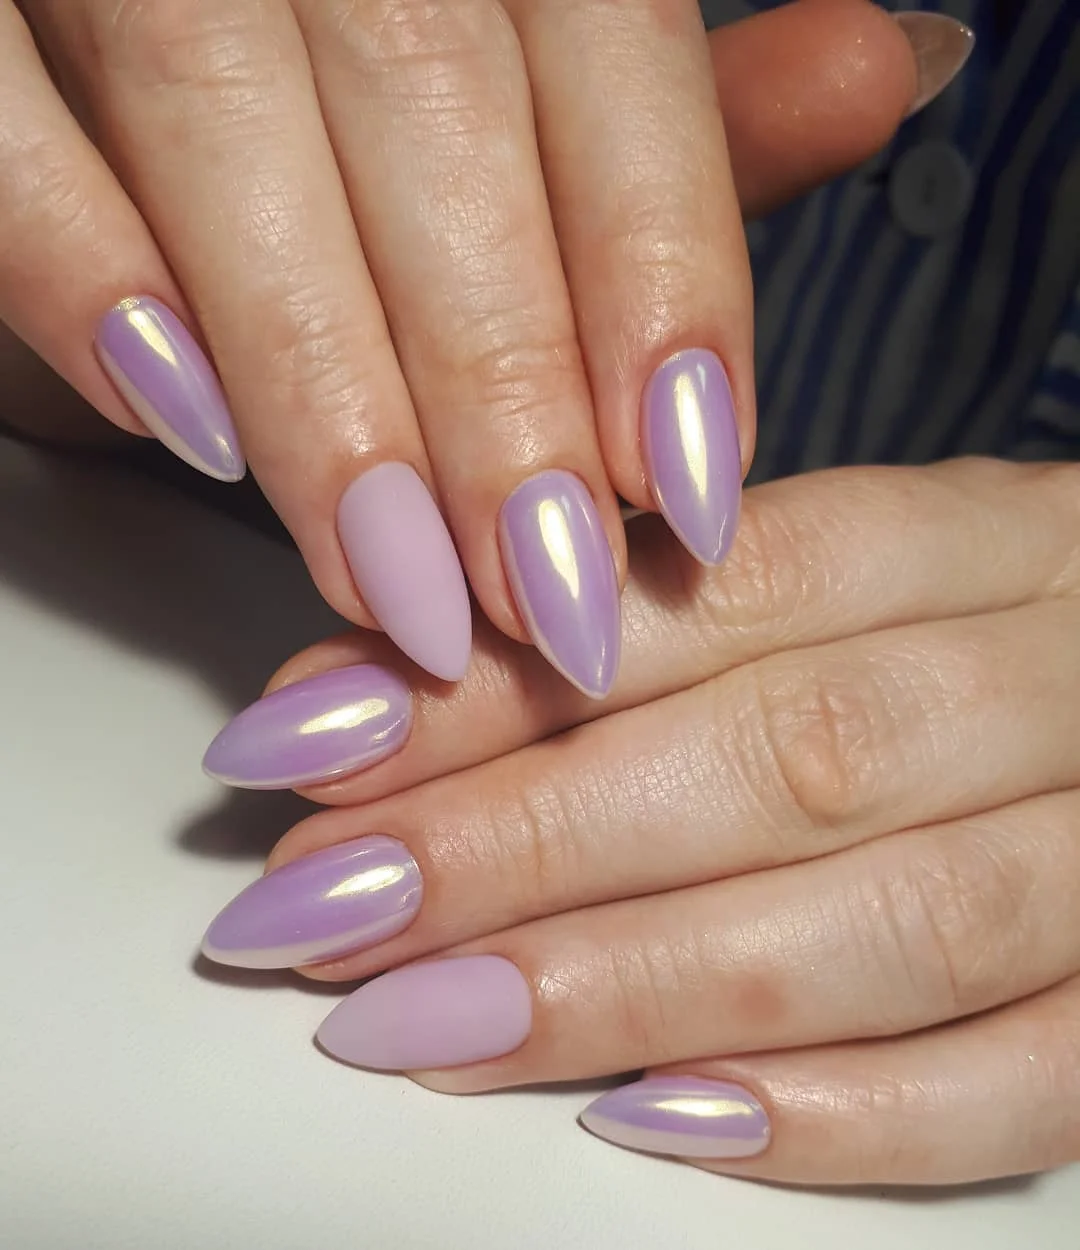
I would use a pale lilac gel polish, a sheer chrome powder with an iridescent finish, and a no-wipe top coat designed for chrome applications. A soft lavender such as OPI Do You Lilac It? can work as a starting point, although I would choose a slightly more delicate base if I wanted that airy pastel effect. The finish depends heavily on the chrome powder, so I would test it over a sample before committing to the whole manicure.
I begin with the almond shape, then apply the lilac base in thin layers. After curing the no-wipe top coat, I gently buff the chrome powder over the surface until the reflective effect becomes even. I keep the pressure light around the cuticle because too much product there can make the manicure look bulky. A final top coat seals the finish and brings back that smooth, glossy surface.
This is the manicure I would choose when I want something feminine without going fully traditional. The lilac keeps it delicate, while the chrome gives it a little attitude. And because the reflective finish changes in different lighting, it feels almost different every time I move my hands. That little surprise is exactly what makes a manicure memorable.
Matte Black With a Graphic Leaf Accent
Black nails have plenty of attitude on their own, but this version softens the effect with one delicate graphic accent. Most of the nails are almond-shaped and coated in a velvety matte black. One accent nail uses a pale nude base with a fine black branching pattern and small leaf-like shapes running along the center. I love the balance: most of the manicure stays minimal while one nail carries the visual detail.
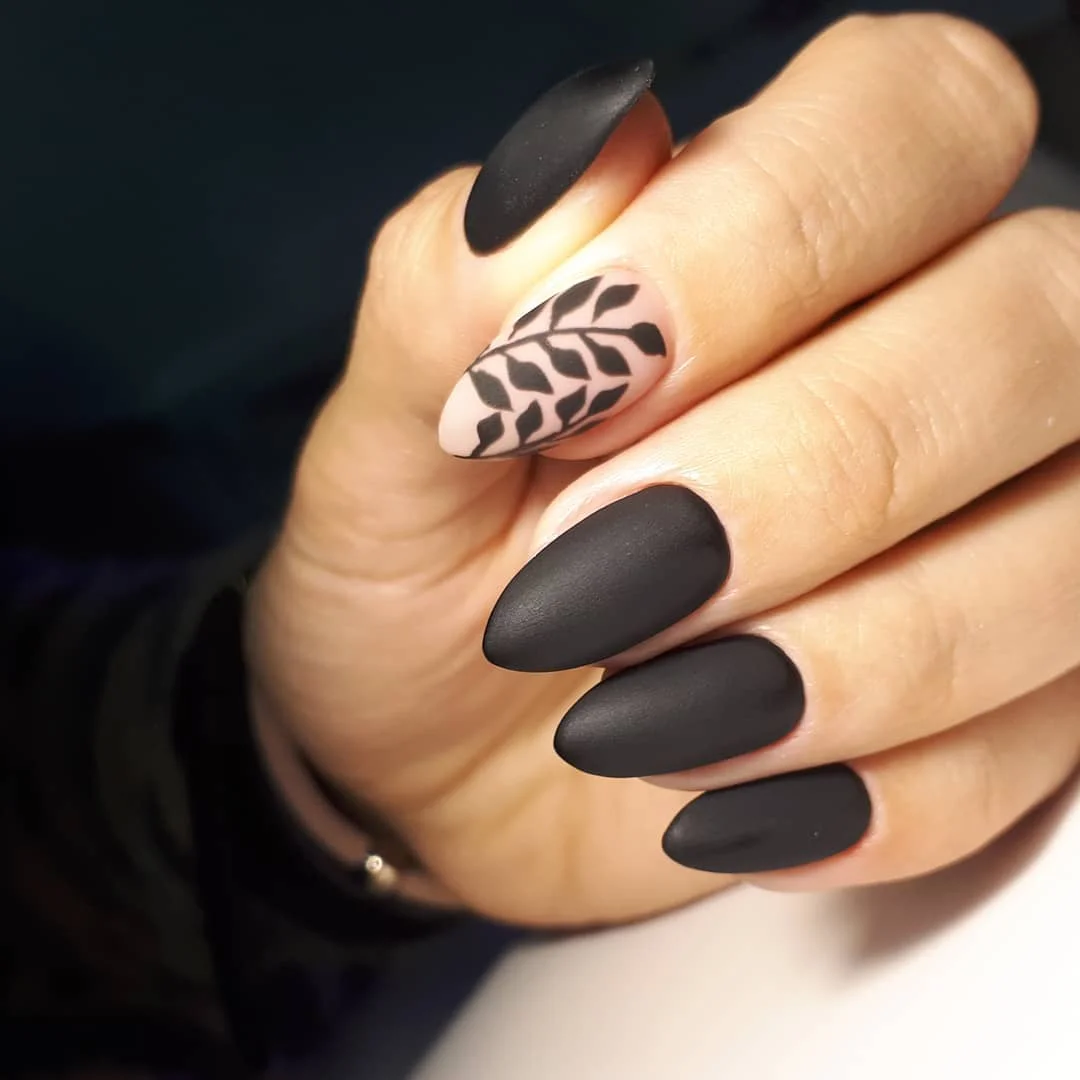
I would need a matte black gel polish, a sheer nude or beige base, black nail-art paint, a very fine detail brush, and matte top coat. The nude should be close to the natural skin tone rather than extremely white because that keeps the accent sophisticated. For the black nails, I prefer a deep formula that becomes opaque quickly, since multiple heavy layers can make a matte manicure feel thick.
At home, I would paint the black nails first and cure them before working on the accent. On the accent nail, I apply the nude base and let it cure completely. Then I use the finest brush I have to draw a thin central branch and add the small leaf shapes one at a time. I would not worry about making every leaf identical; slight variation actually makes the design feel more organic. The final matte coat should be applied carefully over the entire set.
I see this as a perfect transitional manicure when I want something darker but do not want every nail to be a solid black. The little botanical-inspired linework gives the almond shape more character, while the matte finish keeps everything restrained. I could easily wear this with an all-black outfit, a tailored jacket, or a simple neutral sweater and let the manicure provide the detail.
Sheer Nude Almond With a Delicate French Edge
Sometimes I want my nails to look almost impossibly clean, and this manicure captures that feeling beautifully. The nails are naturally elegant almond shapes with a sheer pinky-nude base and a slim white French tip. The white edge follows the curve of the nail rather than becoming too thick, which keeps the overall effect delicate. The glossy finish adds just enough polish to make the hands look fresh and cared for.
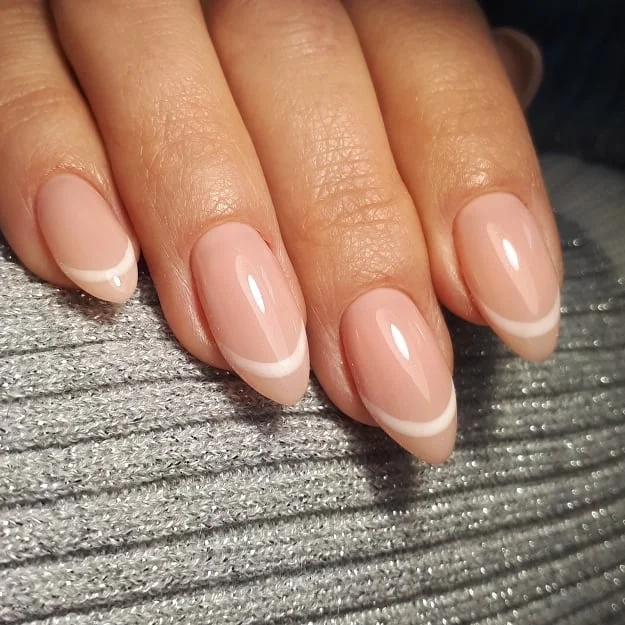
I would keep the product list minimal: a sheer pink or neutral builder base, a soft white gel polish, a fine French-tip brush, and a glossy top coat. The base color should allow some natural nail depth to show through. That transparency is what gives this style its clean appearance, so I would avoid choosing an opaque beige that completely covers the nail.
The key for me is building the French tip gradually. I apply the sheer nude base first and cure it. Then I create the white curve with a thin brush, starting from one side and sweeping toward the center before repeating from the other side. If the line needs correcting, I clean it before curing. Once the smile line looks balanced, I seal everything with a glossy top coat.
This is the manicure I would recommend to myself whenever I am tired of constantly choosing colors. It works with absolutely everything and makes even a simple outfit feel more finished. There is also something wonderfully low-maintenance about the color combination: as the nails grow, the transition remains relatively subtle, which makes the manicure feel easy rather than fussy.
Black Cherry Glitter for a Moody Evening Look
Deep black cherry is one of my favorite ways to make a dark manicure feel richer. The nails have a short-to-medium square shape with softened corners, and the base is an almost-black burgundy. Tiny red glitter particles are scattered throughout the polish, appearing understated in low light and sparkling more clearly when the hands move. The glossy finish gives the color a beautiful depth instead of allowing the glitter to look flat.
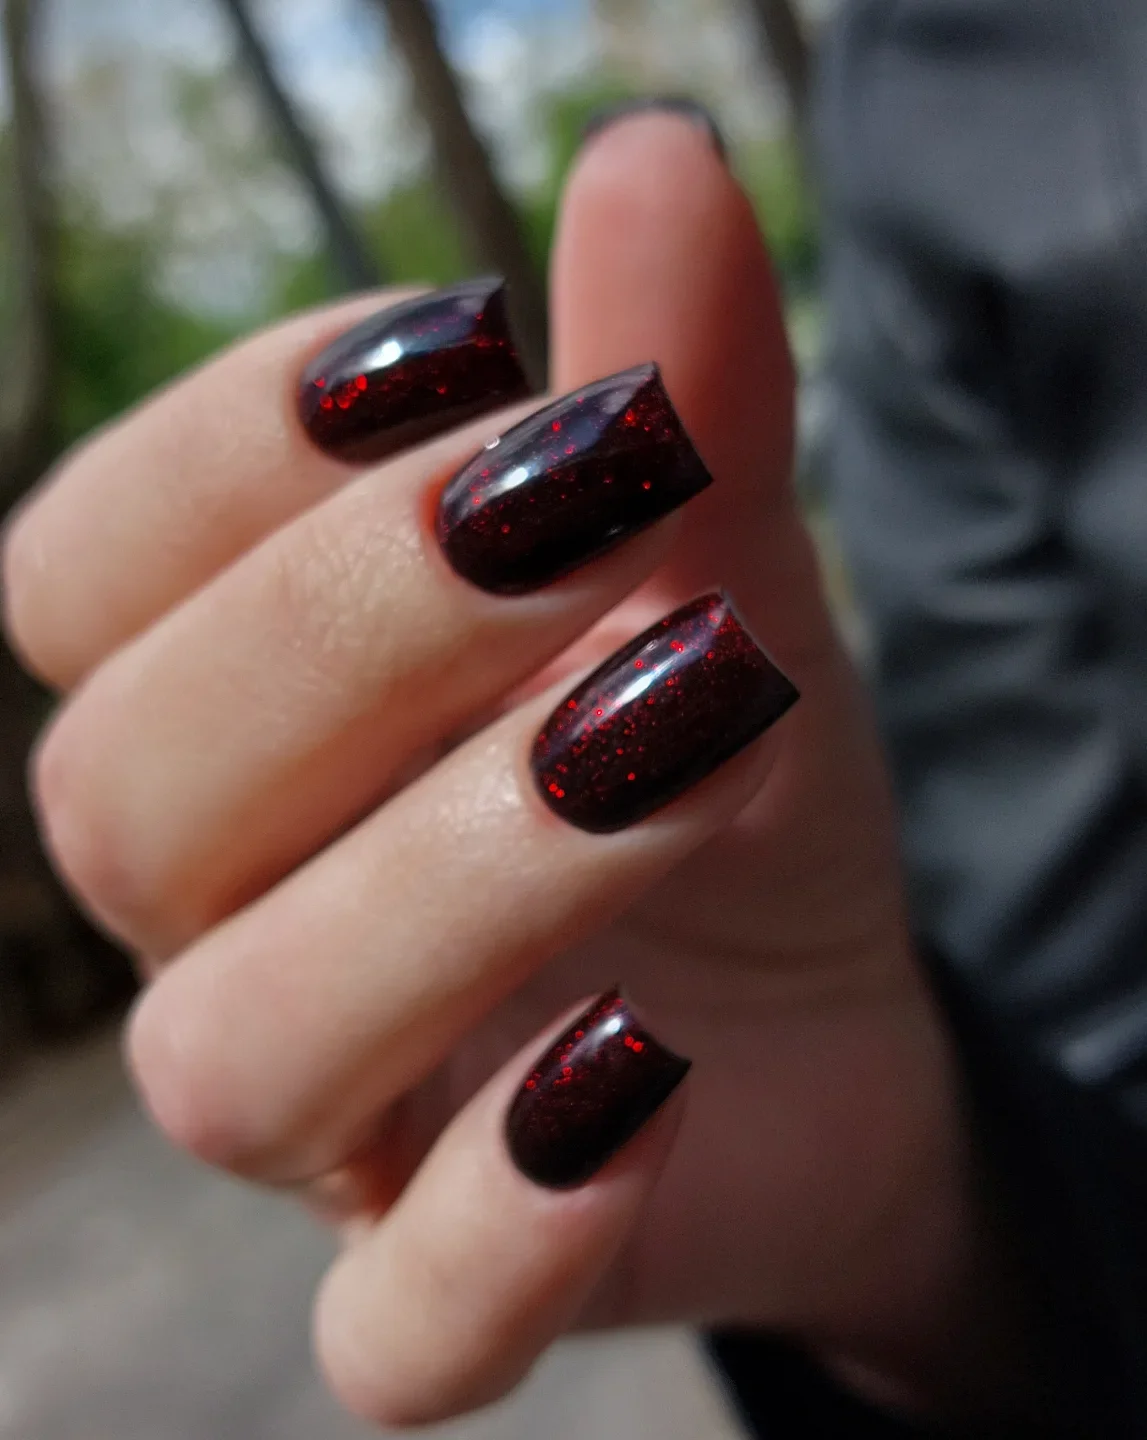
For this manicure, I would use a black-cherry or burgundy gel polish with fine red shimmer, a smoothing base coat, and a high-gloss top coat. If I were mixing the look myself, I would layer a translucent red microglitter over a dark burgundy base rather than using chunky glitter. Fine particles are what create that sophisticated twinkle without making the manicure feel overly festive.
I would start with short, neatly shaped square nails because the darker color looks particularly sleek against that clean geometry. After the base coat, I apply two thin layers of black cherry, curing between coats. If the glitter needs more dimension, I add a very thin shimmer layer before finishing with glossy top coat. I always check the tips before curing because dark polish can easily pool along the free edge.
This is where I would take the manicure when the calendar starts filling with dinners, parties, and evening plans. It has the moodiness of black but the warmth of red, so it feels softer and more dimensional. I especially love it with silver jewelry and simple black clothing. No complicated nail art, no excessive sparkle, just that gorgeous flash of red whenever the light catches my hands.
A chic manicure does not have to be complicated to feel special. I love how the right shade can instantly refresh my look, whether I choose a soft ivory, rich plum, classic red, delicate lavender, or a playful pop of yellow. The key is finding a color and shape that feel natural to my personal style while giving the season a little extra energy. Sometimes one glossy coat of the right shade is all it takes to make an everyday look feel completely pulled together. So, the next time I am ready for a manicure refresh, I know I will have plenty of beautiful ideas to choose from.

