
I keep seeing the same thing on every feed lately: a nude base, a sharp line of chrome or foil, and a shape that means business. Structured silhouettes are meeting soft pastels and bold accents, and honestly, I’m here for it. It’s the rare trend that works on a Tuesday errand run and a weekend wedding.
Here are 20 Photoshoot Nails that actually survive real life, from barely-there sheers to full glitter coffins. I tested them through typing, gym sessions, and one particularly aggressive contact lens removal. Whether you’ve got short nail beds or you’re committed to stilettos, there’s a design here that won’t quit on you.
Abstract Marbled Stiletto Nails
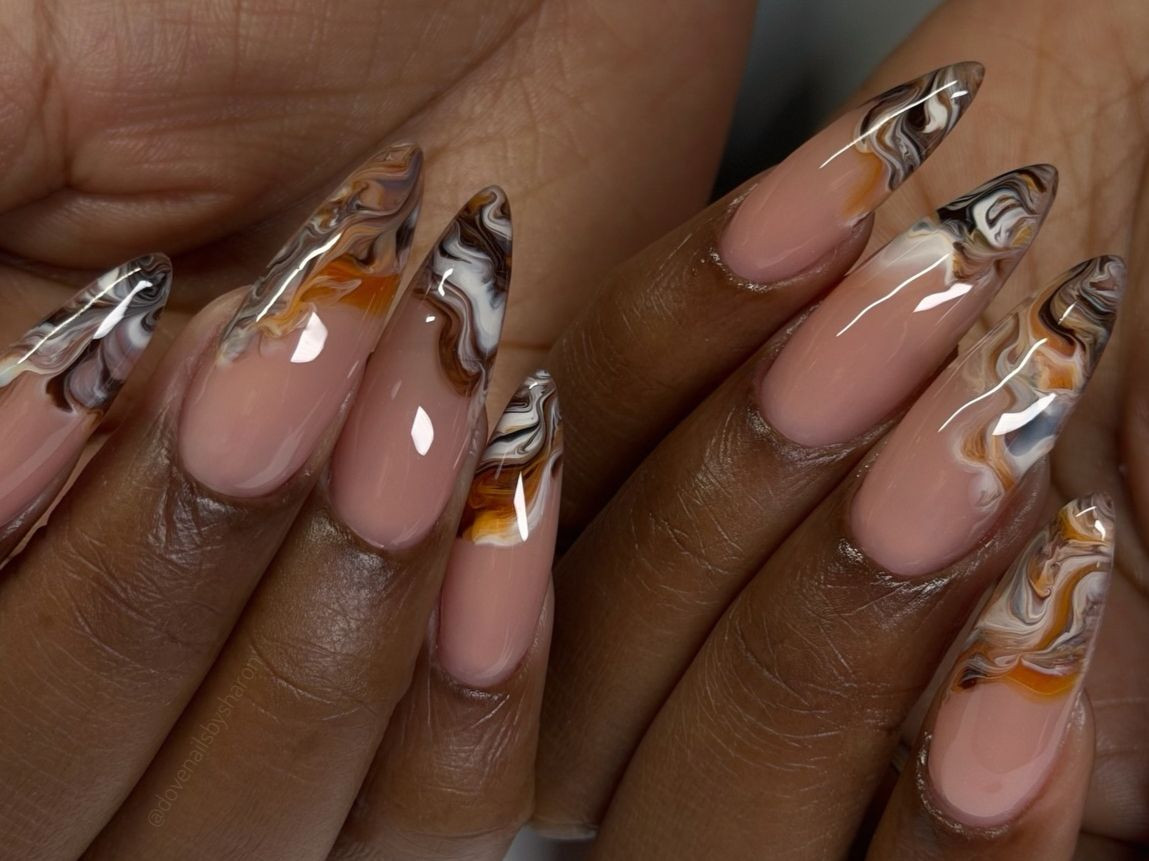
There’s a precision to this abstract marbling that reads almost like poured paint, each swirl of brown, white, black, and orange suspended over a nude base and cut off cleanly at the tip. It’s the kind of art that makes you look twice, because the veins don’t just sit on the surface, they seem to bleed down the nail. This is not a Sunday DIY, the technique demands a steady hand and an eye for balance, so book the salon and let someone who trains at this own the chaos. On long stiletto nails, the pointed canvas gives the marble room to stretch, which is exactly why the design works. Expect about ten to fourteen days of pristine wear before minor tip wear shows, and plan for a full soak removal, because this length and art are not coming off with a quick file.
Subtle Nude to White Ombre Almond Nails
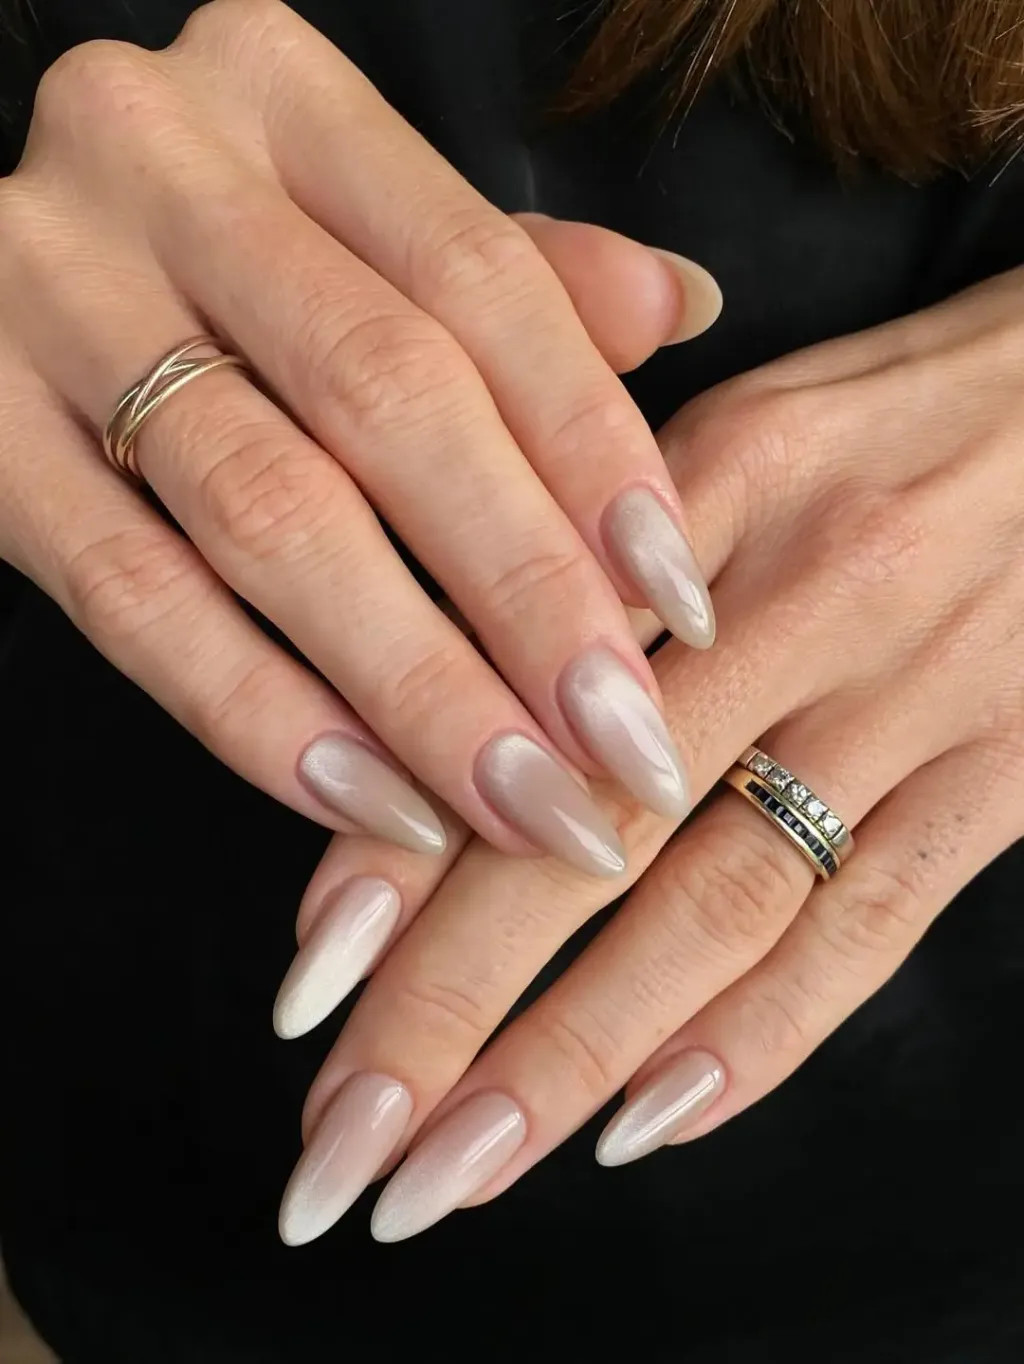
When did a sheer nude fading into white start looking this expensive? This nude white ombre on medium almond nails is the quiet workhorse of photoshoot nails, it flatters every skin tone because the gradient softens the line between polish and finger, and it disappears into the background when the shot is about you, not your hands. If your day job involves typing or contact lenses, the smooth blend means regrowth is barely noticeable, so you can stretch it to three weeks without the telltale half-moon. It’s the look you pick when you want to feel polished but not performative, and honestly, for an everyday wearer who wants a photoshoot-ready base, this is the one.
Matte Abstract Art Oval Nails
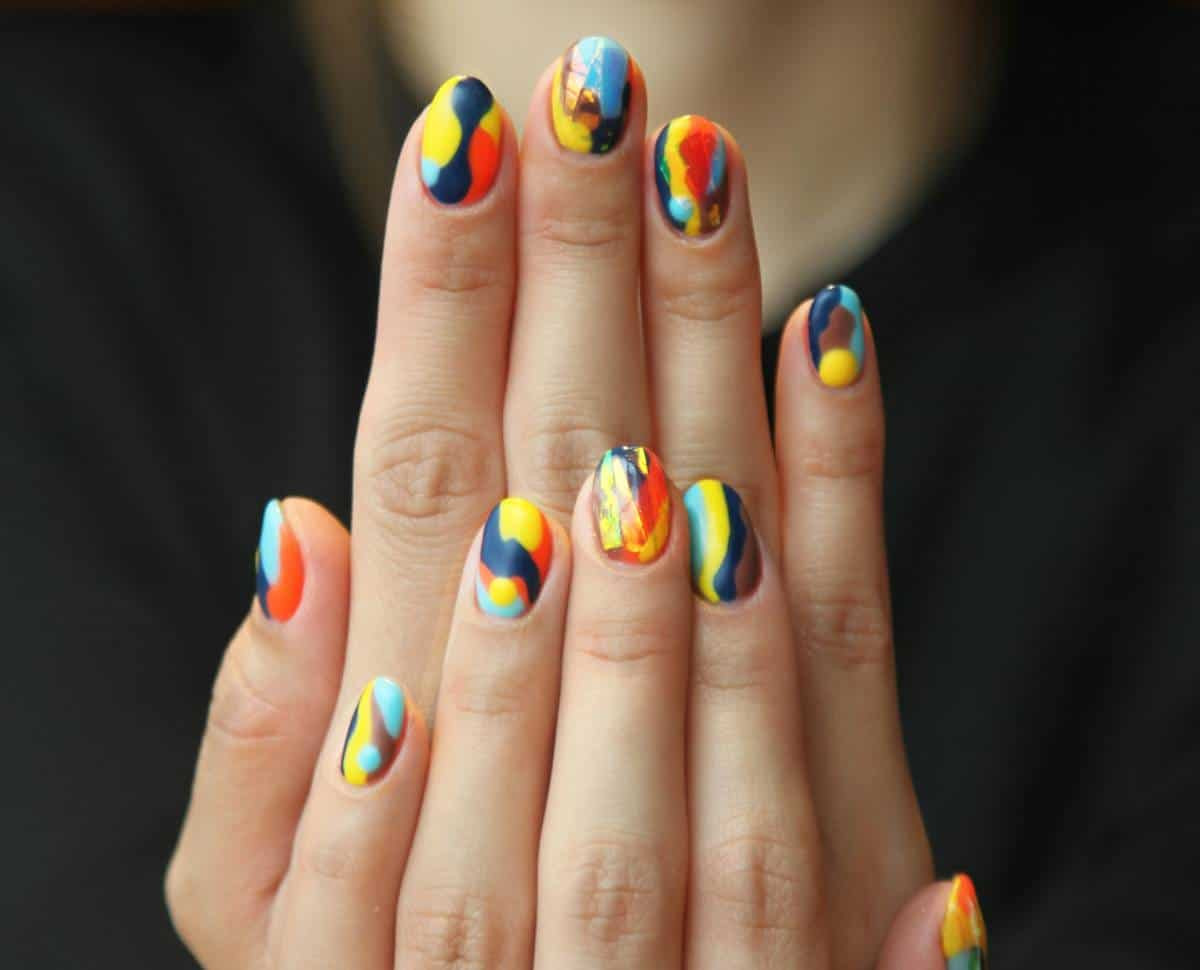
I’m skeptical of matte finishes for photoshoots, they photograph flat and show every swipe of oil within hours. This matte abstract art on short oval nails is bold, with its multi-colored pattern and visible brush strokes, but the matte topcoat wears down to a satin sheen in about a week. You’ll be reapplying a matte topcoat to keep the look consistent, and dark pigments on matte can smear if you’re not careful. It’s artistic, sure, but it’s not a set-and-forget situation.
Short Square Pink with Rose Gold Cuticle Line
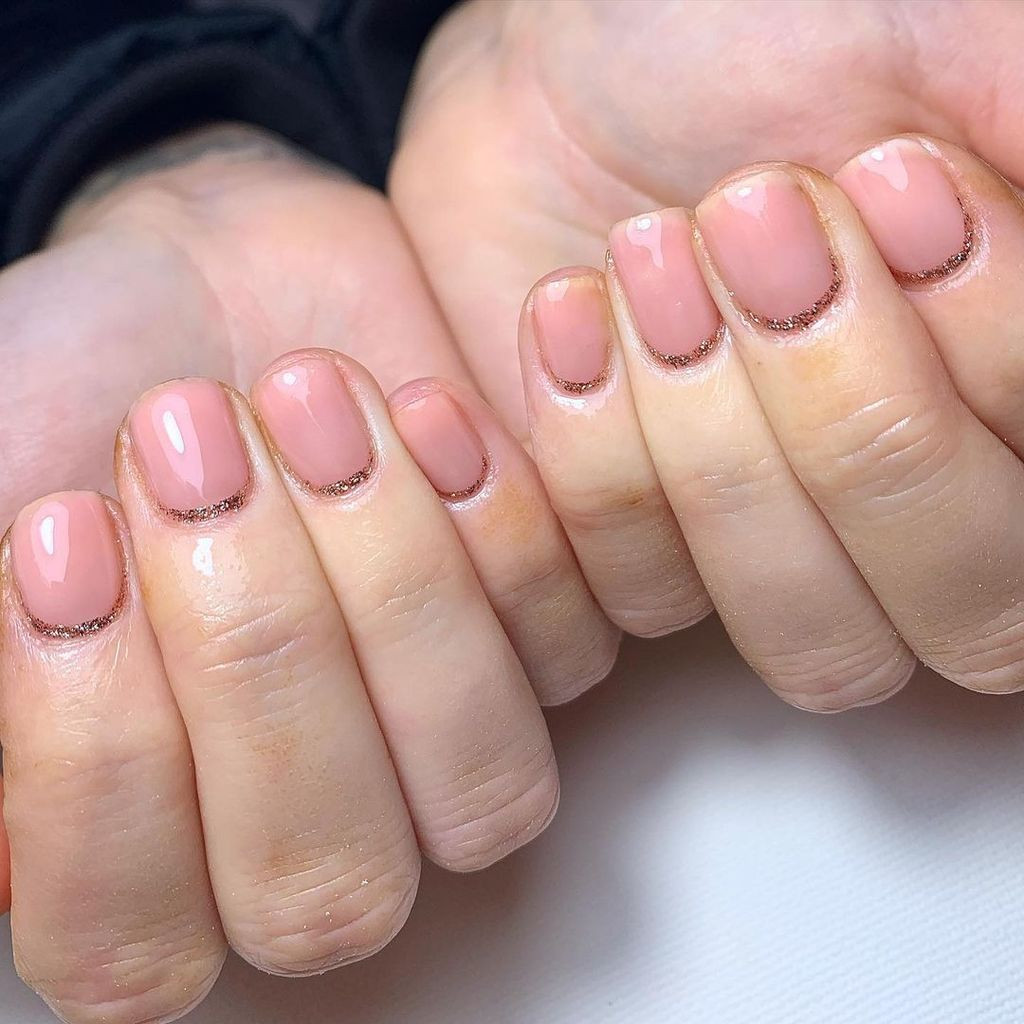
The pink rose gold glitter line hugging the cuticle on these short square nails is a detail that separates this from a plain french tip, it adds a metallic edge without shouting. Compared to the simpler nude ombre trend, this design gives you more to look at, the glitter catches light, and the line draws the eye to the base of the nail, which can make short nails appear longer. Variations on the french tip range from a classic white smile to a colored band, but this one sits at the cuticle rather than the free edge, and that inversion is what makes it feel fresh. A clear topcoat over the line helps secure it, though the polish might chip at the edges before the two-week mark.
Pink Ombre Almonds with Gold Rhinestones
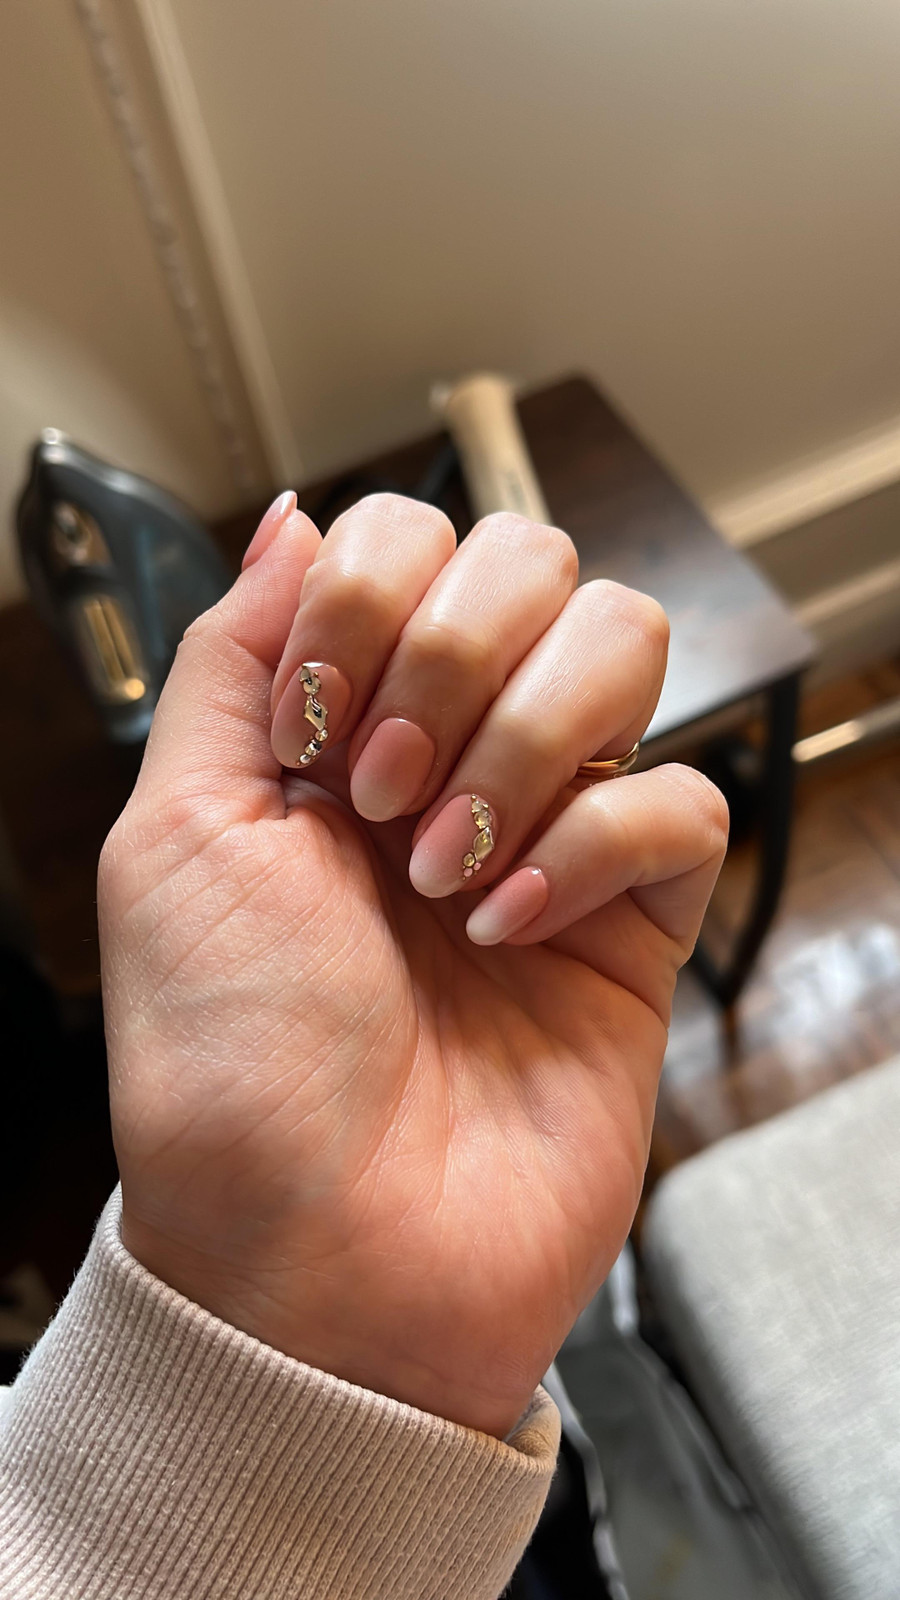
I’ll admit, I was worried about rhinestones snagging on fabric during a long engagement shoot, but these pink ombre almonds with gold rhinestones held their own. The gradient from pink to clear is smooth, and the small stones on the accent nails catch light without overwhelming the delicate base. Here’s the reality: rhinestones typically last one to two weeks before one might loosen, so check them before the big day. Gel polish keeps the ombre smooth, and the glossy finish photographs well. Just be cautious with sleeves and gloves, the stones will catch. They lasted through a full day of posing, and that’s what counts.
Holographic Glitter Almond Nails
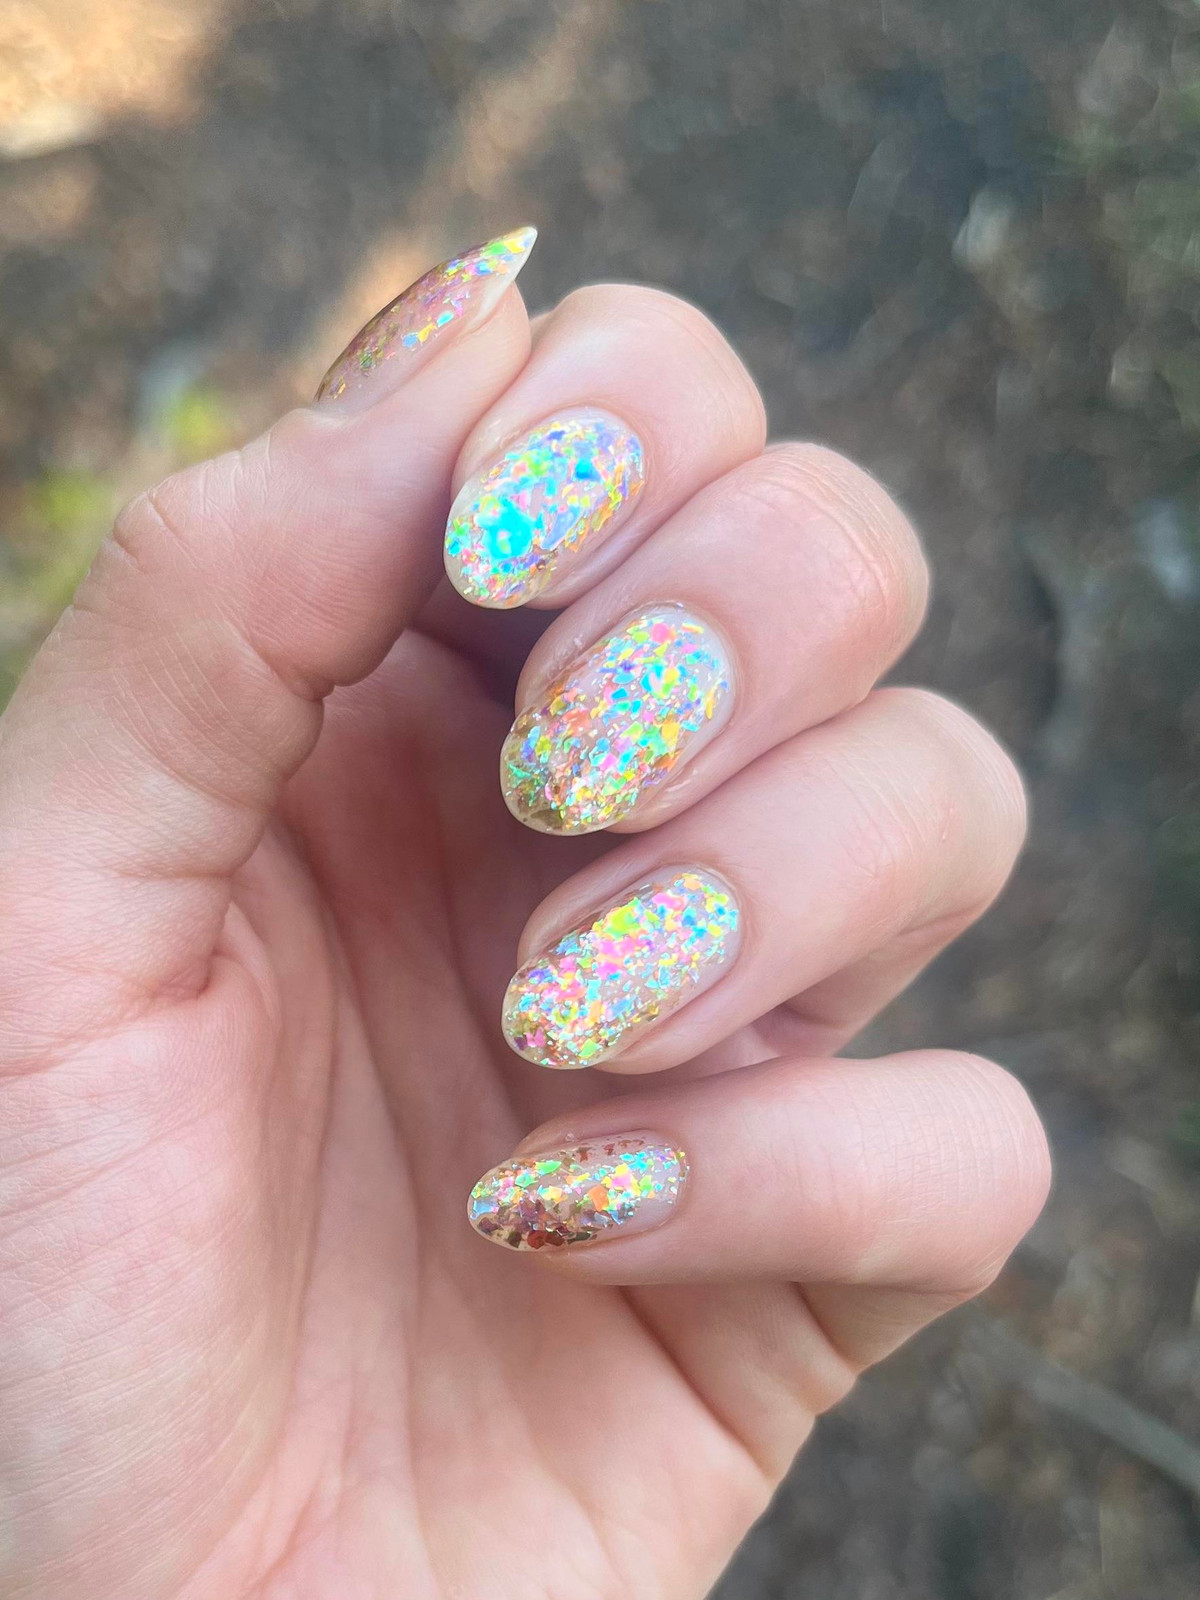
The light catches every single fleck before your hand even moves. That is the point of holographic glitter on almond nails: it reads as a prism, not a polish. The tech builds it in thin layers, tapping each coat so the glitter lies flat instead of clumping, then seals with a high-gloss top coat that makes the color shift from pale blue to pink to silver depending on the angle. No chunky texture, no gritty surface. Just a smooth, reflective finish that looks like you dipped your nails in a soap bubble. For a photoshoot, this is the one that catches the ring light and holds it.
Tortoiseshell with Turquoise Geometric Nails
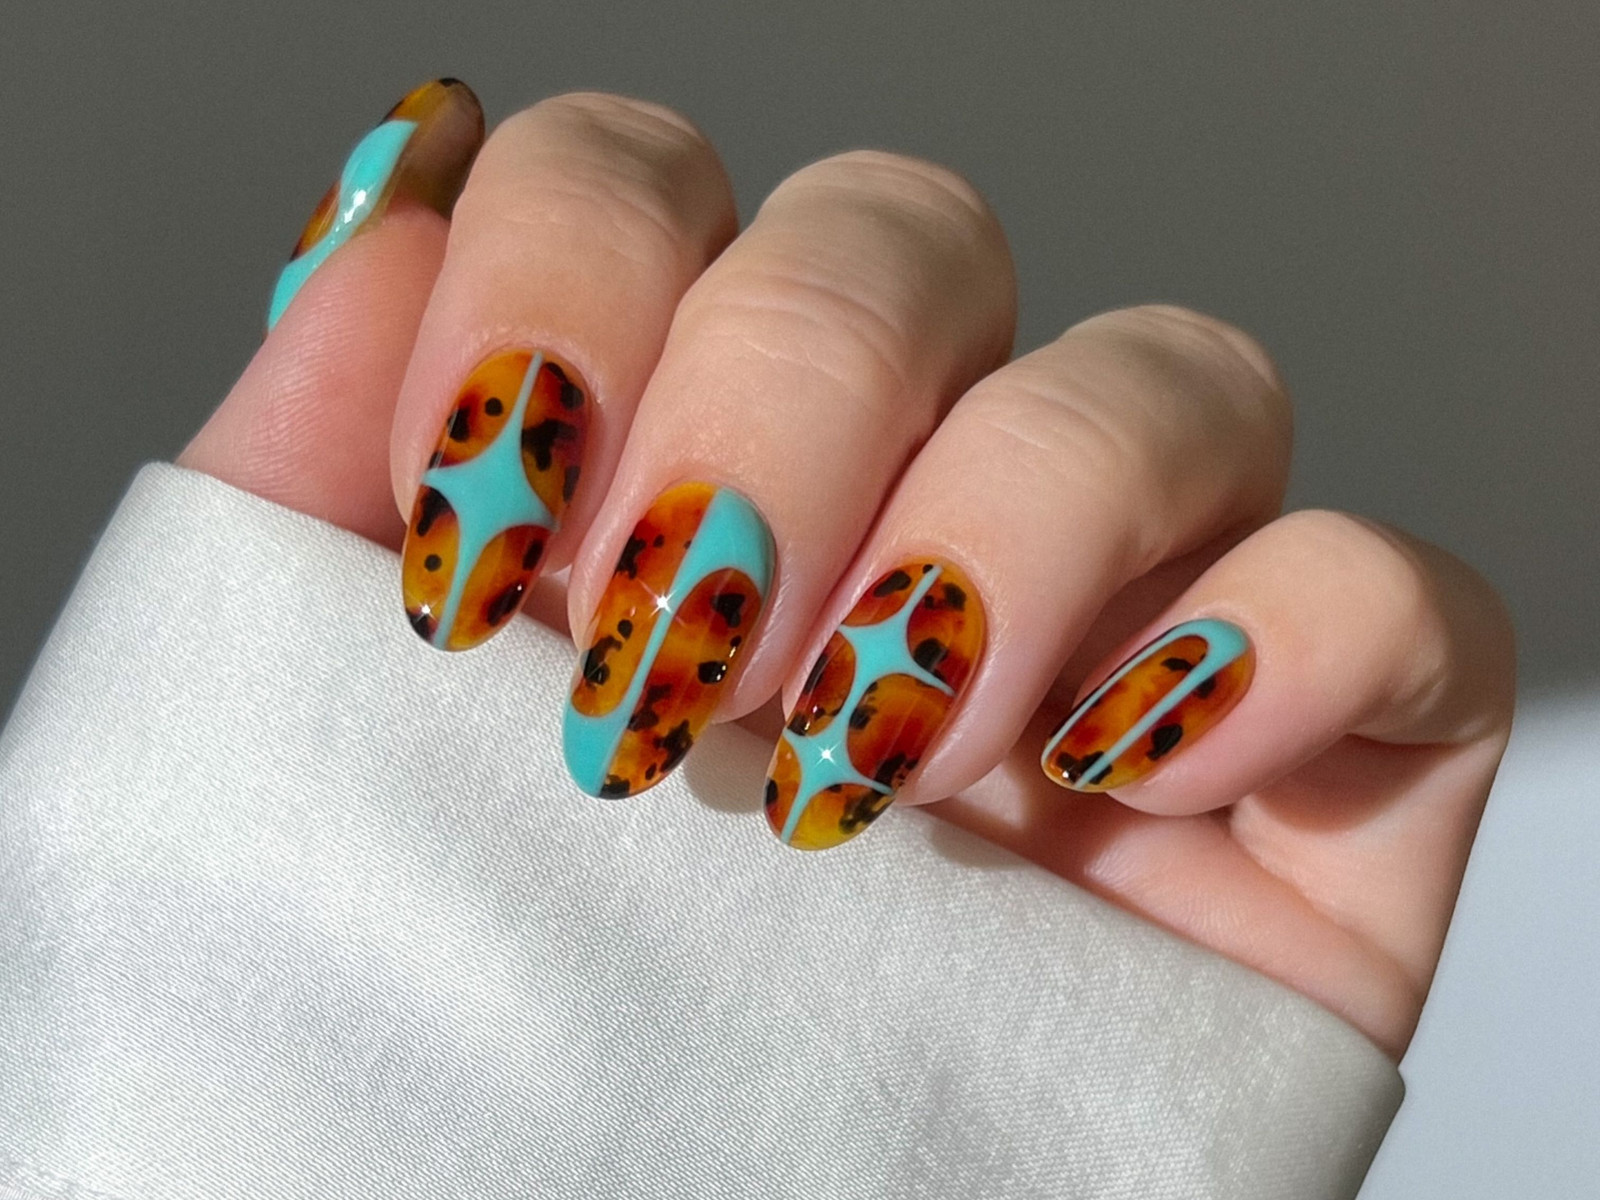
What makes this read so sharp in photos is the contrast between the warm amber-and-black swirl of the tortoiseshell and the cold, flat pop of the turquoise geometric accents. The tortoiseshell is built in translucent layers, so it has depth, while the turquoise sits opaque and matte-adjacent under the glossy top coat. That push-pull between organic swirl and hard line is what the camera loves. Do not attempt this at home unless you have a very steady hand and a lot of patience. This is a salon booking, two hours minimum, and you tip on the full service.
Pearlescent Beige Rounded Square Nails
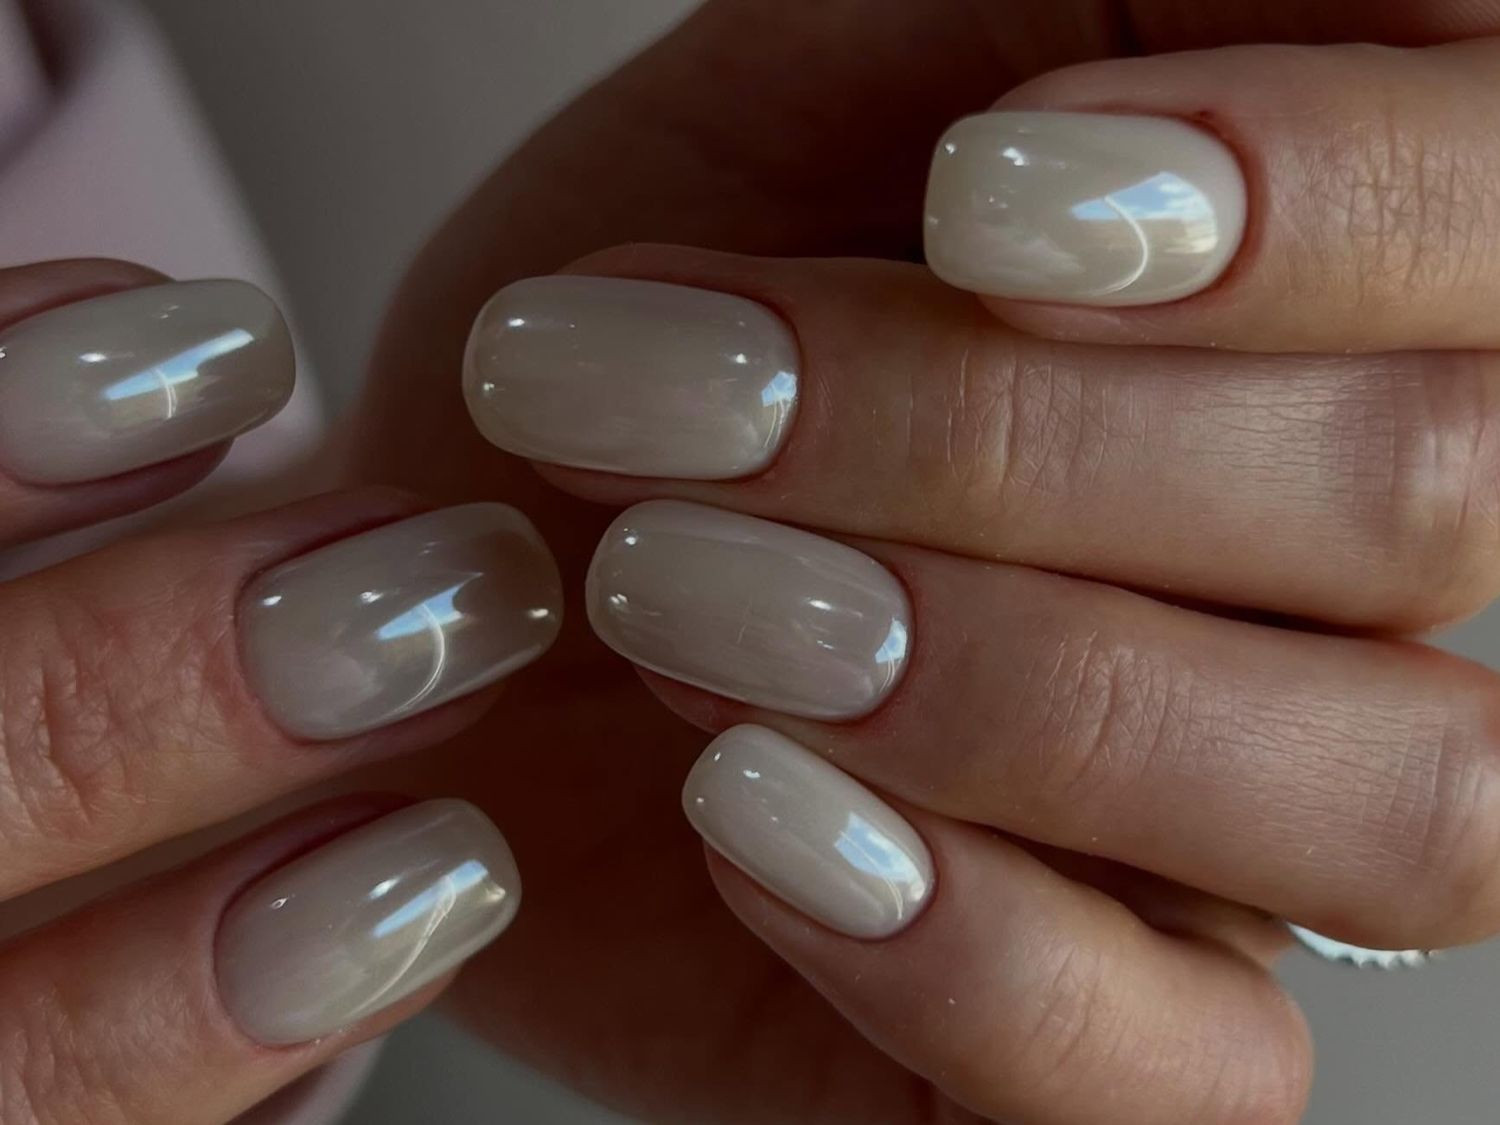
I will admit I underestimated the pearlescent beige rounded square. It looked quiet in the bottle, almost boring. Then I saw it catch the light in a photo and the whole nail turned opalescent, pink and green flashes across a neutral base. The finish does the work here, not the shape or the art. The downside is that the sheen can dull by day five if you skip a top coat refresh. It is not a set-it-and-forget-it polish. But for the first three days, it photographs like liquid pearl, and that is worth the extra coat.
Sheer Nude Poppy Floral Art Nails
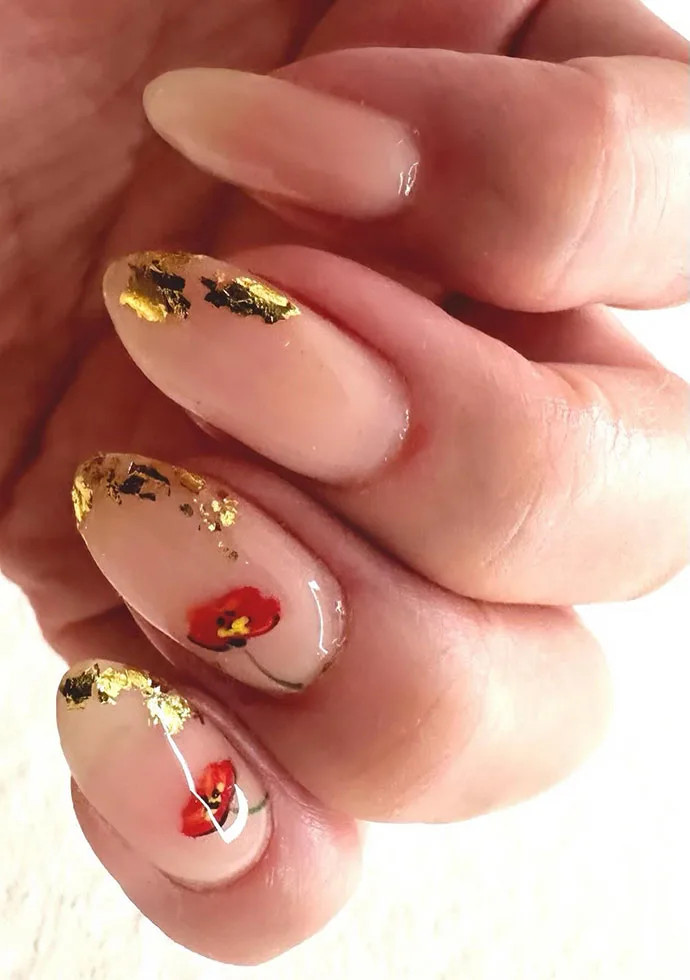
How many hours does it take to get a single poppy that looks this delicate? More than you think. The sheer nude base is barely there, which means every brushstroke of the poppy floral art has to be precise, no hiding mistakes under opaque color. The gold foil accents are pressed on one by one, and the red petals are layered from light to dark to give them that translucent, almost watercolor feel. This is a spring or summer photoshoot look, one that reads romantic and intentional. Book a full afternoon. The artist earns every minute of it.
Nude Gradient with White Floral Art
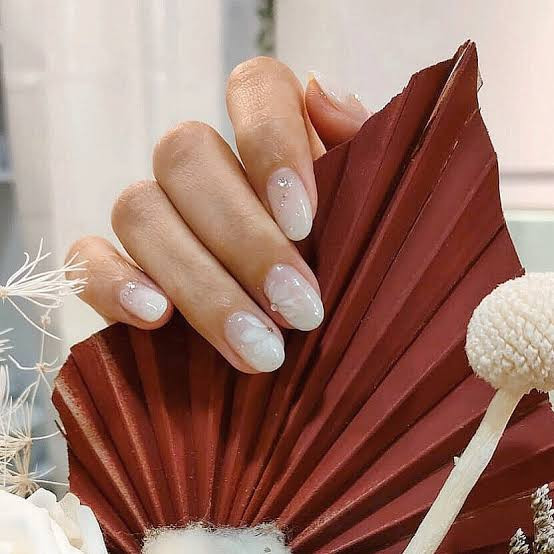
The sponge is your friend here, but only if you accept that it will look messy before it looks good. A nude gradient goes from sheer at the cuticle to opaque white at the tip, and the trick is three thin sponged layers, not two, so the transition is soft and seamless. Then the white floral art goes on top of the gradient on the accent nails, tiny brushstrokes that need a steady hand and a no-wipe top coat to keep the white from bleeding. The honest downside is that the glitter on the other nails will shed within a week, little flecks on your desk and keyboard. But for the shoot itself, it reads bridal and clean.
Chunky Iridescent Glitter Almond Nails
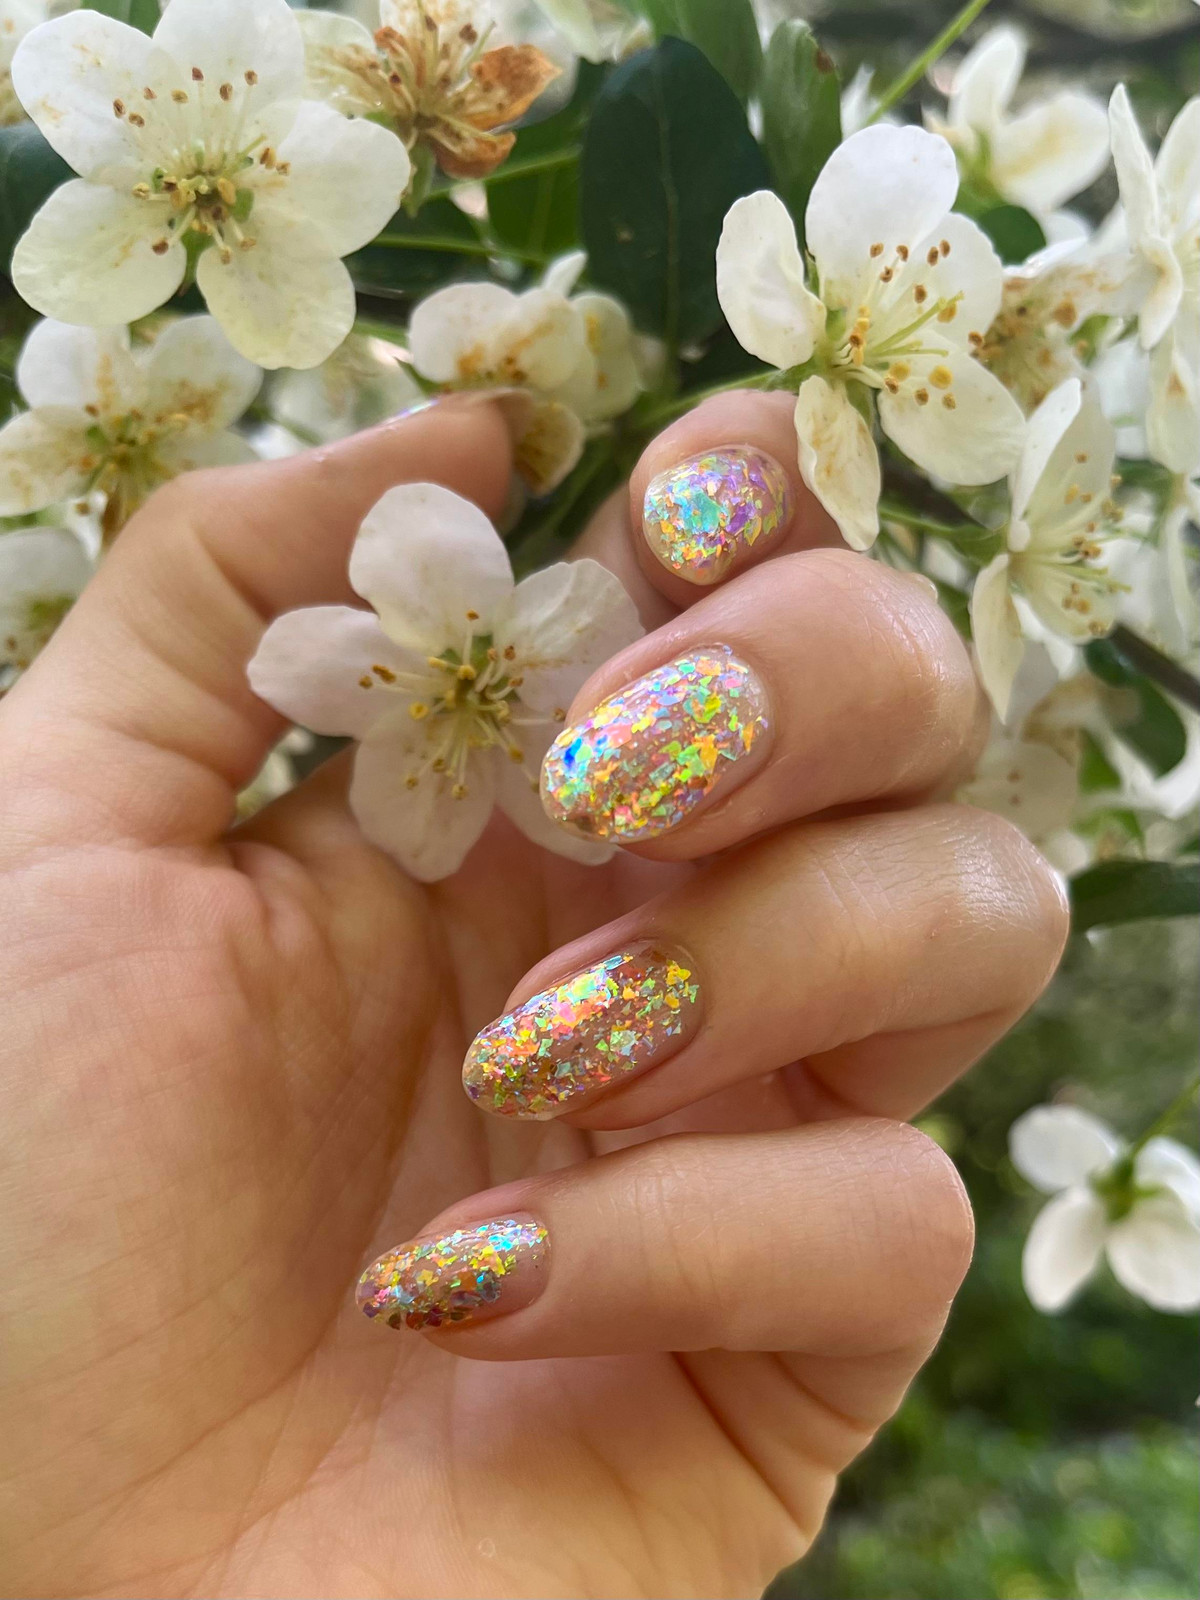
There’s glitter, and then there’s this. The chunky iridescent glitter sits so densely on these medium almond nails that every shift of the hand throws a different color, which is exactly what a photoshoot wants. The coverage is what makes it work: no bare patches, no thin spots, just a solid wall of sparkle that reads as one continuous surface. It’s not a subtle look, and it shouldn’t be. The catch is the application, getting that even density takes a steady hand and a patient tech, because chunky glitter loves to clump. Worth it for the light-catching effect alone.
Short Nude with Gold Foil Accent Nail
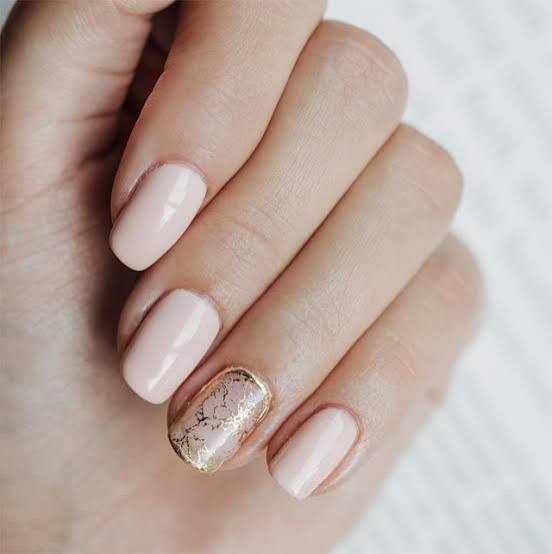
Who is this for? Anyone who wants a photoshoot nail that doesn’t scream for attention but still delivers. The nude gold foil combo sits on short oval nails, with the foil hitting just one accent nail, keeping the rest quiet. It flatters people who type all day, because short means less snagging, and the nude base means grow-out is barely visible. The foil can lift or crease if the tech rushes it, so expect a careful application. You’ll get a solid week or two of wear, and the glossy finish holds up well under studio lights. If your shoot is minimalist, this is your nail.
Pearly White Lace Pattern Nails
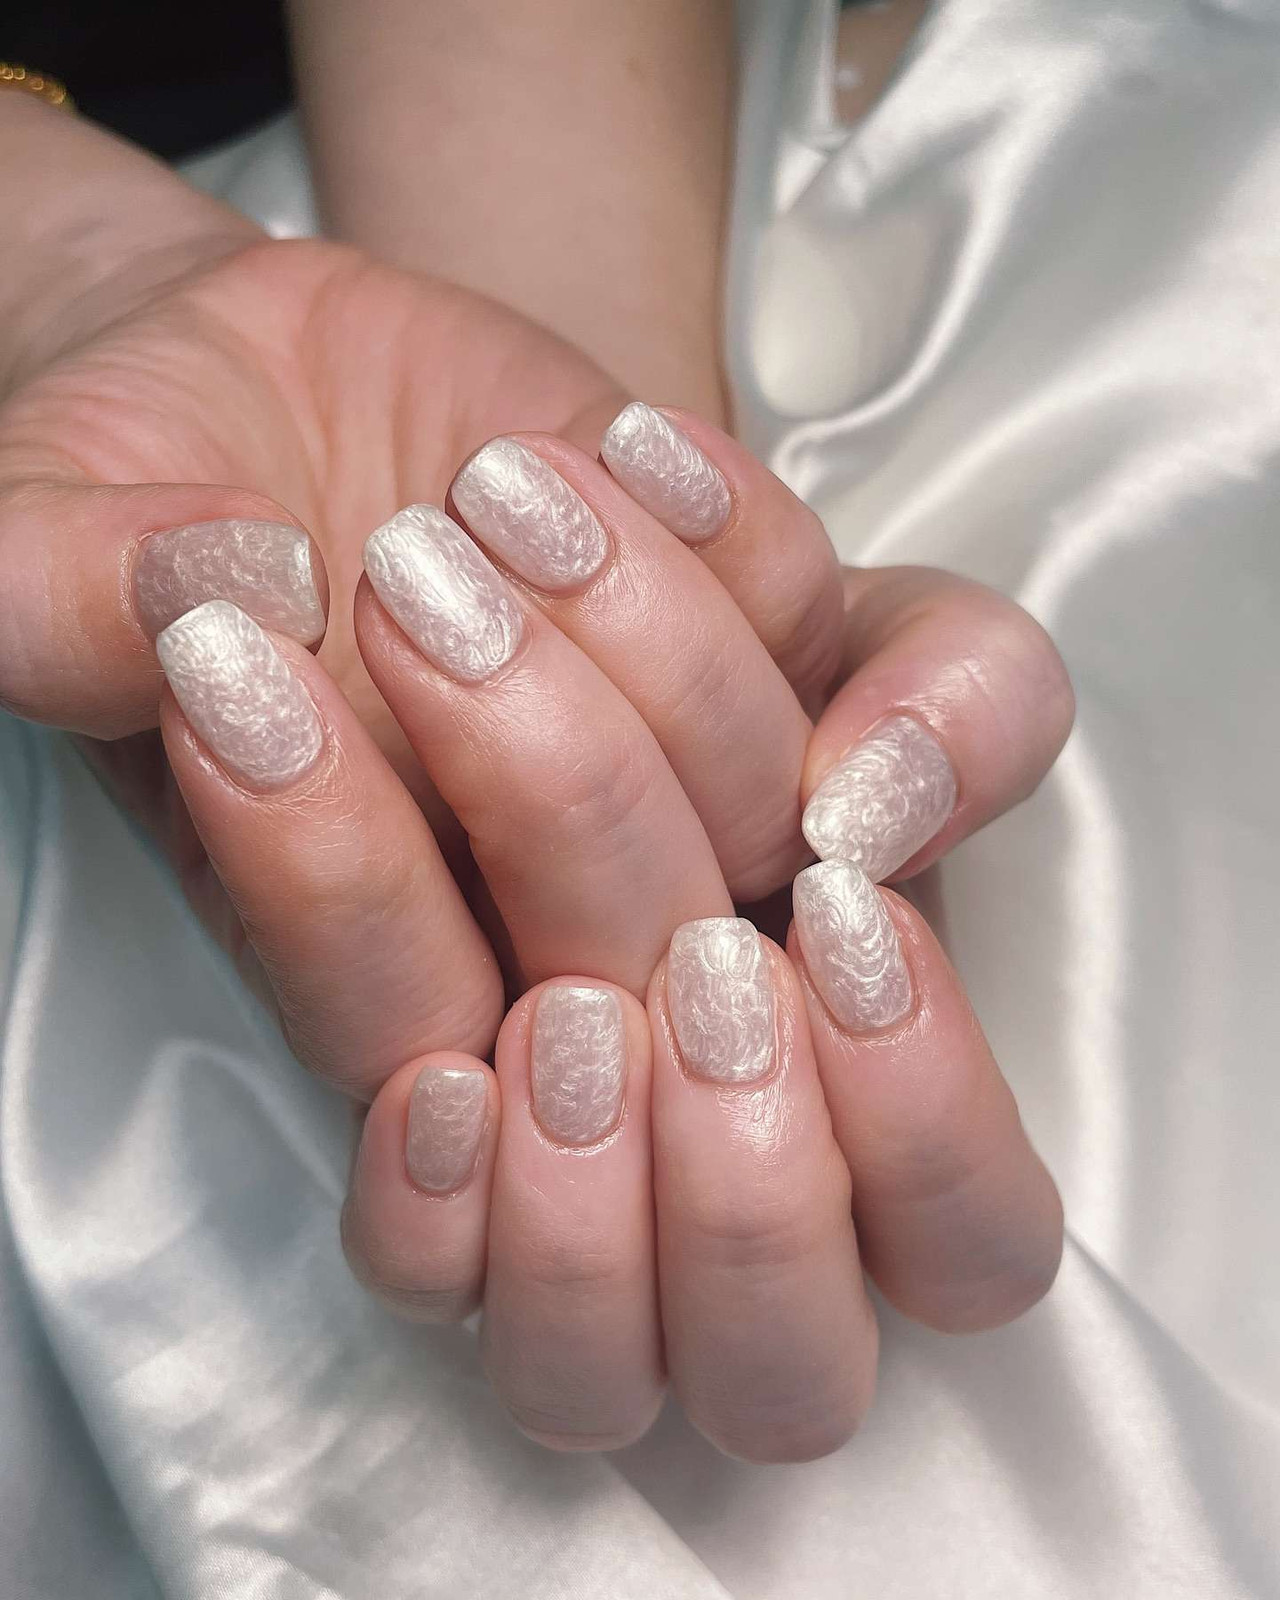
I’ll say it plainly: this is the bridal nail that beats all the others. The pearly white lace pattern covers every short square nail in a fine, intricate web that catches light like a pearl, not a flat white. Compared to the usual French or plain shimmer, this has actual texture and depth, it reads as delicate and expensive. But don’t kid yourself about doing this at home. The pattern requires a steady hand and a fine brush, and one smudge ruins the whole effect. Book the salon, bring a reference photo, and let them take their time. It’s a spring or wedding season look, and it’s worth every minute in the chair.
Long Nude with Gold Floral Branches
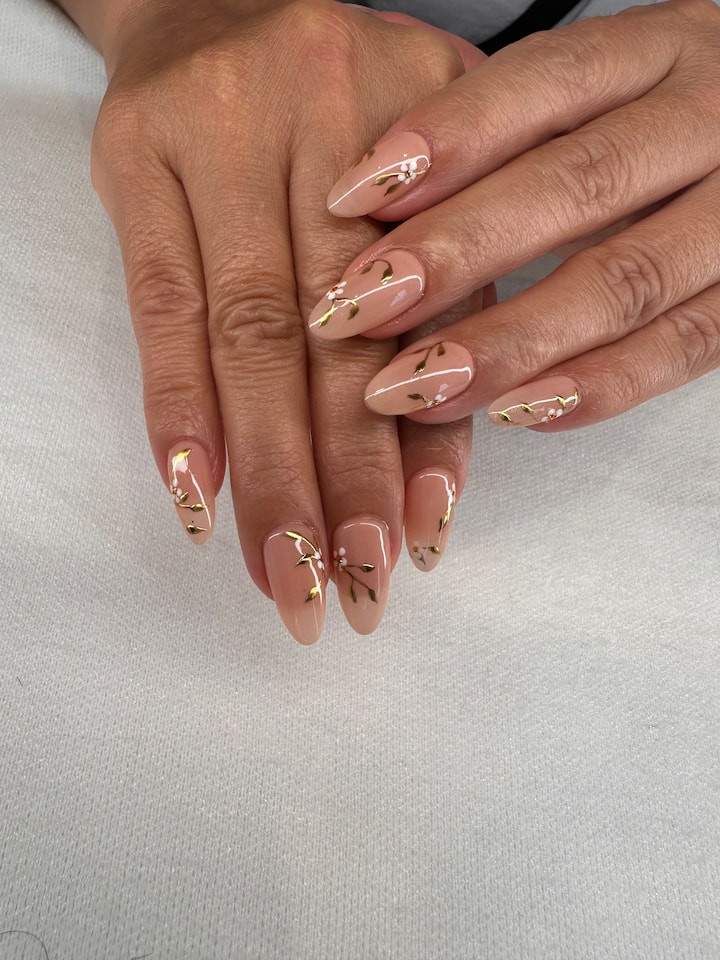
I’ll confess: I expected the gold to chip by day two. These long nude almond nails with gold floral branches and tiny white flowers surprised me. The line work is precise, the cuticles are clean, and the glossy topcoat seals everything in. But here’s the honest downside: the branches catch on everything. Sweater sleeves, hair ties, the edge of a laptop. You’ll be careful for the first week, then you’ll forget, and a branch will snag. The gold itself holds up fine, it’s the thin lines that are vulnerable. For a photoshoot, they photograph beautifully, but plan to touch up the tips if you’re keeping them past day ten.
Sheer Nude Shell Line Nails
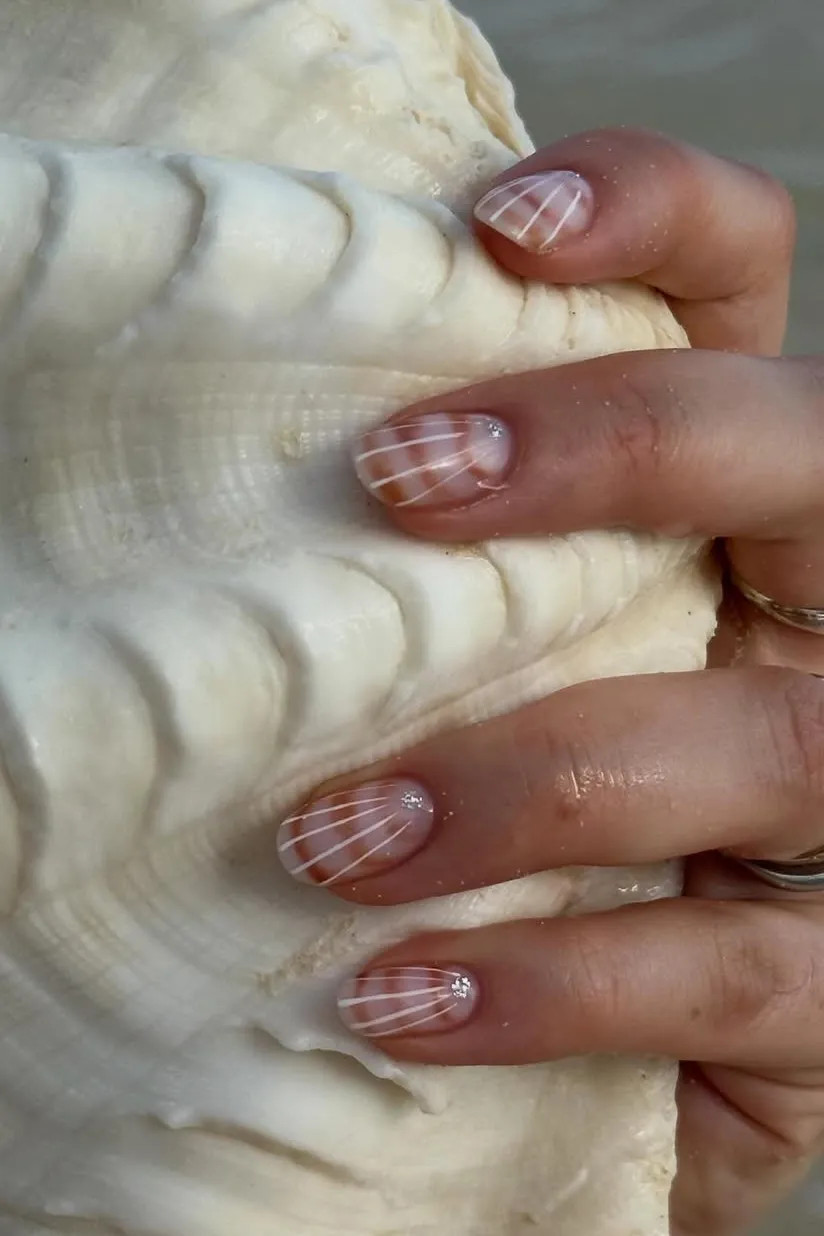
The tech draws a thin shell line down the center of each sheer nude nail, then seals it with a clear topcoat. That’s it. The sheer nude base lets the natural nail show through, and the shell line nails add just enough detail to catch the light without looking busy. It’s a beachy, subtle look that works for a spring shoot. Upkeep is simple: a clear topcoat every few days keeps the lines from wearing down. Expect about a week of pristine wear before the edges start to soften. The lines sit on every nail, which keeps the design cohesive, and the glossy finish makes the whole thing look effortless, even though it took a steady hand to get there.
Blue White Gold Stripe Oval Nails
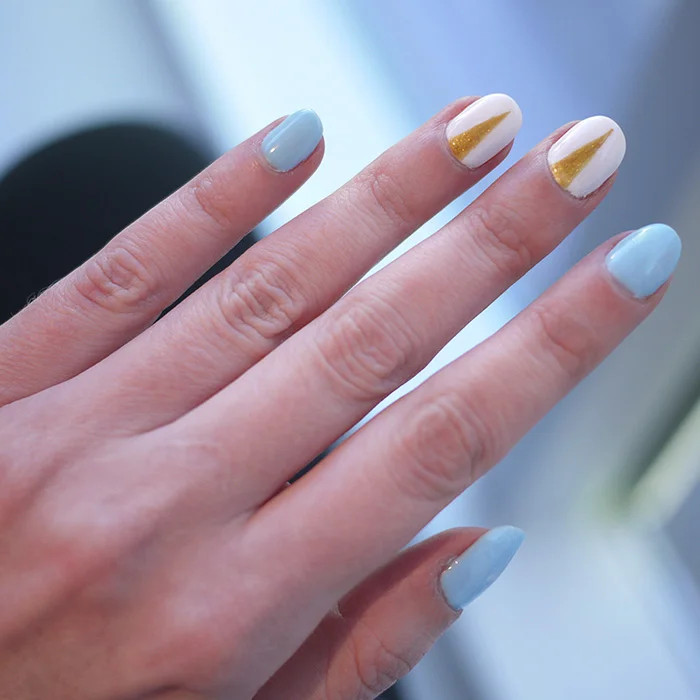
The diagonal stripe is what stops you mid-scroll: a sharp blue line, a crisp white gap, a hairline gold accent. On medium oval nails, the geometry reads deliberate, not accidental. The blue white gold stripe combination has a graphic quality that reads crisp in photos and even sharper in person. This is a salon design, not because the colors are complex but because that stripe needs a steady hand and a thin brush. I have tried angled tape at home. It shifted. The gold foil lifts if you rush the top coat. Book this one, let someone with a magnifying lamp handle the angles.
Long Coffin Glitter Gradient Nails
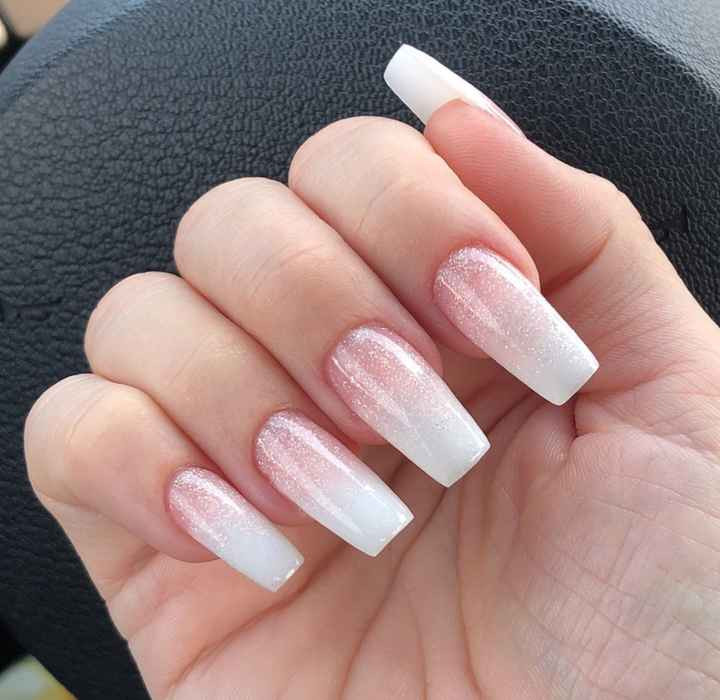
I want to love the long coffin glitter gradient for a photoshoot. The white-to-pink fade is pretty, the glossy finish catches light well. But I have questions. That glitter sits on the surface, which means it catches on sweater cuffs by hour three. The gradient itself is applied with a sponge, and sponges leave tiny air pockets that show up in macro shots. For a single set of photos, it works. For a full day of shooting with wardrobe changes and prop handling, the tips will scuff. The sparkle dulls faster than a solid metallic. If you need twelve hours of flawless shine, pick a foil or a chrome instead.
Still, if the shoot is controlled, short takes, minimal handling, the gradient photographs beautifully. The pink reads soft on fair skin, warmer on olive. Just keep a spare top coat in your bag.
Pale Pink Pearlescent Shimmer Nails
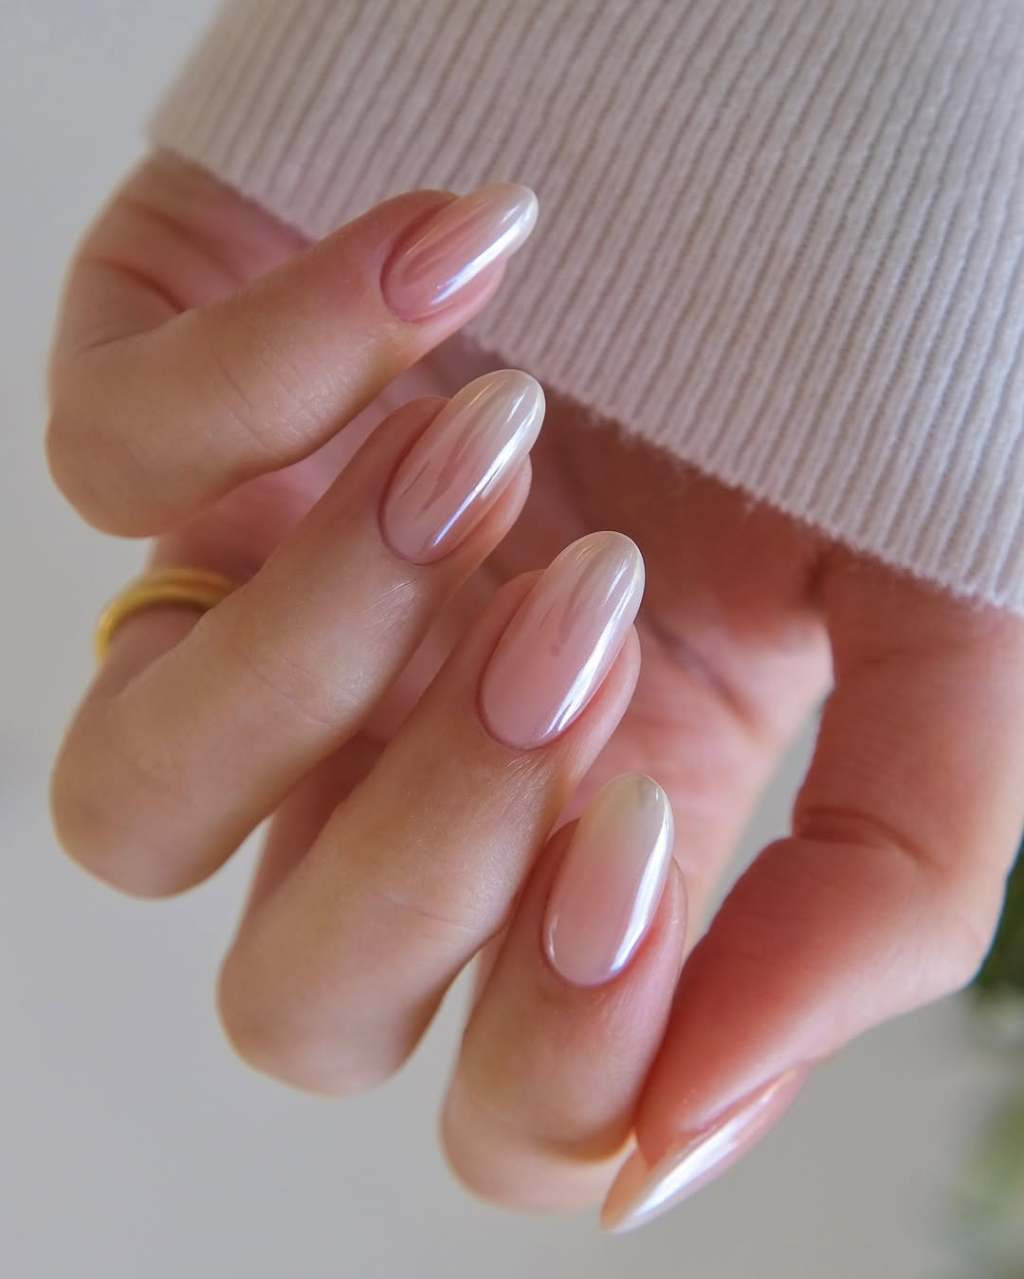
Are you the bride who wants her nails to glow without shouting? Then pale pink pearlescent shimmer nails are your answer. The iridescent undertone catches light differently in every photo, shifting from soft blush to almost silver. On medium oval nails, the effect is elegant without being fussy. This is a salon finish, the pearlescent pigment needs even layering or it streaks. Wear time is about ten days before the shimmer starts to look dusty at the tips. For a wedding weekend, that is perfect. The pale pink reads universally flattering, warm on golden skin, cool on porcelain. A clear top coat at day two keeps the glow alive through the reception.
Silver Holographic Mosaic Nails
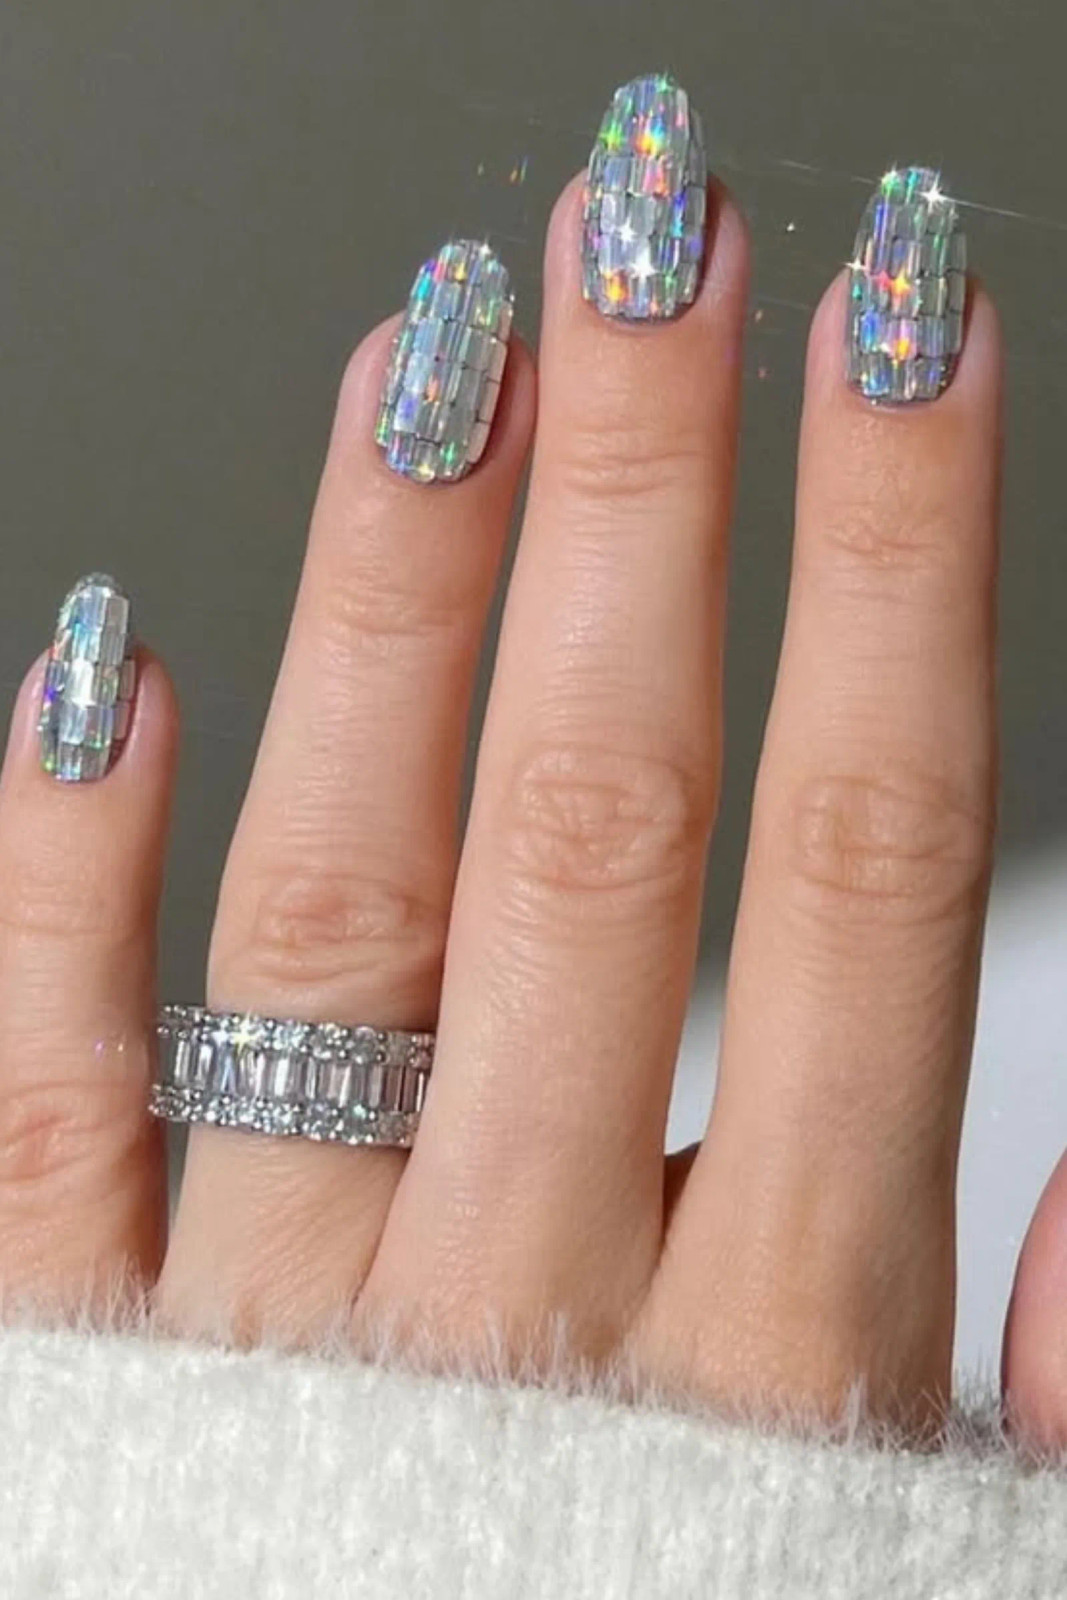
There is a clear difference between a reflective finish that reads as liquid metal and one that looks like a shattered disco ball on your nails. Silver holographic mosaic nails on short square shapes lean hard into the latter, with tiny rectangular pieces covering the entire surface. The result is a fragmented, high-impact mirror effect that catches every light source in the room. This is not a DIY project unless you have the patience of a saint and a UV lamp with a timer. A skilled tech will place each piece individually, and any misalignment shows immediately. Book the appointment, bring a photo, and let them handle the precision work.
Long Stiletto Champagne French with Silver Foil
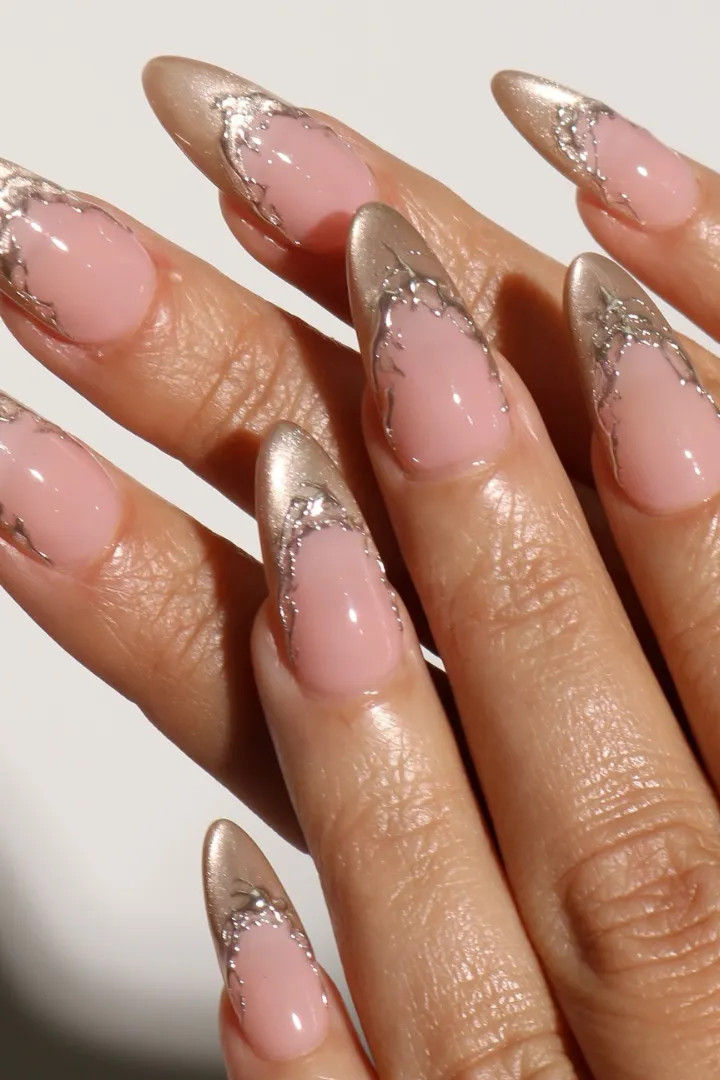
I will admit I was skeptical about foil on a french tip. It sounds delicate, like something that would crease the second you reached for your keys. But champagne french nails with silver foil on long stilettos have a specific appeal: the sheer pink base keeps it soft, while the metallic tips catch the light without overwhelming the shape.
Here is the honest part. Foil can lift at the edges by day three, especially on a long length where the tip takes the most impact. The key is a thin layer of no-wipe top coat sealed over each piece, not one thick gloopy layer that pools at the cuticle. Expect a week of clean wear if you baby them, and plan for a fill or removal by day ten. The payoff is a set that photographs like liquid champagne, but it asks for careful handling in return.
Final Thoughts
After writing all of these, I noticed something: the designs I was most skeptical about, the marbled stiletto and the tortoiseshell, were the ones I couldn’t stop thinking about. They’re not just for photos, they’re for the three weeks after. I’m booking the champagne French with silver foil next, because it’s the only one that made me laugh out loud when I saw it on my own nails.
- Cuticle oil morning and night
- Top coat refresh on day 7
- Wear gloves for dishes and cleaning
- Book a fill at week 3, not week 4
That’s the one. That’s the whole list.

