
Looking for a fresh way to make your manicure feel more personal and eye-catching? Creative nail art can turn even a simple set of nails into a small piece of art, whether you prefer delicate details, unexpected color combinations, or bold accents. I love seeing how a few thoughtful elements can completely change the mood of a manicure without making it feel overly complicated. From playful patterns to elegant artistic touches, there are endless ways to experiment and find a design that feels like you. Which nail art ideas would you actually wear, and which ones would inspire you to try something completely new? In this collection, I’m sharing creative nail art ideas and inspiration that can help you discover your next favorite manicure.
Cherry Wine Nails With Hand-Painted Marble Accents
I love the contrast between rich burgundy and soft white in this manicure. The nails have a short-to-medium square shape with gently rounded corners, while most of the surface is covered in a glossy, dark cherry-wine shade. Two accent nails interrupt the solid color with milky white and burgundy marbling, plus delicate grayish-white strokes that give the design a fluid, almost painted quality. It feels polished without being predictable, which is exactly the balance I look for when choosing creative nail art.
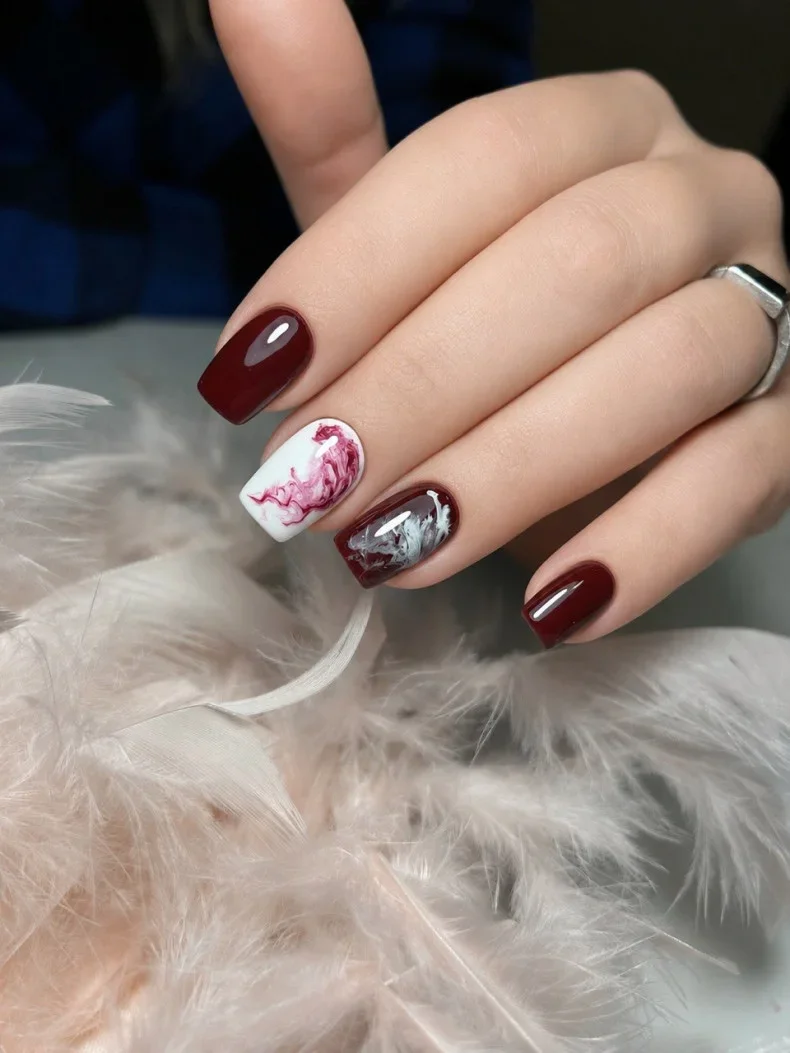
For the base, I would reach for a deep burgundy gel polish with a cool red undertone and a high-shine top coat. The accent nails need an opaque white or milky-white base, plus a burgundy art color and a fine liner shade in white, gray, or a slightly softened silver. A detail brush makes the biggest difference here because the marbled lines need to stay delicate rather than becoming thick blocks of color.
I would start by shaping the nails evenly, applying the base color, and curing each layer before moving to the art. On the accent nails, I would paint the white foundation first and let it cure completely. Then I would place tiny irregular touches of burgundy and pull them gently with a fine brush while the design is still workable, creating those soft, wandering marble lines. A glossy top coat brings the whole manicure together and makes the darker shade look especially rich.
This is one of those designs I would happily wear for a dinner date, an evening event, or even a simple white-shirt-and-jeans outfit. The burgundy gives the manicure depth, while the marble accents keep it from feeling too serious. I also like that the pattern does not need to be perfectly symmetrical. In nail art, a little imperfection can be what makes a hand-painted detail look genuinely artistic.
Milky White Almond Nails With Green Botanical Lines
For a completely different mood, I would go for these elongated almond nails with a translucent milky-white foundation and vivid green botanical line work. The green details sweep along the edges and tips rather than covering the entire nail, leaving plenty of negative space between the designs. That balance keeps the manicure fresh and airy even though the nails themselves are quite long. It has that crisp summer feeling that works beautifully with linen, white cotton, and simple gold jewelry.
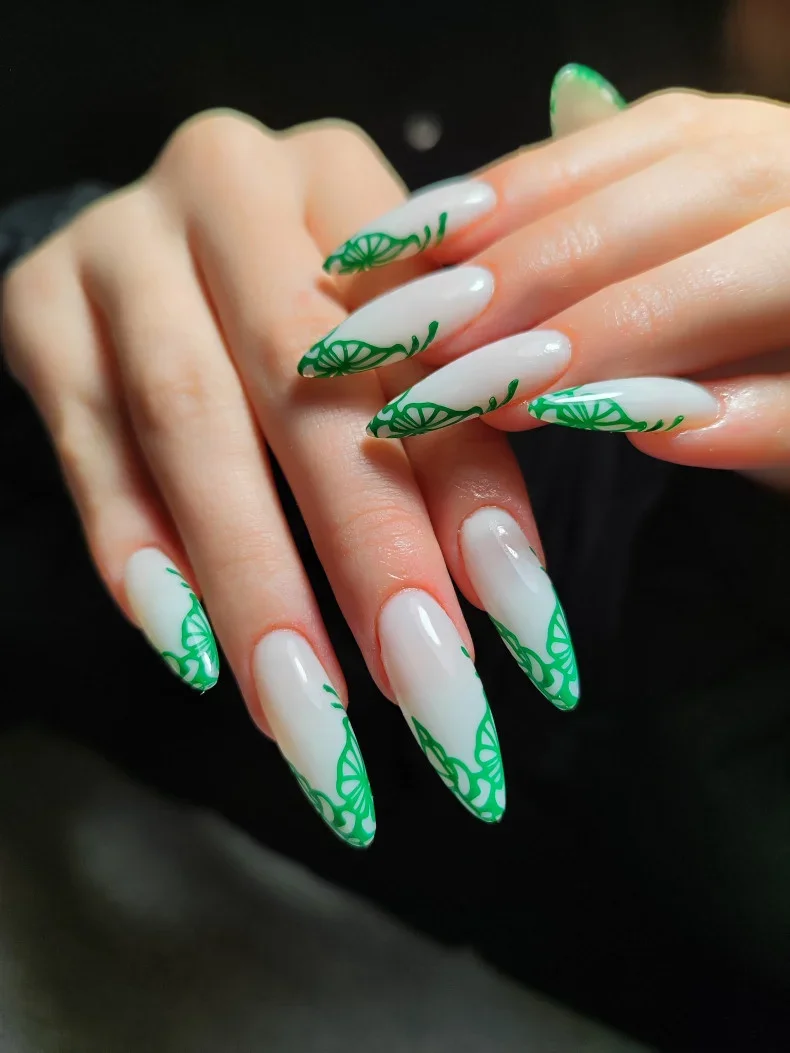
I would use a sheer white or milky gel polish for the base and a saturated green gel paint for the botanical details. A very fine liner brush is essential for creating the narrow stems, curved leaves, and decorative flourishes. I would also keep a glossy top coat nearby because the smooth finish helps the green artwork look especially clean against the pale base.
After preparing and shaping the nails into a consistent almond silhouette, I would build the milky-white base in thin layers. Once cured, I would sketch the green curves from the side of the nail toward the tip, adding small leaf-like shapes along the lines. I prefer building the pattern gradually rather than trying to paint the entire motif in one movement. That makes it easier to keep the spacing elegant and prevents the artwork from becoming visually crowded.
I find this style especially tempting for summer because it feels decorative without looking heavy. If I were heading on vacation, I would absolutely put this one on my shortlist. The green can also be changed to cobalt, coral, or even a softer sage depending on the clothes and accessories I plan to wear.
Blush Pink Nails With Tiny Black And Gold Details
Sometimes creative nail art does not need a complicated base. Here, the manicure keeps almost every nail in a glossy blush-pink nude, creating a soft and clean foundation. A couple of accent nails feature tiny black leaf-like shapes with touches of gold, adding just enough contrast to make the manicure interesting. I especially like the short, rounded-square shape because it makes the design feel practical and easy to wear every day.
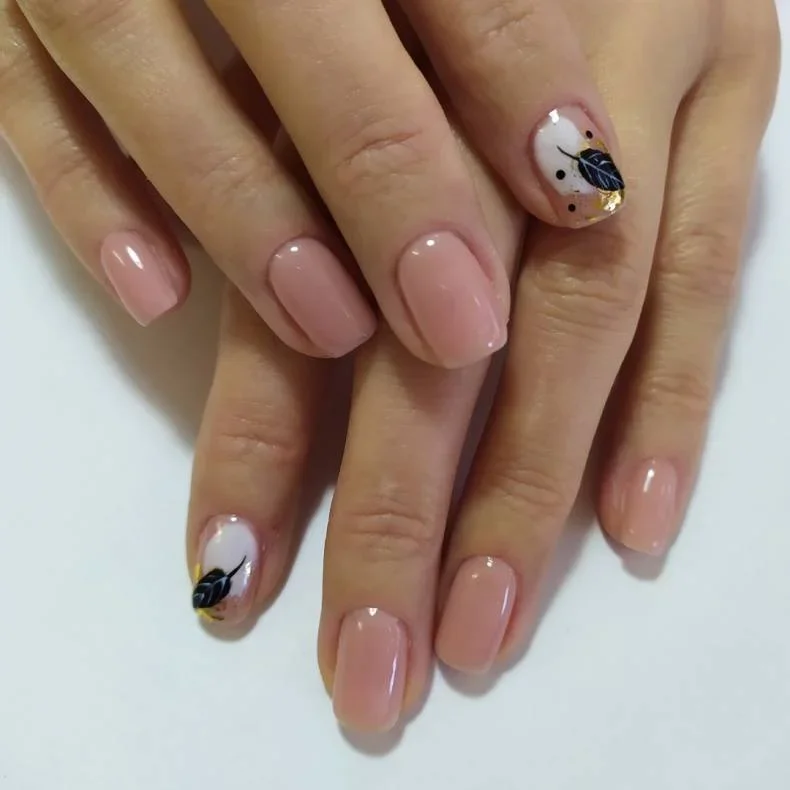
For this version, I would choose a pink-nude gel polish that closely complements the natural nail tone, along with black gel paint and a metallic gold detail polish or foil. I would use a fine detailing brush for the black motif and a small precision tool for the gold accents. The goal is not to create a large illustration but to make the decorative element look intentionally tiny.
I would apply two thin layers of the blush base, curing between them, and then place the black accent design toward the side or upper portion of the selected nails. I would add the gold detail sparingly so it acts almost like a tiny glint rather than the main attraction. Once everything is cured, I would seal the design with a glossy top coat, taking care not to flood the cuticle area.
This is probably the easiest style in the collection for me to imagine wearing on repeat. It has enough personality to feel special but remains neutral enough for work, weekends, and last-minute plans. If I wanted to dip my toes into nail art without committing to a full set of elaborate designs, this would be a very safe place to start.
Glossy Pink Almond Nails With Black Graphic Accents
Soft pink gets a much bolder personality here. The almond-shaped nails are coated in a glossy pink shade, while selected nails feature black-and-white graphic artwork with touches of red and metallic-looking detail. The contrast is striking because the majority of the nails remain simple. I like that visual trick: let several nails breathe, then make the accent nails do the talking.
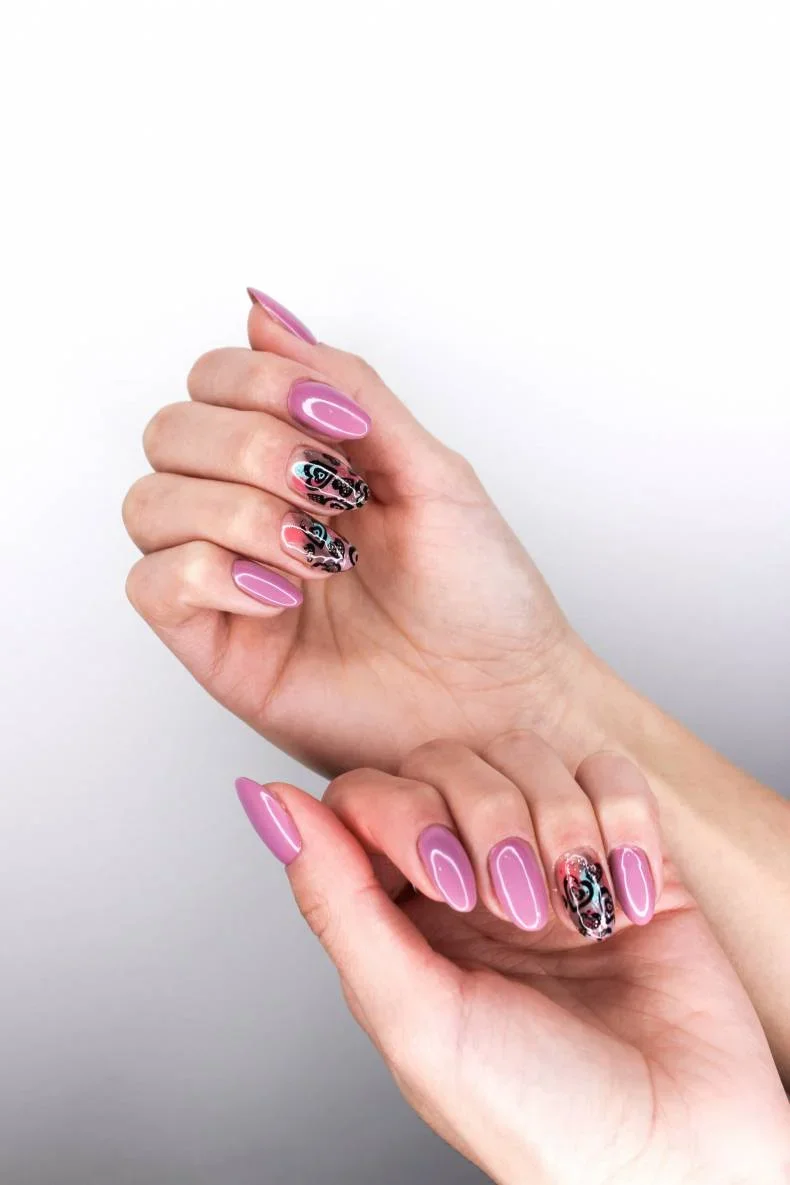
I would choose a medium pink gel polish with a slightly cool undertone, a crisp black art gel, white detailing color, and a small amount of red or metallic accent pigment. Because the graphic artwork is intricate, I would work with an ultra-fine brush and a dotting tool. A smooth glossy top coat is important because it gives the pink base that glassy finish and helps the artwork look more dimensional.
I would begin with the pink base and cure it thoroughly before starting the accent nails. For the artwork, I would build the black shapes first, then add white details and tiny touches of red where needed. I would resist the temptation to copy every tiny element perfectly. With this type of design, keeping the composition balanced is more important than making every line identical.
Personally, I would save this manicure for a moment when I wanted my nails to become part of the outfit. A simple black top, denim, and silver or chrome accessories would let the artwork stand out beautifully. It has a playful edge, but the pink keeps the overall effect feminine rather than overly harsh.
Black And White Statement Nails With Golden Graphic Art
Black polish immediately changes the energy of a manicure, and this combination makes that clear. Several short, rounded nails are covered in glossy black, while the accent nails use a pale base decorated with black outlines, tiny dots, yellow-gold elements, and abstract graphic shapes. I like the almost poster-like quality of the accent nails because the design feels playful rather than delicate.
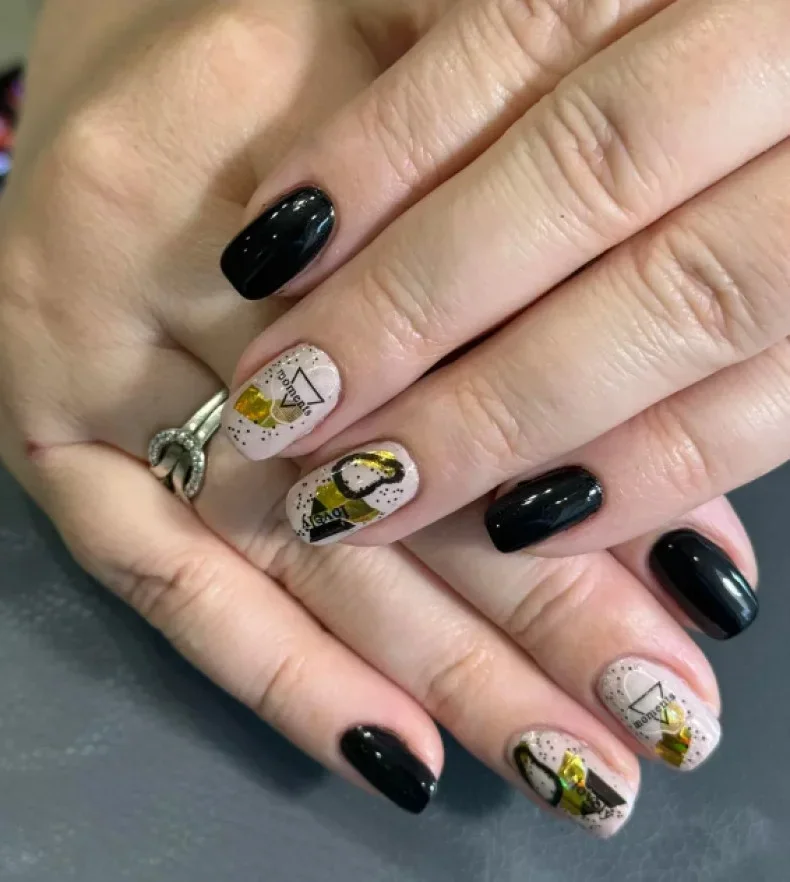
I would use a highly pigmented black gel polish, a soft ivory or pale nude for the accent nails, and small amounts of mustard yellow or metallic gold. Black and white art gel would create the outlines and dots, while a fine brush would help keep the graphic elements crisp. Because the base colors are so contrasting, I would make sure each layer is fully cured before adding the next detail.
I would paint the black nails first and then create the pale accent bases. Once those are cured, I would sketch the abstract shapes with black and add the yellow elements selectively. Tiny dots can be placed around the larger shapes to give the composition more rhythm. Finally, I would finish everything with a glossy top coat for that smooth, reflective surface.
I think this is a great reminder that short nails can carry serious personality. I would choose this manicure when I wanted something energetic but still easy to wear. The black base also makes it surprisingly versatile; it can work with denim, tailoring, monochrome outfits, or even a colorful summer wardrobe.
Soft Nude French Tips With Playful Cartoon Accents
A barely-there nude base gets a cheerful update with neon-tipped nails and tiny cartoon-inspired details. The almond shape creates a graceful silhouette, while the colored tips appear in lively yellow and turquoise tones. Small black-and-white character details add another layer of fun without taking over the entire manicure. It feels nostalgic in the best possible way.
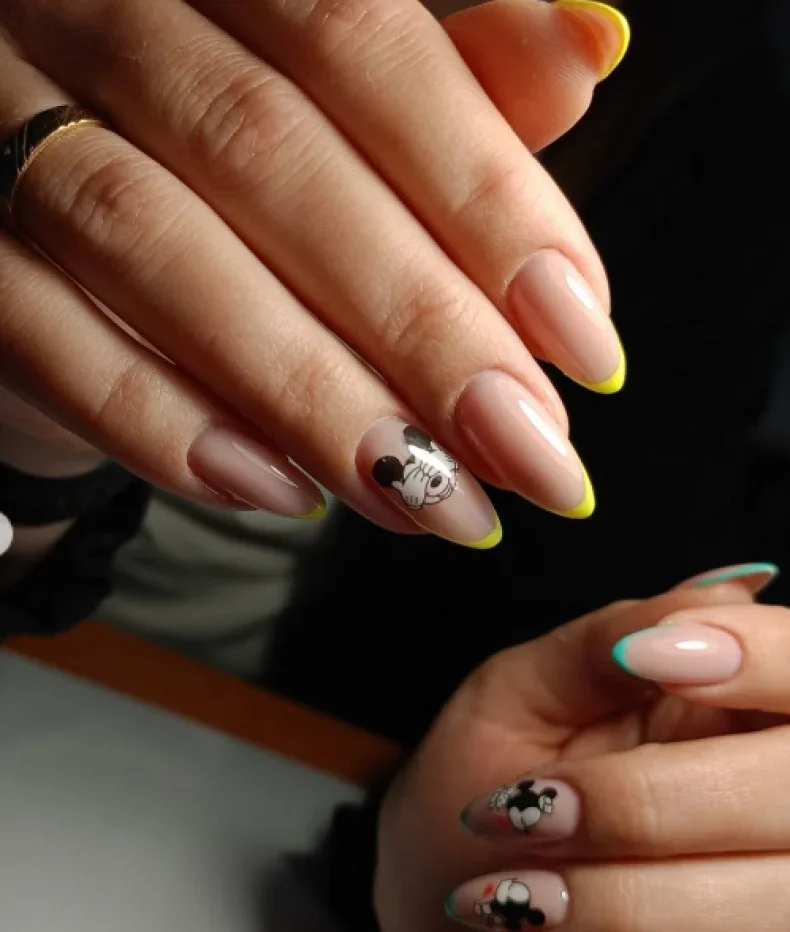
For the base, I would choose a translucent nude or pink-beige gel polish. The tips can be created with bright yellow and turquoise gel colors, while black, white, and a small amount of red are useful for the character details. I would definitely use a fine liner brush because tiny cartoon elements need controlled strokes, especially on a narrow almond nail.
I would apply the nude base first and cure it before creating the colorful French tips. Rather than making the tips perfectly traditional, I would follow the almond shape and keep the color concentrated along the edge. The character details would come afterward, using small dots and short lines instead of trying to paint an oversized illustration. A glossy finish keeps everything looking fresh.
This one makes me smile. I could see it working particularly well for a summer vacation, a concert, or simply a week when I want my manicure to feel less serious. Why should every manicure be elegant in the traditional sense? Sometimes a tiny playful detail is exactly what makes the whole look memorable.
Hot Pink Pop Art Nails With Colorful Swirls
This manicure turns the volume way up with vivid hot pink nails and colorful abstract accent work. The shape is short and softly rounded, which helps balance the intensity of the colors. Selected nails feature a pale base covered with pink, purple, turquoise, black, and white curved shapes, dots, and loops. It has the energy of pop art translated into a manicure.
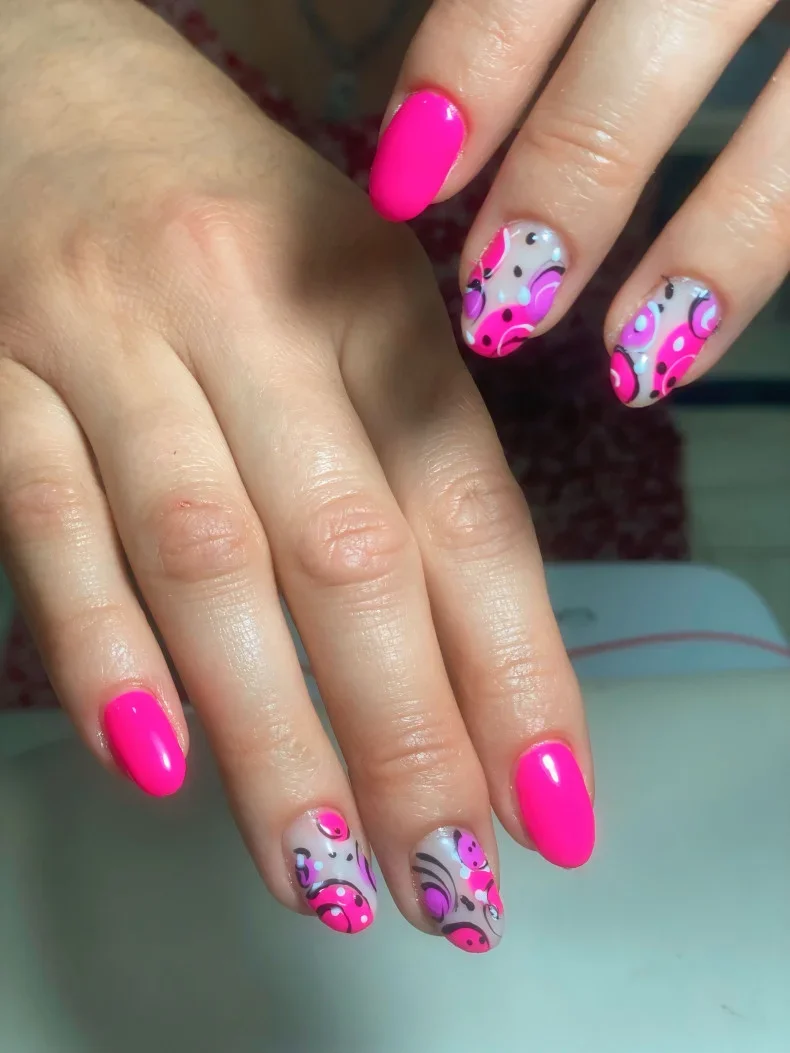
I would use a saturated hot pink gel polish for the solid nails and a soft white or translucent nude for the artwork. The accent palette can include electric pink, purple, turquoise, black, and white, with a dotting tool and fine liner brush doing most of the work. I would keep the finish glossy because these colors look especially lively when they reflect the light.
I would paint the solid pink nails first, then create the pale bases on the accent nails. Once cured, I would layer the colorful shapes one at a time, allowing some colors to overlap while leaving small areas of the base visible. Black dots and curved lines help separate the brighter shades and give the design that unmistakable graphic quality.
I would wear this when I wanted my nails to feel like an accessory rather than an afterthought. It is bold, yes, but the shorter length keeps it approachable. If a full set feels too much, I would borrow the idea and place the pop-art accents on only two nails per hand.
Romantic Stiletto Nails With Script And Heart Details
Here, the manicure leans fully into expressive nail art. Long stiletto nails combine sheer pink, white, black, and deep red, with pointed black French tips and hand-drawn hearts, swirls, stars, and handwritten-style lettering. Each nail contributes something different, so the result feels intentionally collected rather than repetitive. It has a little romance, a little attitude, and plenty of personality.
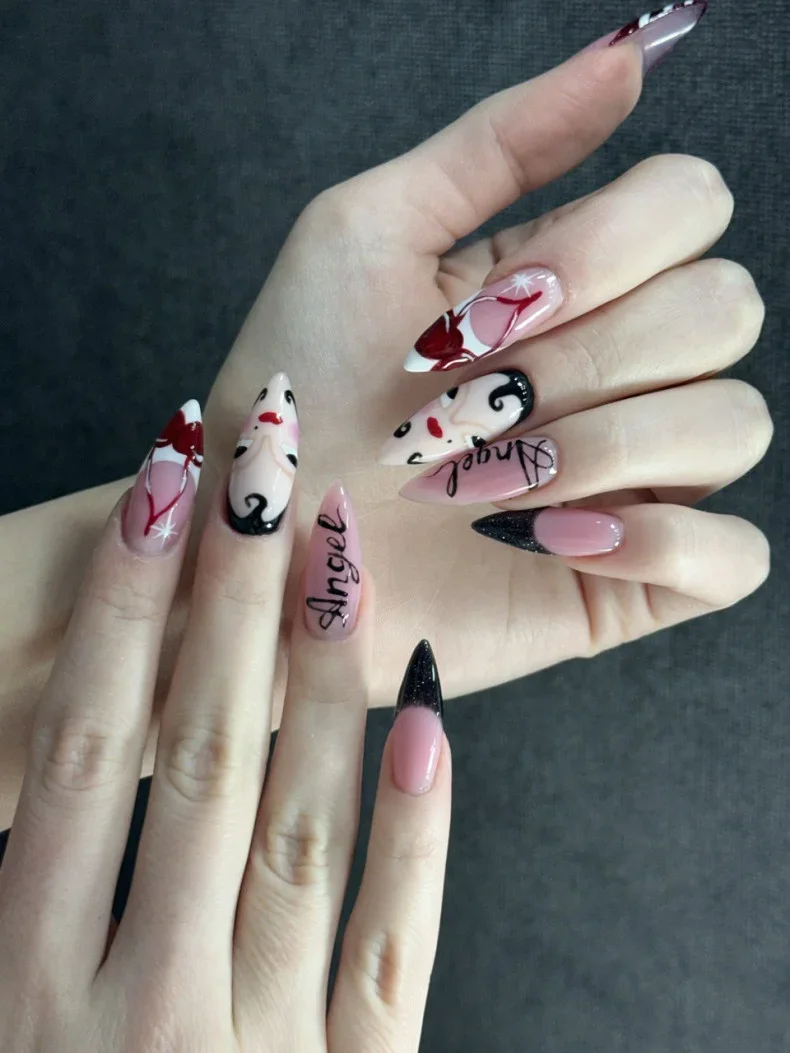
I would start with a sheer blush-pink base and add white gel paint, deep red, and black for the artwork. A highly precise liner brush is essential for the lettering and tiny symbols, while a small dotting tool can help with the miniature decorative elements. For the pointed tips, I would use a dense black gel color that can be applied cleanly along the stiletto edge.
I would shape the nails carefully first because this design depends heavily on consistent, dramatic points. After applying the sheer base, I would create the black French sections and cure them before moving to the hand-painted artwork. I would place the larger motifs first and fill in the tiny hearts, stars, and lines afterward. The lettering should be kept thin so it remains decorative rather than visually heavy.
This is not the manicure I would choose when I need something quiet. And that is precisely why I like it. It would be fantastic for a night out or whenever I am wearing a simple outfit and want one unmistakable statement detail to carry the look.
Lavender Almond Nails With Delicate Metallic Flecks
Lavender becomes unexpectedly sophisticated when paired with tiny metallic accents. The medium-length almond nails are coated in a smooth pastel purple-lilac shade, while small irregular pieces of metallic foil appear near the sidewalls and across selected nails. The decoration is deliberately restrained, so the manicure still feels soft and polished rather than heavily embellished.
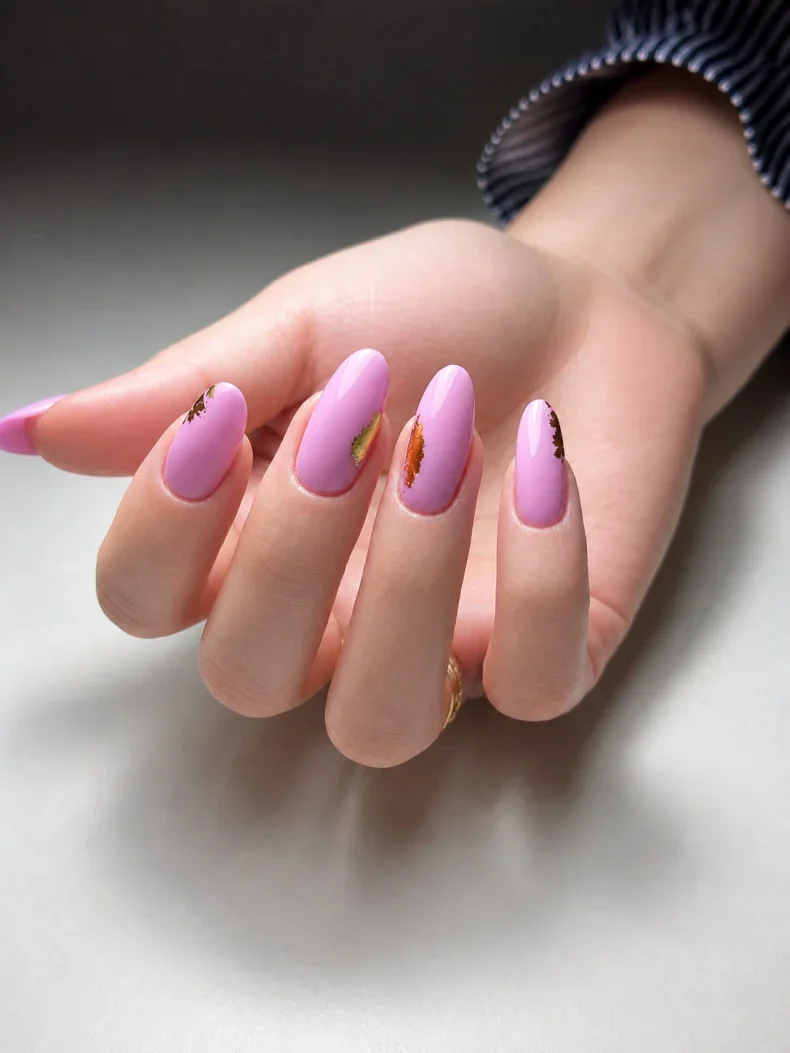
I would choose a creamy lavender gel polish with a glossy finish and use small pieces of gold, bronze, or copper foil for the accents. A clear builder gel or foil adhesive can help secure the metallic pieces, followed by a smooth top coat to lock everything in place. I would keep the foil fragmented rather than using large sheets because the little flashes of metal look more modern.
After applying and curing the lavender base, I would position tiny pieces of foil along the selected nails. I like placing them slightly off-center rather than creating a perfectly repeated pattern. Once the metallic details are secured, I would encapsulate them with a glossy top coat, making sure the surface remains completely smooth.
This is probably my favorite kind of understated creativity. From a distance, the manicure looks like a beautiful pastel set; up close, those tiny metallic flashes suddenly appear. It would be lovely for late summer when softer colors start feeling especially appealing but I still want a little sparkle.
White Stiletto Nails With Minimal Gold And Black Details
The final design goes in a crisp, architectural direction with long stiletto nails covered in an opaque white base. Thin golden lines trace sections of the nails, while black handwritten-style marks and tiny abstract motifs add contrast. The sharp silhouette makes the otherwise simple palette feel much more dramatic, and the result is surprisingly refined.
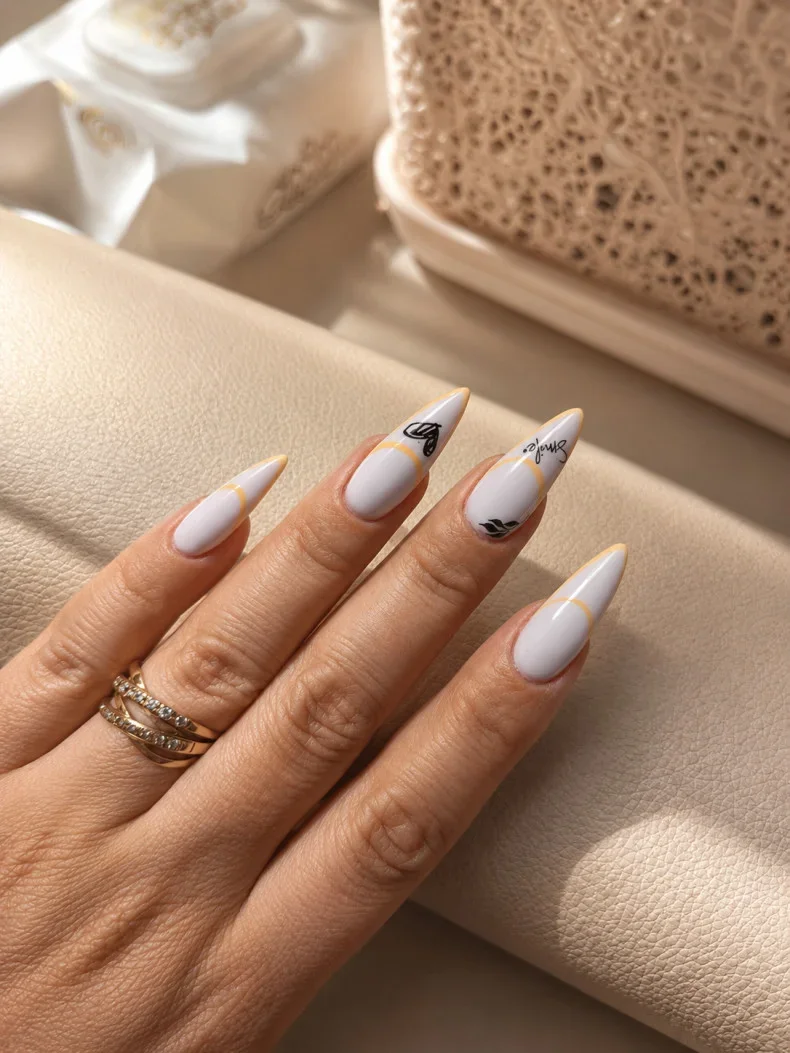
I would use a clean opaque white gel polish, a fine gold art gel or metallic polish, and black gel paint for the tiny lettering and symbols. Because the white background shows every mistake, I would take extra care with the base application and use a very thin detailing brush for the gold lines. A high-gloss top coat would give the finished manicure that smooth, editorial shine.
I would begin with the white foundation and make sure it is perfectly even before adding anything decorative. Then I would draw the narrow gold curves and accents, allowing them to follow the shape of each nail rather than forcing identical lines across the set. Black details come last, and I would keep them intentionally small so the white space remains part of the design.
I like how this manicure proves that creative does not always mean colorful. Sometimes a restricted palette creates the strongest effect. If I were wearing a neutral summer outfit with gold jewelry, these nails would add just enough graphic detail to make the whole look feel considered without competing with the clothes.
Fresh Green Nails With Graphic Dot Details
I love how this manicure takes a strong chartreuse green and makes it surprisingly wearable with a soft matte finish. The nails have a neat medium-length shape with gently rounded corners, while tiny black dots create different graphic arrangements across several nails. Some dots curve along the upper edge, others form compact vertical clusters, so the design feels coordinated without looking perfectly repetitive. That little difference between each accent is what gives the manicure its personality.
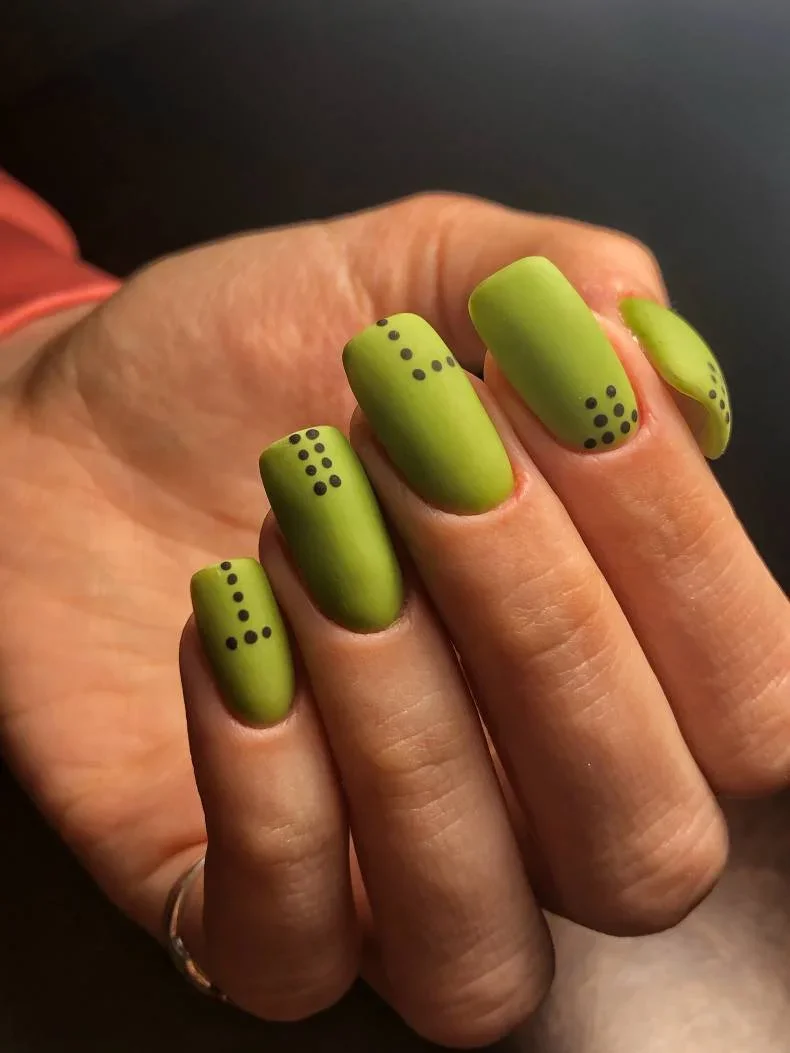
For this look, I would start with a chartreuse or yellow-green gel polish and a true matte top coat. A deep black gel paint is enough for the dot details, and I would keep a dotting tool nearby in two sizes to create variation. The base color does most of the talking here, so there is no need to pile on extra decoration. A carefully shaped nail and an even color layer make the finished manicure look much more polished.
At home, I would prep the nails carefully, shape them evenly, and apply the green base in two thin coats rather than trying to get full coverage in one pass. Once cured, I would use a dotting tool to place the black accents, deliberately changing their position from nail to nail. After everything is cured, a matte top coat softens the intensity of the green and gives those tiny black marks a velvety contrast. The trick is restraint: too many dots would completely change the effect.
This is the kind of manicure I would choose when I want color but do not want traditional florals or glitter. The green feels energetic, while the black details keep it slightly graphic and cool. It would be especially fun during late summer when I am ready to move beyond pale seasonal shades but am not quite in the mood for deep autumn colors yet.
Sunny White Nails With Tiny Yellow Florals
There is something instantly cheerful about a milky white manicure decorated with miniature yellow flowers and delicate black leaves. I like the combination because the white base keeps everything crisp, while the yellow centers add just enough warmth. The flowers are placed selectively rather than covering every nail, creating little moments of detail against an otherwise clean manicure. The soft oval shape also helps the design feel feminine without becoming overly sweet.
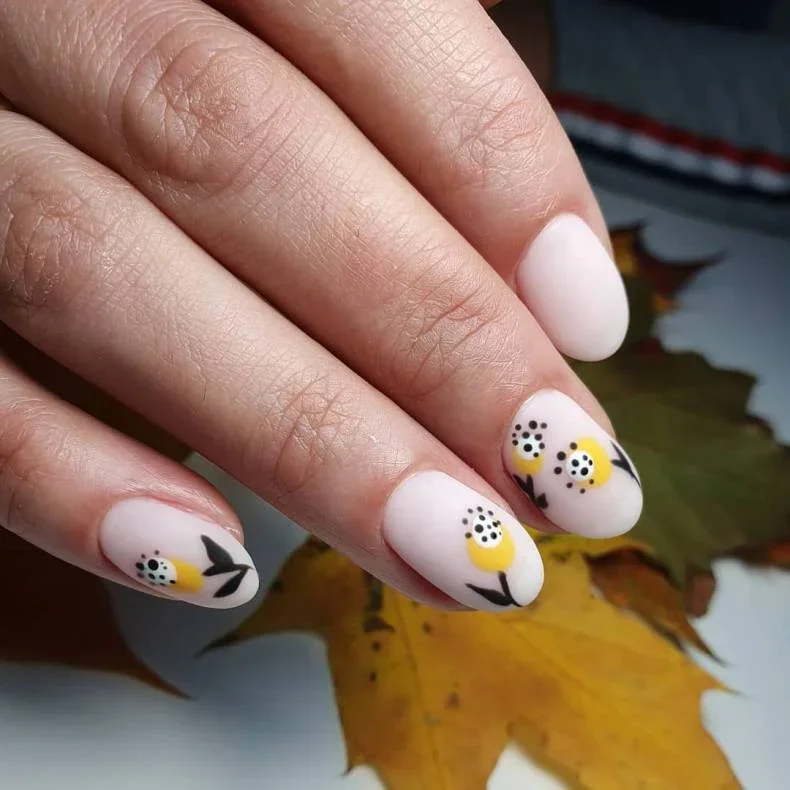
I would use a creamy white or milky gel polish as the foundation, a sunny yellow for the flower centers, black for the fine leaf and dot details, and a fine liner brush for the artwork. A small dotting tool would make the tiny flower centers much easier to control. For the finish, I would choose a glossy top coat because the shine makes the white base look fresh and helps the yellow details pop.
The easiest way to recreate this style is to begin with two thin coats of white, curing each layer properly. I would then add small yellow rounded shapes where the flowers should sit and surround them with tiny black dots. The leaf shapes can be painted with a fine brush using short, confident strokes. I would finish with top coat applied carefully around the artwork so the details remain crisp rather than becoming blurred under a thick layer.
I keep coming back to this type of manicure because it works for almost any casual summer plan. A white base feels clean in hot weather, while the little yellow flowers give it that happy weekend energy. It is also a great choice when I want nail art that looks special up close but still blends easily with everyday clothes.
Sheer Pink Nails With Delicate Red Botanical Accents
This design has a much softer starting point: translucent pink and white tones create a barely-there base, while red botanical shapes bring in a more artistic element. I especially like the thin red and black lines crossing parts of the nails because they create movement instead of sitting like isolated stickers. The almond shape adds elegance, and the combination of sheer color with tiny painted details keeps the manicure light.
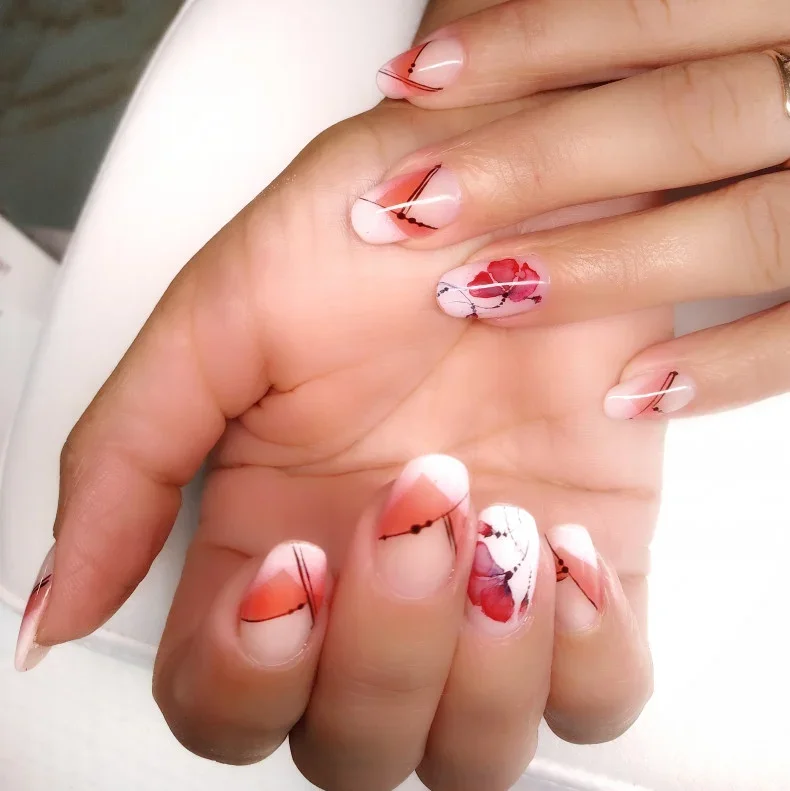
I would reach for a sheer blush gel, a soft white gel for the subtle French-style areas, and rich red and black gel paints for the decorative work. A very fine liner brush is essential for the narrow lines, while a small detail brush can create the red petals. A high-shine top coat would finish the look beautifully without hiding the transparency of the base.
I would build the manicure slowly, starting with a sheer pink layer and adding delicate white areas where needed. After curing, I would sketch the fine lines first because they establish the placement of the larger red accents. The botanical details can then be added with small amounts of red pigment, keeping the edges slightly organic rather than perfectly geometric. I would avoid making every nail identical; the charm comes from the loose, hand-drawn feeling.
For me, this is a perfect example of creative nail art that does not need a loud base color. I could easily wear it to dinner, a summer event, or even with a simple white outfit when I want one unexpected detail. There is something almost sketchbook-like about the finished result, and that makes it feel personal rather than overly polished.
Minimal Nude Nails With Continuous Line Faces
Minimal nail art can still have a point of view, and this nude manicure proves it. Most of the nails are coated in a glossy peachy nude, while selected accents feature simple black continuous-line faces. The artwork is deliberately sparse, with curved lines suggesting facial profiles rather than attempting to create detailed portraits. I like the contrast between the soft, natural-looking base and the expressive black drawing.
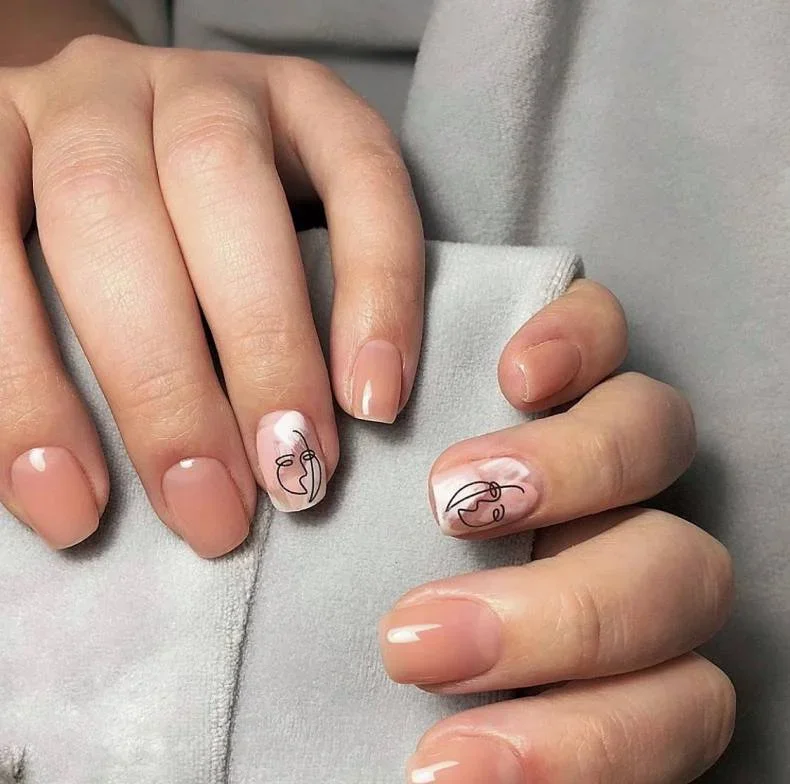
For this manicure, I would choose a translucent peach-nude or blush gel polish, a highly pigmented black gel liner, and a very fine detail brush. The design does not need multiple colors, rhinestones, or additional texture. In fact, keeping the palette this restrained is what makes the line art feel modern.
After preparing and shaping the nails, I would apply the nude base in thin coats and cure it completely. Then I would lightly map out the face with the liner brush before committing to the final line. The best approach is to keep the brush moving smoothly instead of stopping repeatedly, because continuous-line artwork looks more natural when the curves have a confident flow. A glossy top coat brings everything together.
I would choose this manicure when I want something artistic but still understated. It feels especially good for those days when I am bored with plain nude nails but do not want a complicated design on every finger. The tiny faces almost become a conversation starter, which is exactly what I want from creative nail art.
White Nails With Gold, Black, and Botanical Geometry
Here, a clean white base becomes the backdrop for a much more structured design. Thin gold bands and black geometric lines divide selected nails into graphic sections, while a small black botanical accent softens the geometry. The remaining nails stay mostly white, which gives the decorated fingers room to breathe. The oval shape keeps the composition elegant even though the details have a distinctly modern edge.
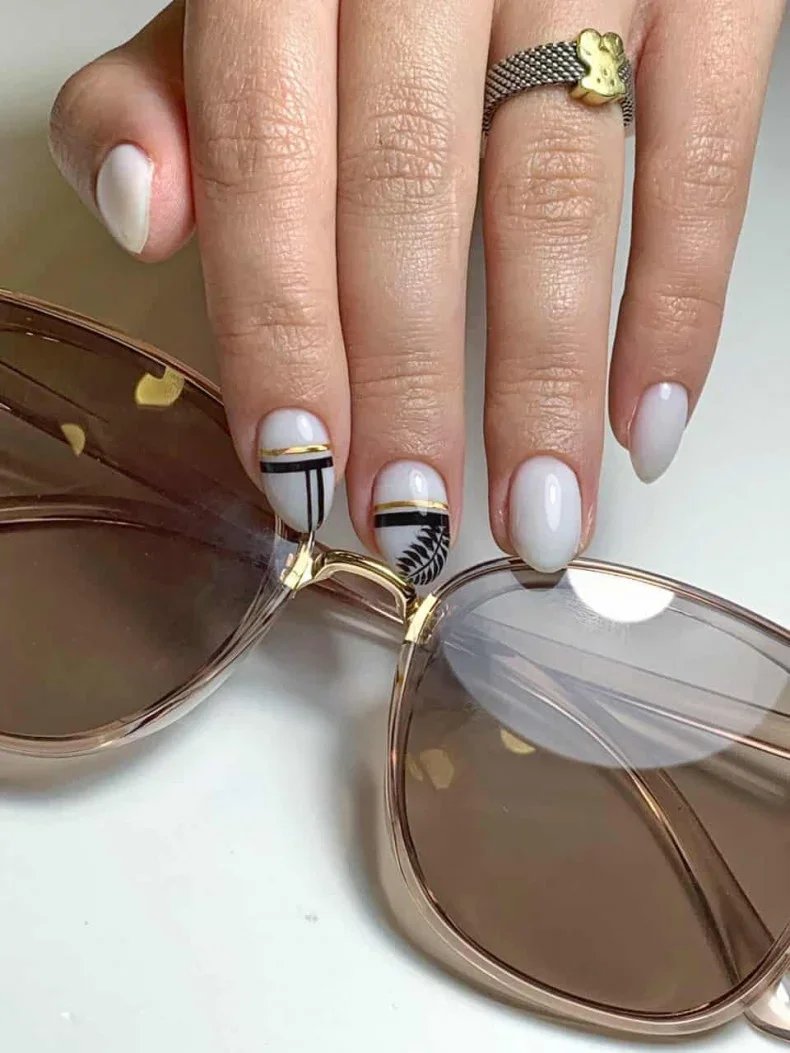
I would use a cool white gel polish, metallic gold striping gel or fine gold foil, and black gel paint for the lines and botanical detail. A thin liner brush would be the main tool, although striping tape can help create exceptionally straight bands. I would keep the finish glossy so the gold catches the light and adds another layer of dimension.
I would first create the white base and make sure it is completely smooth before adding the graphic details. The gold line should be placed carefully because uneven spacing will be noticeable against such a clean background. Once the gold is secured, I would add the black horizontal and vertical elements, followed by the small botanical illustration. The key is to let each line remain crisp and give every section enough visual space.
This manicure feels like a good bridge between classic and creative. I could see myself wearing it with gold jewelry, a crisp blouse, or even a simple neutral outfit where the nails become the most interesting detail. Sometimes a few precise lines do more than a whole collection of embellishments.
Glossy Red Nails With a Cozy Graphic Accent
Classic red gets a playful update here with a glossy, compact shape and a single decorated accent nail. The majority of the nails are coated in a rich, saturated red, creating that instantly recognizable manicure effect. One nail introduces a contrasting dark red and white graphic pattern that resembles a tiny textile-inspired print. The result feels festive without losing the confidence of a traditional red manicure.
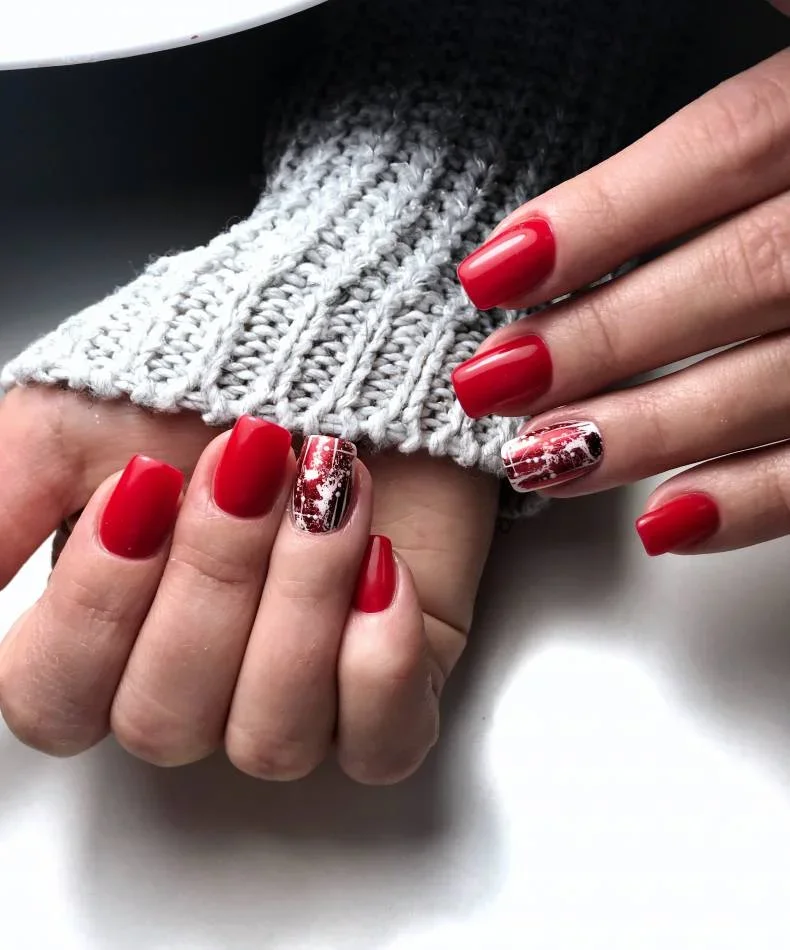
I would choose a deep classic red gel polish with a high-gloss finish, plus burgundy, white, and possibly a muted neutral for the accent artwork. A fine brush would help create the small lines and irregular pattern, while a glossy top coat would keep the red looking glassy. The accent should remain relatively small so the manicure does not become visually crowded.
I would apply the red shade evenly across the nails, leaving one or two accent nails for the artwork. Once the base is cured, I would build the accent pattern with thin horizontal and vertical lines, adding small irregular marks to make it resemble a textile rather than a perfect grid. The final top coat should be smooth enough to protect the design without creating unnecessary thickness.
I love this idea for the moment when the seasons begin to turn and I want a richer color on my nails. Red always has presence, but the single patterned nail makes it feel much more considered. It is also one of the easiest ways to experiment with nail art if I usually stick to one-color manicures.
Black and White Almond Nails With Playful Hand-Drawn Art
This manicure goes in a completely different direction, pairing black and white bases with intricate hand-drawn illustrations. The long almond-to-stiletto shape gives the artwork plenty of space, while the monochrome palette keeps the many details from becoming chaotic. Crowns, cartoon-like symbols, abstract marks, and expressive line drawings appear across the nails, creating an almost sketchbook effect.
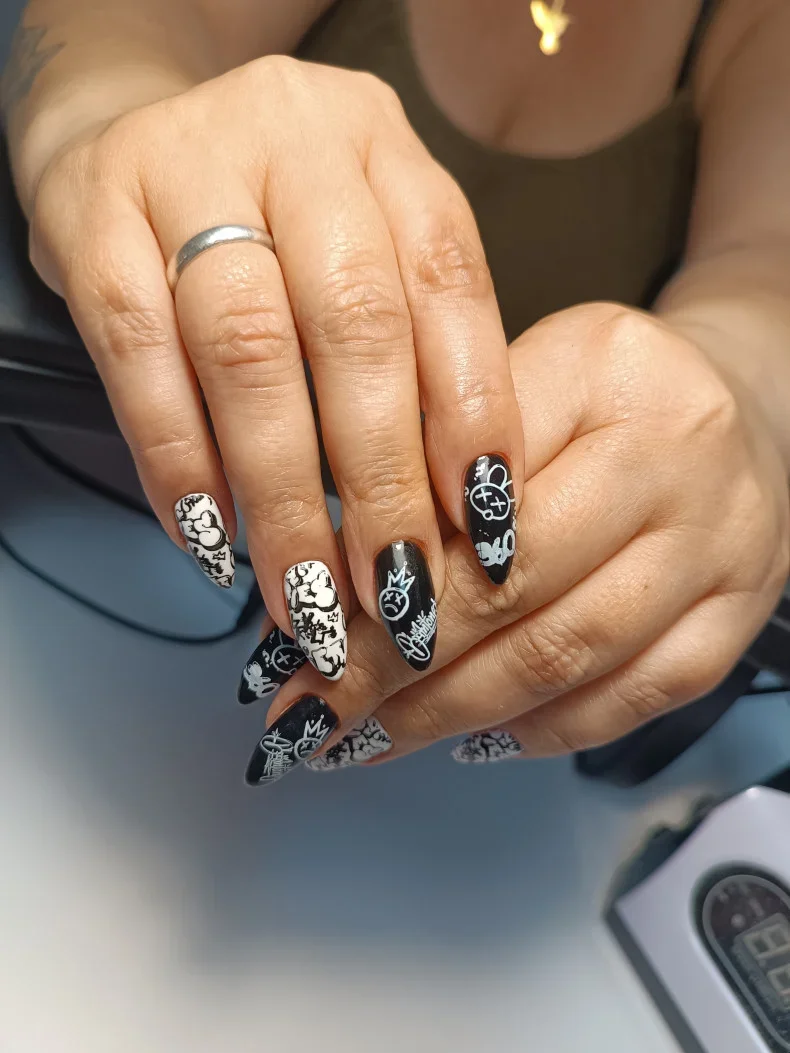
I would use a dense black gel polish, a crisp white gel polish, and several shades of white and black gel paint for the illustrations. Fine liner brushes in different widths would be useful because some designs require delicate outlines while others need slightly bolder strokes. I would also use a glossy top coat to intensify the black and create a clean contrast with the white.
For an at-home version, I would simplify the artwork rather than attempting every tiny illustration at once. After creating the black and white base, I would choose two or three symbols that can be repeated in different ways. Fine lines should be applied in very small sections and cured as needed to prevent accidental smudging. The long almond shape provides the perfect canvas, but precision matters more than speed.
This is definitely the manicure I would pick when I want my nails to have an attitude. It feels playful, rebellious, and highly personal without relying on a complicated color palette. If I were wearing a simple black outfit, these nails could easily become the statement piece.
White Almond Nails With Elegant Figure Line Art
The long white nails here are transformed into miniature canvases for delicate black figure drawings. Each illustration uses only a few flowing lines to suggest the human form, while another accent introduces a more detailed botanical-style motif. The simplicity of the palette is important because it allows every curve of the artwork to remain visible. The elongated almond shape also makes the figures look especially graceful.
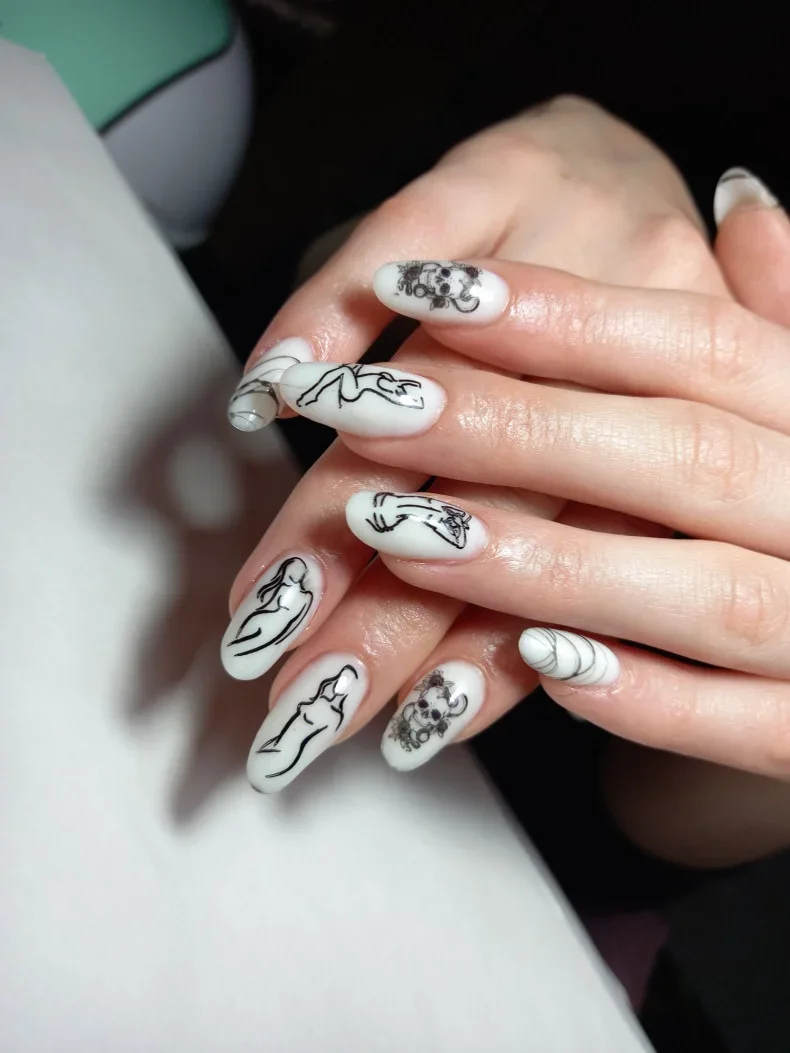
I would start with a soft opaque white gel polish and a highly pigmented black liner gel. For the finer illustrations, I would use an ultra-thin nail art brush and keep a detail brush available for slightly thicker sections. A glossy finish would work beautifully, although a satin top coat could create an interesting editorial variation.
I would apply the white base carefully and cure it before beginning the artwork. Rather than drawing an entire figure in one attempt, I would divide the design into flowing sections, allowing the curves to connect naturally. A steady hand helps, but I have found that taking a breath and slowing down makes a bigger difference than trying to rush through fine-line art. The final top coat should be applied with a light touch.
There is something very fashion-editorial about this design. I like that it references art without looking like a literal illustration pasted onto the nail. It would be particularly striking for an evening event, but the monochrome palette also makes it surprisingly versatile.
Milky White Nails With Fine Black Illustration
A milky white base gives this manicure a soft, almost porcelain-like appearance, while delicate black illustrations add an artistic finish. The long coffin shape provides a generous surface for the fine details, and each accent nail appears to tell a slightly different visual story. Because the drawings remain monochrome, the overall manicure feels cohesive even with several different motifs.
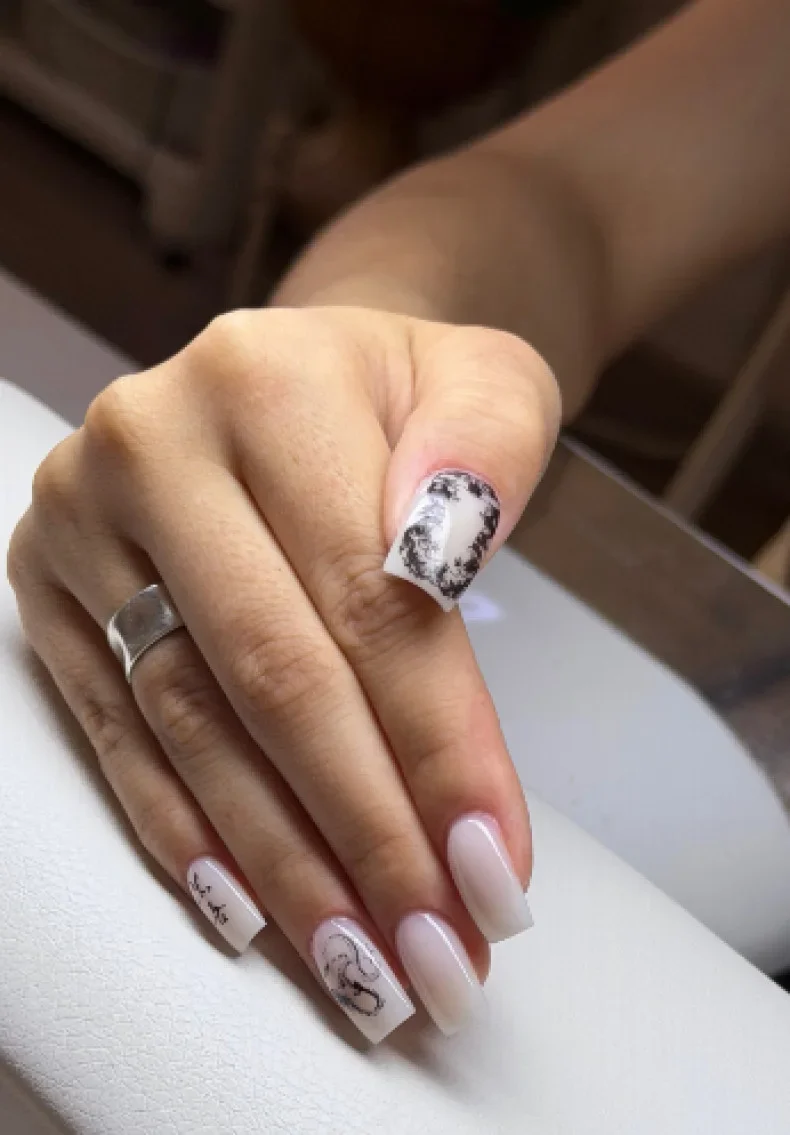
I would use a translucent milky white gel, black liner gel, and an ultra-fine brush designed for miniature nail art. If I wanted extra depth, I could layer the milky base slightly so the nails retain a soft glow instead of becoming completely opaque. A glossy top coat would help protect the delicate drawings and keep the manicure looking freshly finished.
The application begins with a smooth milky base, followed by careful placement of the black line art once the foundation is cured. I would work from the largest curves toward the smaller details and avoid pressing too hard with the brush. For anyone recreating the look at home, simplified motifs can deliver the same effect without requiring professional-level drawing skills.
I find this style especially appealing when I want something sophisticated but not conventional. The white base feels clean and calm, while the black artwork gives the manicure a little mystery. It is proof that creative nails do not always need color to make an impression.
Warm Multicolor Nails for the Seasonal Transition
This manicure brings together warm shades of brown, burnt orange, golden yellow, and deep burgundy across a short-to-medium rounded-square shape. Each nail carries its own color, creating a deliberately mismatched palette that still feels connected because all the shades share a warm undertone. Small handwritten-style black details appear on some of the yellow nails, adding a casual graphic element to the color story. It feels like the moment summer starts giving way to fall.
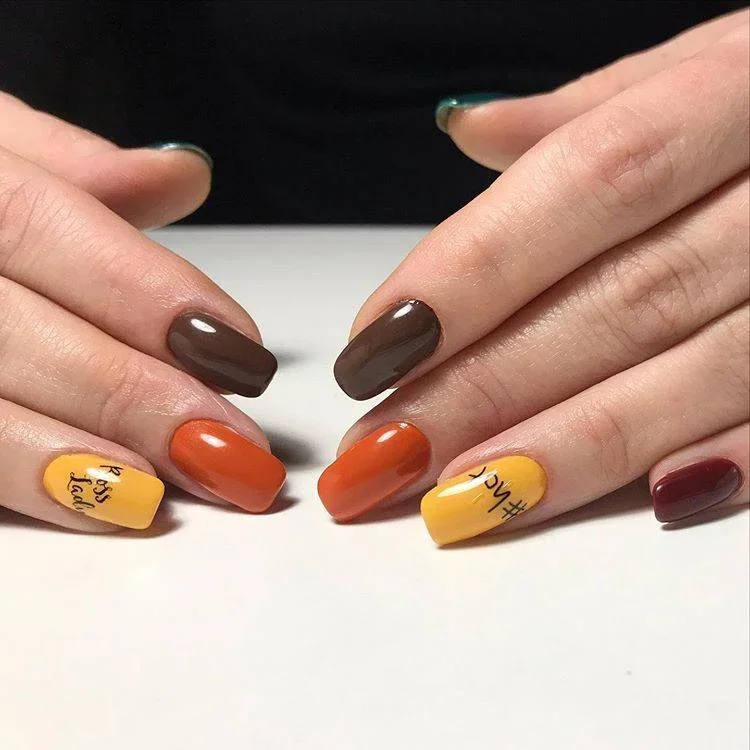
I would choose a glossy chocolate brown, burnt orange, mustard yellow, and deep wine-red gel polish to build the palette. A nude or creamy neutral can be added if the colors need more breathing room. For the tiny lettering, I would use black gel paint and an extremely fine liner brush. The beauty of this manicure is that the colors provide most of the decoration, so the artwork can stay minimal.
I would assign the colors to the nails before painting so the distribution feels balanced. After applying two thin coats of each shade, I would cure them and add the tiny handwritten marks to the selected yellow nails. I would not try to make the lettering perfectly uniform; a slightly hand-drawn quality actually suits the relaxed character of the manicure. A glossy top coat ties all the shades together.
This is the kind of nail art I would save for that in-between season when I am still enjoying brighter days but suddenly craving warmer colors. The combination feels cozy without being heavy, and the mismatched approach makes it easy to personalize. If you have been wearing the same neutral manicure all summer, this could be the little shake-up that makes your next appointment much more exciting.
Black And White Yin-Yang Nail Art With Character
I’m drawn to this manicure because it turns a short, softly rounded nail shape into something much more expressive. The foundation is a clean milky white, with selected nails carrying black-and-white yin-yang motifs that immediately become the focal point. Small black dots add another layer of detail, while hand-painted black characters give the manicure an artistic, almost graphic quality. The contrast is crisp without looking harsh, and the glossy finish keeps everything polished. It is the kind of nail art that feels playful but still surprisingly easy to wear.
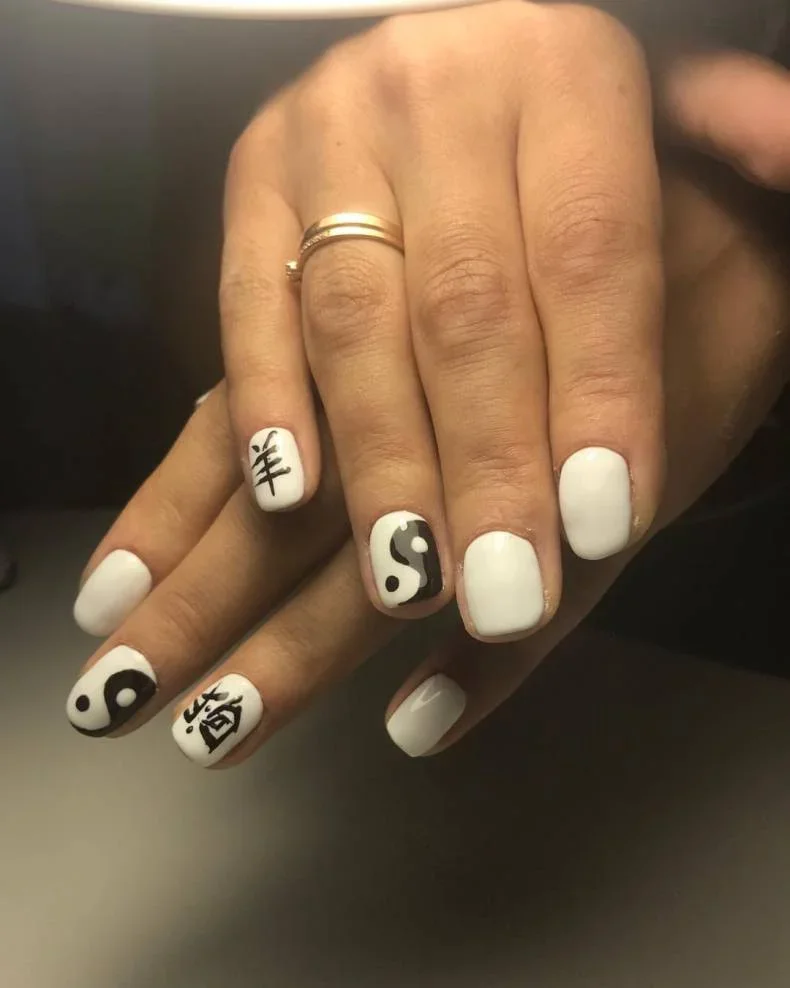
For this look, I would start with a sheer white or soft ivory gel polish such as OPI GelColor Alpine Snow or a comparable milky white shade. A highly pigmented black gel polish is essential for the yin-yang shapes and lettering, and I’d keep a very fine liner brush and dotting tool nearby. A glossy top coat will sharpen the black-and-white contrast and give the finished manicure that smooth salon-like surface. If hand-painted characters feel intimidating, nail art stickers can make the process much easier without changing the overall concept.
I’d first shape the nails into a short rounded-square silhouette and prepare the surface carefully. After the white base has cured, I’d map out the yin-yang design with a tiny brush, working slowly rather than trying to create both curved sections in one movement. The dots can be added with a dotting tool once the main design is secure, while the characters should be painted last so they stay crisp. I always prefer building thin layers here; thick black gel can make small details look bulky. A final glossy top coat pulls everything together.
What I like most is how much personality this manicure has without relying on long extensions. I’ve always thought short nails can carry elaborate ideas beautifully when the artwork is concentrated instead of scattered across every nail. The little symbols make the design feel almost like a collection of tiny charms. Would I wear it for an ordinary summer weekend? Absolutely. It would look especially fun with a simple white tank, black sunglasses, and minimal jewelry.
Sheer Blush Nails With A Tiny Botanical Accent
This manicure takes the opposite approach, and that contrast is exactly why I like it. The nails are kept at a practical medium-short length with a soft rounded shape, while the base has a translucent blush-nude appearance that allows the natural nail to remain part of the design. One accent nail carries a miniature black botanical illustration with a delicate curved stem and small details, creating the feeling of a tiny sketch placed over glass. The rest of the nails stay almost completely understated, with a subtle pearly sheen that catches the light beautifully.
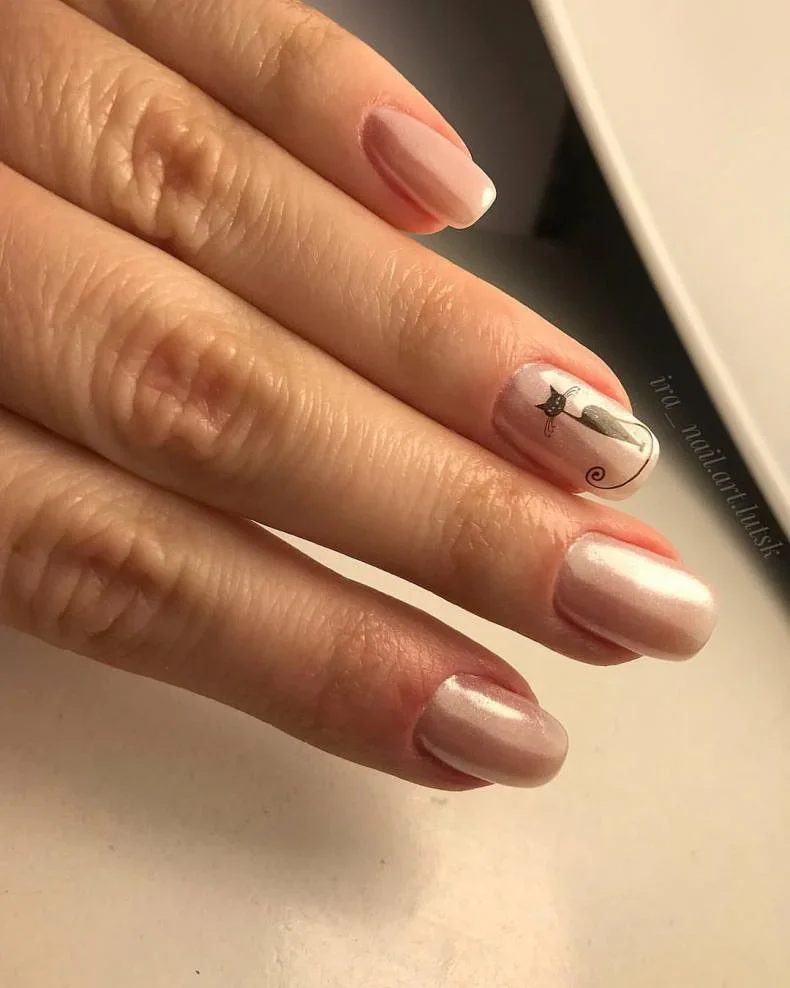
I would reach for a sheer pink-beige gel such as OPI GelColor Bubble Bath or a similar translucent nude, depending on the natural nail tone. For the accent, I’d use an ultra-fine black nail art brush and a strongly pigmented black polish or gel. A soft pearlescent top layer can add the barely-there glow seen across the manicure, although I would avoid anything too glittery. The goal is transparency and refinement, not sparkle overload.
I’d apply one or two very thin coats of the sheer base, curing each layer carefully. Once the surface is smooth, I’d use the liner brush to create the tiny botanical shape with light pressure, keeping the stem intentionally delicate. There is no need for perfect symmetry here; a hand-drawn quality is part of the charm. After the illustration is cured, I’d seal everything with a glossy top coat. If I were doing this at home, I’d rest my painting hand on a flat surface before working on the accent nail because that small bit of stability makes surprisingly good artwork possible.
This is the manicure I’d choose when I want something creative but don’t want my nails to dominate the outfit. It has that quiet little detail that someone notices only after looking twice, which can be much more interesting than a full set of decoration. I could easily see it working for summer dinners, office days, weddings, or a vacation when I want my hands to look polished in every coffee-and-sunglasses moment.
Playful Abstract Nails In White, Blue, Yellow, And Black
Here the mood shifts completely into modern summer territory. I see a soft white base paired with abstract blocks and curved shapes in muted blue, warm yellow, and black, plus tiny black speckles that give the manicure an almost illustrated texture. The nails are longer and more almond-shaped, which gives the curved color sections enough room to breathe. Rather than repeating one exact pattern, each nail gets its own arrangement, yet the limited palette keeps the whole set connected. That mix of individuality and coordination is what makes abstract nail art so addictive.
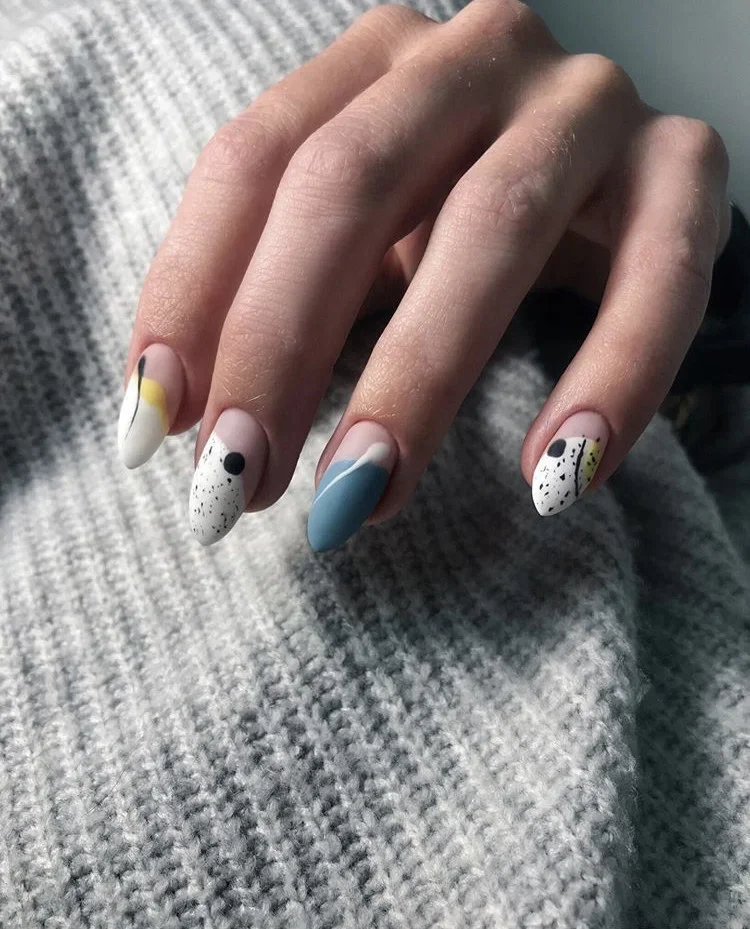
For the palette, I’d choose an opaque white gel, a dusty denim or muted sky-blue shade, a soft mustard yellow, and a deep black. OPI, Essie Gel Couture, and CND all offer shades that can be mixed into a similar palette, although the exact colors matter less than keeping the blue slightly muted and the yellow warm. I’d also use a thin liner brush, a small detail brush, and a matte or glossy top coat depending on the final mood. A matte finish would make the graphic elements feel particularly modern, while gloss would give the colors more depth.
I’d begin with the white foundation and then treat every nail almost like a tiny canvas. I’d place the larger blue or yellow shape first, cure it, and then add the black lines, dots, and speckles afterward. The important trick is not to overcrowd the surface. I’d leave visible white space around the artwork so each color has room to stand out. For the speckled effect, I’d use a nearly dry detail brush or a tiny dotting tool rather than dragging wet polish across the nail.
I especially like this approach for summer because it feels energetic without depending on neon shades. It reminds me of those outfits where everything looks effortless because the colors are doing the work: a white shirt, denim, one warm accessory, and suddenly the whole look feels intentional. If I wanted to experiment with nail art for the first time, I’d actually prefer this kind of abstract design over trying to paint a complicated illustration. There is freedom in being imperfect here, and that makes the manicure much less intimidating.
Graphic Black And White Nails With Minimal Dot Details
This black-and-white manicure proves that a limited palette can still create plenty of visual movement. The nails alternate between glossy white and deep black, with one black accent carrying thin horizontal lines and a sequence of small white dots. Another nail introduces a delicate pale accent near the tip, preventing the design from becoming too uniform. The shape is short and softly squared, which makes the graphic details feel neat and intentional rather than overly dramatic. It has a clean, slightly retro graphic quality while still looking completely wearable.
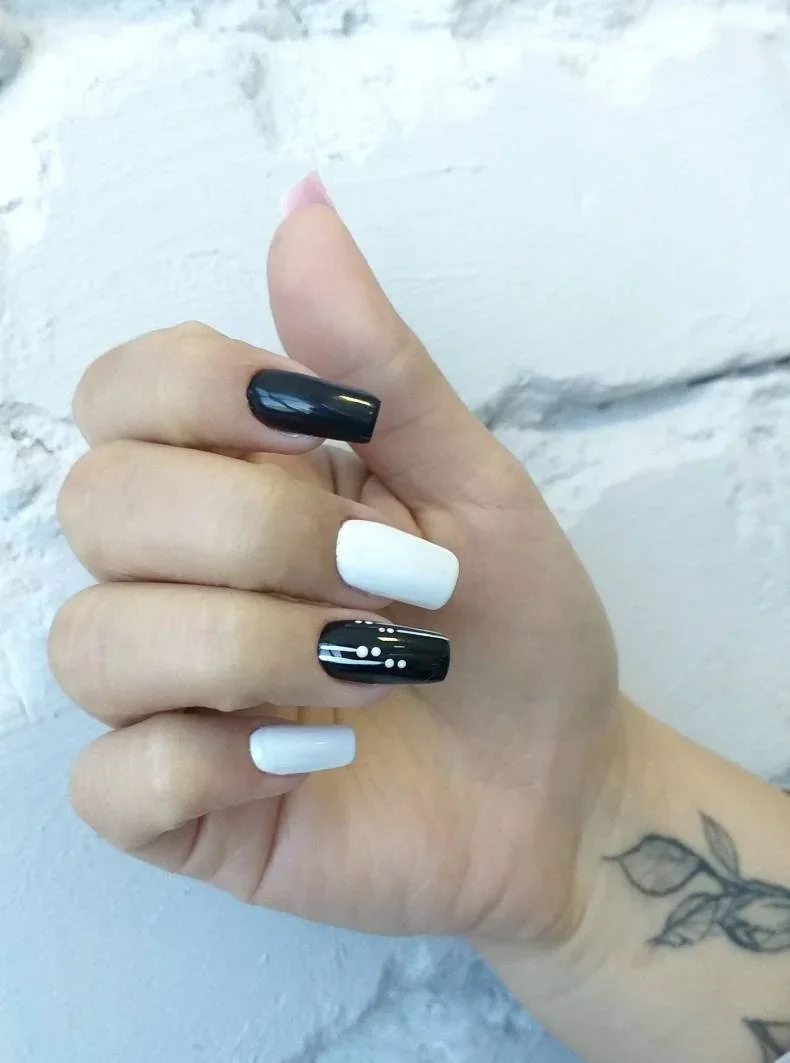
I’d use a highly opaque white polish and a rich black polish with a smooth, self-leveling finish. For the decorated black nail, I’d keep a striping brush and a small dotting tool ready, because those two tools can recreate almost the entire design. A glossy top coat is my preference here because it intensifies the black and makes the white elements look especially clean. If the natural nails are short, there is no need to add length; this particular design actually benefits from a compact silhouette.
After preparing and shaping the nails, I’d alternate the black and white base colors and cure them completely. On the black accent nail, I’d draw the thin horizontal lines first, checking their spacing before adding the small white dots. I’d keep the dots slightly different in size rather than forcing perfect uniformity, which gives the design a more natural hand-painted finish. The remaining nails can stay solid, allowing the decorated nail to do the visual heavy lifting. Finally, I’d apply a thin glossy top coat and make sure the edges are properly sealed.
For me, this is one of those designs that could move easily from summer to the rest of the year. It has enough personality to feel special but enough restraint to work with almost anything in my closet. I also love that it doesn’t require ten decorated nails to make an impression. Sometimes one carefully planned accent is all a manicure needs. And honestly, isn’t that the beauty of creative nail art—finding one small detail that makes the whole set feel like you?
Creative nail art is all about finding a style that feels like you, whether that means a soft lavender manicure, bold graphic accents, or playful hand-painted details. I love how even one unexpected color or tiny design can make a familiar manicure feel completely fresh. You don’t need to follow every trend, either—choose the details that make you excited to look down at your hands. Which idea are you ready to try first?

