
The nail shape can completely change the mood of a manicure, and right now, one of the most intriguing silhouettes is the lipstick nail. With its distinctive diagonal tip, this shape feels edgy, elegant, and just unexpected enough to make a simple manicure stand out. But what makes lipstick nails so appealing, and are they actually practical for everyday wear? I love how the angled edge can transform everything from a classic red manicure to soft nude, pastel, or glossy designs. Whether you are looking for a fresh summer idea or simply want to break away from the usual square and almond shapes, there is plenty of room to play. So, which lipstick nail looks might inspire your next manicure?
The beauty of this shape is that it can completely change the personality of a familiar manicure. A sheer nude becomes more fashion-forward, a classic red suddenly feels sharper, and even a simple solid color gets that Pinterest-worthy finish. But are lipstick nails practical? Which colors make the diagonal shape stand out? And how can I recreate the look without ending up with uneven tips? These are exactly the details worth exploring before booking the next manicure.
Deep Olive Lipstick Nails With a Sleek Finish
I love how much attitude this deep olive manicure gets from the lipstick shape alone. The nails are long with a strong, sculpted silhouette, while each free edge is cut on a diagonal rather than straight across. The rich olive-brown shade has a smooth glossy finish that catches a subtle highlight down the center of each nail. It feels earthy enough for early fall but still polished enough to work with a minimalist outfit, gold jewelry, or even a simple black dress.
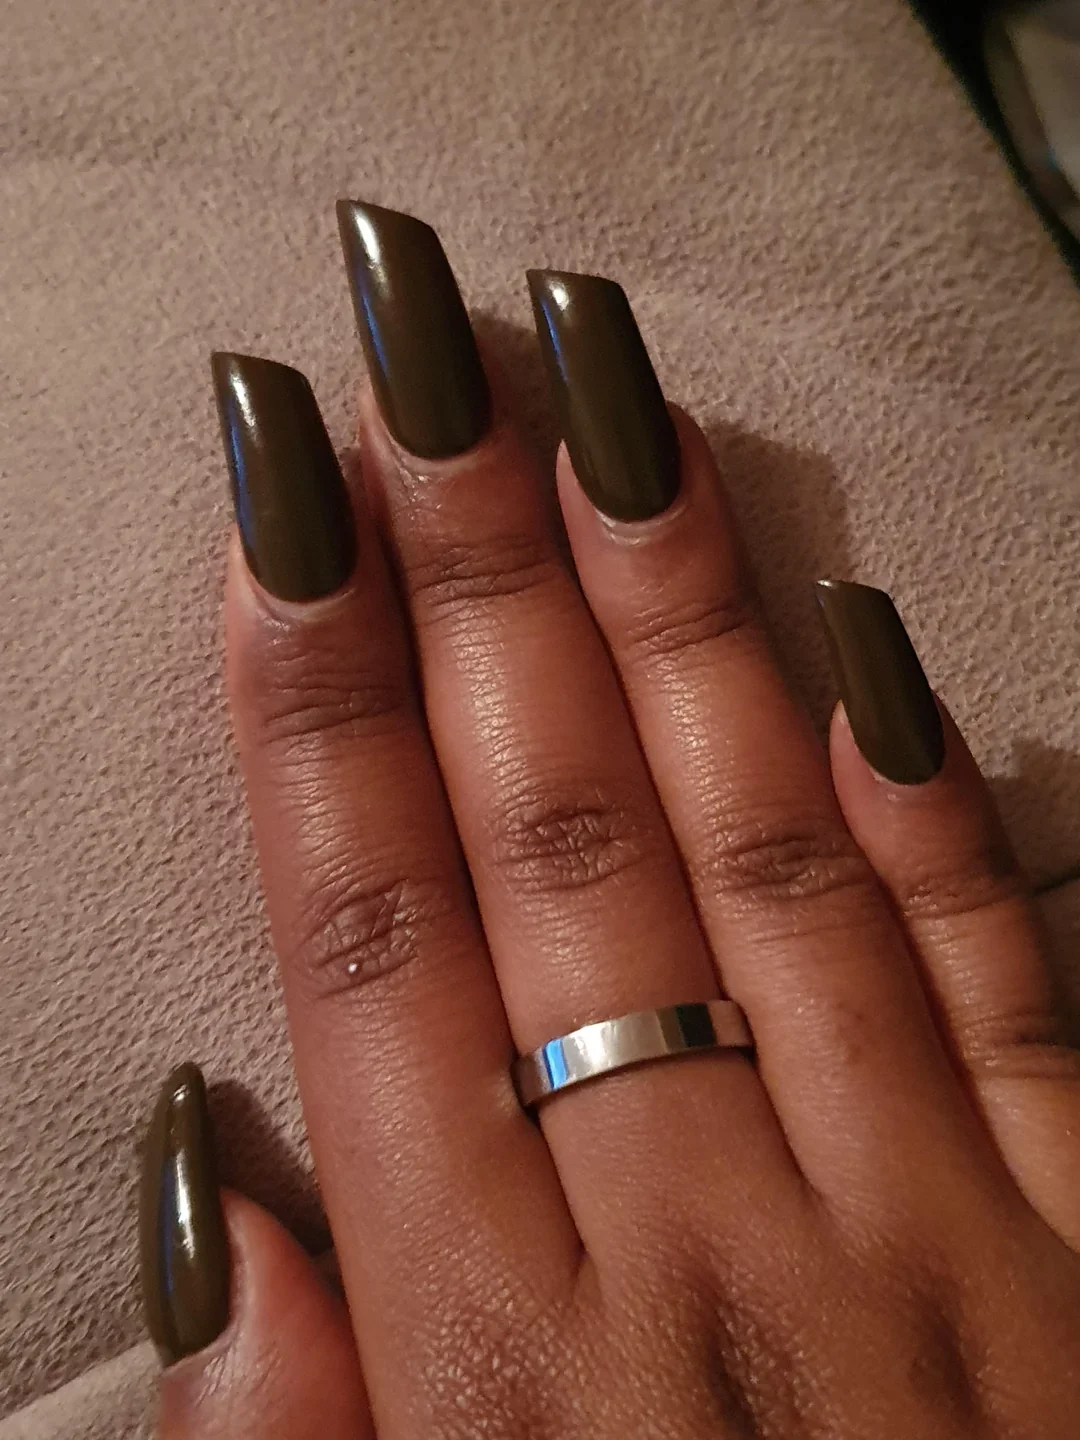
For a similar result, I would reach for a deep olive gel polish with warm undertones, something close to military olive or dark moss. A sheer nude or neutral base can help even out the natural nail before the color goes on. I would also use a builder gel or structured gel if extra length and strength are needed, plus a fine nail file for creating that unmistakable diagonal edge. A high-shine top coat is important here because the reflective finish makes the dark color look much richer.
I would start by shaping the sidewalls so they stay relatively straight, then carefully file the free edge at one consistent angle across every nail. That last part takes patience. I prefer checking the nails from several directions instead of filing quickly and hoping they match. After shaping, I would refine the surface, apply the olive color in thin layers, cure each layer according to the product instructions, and finish with top coat. The goal is a crisp silhouette rather than an exaggerated point.
This is one of those manicures I could wear when I want my nails to say something without actually shouting. The color feels sophisticated, while the diagonal tip gives it a rebellious little twist. And honestly, that combination is hard to resist when the weather starts cooling down.
Opalescent Pink and Blue Lipstick Nails
Here, the lipstick silhouette becomes much more playful. The long nails have a diagonal free edge with softly tapered sides, while the surface shifts between icy blue, baby pink, lavender, and pearly reflections. I especially like the way the colors appear to move depending on the light. Instead of looking like a traditional multicolor manicure, the finish has that glossy, almost glasslike quality that makes every nail feel slightly different.
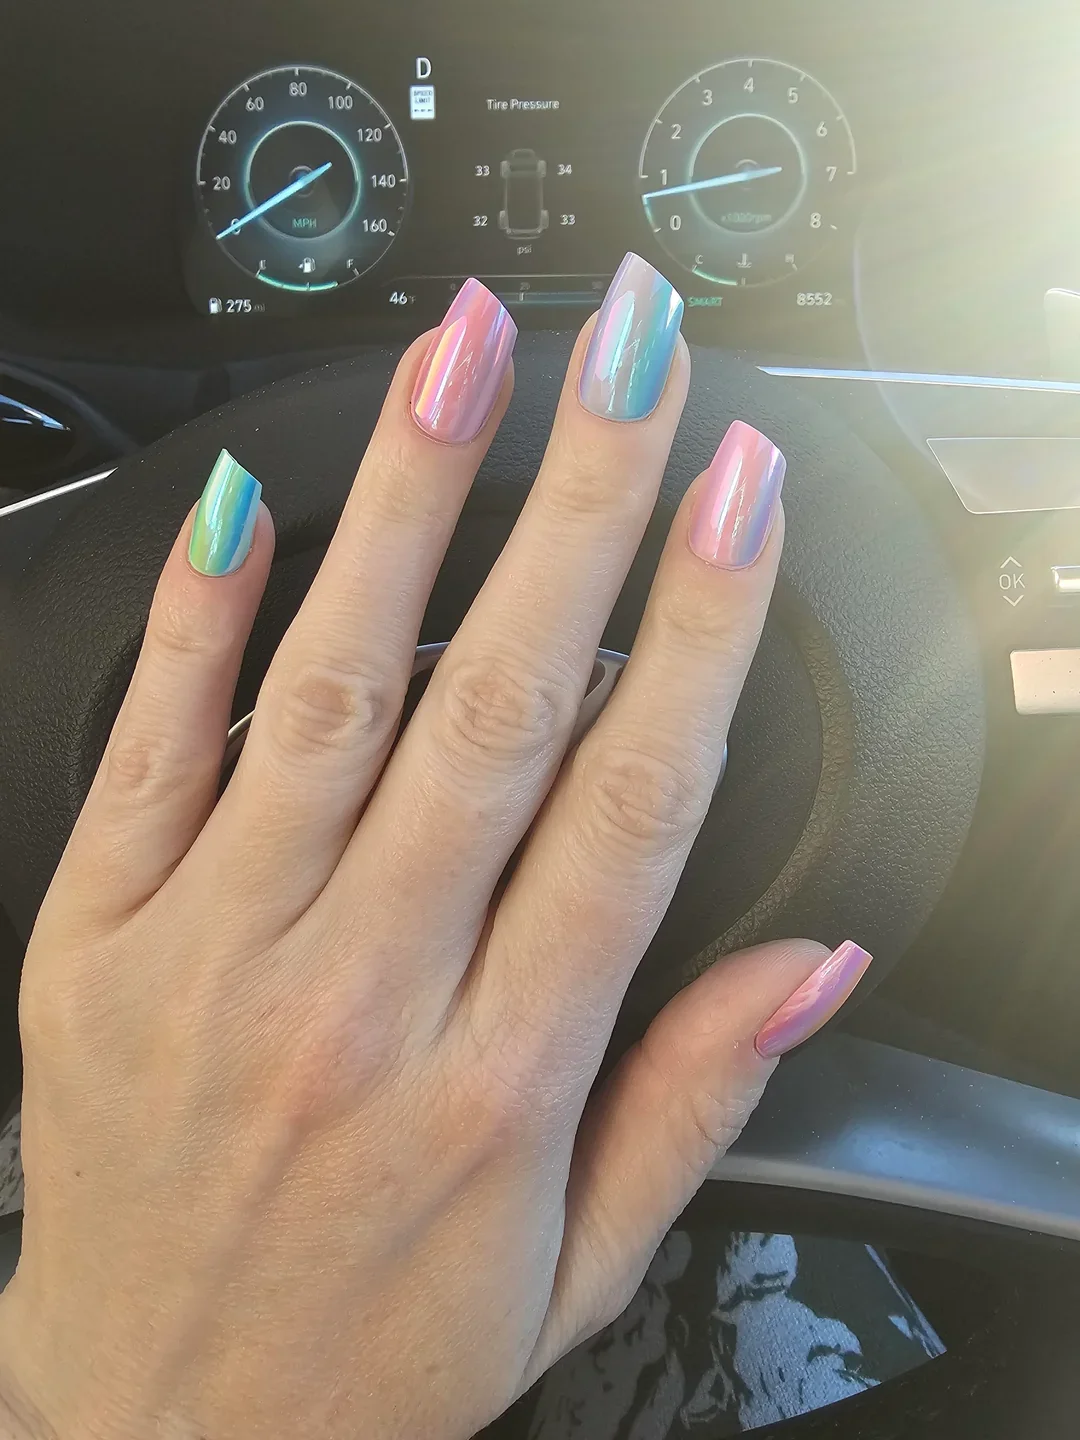
I would use a translucent milky base followed by an iridescent chrome or glazed powder that reflects pink and blue. A pale pink gel, soft aqua gel, or sheer lavender can be layered underneath to intensify the shifting effect. The essentials are a smooth base, a chrome-compatible top coat, the chosen pearlescent pigment, and a crisp top coat to seal everything. Keeping the base relatively sheer is what helps the reflective finish stay delicate rather than becoming too opaque.
For the shape, I would first establish the length and then create the diagonal edge with a straight, controlled filing motion. Once the structure is even, I would apply the milky color, cure it, add the iridescent layer, and seal it carefully. I would pay extra attention to the free edge because lipstick nails look best when the angle is clean and intentional. A tiny difference from nail to nail can make the whole set feel less polished.
This is the version I would save for summer parties, vacations, or one of those sunny weekends when even a little shimmer feels right. It has that dreamy quality I usually associate with glossy lip products and holographic accessories. Why settle for one color when the light can choose the shade for you?
Soft Nude Lipstick Nails With Gold Accents
This manicure takes the lipstick shape somewhere much more decorative. The nails are long and softly nude through the center, while shimmering gold follows the angled free edge in graphic, asymmetric sections. The contrast between the natural-looking base and metallic detail makes the diagonal shape especially noticeable. I like that the design does not cover the entire nail with glitter; the gold is concentrated exactly where the unusual silhouette deserves attention.
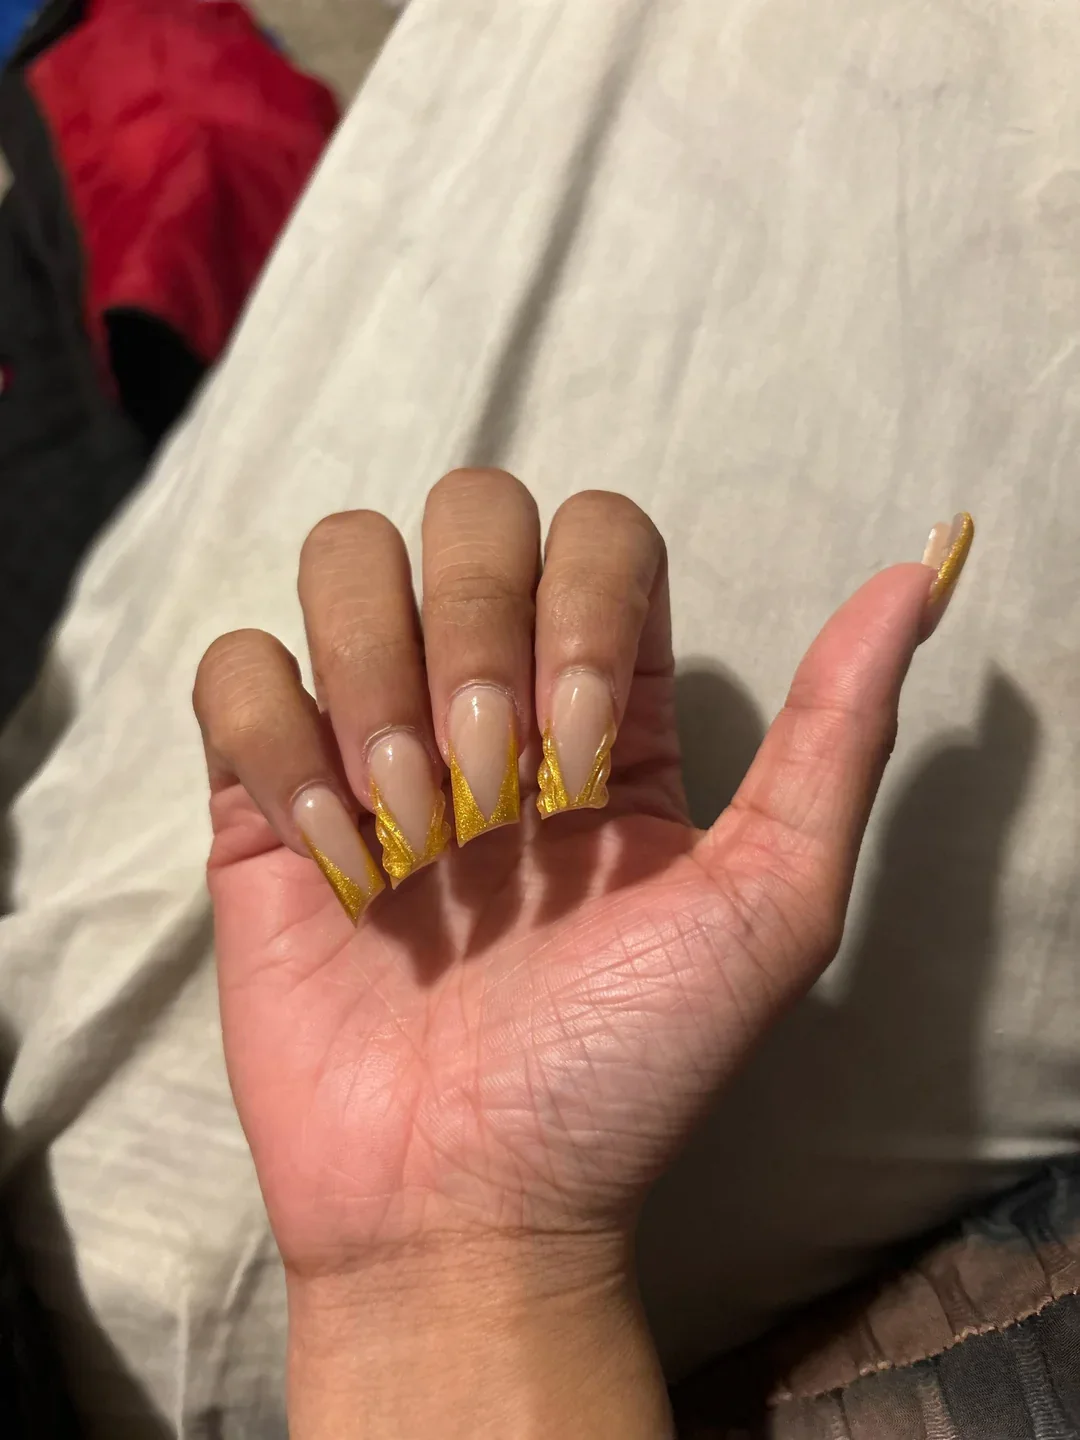
I would begin with a translucent nude or milky beige gel that closely complements the natural nail. For the decoration, a metallic gold gel polish or fine gold glitter would work beautifully. A thin detail brush helps create the clean diagonal borders, while a glossy top coat gives the nude portion a smooth, glassy appearance. If I wanted the gold to look more reflective, I would choose a metallic gel rather than loose glitter.
After creating the lipstick shape, I would apply the nude base and cure it completely. Then I would map out the gold sections with a very fine brush, following the diagonal tip rather than trying to make every line perfectly symmetrical. Once the gold is cured, I would seal the entire manicure with top coat, making sure the free edge is capped. With detailed designs like this, I find that taking a few extra minutes to clean the lines before curing makes a noticeable difference.
I see this as a fun occasion manicure when I want something glamorous without committing to a fully embellished set. The nude keeps it wearable, while the gold gives it a little evening sparkle. It would look especially good with warm metallic jewelry, a satin dress, or even jeans and a white top when I want the manicure to be the accessory.
Glossy Green Lipstick Nails With a Marble Effect
Deep green already has plenty of personality, but the lipstick shape and abstract marbling push this manicure into a more editorial direction. The long nails have sharply angled ends, while several shades of green appear to flow across the surface. There are darker forest tones, brighter emerald-like areas, and lighter streaks that create movement. The glossy finish makes the entire set look almost liquid.
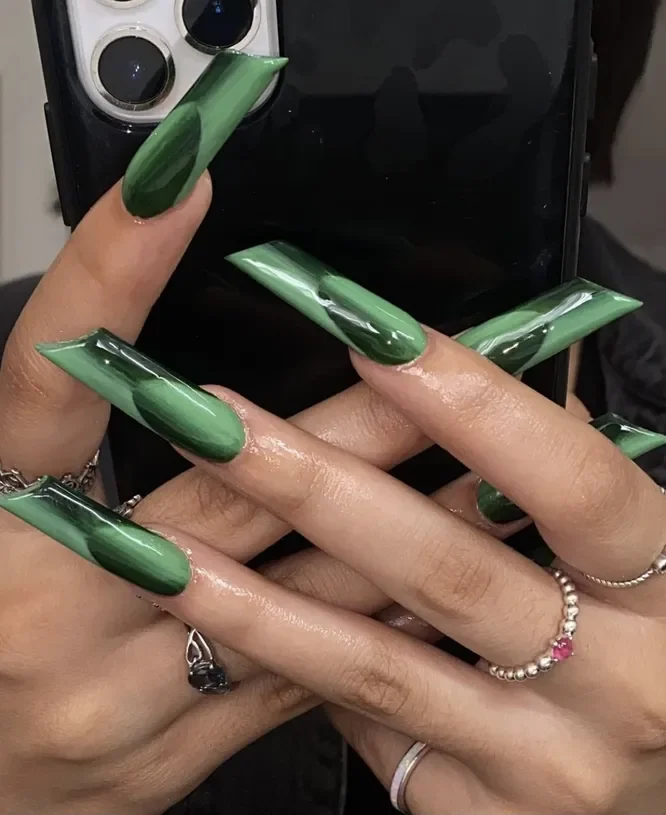
For this design, I would choose a dark green gel, a medium emerald green, and a lighter sage or mint shade for contrast. A nude base can be used underneath if the design is intended to remain slightly translucent. I would also keep a detail brush nearby for pulling the colors into irregular swirls. A glossy top coat is essential because a high-shine surface emphasizes the depth of the marble effect.
I would shape the nails first and make sure the diagonal edges are consistent before touching the color. Then I would apply the base shade and cure it. While the next layer is still workable, I would add small amounts of the contrasting greens and gently drag them through one another with a thin brush. I would avoid overmixing because the beauty of marble is in those visible streaks and variations. After curing, one glossy layer brings everything together.
This feels like the manicure I would choose when a plain green polish sounds a little too predictable. The shape gives it structure, and the marbled finish makes every nail feel individual. It is bold, yes, but it still has that sophisticated botanical mood that works beautifully as summer turns toward fall.
Classic Red Lipstick Nails With a Bold Silhouette
Red and lipstick nails make almost suspiciously good sense together. The rich red polish gives the long, angular silhouette a dramatic quality, while the combination of glossy and matte finishes adds another layer of interest. The shape is unmistakably lipstick: the free edge is angled rather than horizontal, giving the nails a slightly rebellious profile without turning them into a traditional stiletto.
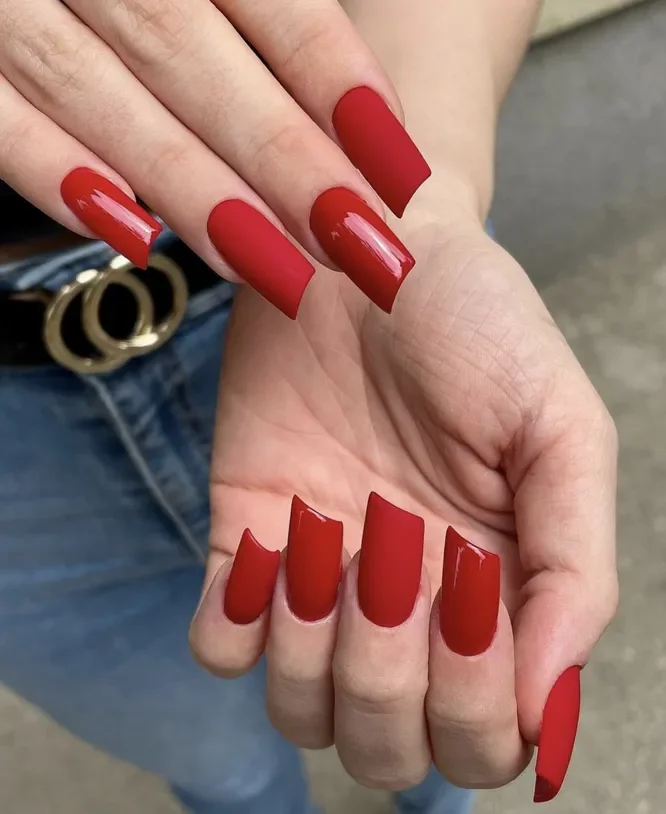
For a similar manicure, I would choose a true classic red rather than a burgundy or orange-red, especially if I wanted the shape to be the star. A glossy red gel polish, matte top coat, and standard high-shine top coat are enough to recreate the contrast. I would keep the color application extremely clean because dark, saturated shades make uneven edges much easier to notice.
I would carefully file the nails into a long lipstick shape, checking the angle from the front and side. After applying two thin coats of red and curing them, I would decide which nails should remain glossy and which should receive the matte finish. This small change can make a monochromatic manicure feel much more intentional. I would finish by sealing the free edge and cleaning any polish that has touched the surrounding skin.
I keep coming back to red because it never really needs an explanation. It works for date nights, holidays, dinners, special events, and those random Tuesdays when I simply want my hands to look put together. With lipstick nails, though, classic red gets a sharper, more contemporary personality.
Pastel Rainbow Lipstick Nails With a Glazed Glow
This set proves that lipstick nails do not have to look dramatic. The nails have a soft, elongated shape with diagonal tips, but the colors are light and airy: pink, blue, green, yellow, and milky white appear in delicate gradients. Each nail has a translucent, glossy finish that gives the colors a soft-focus quality. The overall effect feels cheerful without becoming overly sweet.
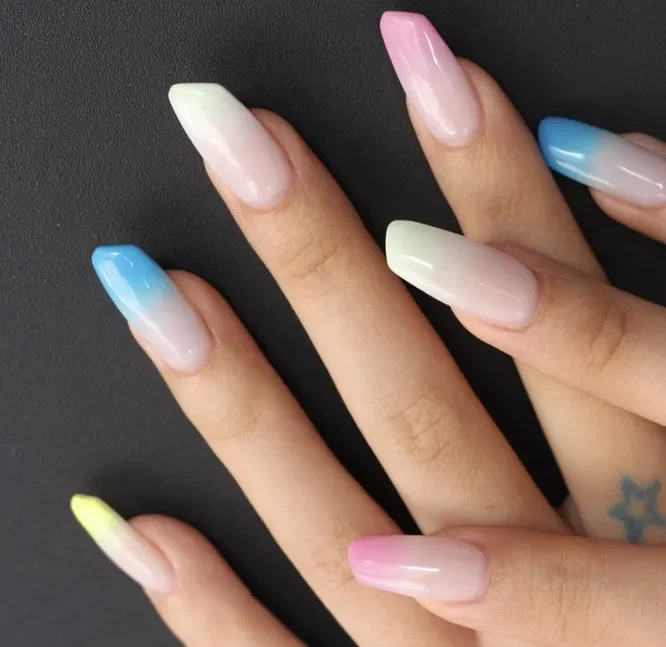
I would use a sheer milky base and a collection of pastel gel colors, choosing one shade for each nail. Soft baby blue, blush pink, pale yellow, mint, and creamy white are an easy starting palette. A translucent jelly polish can help create the slightly see-through effect, while a glossy top coat adds the smooth finish that makes pastel colors look fresh rather than chalky.
To recreate the look, I would keep the shape relatively slim and make the diagonal tips clean but not overly severe. After the base layer, I would apply the pastel shades in thin coats, building opacity gradually. For a softer transition, I would use a sponge or blending brush while the color is still workable. The final top coat should be glossy and smooth, especially over the angled free edge.
This is the set I would save for the height of summer. It has the same carefree feeling as colorful sandals, iced drinks, and a fresh pedicure, but the unusual shape keeps it from looking basic. If I wanted to try lipstick nails for the first time and felt nervous about going too edgy, this would be my gentle introduction.
Milky Pink Lipstick Nails With a Clean Finish
Sometimes the most convincing nail trend is the quietest one. These long lipstick nails are coated in a translucent milky pink that allows a hint of the natural nail to show through. The diagonal free edge is subtle but unmistakable, and the glossy surface gives the manicure a clean, almost glazed appearance. There are no charms or complicated details competing with the shape, which makes the silhouette especially easy to appreciate.
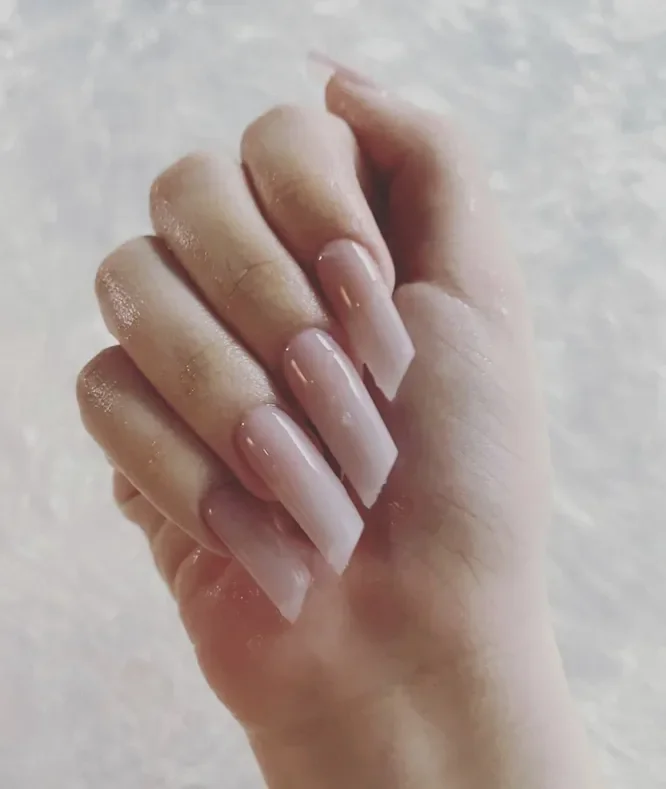
I would choose a sheer pink or milky nude gel with enough translucency to create that natural effect. A rubber base or structured base can help create a smooth surface if the natural nails need a little support, followed by the sheer color and glossy top coat. The products do not need to be complicated here. In fact, the simpler the palette, the more important the preparation becomes.
I would spend most of my time getting the shape right before applying color. The sidewalls should look balanced, and the diagonal tip should follow a similar direction on every nail. After gently refining the surface, I would apply one or two thin coats of milky pink, cure them, and finish with a glossy top coat. I would resist the temptation to add extra decoration because the beauty of this manicure is its restraint.
This is probably the easiest version for me to wear every day. It works with office clothes, denim, evening outfits, and basically everything in between. There is something very satisfying about a manicure that looks expensive without looking like I tried too hard.
Fresh Mint Lipstick French Tips
A French manicure gets a completely different attitude when the traditional white tip is replaced with pale green. The base remains soft and natural-looking, while the mint color follows the diagonal lipstick edge. The result is clean, fresh, and distinctly modern. I especially like how the bare-looking base creates negative space around the green, allowing the unusual tip shape to remain visible.
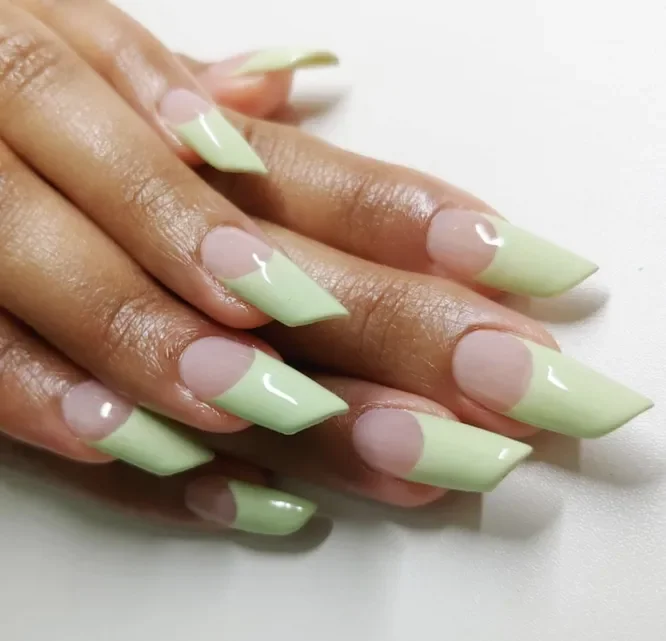
I would use a sheer pink or nude gel for the base and a pastel mint green for the tips. A fine liner brush is useful for tracing the curved area near the cuticle and the angled free edge, although a French-tip guide can make the process easier at home. I would finish with a glossy top coat to keep the mint looking crisp and luminous.
I would shape the nails first, then apply the sheer base and cure it. For the French detail, I would start near one side of the nail and carefully follow the diagonal line toward the opposite corner. I would not try to paint the whole tip in one fast motion. Small controlled strokes give me much more control, particularly when working around a sharp silhouette. Once the green is cured, I would add top coat and check that the free edge remains clean.
This feels like a perfect warm-weather compromise. I get the freshness of pastel green without committing to an entirely green manicure, and the lipstick shape makes the classic French idea feel new again. It is playful enough for vacation but polished enough for everyday life.
Glossy and Matte Red Lipstick Contrast
Here is where the lipstick nail shape becomes unapologetically bold. The long red nails have the same strong diagonal edge, but the finish alternates between rich matte and reflective glossy surfaces. That simple change in texture gives the monochromatic red manicure surprising depth. Instead of adding rhinestones or complicated art, the design relies on shape, color, and finish.
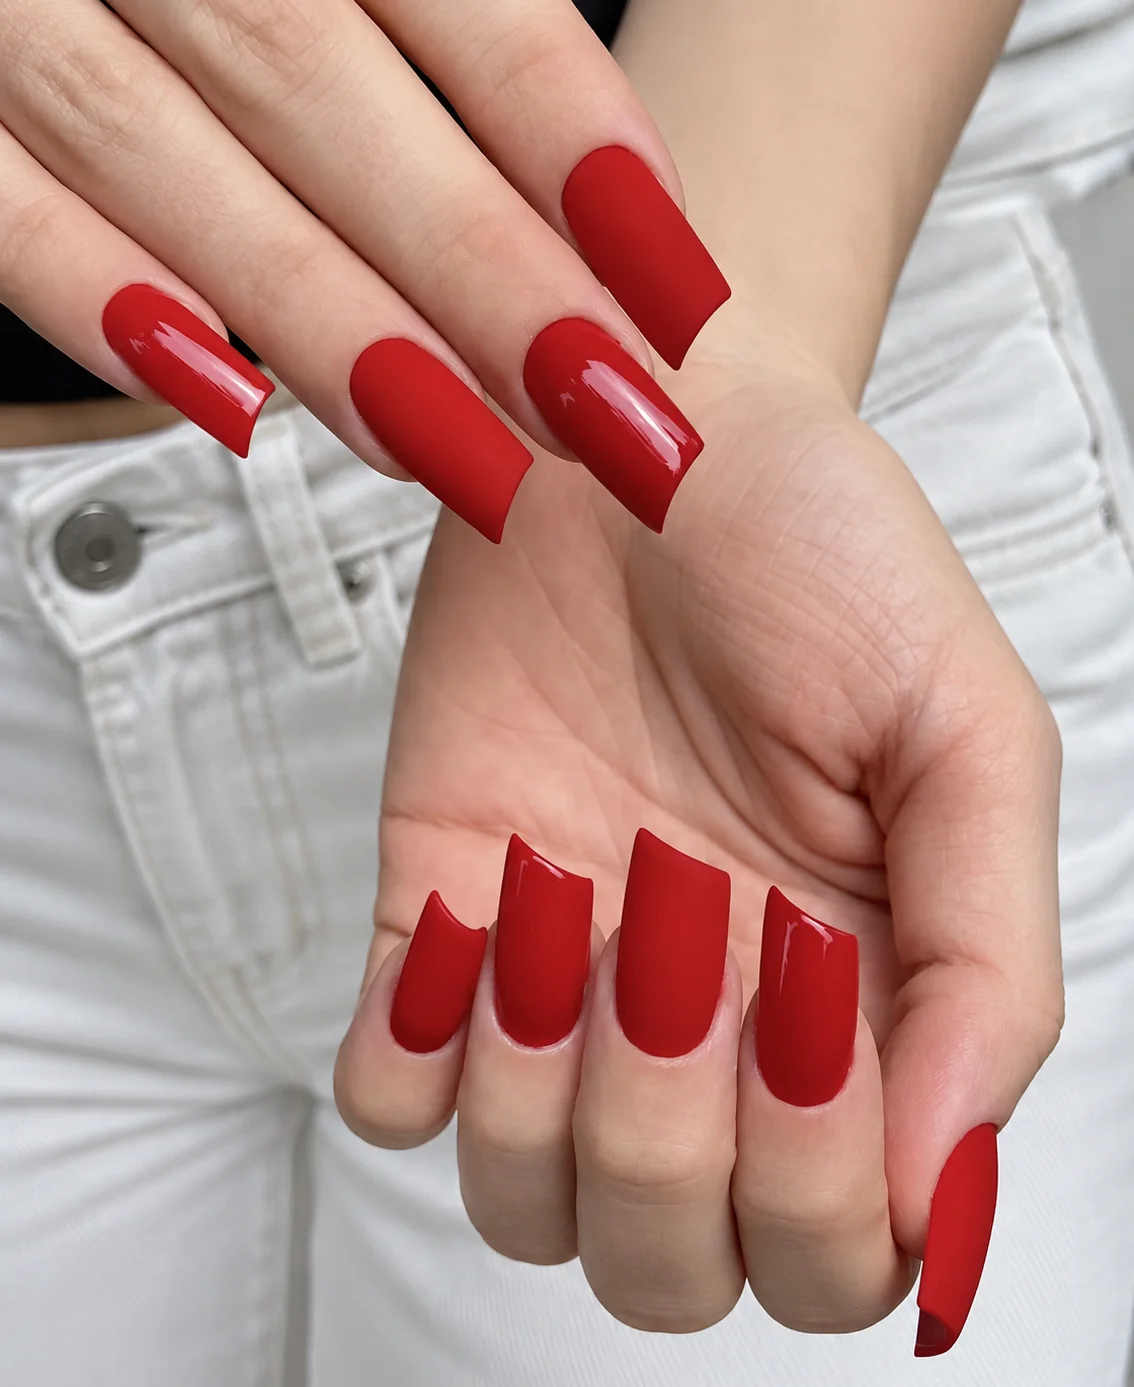
I would use one saturated red gel polish and pair it with both a matte top coat and a glossy top coat. That is really all the color story needs. A quality base coat and a smooth structured surface are more important than collecting multiple shades. For a more sophisticated red, I would choose a blue-based classic crimson that stays vivid under both finishes.
After shaping and applying the red color, I would decide which nails should be matte and which should remain glossy. I would cure the manicure fully before applying the different finishing products, because switching between textures requires a little planning. The angled tips should be checked one final time before finishing because a matte surface can make tiny imperfections more noticeable.
I love this approach when I want a statement manicure but do not want nail art to take over. Red already has plenty of drama, so changing the texture feels clever rather than excessive. It is especially tempting around fall and holiday season, when deeper reds start appearing everywhere again.
Transparent Lipstick Nails With Tiny Red Details
The transparent version takes the trend in a completely different direction. The nails are long and sharply angled, with a clear or translucent finish that leaves the natural-looking base exposed. Tiny red embellishments near the tips add just enough color to keep the manicure from disappearing into the background. The overall effect is delicate, modern, and slightly unexpected.
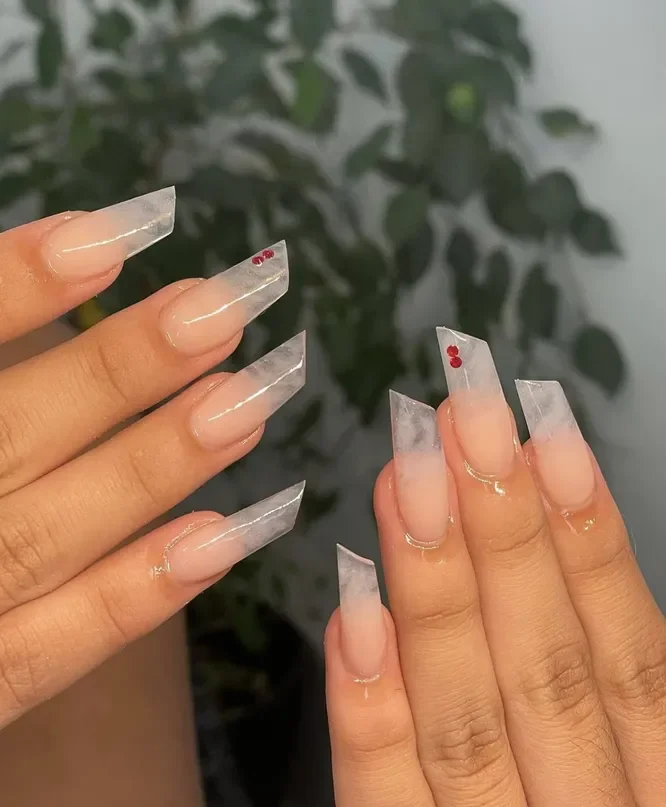
I would start with a clear builder gel or translucent nude extension base, depending on the desired length and structure. For the tiny accents, I would use small red nail-art decals, micro gems, or carefully placed red gel details. A high-gloss top coat would preserve the glasslike finish. Because transparent nails reveal so much of the surface, smooth preparation is particularly important.
I would create the lipstick shape before applying the transparent finish, making sure the diagonal edges are symmetrical. Once the base is perfected and cured, I would place the tiny red accents close to the tips, keeping their position intentionally minimal. A small dotting tool or fine tweezers can make placement easier. After securing the details, I would apply top coat carefully so the surface remains smooth and the tiny decorations stay in place.
This is the kind of manicure I would choose when I want people to look twice. It does not rely on a loud color, yet the shape and little flashes of red make it feel fashion-forward. It would be particularly pretty for a special event when I want my nails to complement rather than compete with the rest of the look.
Olive Green Crocodile Texture With a Sharp Edge
I love when a nail shape does most of the talking before the color even gets a chance. Here, the long, straight sides and dramatically angled tips give the manicure that unmistakable lipstick-nail silhouette, while a deep olive green turns it into something moodier and much more unexpected. The glossy finish makes every raised, curved line of the crocodile-inspired texture stand out, creating a look that feels almost like tiny pieces of polished reptile leather.
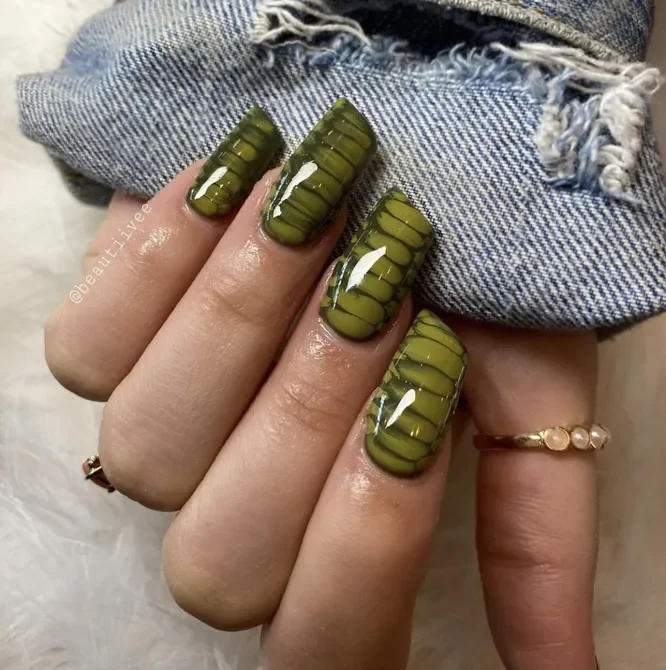
To recreate this effect, I would start with an opaque olive or moss-green gel polish, then add a darker green or black-green shade for the recessed details. A sculpting gel or textured nail art gel helps create the dimensional pattern, while a high-shine top coat brings out the wet, lacquered finish. The exact green can be adjusted easily; I especially like a slightly yellowed olive because it feels earthy without becoming too military.
I would shape the extensions into a lipstick silhouette first, keeping the sides relatively straight and filing one side of the free edge on a diagonal. After curing the base color, I would build the curved textured sections one at a time rather than trying to draw everything in one pass. A fine liner brush makes the darker separations easier to control, and a glossy top coat over the finished design gives the texture that almost glass-like depth.
This is the kind of manicure I would save for early fall, when denim, leather jackets, and oversized knits start returning to the rotation. The olive shade feels grounded, but the unusual shape keeps it from looking predictable. If a classic square manicure feels a little too safe lately, why not let the diagonal tip do something more interesting?
Black and Crimson Flames for a Dramatic Lipstick Shape
Some manicures whisper, and some absolutely refuse to. This one belongs to the second category. The long lipstick-shaped nails combine sheer pink sections with black polish, fiery red accents, and curling flame motifs, creating a rebellious finish that feels made for a night out. The diagonal tips are especially effective because they sharpen the flame artwork instead of competing with it.
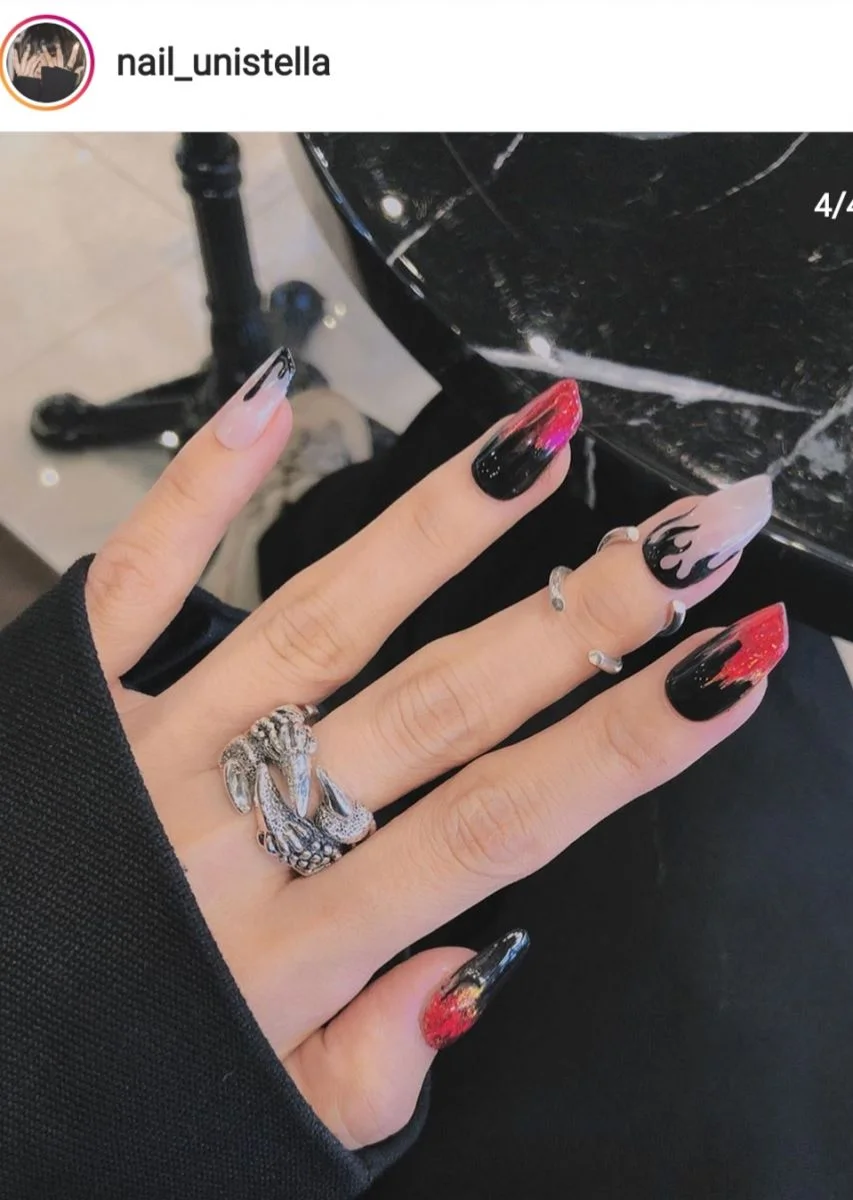
For a similar result, I would keep a sheer pink or milky nude gel polish as the base and pair it with a dense black gel, a bright crimson red, and a small amount of glitter or metallic red. A highly pigmented white can also help create cleaner flame highlights. I would use a thin liner brush for the curves because flame designs look much better when the lines remain fluid instead of overly geometric.
I would begin with the nude base and cure it completely before adding the black sections. Then I would sketch the flame shapes with a liner brush, allowing some red to overlap the black for a layered, almost glowing effect. The lipstick shape should be filed before the artwork begins, since changing the edge afterward could cut into the design and throw off the proportions.
I find this style particularly fun when the rest of an outfit is simple. Black jeans, a fitted jacket, and this manicure? Done. The nails become the statement accessory without requiring rhinestones or an elaborate color palette. And honestly, there are days when subtle just isn’t the assignment.
Chocolate Brown and Gold With a Polished Editorial Finish
Brown nails have been having a serious fashion moment, but this combination gives the shade a more sophisticated direction. Deep chocolate brown covers several nails in a glossy finish, while nude sections create negative space around sharply angled lipstick tips. Fine gold lines trace the transition between the colors, adding just enough shimmer to make the manicure feel dressed up without becoming overly decorative.
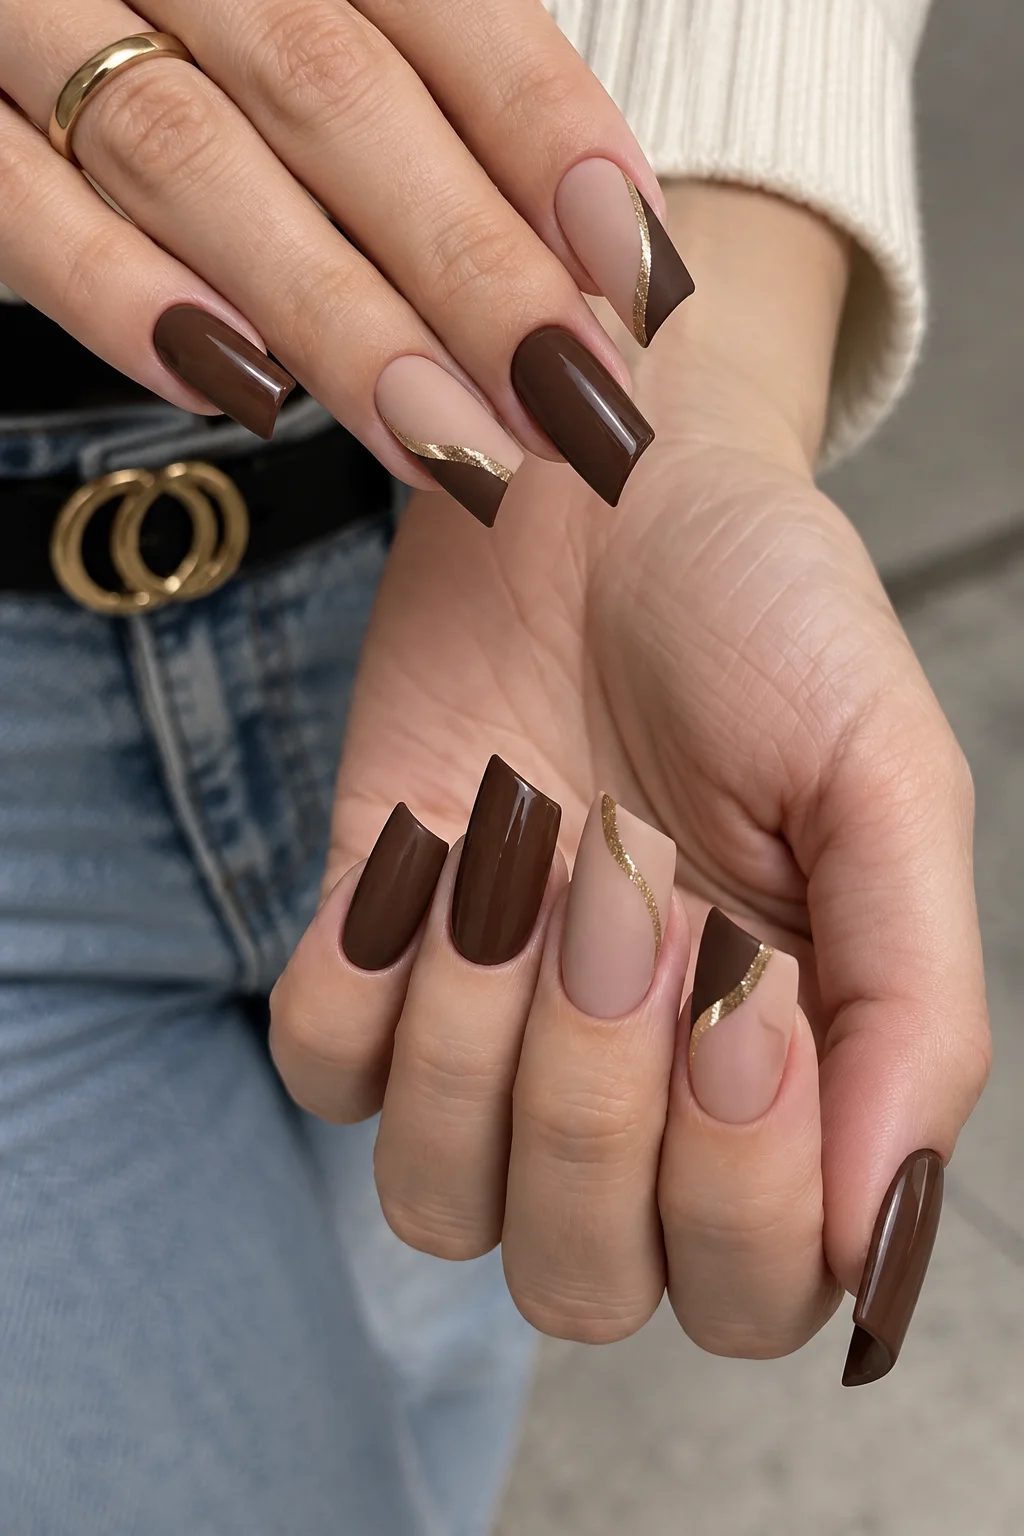
I would reach for a rich espresso or dark chocolate gel polish, a warm nude that closely complements the natural nail bed, and a fine metallic gold gel. A narrow striping brush is essential for the delicate gold detail. For the finish, I prefer a glossy top coat because it makes the chocolate shade look almost like melted lacquer.
The trick here is precision rather than a huge collection of products. I would create the nude base first, then paint the brown blocks along the diagonal edge of each lipstick tip. Once those sections are cured, I would carefully draw the gold line along the boundary. Keeping the line slightly curved on some nails gives the design a softer flow and prevents the manicure from looking too rigid.
I would wear this one straight through the transition from summer into fall. It works beautifully with denim, cream sweaters, camel coats, and gold jewelry, which is probably why it feels so effortlessly expensive. If you want to experiment with lipstick nails without going full dramatic, this is the version I would try first.
Minimal Rose Sketches on a Soft Nude Base
There is something incredibly pretty about a manicure that barely raises its voice. The long lipstick-shaped nails are coated in a translucent milky nude, allowing the natural nail to remain part of the design. Delicate black botanical sketches sit near the tips, with slender stems and tiny rose-like blooms creating an almost hand-drawn effect.
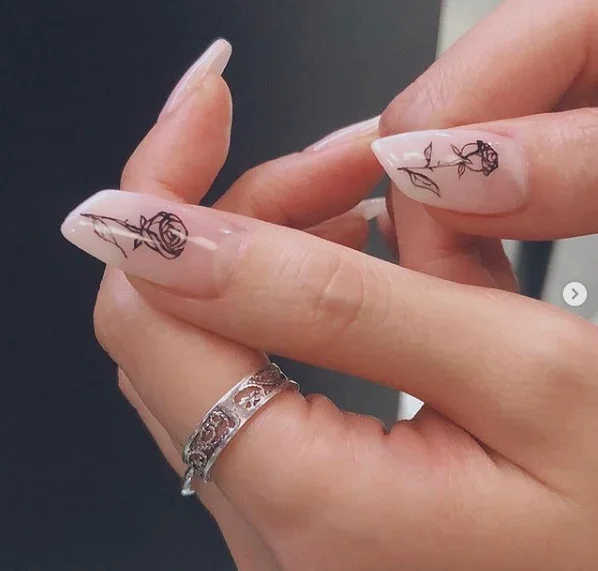
I would keep the product list refreshingly short here: a sheer pink or milky nude gel polish, a black nail art gel or highly pigmented liner polish, and a glossy top coat. If the natural nails are strong enough, there is no need to create an extremely thick extension. The elegance comes from the slim silhouette and the fine artwork.
After shaping the nails into that characteristic angled lipstick edge, I would apply one or two thin layers of the sheer nude. Once cured, I would use a very fine brush to sketch the stems first, then add the tiny flowers with a few controlled strokes. I would resist the temptation to make every flower identical. Slight variation is what gives botanical nail art its delicate, almost illustrated quality.
This is probably the easiest style in the group for me to imagine wearing every day. It has the unusual shape, but the restrained palette keeps everything graceful. I could wear it with a white button-down, a slip dress, or my favorite jeans and not feel like the manicure was competing with the outfit. Sometimes the smallest detail is the one that makes the whole look.
Royal Blue Bandana Art With a Playful Twist
Bright blue instantly changes the personality of lipstick nails. Here, the manicure uses an intense cobalt blue across a long, squared silhouette, with intricate white bandana-inspired motifs placed across selected nails. Paisley shapes, curved lines, and tiny decorative details create a graphic contrast against the saturated blue, giving the whole look a fun Western-meets-Y2K energy.
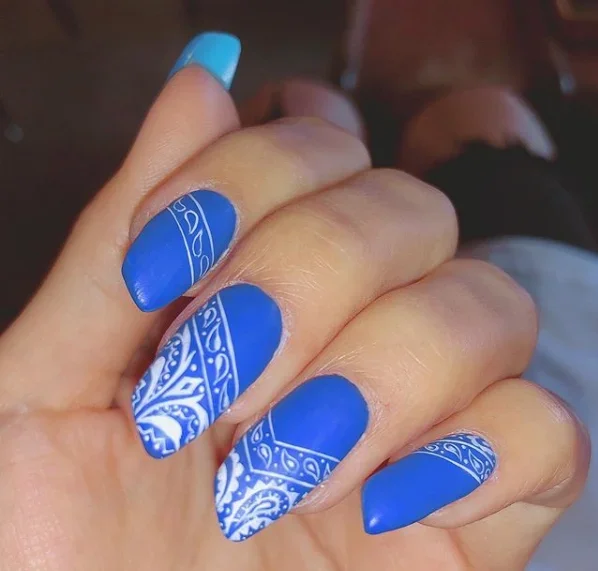
For this design, I would use a vivid cobalt or royal blue gel polish, a crisp white nail art gel, and a thin detailing brush. A matte top coat could make the pattern look more graphic, but I personally prefer glossy blue when I want that rich, almost electric color to stand out. Nail stickers can simplify the intricate motifs if freehand drawing is not your thing.
I would apply the blue base evenly and cure it before beginning the white artwork. Rather than attempting the entire paisley pattern at once, I would work from the largest curved shapes toward the tiny dots and flourishes. The key is leaving enough blue negative space between the white details so the pattern remains readable instead of turning into one busy block.
I love this version for the warmer months because it has that carefree vacation energy without relying on obvious tropical motifs. It would look fantastic with denim shorts, a white tank, or even a simple swimsuit. Want something that feels playful but still unmistakably styled? This blue-and-white combination hits that sweet spot.
Lavender Flames With Iridescent Shimmer
Soft lavender and fiery motifs sound like opposites, which is exactly why this manicure works. The nails combine pastel purple tips with translucent, shimmering centers and pale yellow flame shapes. Instead of looking heavy or gothic, the flames feel almost dreamy, especially against the reflective base. The lipstick-inspired diagonal edges add another layer of movement to the design.
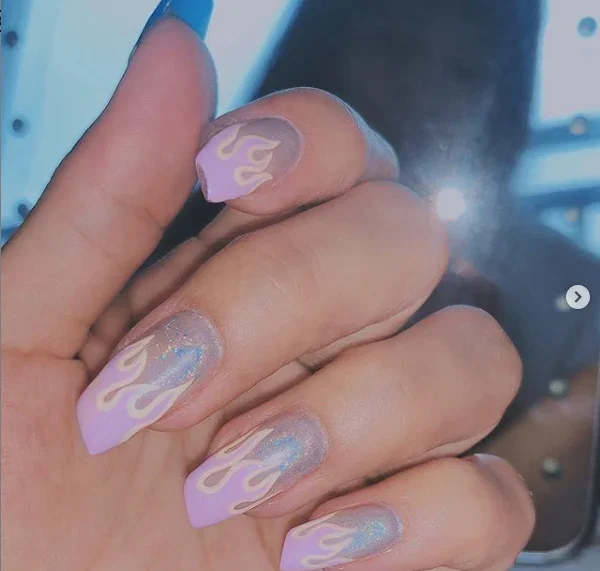
I would use a pale lavender gel, a sheer iridescent or pearl-effect polish, and a soft buttery yellow for the flame details. A translucent milky base can help the shimmer look more dimensional, while a glossy top coat pulls the colors together. For anyone who likes sparkle but does not want obvious glitter, an aurora or pearl chrome effect would be a beautiful alternative.
I would create the lavender sections first, carefully following the angled edge of the lipstick shape. After curing, I would add the iridescent layer to the central areas and finish with the flame motifs using a very fine brush. The yellow should remain delicate; too much pigment would overpower the airy quality that makes this manicure special.
This is the kind of design I would choose when I want something noticeable but still soft. It has enough personality for summer parties and concerts, yet the pastel palette keeps it wearable. There is also something wonderfully nostalgic about the flame motif, but the shimmer makes it feel much more current.
Black Gloss, Sheer Pink and Signature-Inspired Details
Black lipstick nails can look surprisingly elegant when the shape is balanced with negative space. This manicure pairs glossy black tips with translucent pink sections, creating a crisp contrast along the angled edge. Small white interlocking motifs add a recognizable luxury-inspired touch, while the overall design remains relatively clean rather than covered in embellishments.
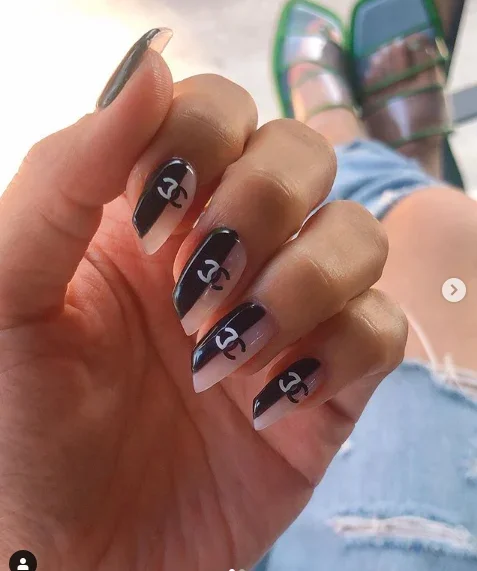
I would choose a sheer blush-pink base, jet-black gel polish, and a white detailing gel for the tiny emblem-like artwork. A high-gloss top coat is important here because the contrast between transparent pink and glossy black is part of the appeal. For a more personalized interpretation, I would swap the logo-inspired motif for simple initials, abstract loops, or another small symbol.
I would shape the nails before painting because the diagonal tip needs to remain crisp. After the sheer base is cured, I would paint the black sections carefully along the free edge, following the same angle on every nail. The tiny white designs come last, and I would keep them relatively small so they function as accents rather than the main attraction.
I can see this manicure working especially well for someone who likes designer-inspired beauty but does not want an obvious logo manicure. The black-and-pink combination feels sleek, while the lipstick shape adds a little attitude. Add silver or black accessories and suddenly the whole look feels very intentional.
Ocean Blue Foils With a Glassy Finish
This manicure goes in an entirely different direction, turning lipstick nails into something that looks almost aquatic. Transparent and milky sections are layered with fragmented blue and turquoise foil, creating the impression of tiny pieces of sea glass suspended beneath the surface. The pointed diagonal silhouette makes the reflective fragments look even more elongated.
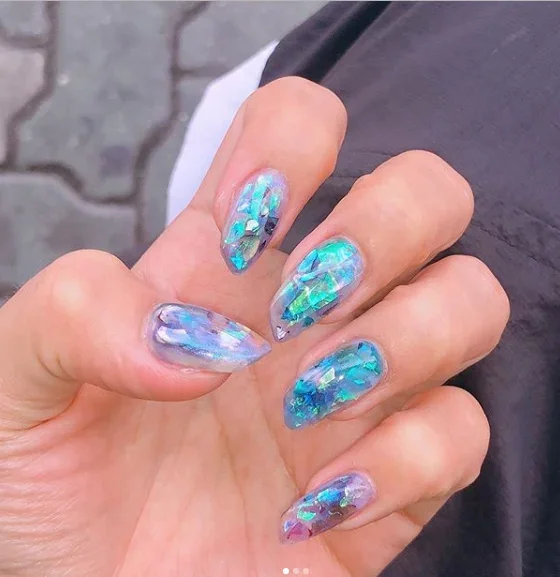
I would use a translucent nude or milky base, blue and turquoise foil flakes, and a clear builder gel or encapsulation layer. Small pieces of iridescent foil work particularly well because they catch different tones as the light moves. I would finish everything with a thick glossy top coat to create the smooth, glass-like surface seen here.
I would start with the sheer base and cure it before placing irregular pieces of foil over selected areas. I like the fragments to remain imperfect because natural variation makes the design feel more organic. After securing the foil, I would encapsulate it with clear gel if needed, file the surface carefully once cured, and finish with a glossy top coat.
This is the manicure I would save for a vacation, poolside weekend, or any moment when I want my nails to feel like an accessory rather than just polish. The turquoise catches sunlight beautifully, and the transparent sections keep the long shape from feeling too heavy. It is bold, yes, but there is something almost weightless about it.
Neon Green French Tips That Make Lipstick Nails Pop
A neon French manicure does not need much decoration to make an impression. The fresh white-pink base here creates a clean canvas for electric green tips, with the bright color following the diagonal lipstick shape. Because the neon appears only along the edges, the manicure feels energetic without becoming overwhelming.
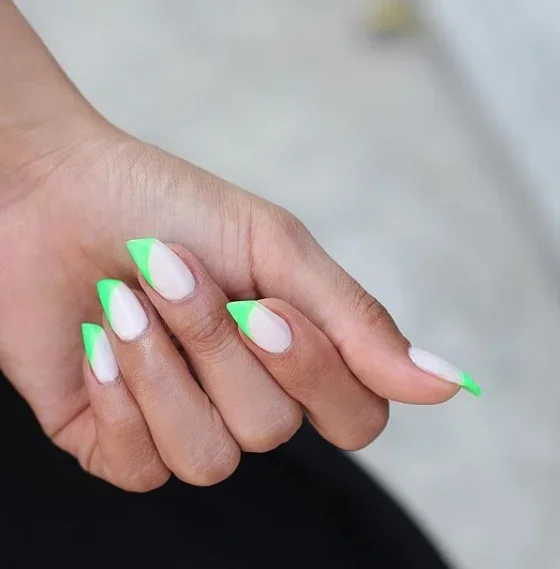
I would use a sheer milky pink base and an intensely pigmented neon green gel polish. A fine liner brush is helpful for sharpening the inner edge of the French tip, while a glossy top coat keeps the neon looking juicy. If the color is slightly translucent, two thin coats usually give a more even result than one thick layer.
I would file the lipstick silhouette first, then apply the sheer base. Once cured, I would paint the neon tips one nail at a time, paying close attention to the angle and keeping the color consistent across the hand. I would rather spend an extra few minutes refining the line than rush this part because the clean geometry is what makes the manicure look intentional.
This feels perfect for late summer, when bright colors still make sense but I am starting to crave cleaner, more structured looks. The neon edge gives me that little jolt of fun, while the nude center keeps everything fresh. It is also a clever way to test the lipstick shape without committing to an elaborate nail art design.
Classic Red Lipstick Tips With a Feminine Finish
Red French tips are one of those beauty ideas that never really disappear, and the lipstick shape gives them a fresh angle. The manicure combines a soft pink nude base with rich red tips that follow the distinctive slanted free edge. The result is clean, feminine, and a little flirtatious without relying on excessive decoration.
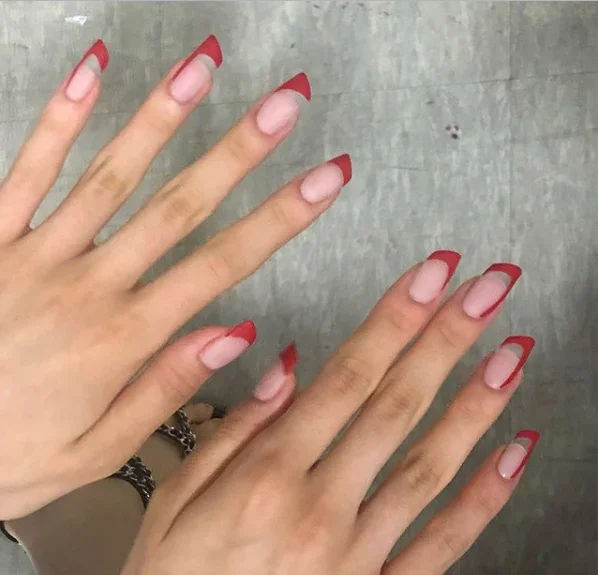
For this look, I would use a sheer pink or neutral nude gel as the base and a classic cherry, crimson, or blue-red gel for the tips. I would also keep a fine liner brush nearby for correcting the diagonal French line. A glossy finish makes the red look richer, while a soft natural base prevents the overall manicure from becoming too stark.
I would shape every nail first, making sure the diagonal edge has a similar direction and length across the hand. Then I would apply the nude base and cure it before painting the red tips. I would use a thin brush to refine the inner curve and check each nail from different angles before sealing everything with top coat.
Out of all these ideas, this is the one I would call the easiest gateway into lipstick nails. Red French tips are familiar, but the angled shape makes them feel new again. If you have been scrolling through manicure ideas and wondering whether this trend is actually wearable, this might be your sign to give it a try. Sometimes all a classic needs is one sharp little twist.
Classic Red Lipstick Tips With a Flirty Retro Twist
I love how this manicure turns the lipstick nail shape into the star without needing complicated nail art. The nails have a soft, sheer nude-pink base that keeps the look fresh and clean, while a saturated red polish follows the sharply angled free edge. Instead of ending in a straight French tip, the red sweeps diagonally across each nail, creating that unmistakable lipstick-inspired silhouette. The contrast is striking, but the translucent base keeps everything from feeling too heavy.
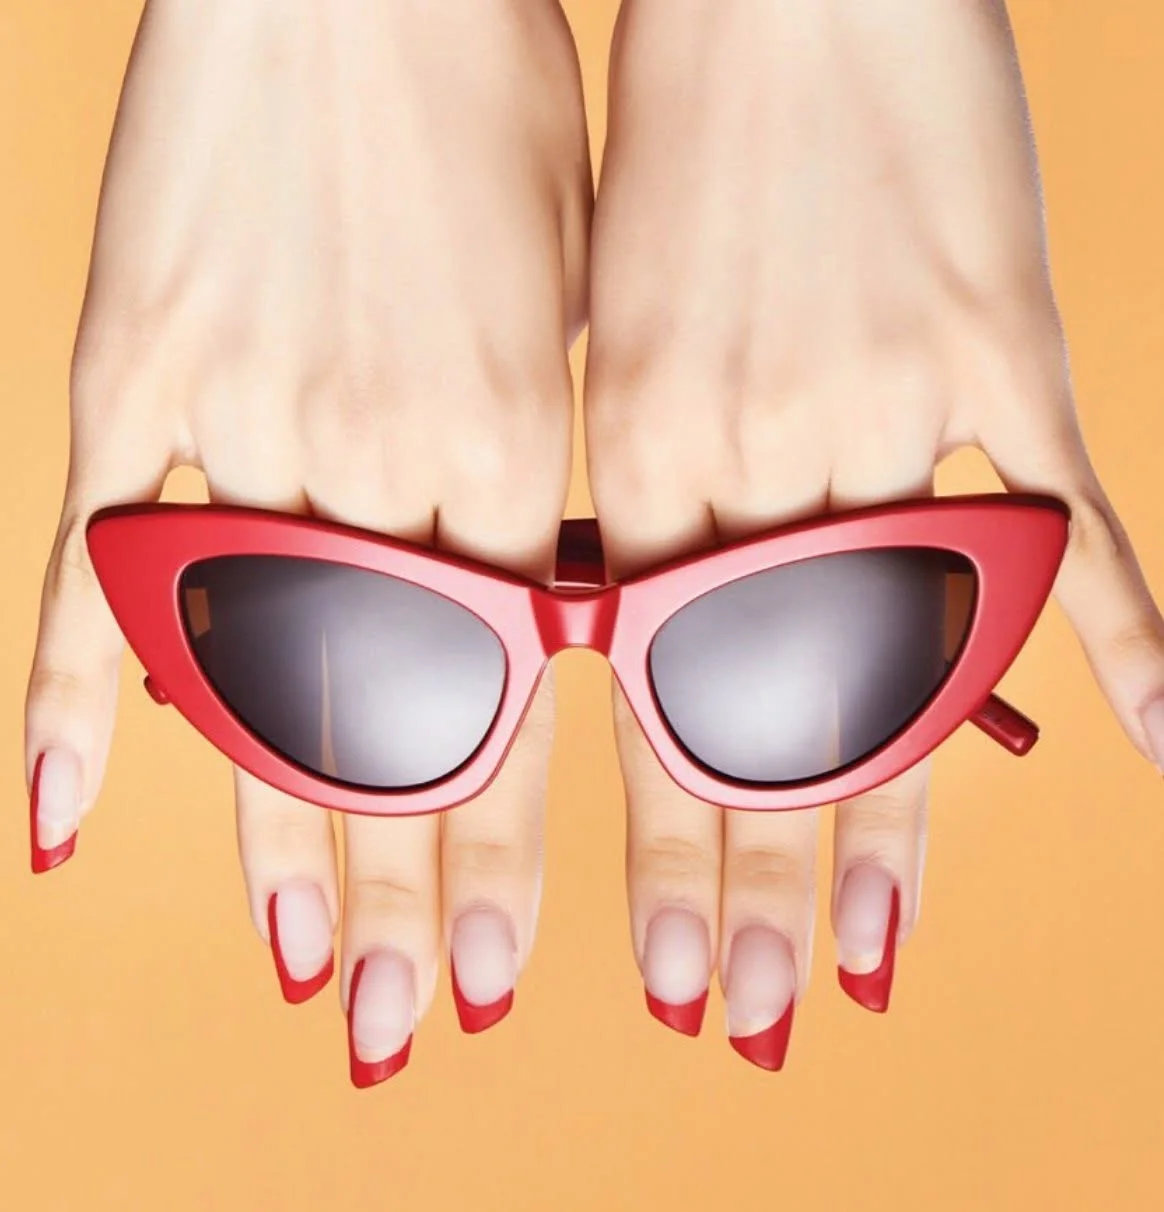
For a similar result, I would start with a sheer milky pink or neutral nude gel polish and a classic true red for the tips. A highly pigmented formula works best because the diagonal edge needs to look crisp rather than washed out. I would also keep a fine liner brush nearby for correcting the angled line and finish with a glossy top coat. The shine is important here; it gives the red an almost lacquered, vintage feel.
When I recreate this style, I first shape the nails so the free edge has a deliberate diagonal rather than trying to force the polish to create the entire illusion. After the base color has cured, I mark the direction of the slant and carefully paint the red section from one side toward the other. I prefer building the color in thin layers because it is much easier to keep that long diagonal clean. A final layer of top coat brings the whole manicure together.
This is one of those designs I would choose when I want something noticeable but still easy to wear. The red feels especially fun for a summer evening, a vacation manicure, or any moment when a simple outfit needs a little something extra. Have you ever noticed how a classic red manicure can instantly make you sit a little straighter? This shape has exactly that effect, only with a more fashion-forward finish.
Black Gloss and Velvet Matte for a Moody Statement
Black lipstick nails take the unusual shape in a much more dramatic direction. Here, the long nails have a strong, squared silhouette with the free edges subtly angled, while the black polish alternates between deep matte and reflective gloss. Some nails look almost velvety, while others catch a sharp stripe of light across the surface. I especially like that the design does not rely on rhinestones or complicated artwork. The finish itself creates the visual interest.
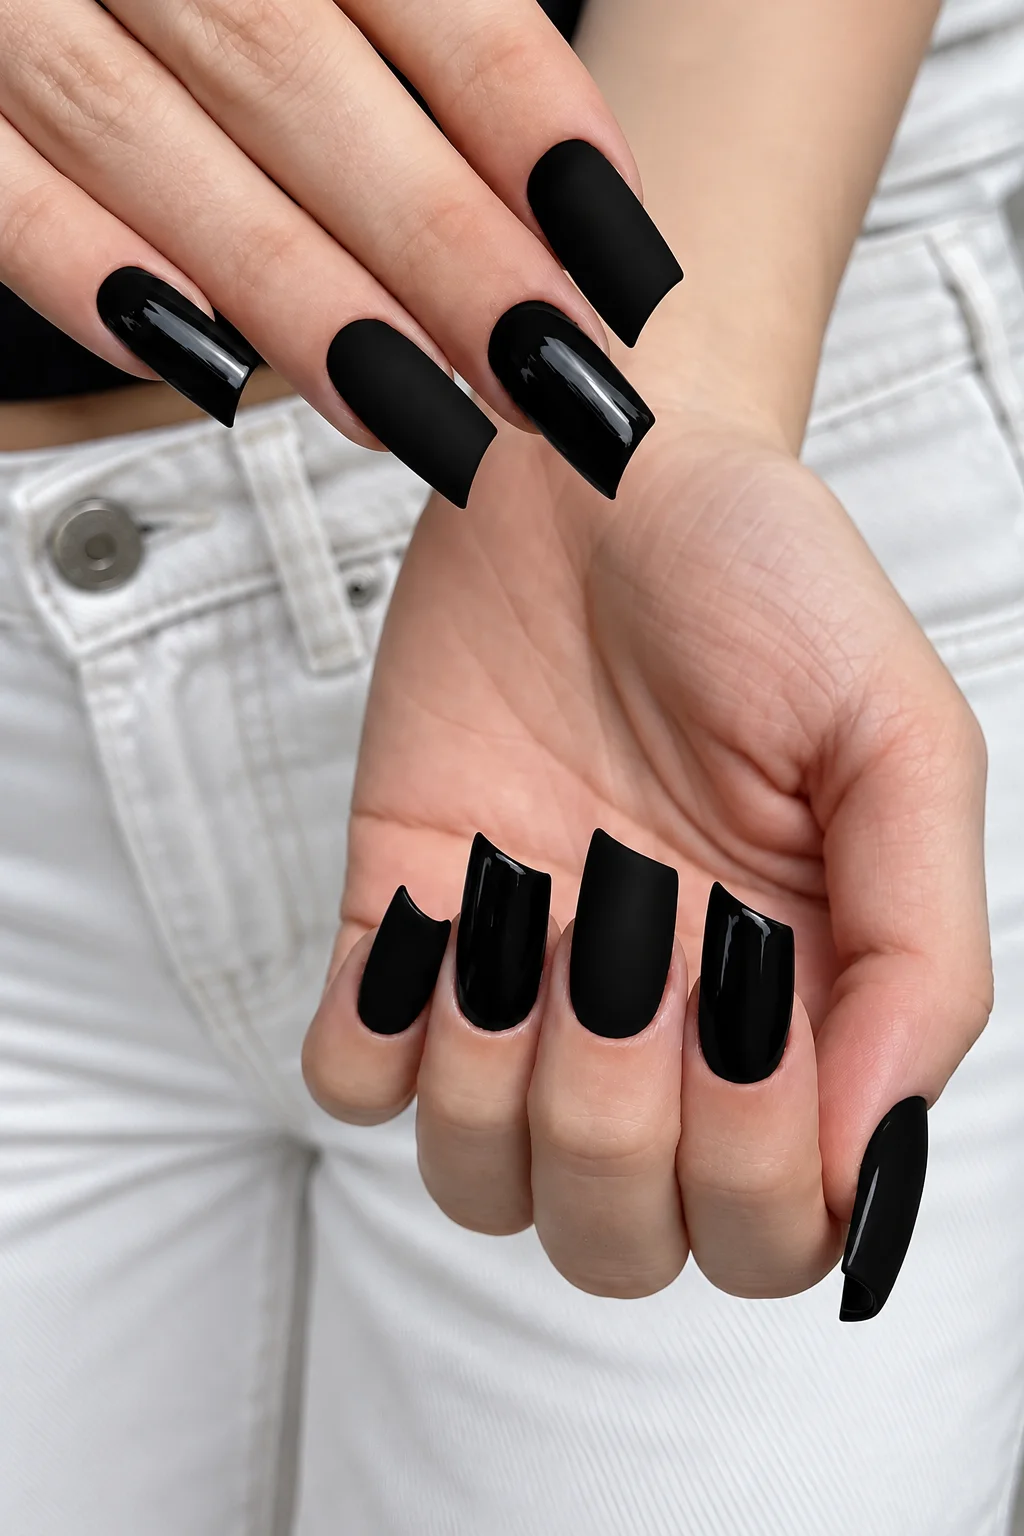
I would use an intensely pigmented black gel polish, a matte top coat, and a separate high-shine top coat to recreate this contrast. The products do not need to be complicated; the trick is choosing a black that becomes completely opaque in one or two thin coats. For the glossy nails, I want a glass-like finish, while the matte nails should look smooth rather than chalky. A precise nail file is just as important as the polish because this shape depends on clean, intentional edges.
At home, I would prepare and shape every nail first, paying particular attention to keeping the diagonal ends consistent from finger to finger. After applying the black base, I would cure it and decide which nails should stay matte and which should receive gloss. If I want the reflective panels seen here, I can leave selected nails glossy while finishing the others with matte top coat. It is a surprisingly simple trick, but the result looks far more elaborate than the process.
I think this is the version for anyone who wants lipstick nails to feel less sweet and much more editorial. Black works beautifully when the weather starts shifting toward cooler evenings because it instantly gives a manicure more depth. I could see this with a leather jacket, an oversized blazer, or even a simple white T-shirt when the nails are supposed to do all the talking. Sometimes the boldest manicure is the one that uses only one color.
Neon Green French Tips That Bring Summer Energy
This version proves that lipstick nails do not have to look dark or dramatic. The nails are kept relatively natural-looking with a glossy nude-pink base, while electric lime green traces the sharply angled tips. The pointed, slanted edge makes the bright French detail look especially dynamic because the color seems to move diagonally across the nail. I also like the balance here: the nude keeps the manicure wearable, while the neon green gives it that unmistakable summer spark.
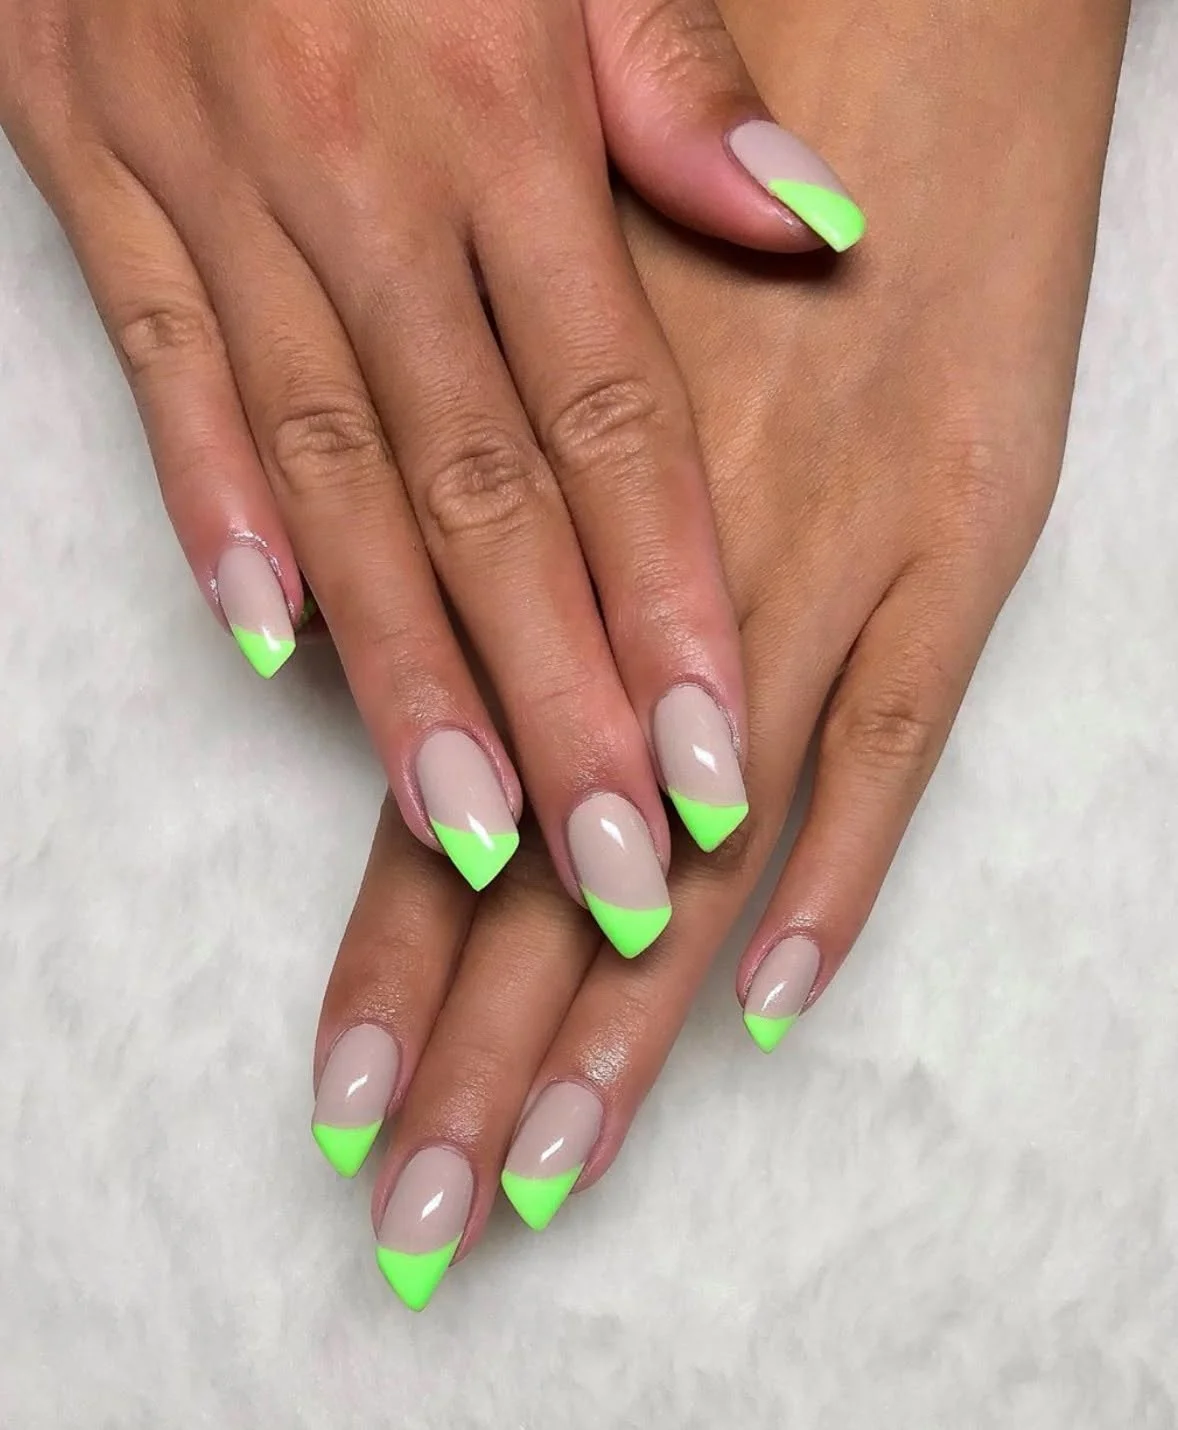
For this design, I would reach for a translucent beige-pink base, a fluorescent lime or chartreuse gel polish, and a glossy top coat. Neon formulas can sometimes look uneven over a transparent base, so I would use a highly pigmented shade and apply it carefully along the free edge. A fine detailing brush can help sharpen the diagonal, especially around the corners. The goal is a clean, saturated flash of green rather than a thick French tip.
I would keep the application fairly simple. After prepping and shaping the nails, I would apply the nude base and cure it completely before working on the green tips. I like to establish the highest point of the diagonal first and then connect the line toward the opposite side, rather than trying to paint the entire shape in one sweep. Once the green is even, a glossy top coat makes the neon look brighter and helps the manicure feel polished rather than overly playful.
This is probably the style I would pick when summer is in full swing and neutral nails suddenly feel a little too quiet. The neon detail looks fantastic with white clothing, denim, linen, or even a bright swimsuit, yet the nude foundation means it does not compete with every outfit. And if you are nervous about going neon, this is a nice way to dip a toe into the trend without covering the entire nail in fluorescent color.
Icy Blue Lipstick French With Graphic Black Details
This manicure feels like a tiny piece of graphic design for the fingertips. The long nude nails have a soft, natural base, followed by icy blue lipstick-shaped tips. Black lines sweep upward from the nude section into the blue, while small black dots add another layer of contrast. The combination of pale blue, black, and nude is wonderfully crisp. Nothing feels random; every line reinforces the unusual diagonal silhouette.
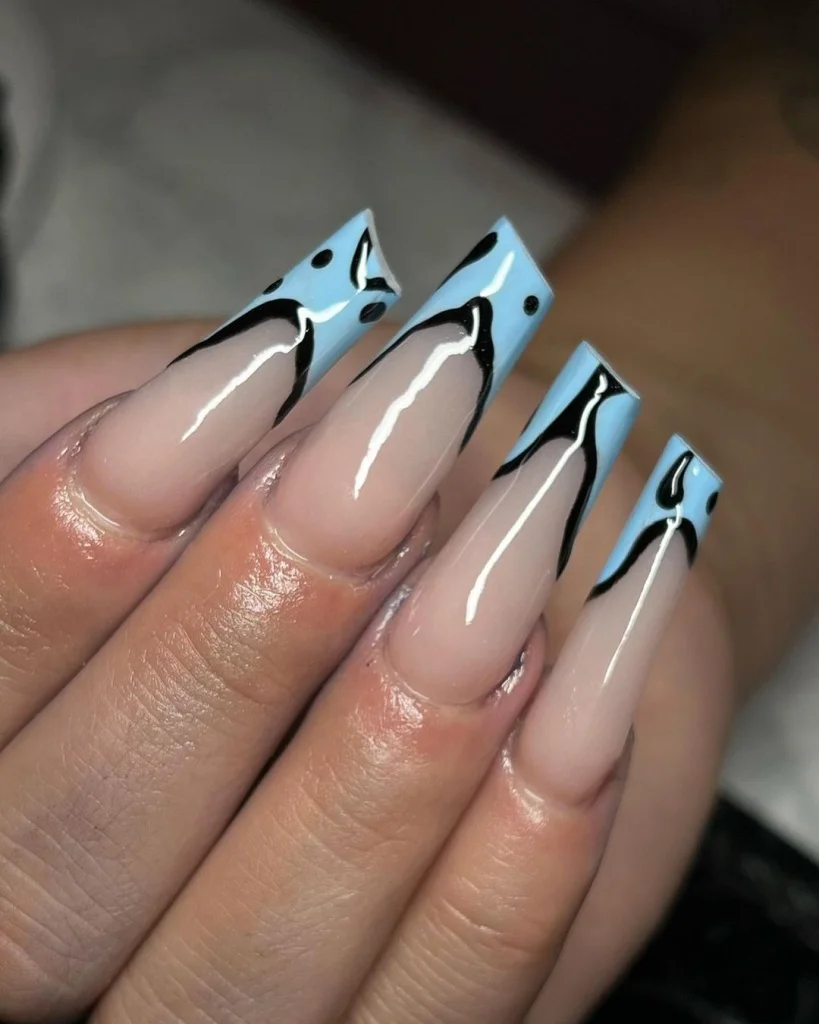
To create this look, I would choose a sheer nude gel, a cool pastel blue with good coverage, and an opaque black nail-art polish. A thin liner brush is essential for the curved black details, while a dotting tool can make the tiny accents much easier to control. I would finish with a high-gloss top coat so the pale blue stays luminous and the black artwork looks sharply defined.
This is not the manicure I would rush through five minutes before leaving the house. I would shape the nails first, apply the nude base, and carefully create the blue angled tips before adding the black artwork. Once the blue is cured, I would use a very small amount of black polish on the liner brush and draw the curves gradually. Small dots should come last, because they are easy to adjust and help balance the design. Patience makes a huge difference here.
I find this combination particularly refreshing for late summer, when bright colors are still welcome but I am starting to crave cooler tones. The icy blue gives the manicure a clean, almost frosted quality, while the black keeps it from becoming too delicate. If you like French manicures but want something that feels genuinely different, this is where I would look first.
Lavender Shine With a Soft Metallic Glow
Lavender makes the lipstick nail shape feel unexpectedly romantic. The nails are long with a strong, slightly squared silhouette and angled free edges, but the color softens the overall effect. A luminous purple polish covers the entire nail, with tiny reflective particles that catch the light as the hand moves. It is not quite glitter and not quite chrome; the finish sits somewhere in between, giving the manicure a subtle twinkling effect.
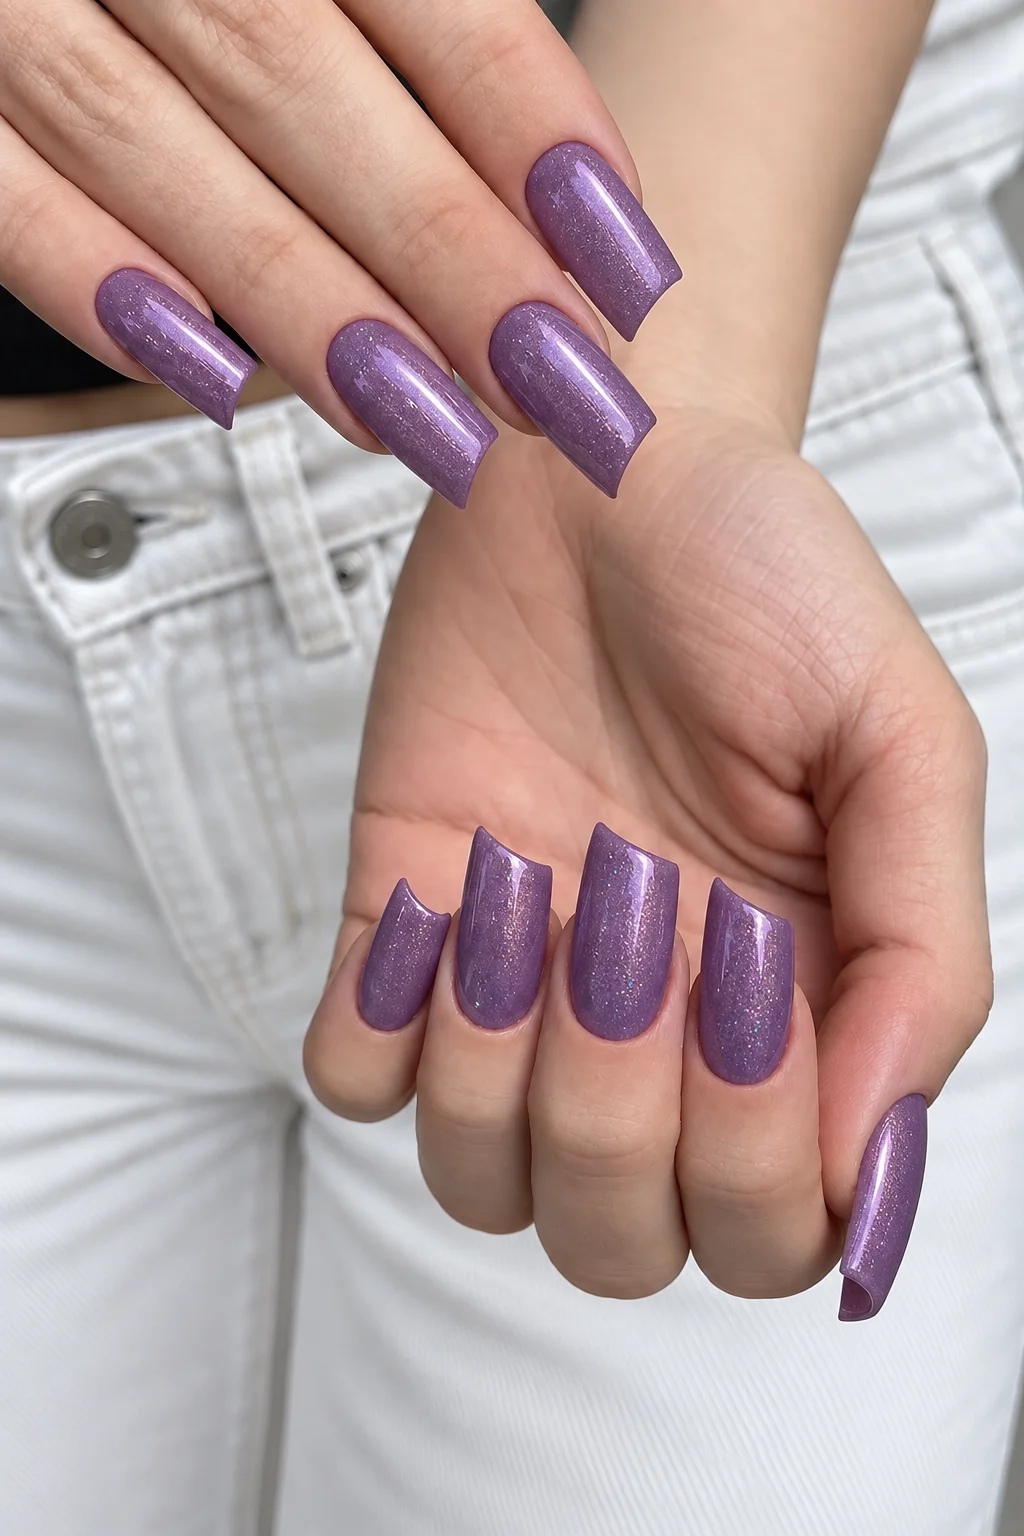
I would use a medium lavender gel polish with fine shimmer, preferably one that has a smooth, glossy finish rather than chunky glitter. A good base coat and a self-leveling top coat would help keep the long nails looking sleek. If the chosen purple is slightly sheer, two thin coats should create enough depth while allowing the shimmer to remain visible. I would avoid heavy glitter because the slanted silhouette already provides plenty of visual interest.
The application itself is wonderfully straightforward compared with the more detailed designs. I would shape the nails first, making sure each diagonal edge follows the same direction and looks intentional. Then I would apply the lavender color in thin, even layers, curing between coats, before sealing everything with glossy top coat. I would take extra care around the sidewalls because long lipstick-shaped nails look especially polished when the edges are neat.
This is the manicure I would save for a moment when I want color without feeling like I am making a huge statement. Lavender has that lovely transition between playful and sophisticated, and the shimmer catches summer sunlight beautifully. It would also be gorgeous for a dinner date or evening event when you want your manicure to sparkle subtly every time you reach for your glass.
A Four-Color Lipstick Nail Moodboard for Every Personality
Sometimes choosing one color is the hardest part, so this collection makes a convincing argument for having several favorites. The manicure ideas range from shimmering lavender to delicate pink, deep wine red, and icy blue, with each shade paired with a long almond-to-lipstick-inspired silhouette. The common thread is the elongated, angled finish, which gives every color a more directional and fashion-conscious appearance. Even the softer shades feel more distinctive because of the shape.
The color palette here is easy to translate into different moods. I would choose a translucent blush pink when I want something understated, a deep burgundy for a richer and more dramatic effect, lavender for a playful shimmer, and icy blue when I want the manicure to feel fresh and cool. Fine shimmer or pearlescent finishes work especially well with these shades because they emphasize the length and catch light along the slanted edges.
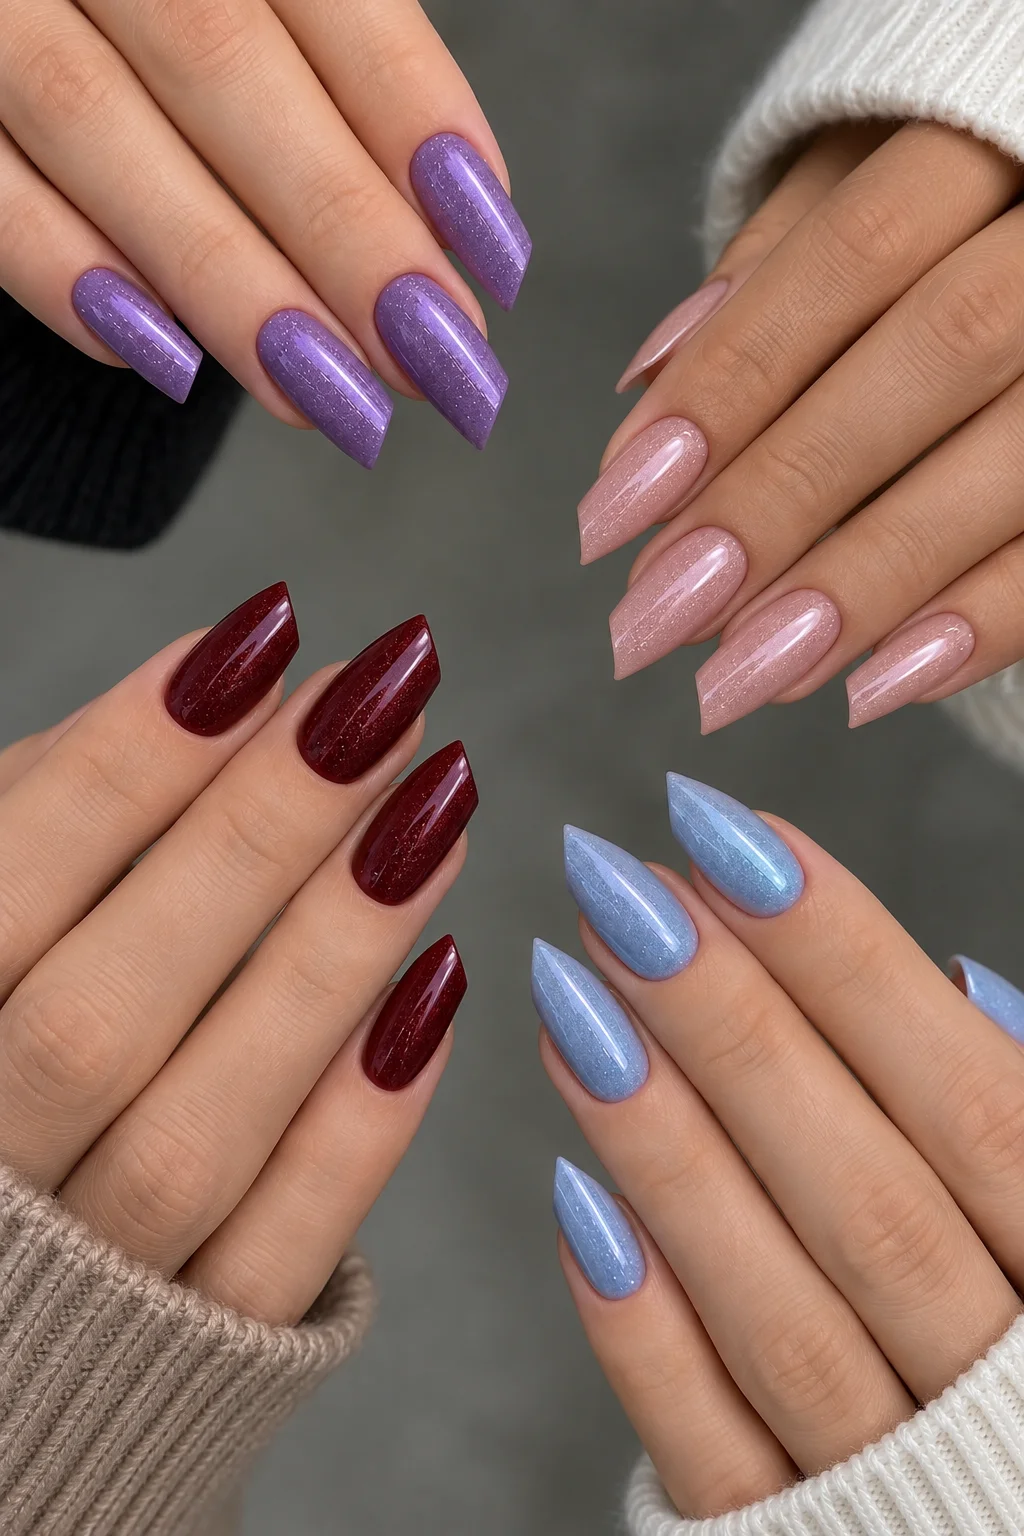
If I were recreating one of these at home, I would focus on getting the shape right before worrying about the color. The nails should be filed consistently so the diagonal free edge looks deliberate rather than uneven. After applying the chosen shade, I would add a glossy top coat to emphasize the length and smooth out the finish. For anyone trying lipstick nails for the first time, starting with one color is probably the easiest way to learn how the shape behaves.
Personally, I love the idea of treating lipstick nails almost like choosing an outfit. Some days call for soft pink, other days need burgundy, and occasionally a little lavender sparkle just makes sense. That versatility is what makes the shape interesting to me. It is distinctive enough to feel like a trend, but the right color can completely change its personality. So, which mood would you pick first?
Lipstick nails prove that a small change in shape can completely refresh a familiar manicure. I love how the angled tip gives even simple colors a more fashion-forward personality without requiring complicated nail art. From glossy reds and deep greens to sheer nudes, pastels, and delicate details, this shape is surprisingly versatile. It can feel bold for a night out or polished enough for everyday wear, depending on the color and finish you choose. If you have been craving something different, this could be the perfect moment to leave the usual square or almond shape behind. After all, sometimes the tiniest twist is all it takes to make your next manicure feel brand new.

