
Nude nails have a way of making every look feel instantly more polished without ever stealing the spotlight. But how do you keep a minimalist manicure from looking too plain or predictable? I love the idea of using soft pinks, creamy beige tones, sheer finishes, and tiny details to create nails that feel effortless yet beautifully considered. These shades are especially easy to wear every day, whether I’m heading to the office, meeting friends for coffee, or dressing up for dinner. And when the right shape and finish come together, even the simplest manicure can feel surprisingly chic. Here are the minimalist nude manicure ideas I’d save for an everyday look that feels fresh, feminine, and completely wearable.
Playful Pastel Lines on a Nude Base
Here, the nude manicure gets a playful little twist without losing its everyday appeal. The nails have a translucent pink base that lets the natural nail show through, while sweeping lines of turquoise blue, soft yellow, and white create an airy abstract pattern. Some tips carry curved blocks of color, while others feature flowing ribbons that move diagonally across the nail. The almond shape gives those colorful details plenty of room to breathe.
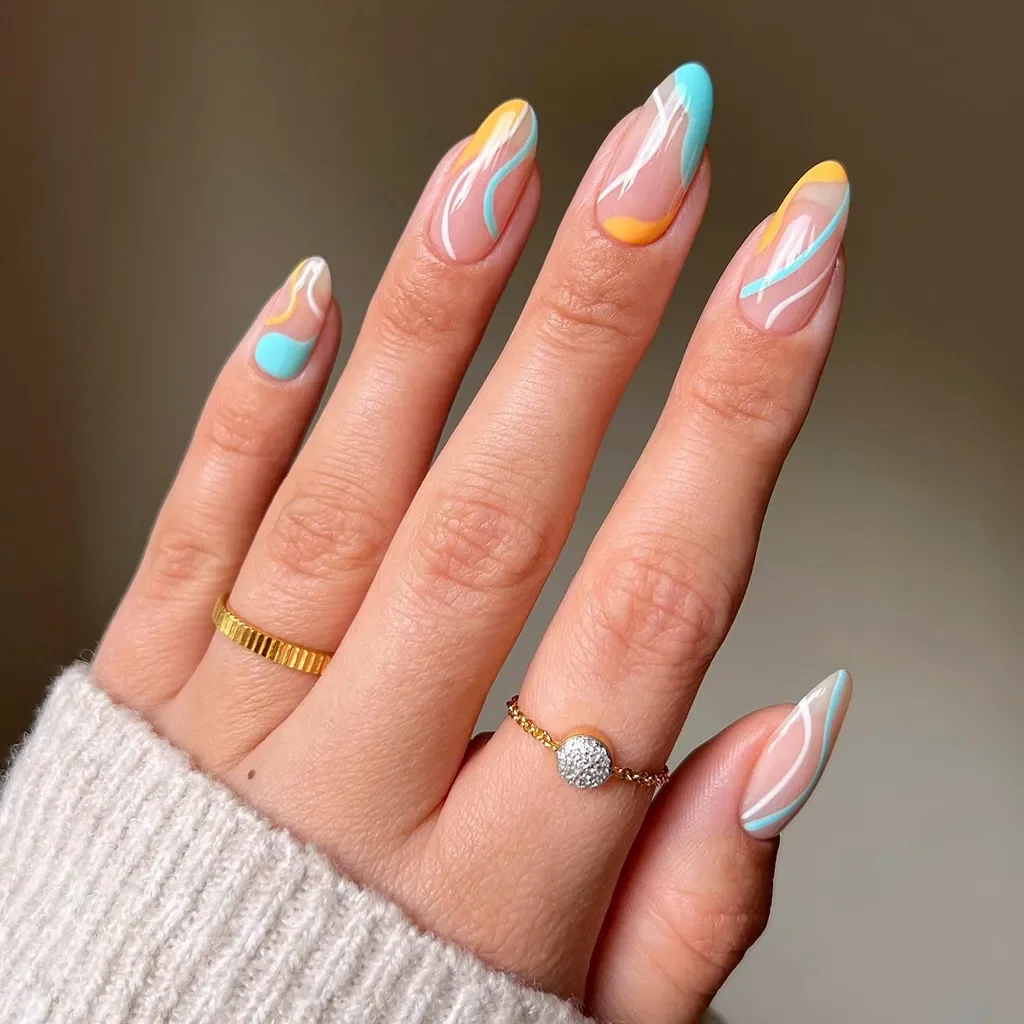
I would use a sheer pink builder base or nude gel as the foundation, then add a fine nail-art brush for the colored details. A soft turquoise, sunny yellow, and crisp white are enough to recreate the palette without making it feel overloaded. I particularly like keeping the background translucent because it prevents the pastel colors from becoming too heavy.
The trick at home is patience. I would apply the nude base first and let it cure completely before attempting the curved lines. With a fine brush, I would draw each stroke in one confident movement rather than repeatedly going over it. If the lines are not perfectly identical, even better—the slight differences give abstract nail art that handmade quality.
Would I wear this every day? Absolutely, especially during warmer months when lighter colors feel natural again. I like that the design has enough personality to catch attention but still leaves plenty of negative space. It is a fun choice when a plain nude manicure feels just a little too quiet.
Blush Nude Nails With Sharp Black Tips
This manicure is proof that nude and black can make an unexpectedly elegant combination. The base is a glossy blush-pink nude, while each sharply tapered almond nail ends with a slim black tip. The contrast is crisp but restrained, creating a modern version of French manicure without relying on the traditional white tip. The long almond shape makes the black detail look especially sleek.
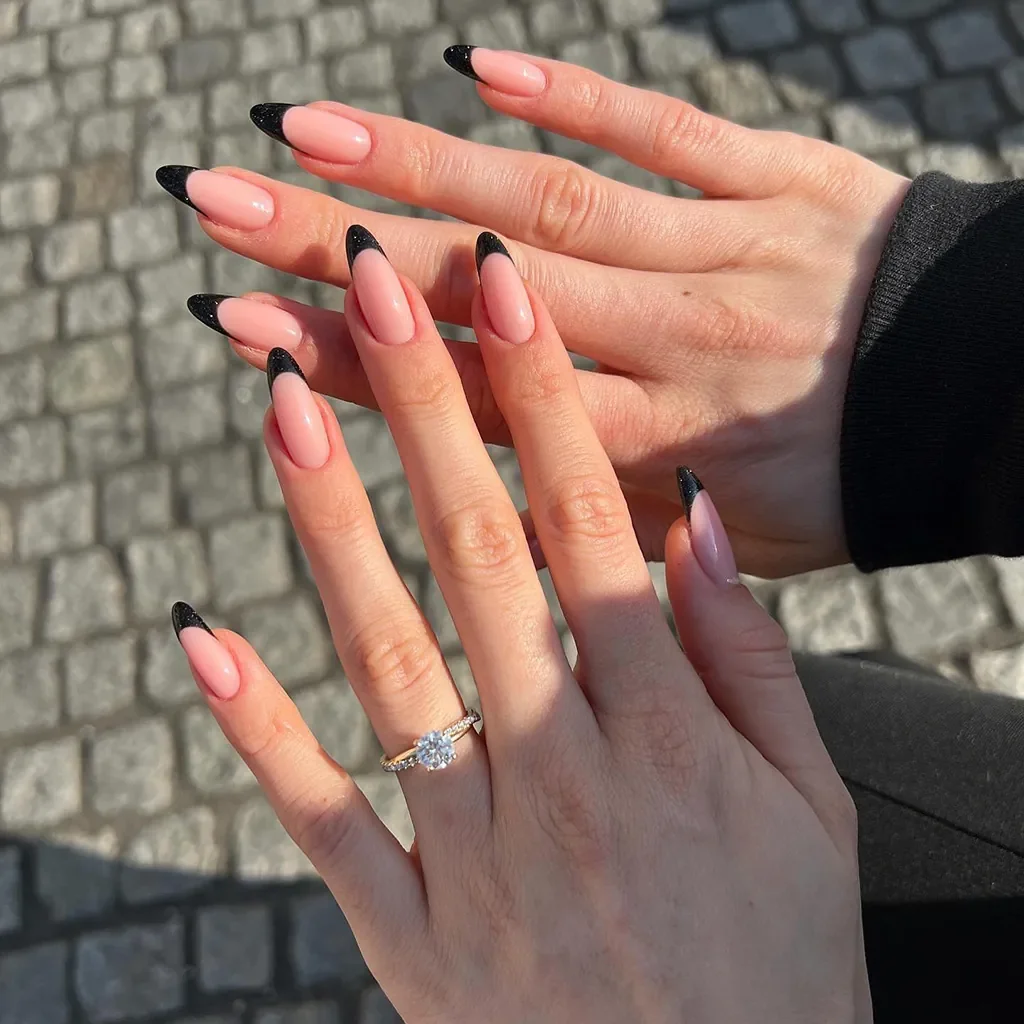
I would choose a pink-beige gel polish with enough coverage to create that smooth, healthy-looking base. For the tips, a highly pigmented black gel works best because only a small amount is needed. A fine liner brush or French-tip guide can help create the pointed black edges, while a glossy top coat keeps the entire manicure looking seamless.
I would shape the nails first and make sure the length is consistent before applying any color. After the nude base cures, I would carefully outline the black tips from one side toward the center, then repeat from the other side. This is one of those designs where a little cleanup brush dipped in gel cleanser can make a huge difference.
I especially like this version for days when I want something minimalist but not overly delicate. The black adds just enough attitude to a traditionally feminine nude base. It would also transition beautifully from a daytime outfit to evening plans, which is exactly what I want from an everyday manicure.
Matte Nude Nails With Delicate Botanical Lines
A soft matte finish changes the entire mood of nude nails. These nails are short to medium in length with a rounded-square shape and a creamy nude-beige color that looks velvety rather than glossy. One accent nail features an extremely delicate black botanical-style line drawing, adding just enough detail to keep the manicure from feeling too basic.
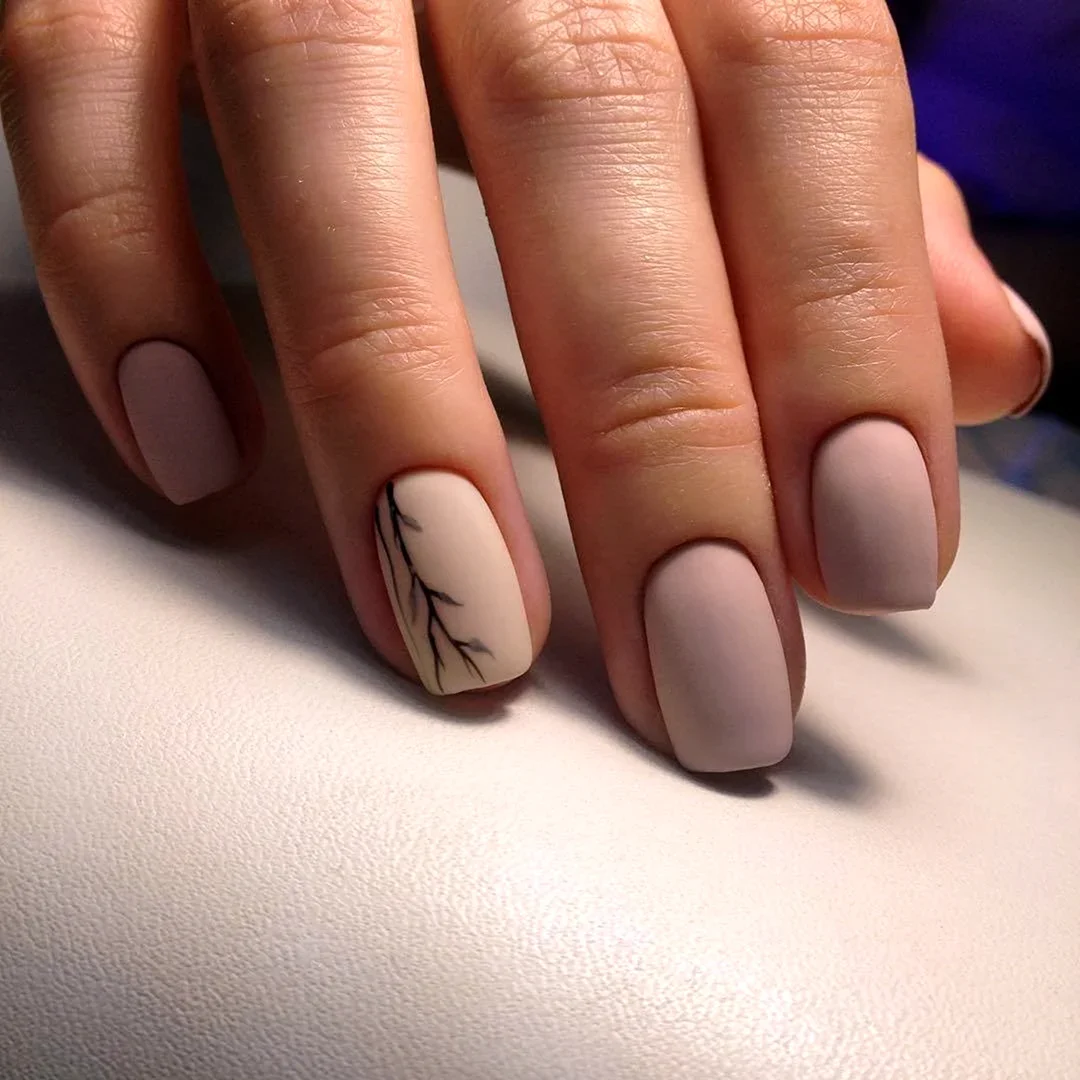
For the base, I would choose a creamy neutral that sits somewhere between pale beige and soft blush. OPI Samoan Sand, Essie Ballet Slippers, or a comparable nude can work depending on the undertone of the skin. A matte top coat is essential here, while a very fine black nail-art brush is enough for the tiny accent detail.
I would keep the nail art deliberately sparse. After applying and curing the nude color, I would use a fine liner to create thin, slightly organic branches or leaf-like strokes on one or two accent nails. There is no need to make the design perfectly symmetrical. Once the artwork is cured, I would apply matte top coat across the nails, taking care not to flood the cuticle area.
This style feels especially wearable to me because the decoration is almost whispered. I could see myself wearing it to work, for errands, or with a cozy sweater on a slow weekend morning. And that tiny accent nail? It is exactly the kind of detail someone notices only after looking twice—which, honestly, is part of the charm.
Soft Pink Almond Nails With a Barely-There Glow
I love how effortlessly polished this almond manicure feels. The nails are shaped into a softly tapered almond silhouette, with enough length to make the fingers look elongated without crossing into dramatic territory. The color is a muted nude pink with a slightly cool, milky quality, and the glossy finish gives the surface that fresh, almost glass-like appearance. There is no nail art competing for attention, which is exactly why the manicure feels so sophisticated.
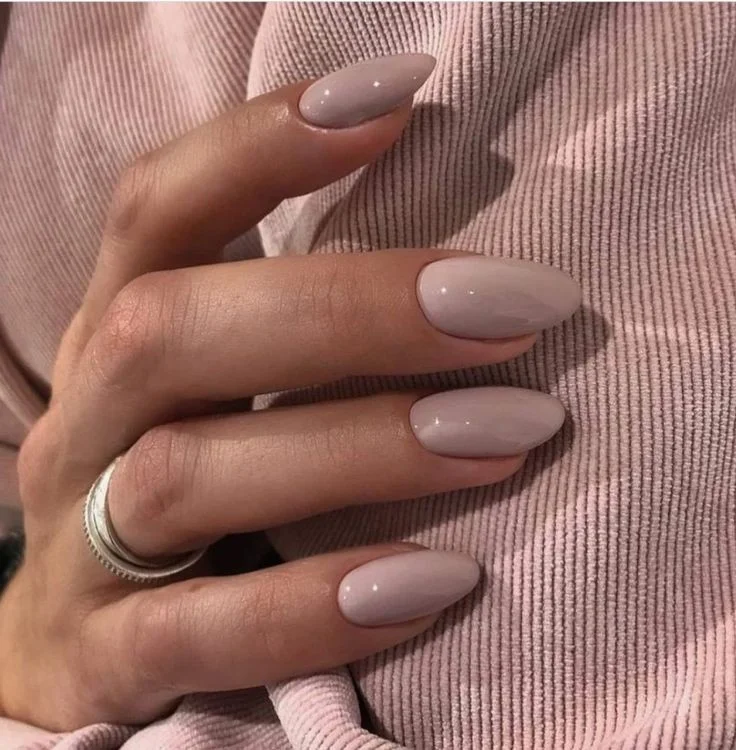
For this kind of finish, I would reach for a sheer or semi-opaque pink-nude gel polish rather than a heavy beige. OPI Bubble Bath, CND Shellac Romantique, or a similar milky pink can create the right base, followed by a high-shine top coat. The secret is choosing a color that blends softly with the natural skin tone instead of looking noticeably painted on.
At home, I would start by gently shaping the nails into a balanced almond form, keeping both sides symmetrical and the tip softly rounded. After cuticle care and a thin base coat, I would build the nude color in two very thin layers. A glossy top coat finishes everything off. I would resist the temptation to apply one thick layer because that can make a minimalist manicure lose its delicate quality.
This is the kind of manicure I would choose when I want my hands to look polished every single day without thinking about them again. It works with jeans, office clothes, a summer dress, and basically every piece in between. Sometimes the most successful beauty choice is the one that quietly makes everything else look better.
Sheer Nude Nails With Rose-Gold Metallic Flakes
If plain nude nails feel a little too predictable, I would add metallic flakes rather than reaching immediately for elaborate nail art. This manicure combines a translucent nude base with irregular pieces of rose-gold and copper-toned foil scattered across the surface. The oval-almond shape keeps the overall effect graceful, while the glossy finish allows every tiny metallic fragment to catch the light.
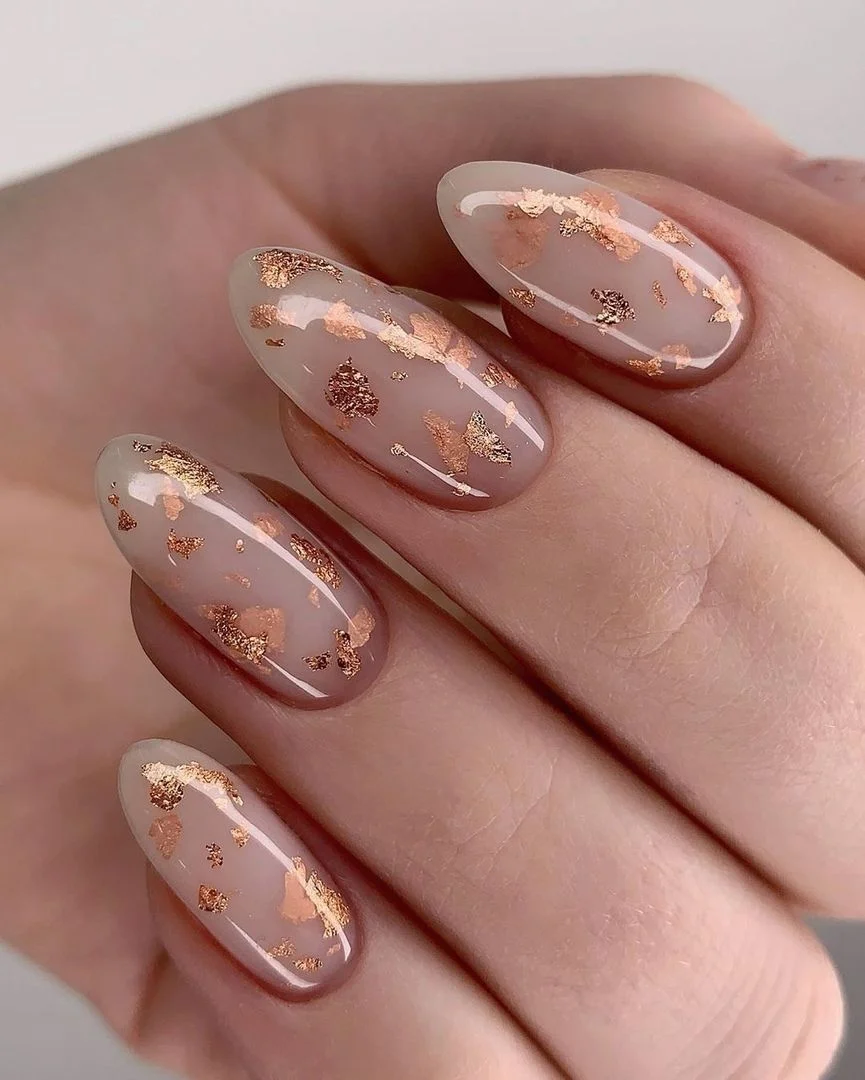
I would use a sheer nude-pink gel polish as the foundation and small cosmetic nail foils in rose gold, copper, or soft champagne. A clear builder gel or foil adhesive can help secure the pieces, followed by a thick but smooth glossy top coat. I prefer irregular flakes to perfectly shaped metallic decorations because they give the manicure a more organic, effortless finish.
To recreate it, I would apply the nude base in thin layers and cure it before placing the foil. Using tweezers, I would pick up small fragments and press them lightly onto selected areas of the nail rather than covering the entire surface. Once everything is positioned, I would seal the design carefully with top coat so the surface feels completely smooth.
This is probably the version I would save for a dinner, celebration, or those days when I want my everyday manicure to feel slightly more special. The rose-gold details bring warmth without overpowering the nude base. It is subtle sparkle, not a full-on glitter moment—and sometimes that is exactly the sweet spot.
Glossy Pink Nude Nails With a Soft Square Shape
I love how effortlessly polished this manicure feels. The nails have a short-to-medium length with softly squared tips and slightly rounded corners, creating a shape that looks neat without becoming overly structured. The color sits somewhere between sheer blush and creamy nude, with enough translucency to let the natural nail character subtly show through. A high-gloss finish adds that beautiful glass-like effect, making the manicure look fresh, clean, and incredibly well cared for. This is exactly the kind of nude I would choose when I want my hands to look refined without making the manicure the entire conversation.
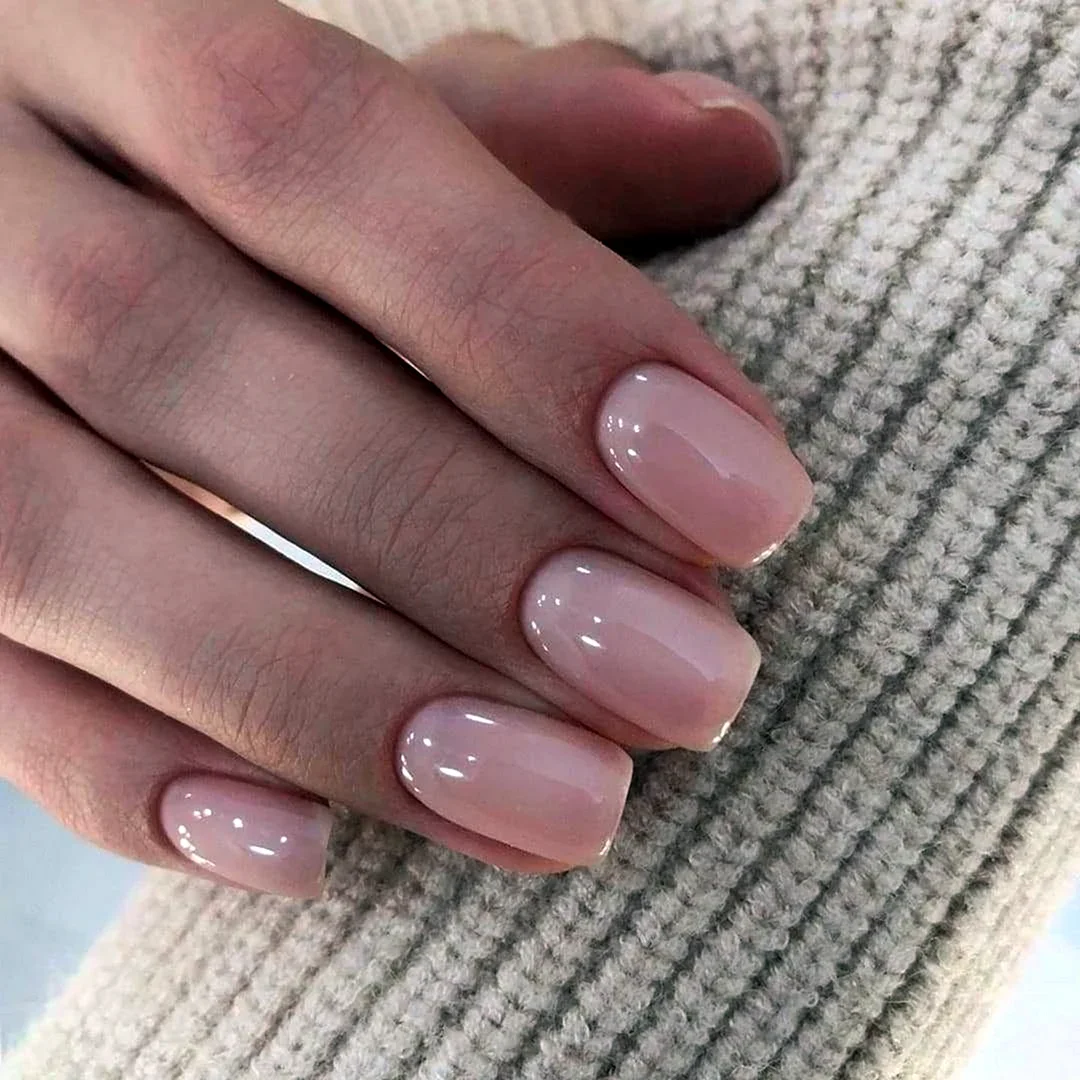
For this look, I would reach for a sheer pink-beige gel polish or builder gel with a translucent finish rather than an opaque nude. OPI Bubble Bath, CND Shellac Romantique, or a similar milky pink shade can create the right base, although I would adjust the number of coats depending on how sheer I want the result. I’d also keep a glossy top coat nearby because the shine is doing a lot of the visual work here. The more reflective the surface, the more expensive and finished the manicure tends to feel.
At home, I would first shape the nails into a soft square, paying particular attention to keeping the corners balanced. After gently tidying the cuticles, I’d apply a thin base coat and then one or two very thin layers of the nude color. I prefer building the color gradually rather than applying one thick coat because that keeps the finish delicate. Once everything is even, I’d seal the manicure with a high-shine top coat and carefully cap the free edge.
This is one of those manicures I could wear for weeks without getting tired of it. I especially like it for busy summer days when I’m switching between casual clothes, office outfits, and evening plans. The soft pink undertone keeps it feminine, while the simple shape makes it practical. If you’ve ever thought nude nails were boring, this is the kind of manicure that might change your mind.
Milky Nude Almond Nails With a Blurred French Finish
This version takes the nude manicure in a softer, more romantic direction. The nails are almond-shaped, with a gently tapered silhouette that visually lengthens the fingers. The base has a translucent pink-nude appearance, while the tips gradually fade into a creamy white. There is no harsh French line here, and that is exactly why the manicure feels so modern. The white appears almost diffused into the nude base, creating a smooth milky gradient that looks incredibly clean and delicate.
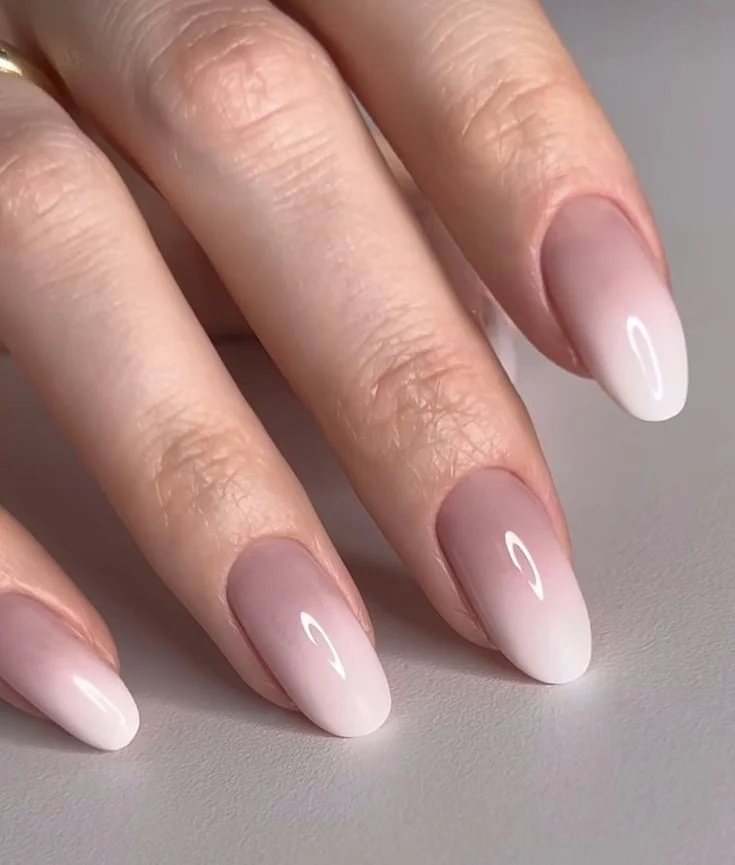
I would use a sheer rosy nude gel as the foundation and a soft white gel polish for the faded tip. A product such as OPI Funny Bunny can work beautifully for the white portion, while a sheer pink builder gel or neutral rubber base can create the translucent foundation. The important thing is choosing shades that blend rather than contrast too sharply. I would also use a very fine sponge or an airbrush-style application technique if I wanted to recreate that softly disappearing edge.
To create the look, I’d start by shaping the nails into a symmetrical almond, keeping the tip elegant rather than dramatically pointed. After the base layer cures, I’d apply the translucent nude and build the milky white toward the ends in very thin layers. The trick is patience. I’d rather make three delicate passes than try to create the entire gradient in one heavy coat. Once the transition looks seamless, I’d finish everything with a glossy top coat.
I find this style especially pretty when I want something that feels dressed up but still completely wearable during the day. It has the elegance of a French manicure without looking overly formal. For a summer wedding guest look, vacation dinner, or simply a week when I want my hands to look especially graceful, this would be high on my list. The almond shape adds length, while the blurred color keeps everything soft.
Short Lavender Nude Nails With a Clean Glossy Finish
Sometimes the smallest change in color makes a minimalist manicure feel completely new. Here, the nails are short and softly rounded, but the nude base has a delicate lavender-pink undertone. The result is subtle enough to read as neutral while still giving the hands a cool, slightly dreamy finish. I particularly like the way the glossy surface catches the light without introducing glitter or decoration. It is simple, but definitely not plain.
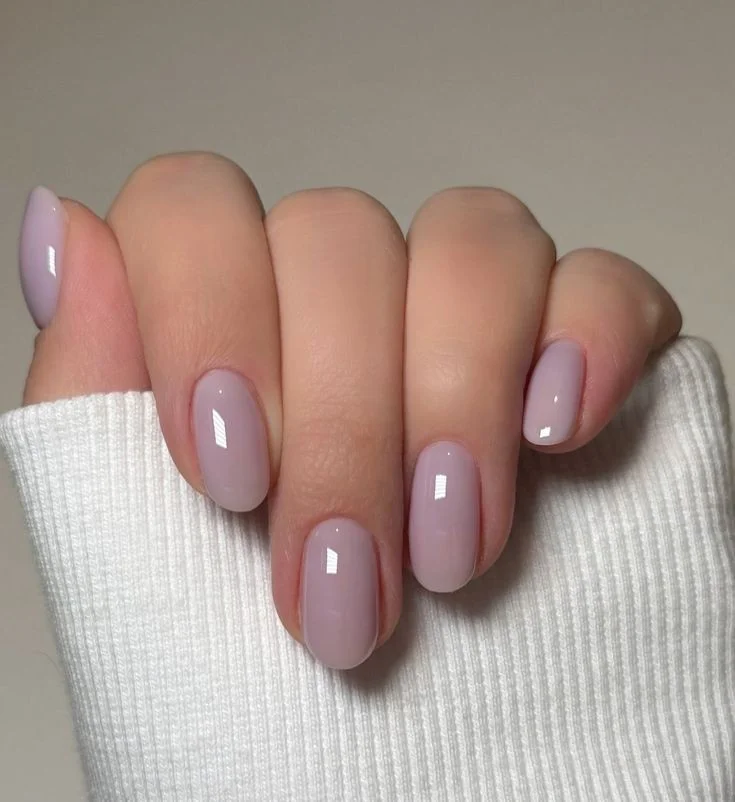
For this kind of manicure, I would look for a pale mauve, lavender nude, or cool-toned pink with a jelly or cream finish. Essie Mademoiselle layered with a cooler sheer polish can create a similar effect, while gel users can choose a translucent mauve builder gel. I would avoid anything too purple because the beauty of this design is how quietly the undertone appears. The color should look almost nude at first glance and reveal its lavender character only in certain lighting.
I’d keep the application uncomplicated. I would gently round the free edge to follow the natural shape of the fingertips, smooth the nail surface, and apply a thin base coat. Then I’d use two very thin coats of the lavender nude, allowing each layer to level before adding the next. A glossy top coat completes the manicure and gives those little reflective highlights that make short nails look especially fresh.
This is probably the version I’d choose when I want a practical everyday manicure with just a tiny twist. Short nails are easy to live with, and the cool undertone works beautifully with white cotton, denim, gray, silver jewelry, and summer neutrals. It also has that wonderfully low-maintenance quality: when the manicure is this subtle, small signs of growth are much less noticeable.
Sheer Blush Nude Nails With Modern Square Tips
This manicure is a great example of how much sophistication can come from getting the basics exactly right. The nails have a medium length and a clean square shape with gently softened corners. The color is a translucent blush nude, slightly warmer than the previous lavender-toned version, and the glossy surface gives the nails an almost glassy appearance. There is no nail art competing for attention, so the beautiful proportions of the shape and the evenness of the color become the focus.
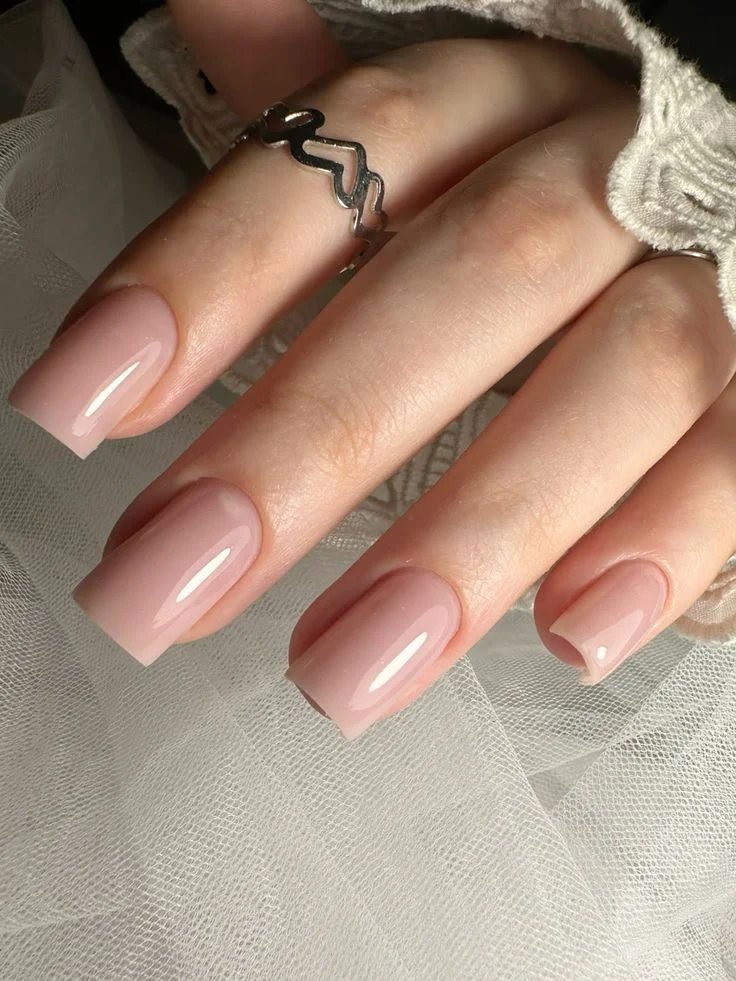
I would use a sheer neutral pink or pink-beige gel polish for this look, preferably one that can be layered without becoming completely opaque. CND Beau, OPI Bubble Bath, or similar sheer blush shades would be good starting points. I’d pair the color with a smoothing base coat if the natural nail has visible ridges because a minimalist manicure leaves very little room for uneven texture to hide. A generous but controlled layer of glossy top coat brings everything together.
When I do a square manicure like this, I pay close attention to the sidewalls because they determine whether the finished shape looks elegant or bulky. I’d file the free edge straight across and then soften the corners just enough to make them comfortable. After applying the nude shade in thin layers, I’d check the nails from different angles before sealing them. With minimalist nails, tiny details suddenly matter a lot.
I could easily see myself wearing this manicure with an oversized white shirt, gold hoops, and barely any other accessories. It has that clean summer feeling I’m always drawn to when the season gets busy and I want my beauty routine to feel effortless. It is also incredibly versatile for work, weekends, dinners, and travel. Sometimes the best manicure is the one that quietly works with everything.
Sheer Nude Almond Nails With Fine White Details
This final look brings a little more artistry into the minimalist nude category. The nails are long and almond-shaped, with a translucent peachy-nude base that allows the natural nail to remain part of the design. Crisp white French tips define the pointed ends, while extremely fine white curved lines sweep across the surface. Those delicate strokes give the manicure movement without making it feel busy. I love that the decoration follows the shape of the nails instead of fighting against it.
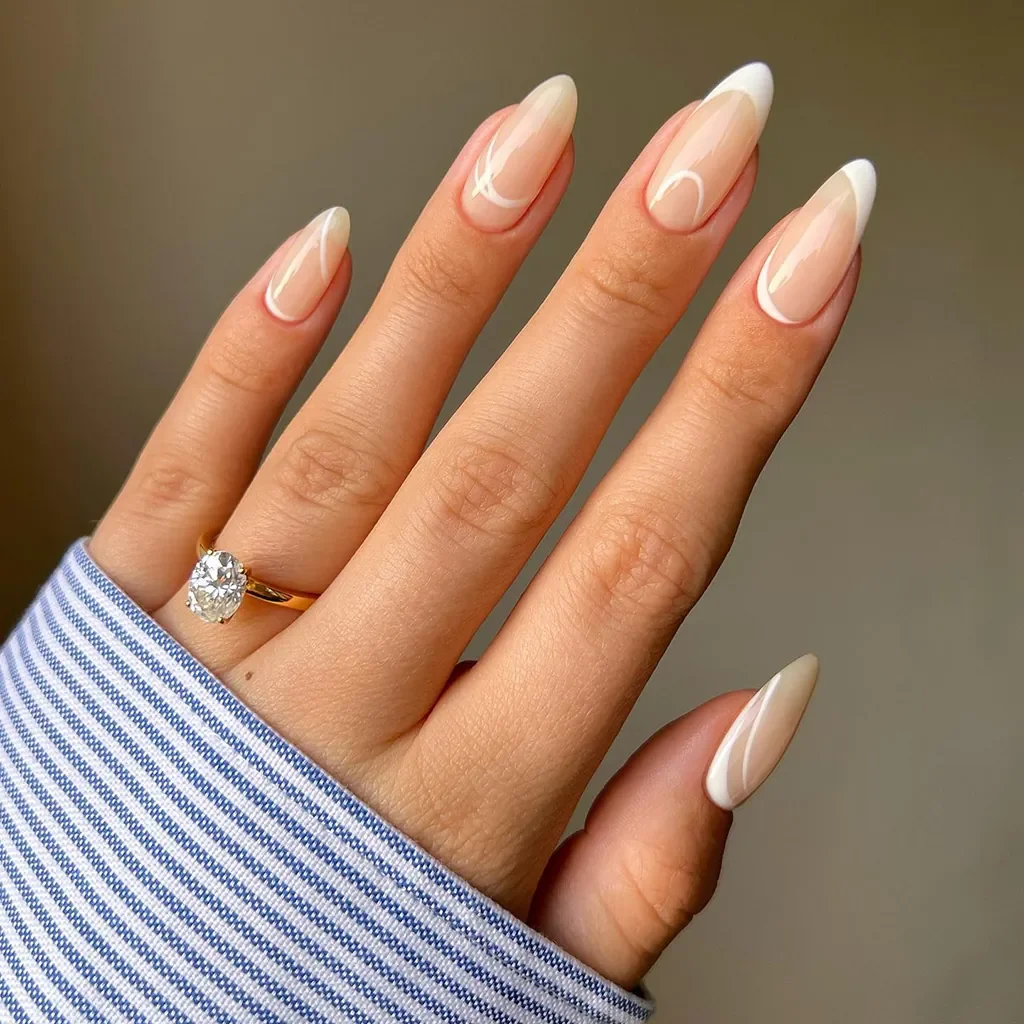
To recreate it, I would use a sheer nude or peach-toned gel as the base, a soft white gel polish for the tips, and a fine nail-art brush for the curved lines. A shade like OPI Funny Bunny can provide the white detailing, while a translucent nude builder gel keeps the base looking natural. I would also use a highly pigmented white polish for the thin artwork because a watery white can require too many passes and make delicate lines look thick.
I’d begin by shaping each nail into a balanced almond and applying the sheer nude base. Once cured, I’d carefully create the white tips, keeping them slim so they complement rather than dominate the design. After curing again, I’d use a fine brush to draw the curved white accents with one confident movement. I would not try to make every line identical. Slight differences actually help the manicure feel more organic and handmade. A glossy top coat finishes the design and smooths everything into one polished surface.
This is the manicure I’d save for when I want my everyday nude nails to have a little more personality. The elongated almond shape feels elegant, but the translucent base keeps it light enough for summer. Those tiny white curves are also a clever way to experiment with nail art without committing to a full design. If you like minimalist beauty but occasionally find yourself thinking, “I want just a little something,” this is exactly where I’d start.
Soft Blush Nude With Rose Gold Details
I love a nude manicure that looks almost effortless at first glance, then reveals a little something extra when you look closer. Here, the nails have a soft almond shape and a sheer blush-pink base that gives the hands a clean, polished appearance without feeling overly done. Most of the nails stay beautifully simple, while two accent nails introduce a milky white base with delicate blush-toned strokes and tiny rose-gold details. The combination feels feminine, refined, and surprisingly easy to wear every day.
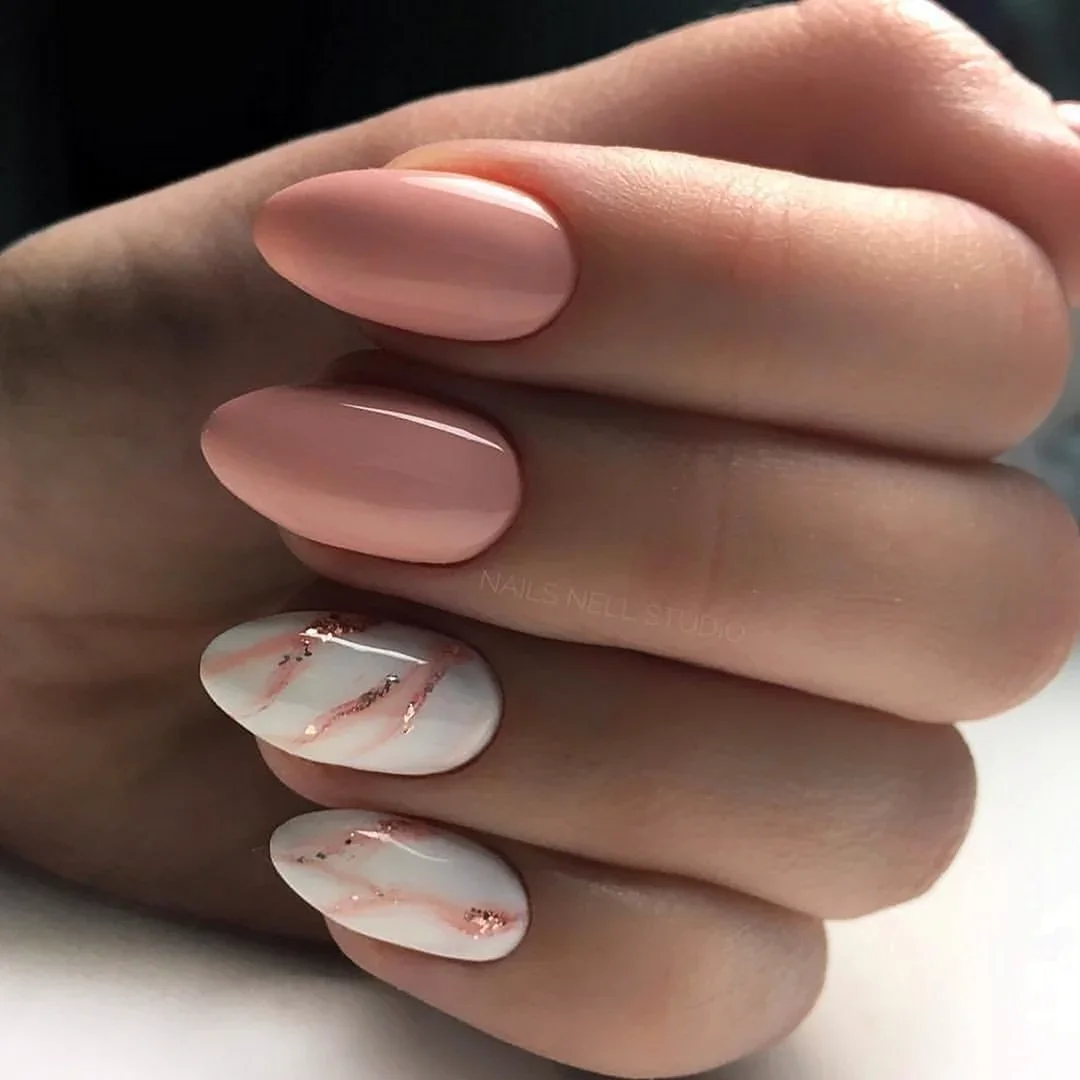
For this look, I would keep the color palette very restrained. I would reach for a sheer pink such as OPI Bubble Bath, Essie Ballet Slippers, or a similar milky nude, plus a translucent white polish for the accent nails. A very fine nail-art brush makes those loose, almost watercolor-like lines much easier to create. For the tiny metallic accents, I would use rose-gold glitter or miniature metallic flakes rather than chunky embellishments. The goal is a whisper of shine, not a statement piece.
I would start by shaping the nails into a smooth almond silhouette and applying a thin base coat. After two sheer layers of blush pink, I would leave the accent nails slightly lighter with a milky white finish. Once that layer is dry, I would use a fine brush to sweep a few irregular blush lines across the accent nails, keeping them airy rather than perfectly symmetrical. A few tiny rose-gold particles along the lines finish everything beautifully. One tip I always follow with delicate nail art is to work in very thin layers; it keeps the design soft instead of muddy.
This is exactly the kind of manicure I would choose when I want my nails to look polished with a cashmere sweater, a white button-down, or even jeans and a simple tank. It has that quiet prettiness that never asks for attention, yet somehow gets noticed. And honestly, isn’t that the sweet spot for an everyday nude manicure?
Sheer Pink Almond Nails With Holographic Glow
There is something especially pretty about a translucent nude base when the light catches it just right. These elongated almond nails begin with a delicate blush-pink color and gradually melt into sparkling, holographic tips. Instead of a traditional French manicure with a crisp dividing line, the glitter fades upward in a soft gradient, creating an almost glassy effect. The result is feminine and modern, with enough sparkle to make an ordinary day feel a little more special.
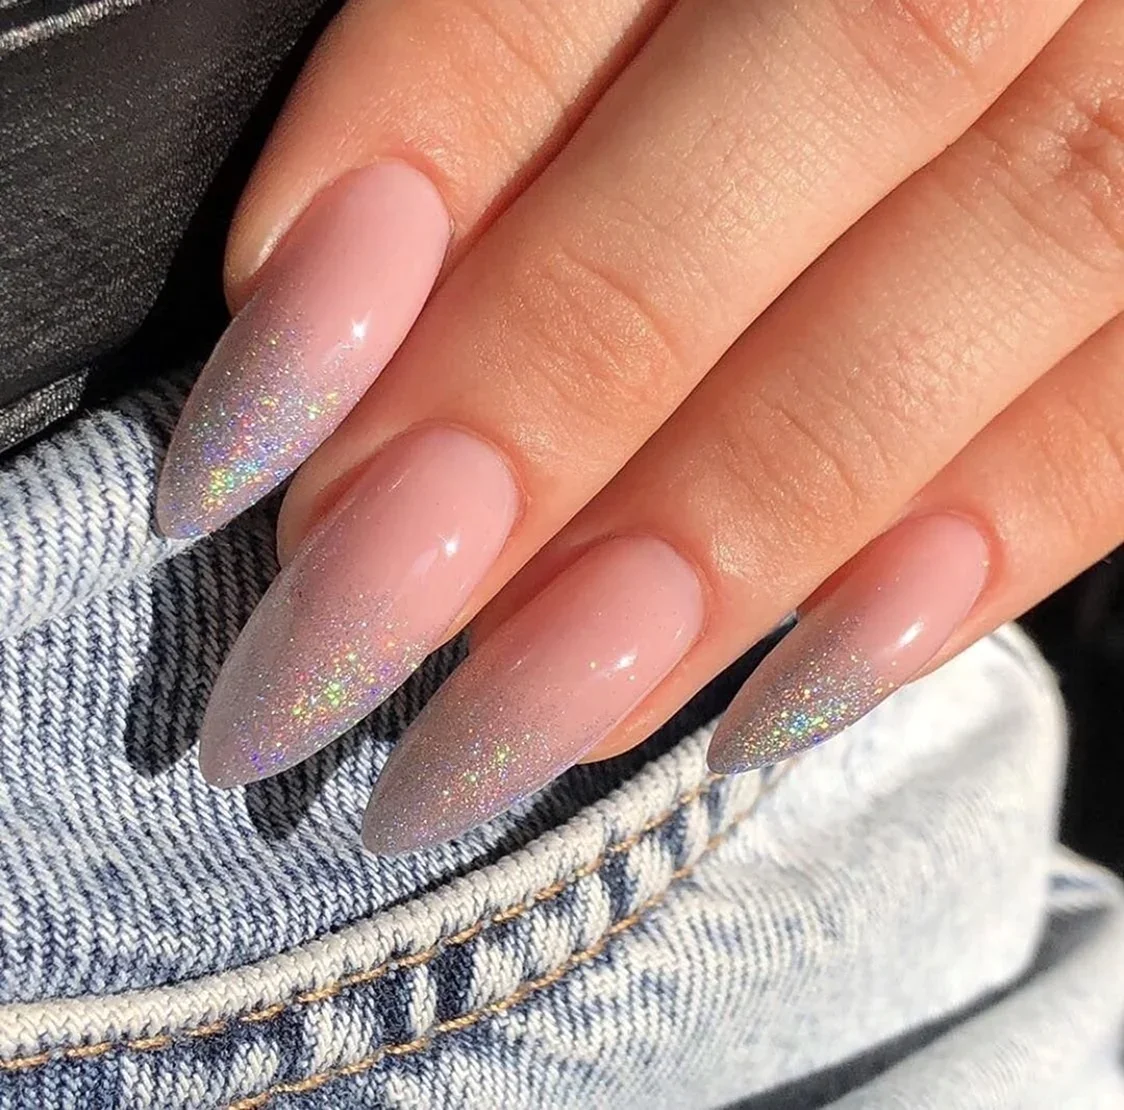
I would build this manicure around a sheer pink gel or polish with a glossy finish. OPI Funny Bunny layered with a soft pink sheer, Essie Ballet Slippers, or a comparable blush nude would work beautifully as the base. For the tips, I would choose a fine holographic glitter rather than large glitter pieces. A makeup sponge can help create the faded effect, while a high-shine top coat brings out those tiny rainbow reflections. Denim makes a surprisingly good companion to this palette, which makes the look particularly easy for everyday wear.
After shaping the nails into a tapered almond form, I would apply the nude base in thin, even layers. Once cured or fully dry, I would gently press holographic glitter onto the lower portion of each tip, concentrating the sparkle toward the edge and diffusing it upward. I would repeat the process until the transition looks seamless, then finish with a glossy top coat. The trick is not to make every nail identical. A slightly softer fade on one nail and a little more sparkle on another can make the manicure feel much more natural.
I particularly like this version for late summer when the sun is still strong but the mood is beginning to shift toward fall. The holographic particles catch daylight beautifully, yet the blush base keeps everything sophisticated. If classic nude nails feel a little too quiet for you, this is an easy way to turn up the volume without going all the way to glittery party nails.
Blush Pink Nails With Playful White Scalloped Tips
This manicure takes the idea of a French tip and softens it into something much sweeter. The nails have a rounded shape and a glossy blush-pink base, while the very edges feature tiny white scallops that look almost like little clouds or petals. The curved tips are intentionally delicate, so the overall manicure still reads as nude and minimalist rather than heavily decorated. I especially like how the white detail follows the natural curve of the nail instead of creating a rigid horizontal line.
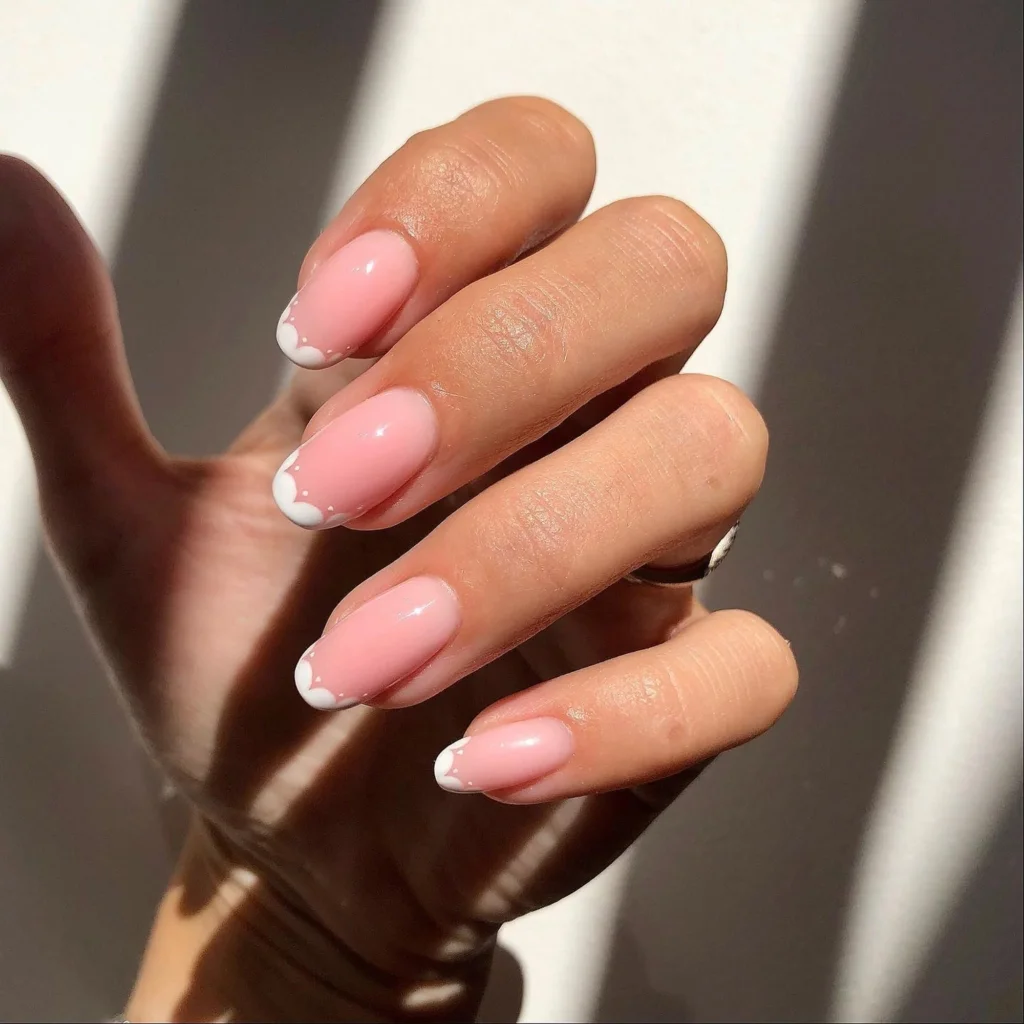
The color story is wonderfully simple. I would use a translucent pink nude for the base and an opaque soft white for the scalloped edge. Essie Mademoiselle paired with a crisp white polish would give a similar effect, although any sheer pink that lets the natural nail show through can work. A dotting tool is helpful for creating the rounded portions of the scallops, while a very fine nail-art brush can clean up the edges. A glossy top coat is essential here because the shine makes the pale colors look fresh and expensive.
I would begin with a neat rounded or softly oval shape, then apply the sheer pink base. Once it is dry, I would place tiny white dots along the outer edge of each nail and connect them carefully into miniature scallops. I would keep the white section quite narrow because the charm of this design is its restraint. After everything has dried, one smooth layer of top coat will blend the details together and give the surface that glassy finish.
I can see myself wearing these nails with a simple summer dress, a linen shirt, or even a casual weekend outfit. They have a youthful little twist without looking childish, which is a surprisingly difficult balance to get right. Want something more interesting than plain nude but still completely office-friendly? This one makes a very convincing case.
Minimal Blush Nails With Delicate White Botanical Lines
Short nails can be every bit as chic as long ones, and this manicure proves it beautifully. The softly rounded square shape keeps the look practical, while the sheer pink-nude base gives the nails a naturally polished appearance. Two accent nails carry very fine white botanical line art, with airy petal shapes that almost disappear into the translucent base. The rest remain intentionally plain, creating a balanced manicure that feels neat rather than overly coordinated.
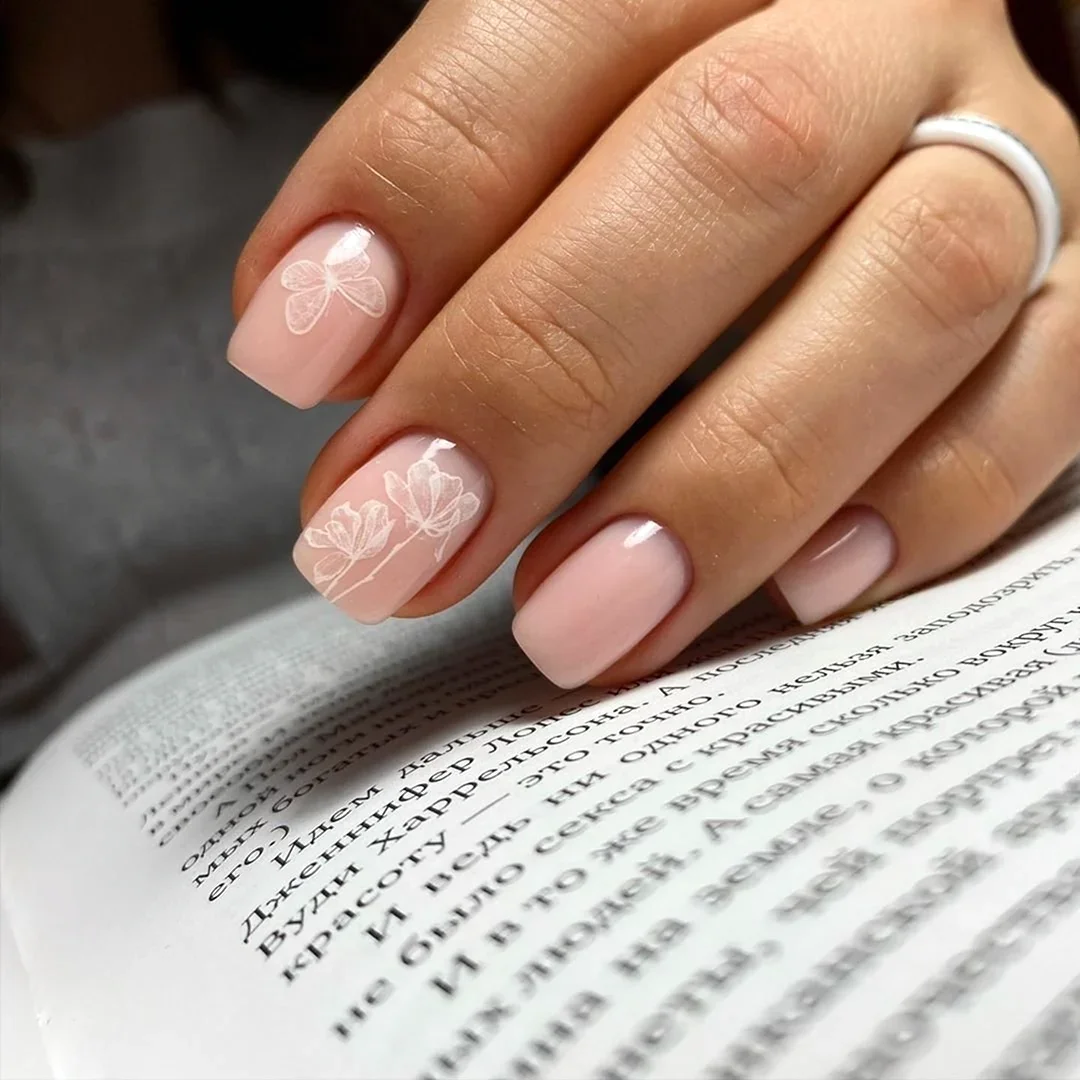
I would choose a semi-sheer blush nude for the foundation and a highly pigmented white detail polish for the artwork. Something like OPI Put It in Neutral or a similar neutral pink would give the right barely-there effect. For the delicate lines, I would use an ultra-fine detail brush or nail-art liner. Because the design is so light, I would avoid adding glitter or extra embellishments. The beauty here comes from the contrast between the glossy nude surface and the almost hand-drawn white details.
At home, I would shape the nails first and gently smooth the edges rather than creating an aggressively squared silhouette. After applying the nude base, I would paint the tiny petals with a few thin strokes, allowing each flower-like motif to remain slightly imperfect. That is important. If every line is too precise, the manicure can lose its delicate, handmade quality. I would finish with a glossy top coat and give the cuticles a little nourishing oil once everything is set.
This is one of those designs I would recommend when practicality matters but plain polish feels boring. Short nails, a soft color, minimal art—it all works together without competing with jewelry, clothing, or makeup. I also love how easily this style can move from a morning coffee run to a dinner reservation. Sometimes understated really does win.
Neutral Nude Nails With Curved Coffee-Toned Accents
Here is where minimalist nude manicure gets a little more graphic. The nails have a short, softly tapered shape with a translucent nude base, while curved lines in creamy white, warm caramel, and deeper brown sweep across the tips and sides. Some areas of the natural-looking base are deliberately left visible, which gives the design a light negative-space quality. Nothing feels rigid or overly geometric; the flowing curves make the manicure look relaxed and contemporary.
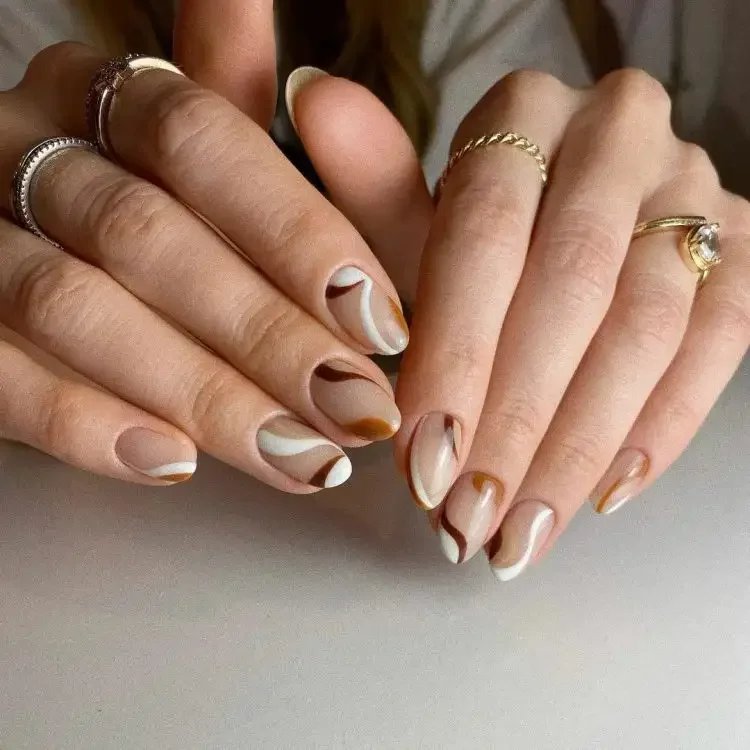
I would keep the palette close to the colors already present: a neutral pink-beige base, creamy white, soft caramel, and a warm chocolate-brown accent. OPI Samoan Sand or a similar beige nude would make a good foundation, while thin art brushes would allow the curved lines to stay clean. I would choose highly pigmented colors for the accents so only one thin layer is needed. A glossy finish would tie the different shades together and make the nude base look especially smooth.
To recreate it, I would first apply the nude base and let it become completely smooth. Then I would use a fine liner brush to create the sweeping white curves, followed by the caramel and brown lines, varying their placement from nail to nail. I would not try to copy every curve exactly because the appeal is in the organic movement. Once the design is dry or cured, I would seal it with a generous but controlled layer of top coat, making sure the edges are covered.
For me, this is the most fashion-forward interpretation of nude in the set. It still works for everyday life, but the brown and caramel accents give it enough personality to feel intentional. It would look fantastic with denim, cream knitwear, gold jewelry, or the warm neutrals that always seem to return when the seasons start changing. If you have been searching for a nude manicure that feels current without becoming complicated, these curved accents are a very easy place to start.
Soft Blush Nails with a Tiny Romantic Detail
I always come back to this kind of manicure when I want my nails to look neat, feminine, and completely effortless. The short-to-medium square shape has gently softened corners, which keeps the silhouette practical while still looking polished. The base is a translucent blush pink with a milky quality, allowing a hint of the natural nail to show through. Most of the nails stay intentionally simple, while tiny black line-art details on two nails add just enough personality. One resembles a miniature heart, while the other has a delicate botanical-inspired mark. Nothing feels oversized or distracting, and that restraint is exactly what makes the design work.
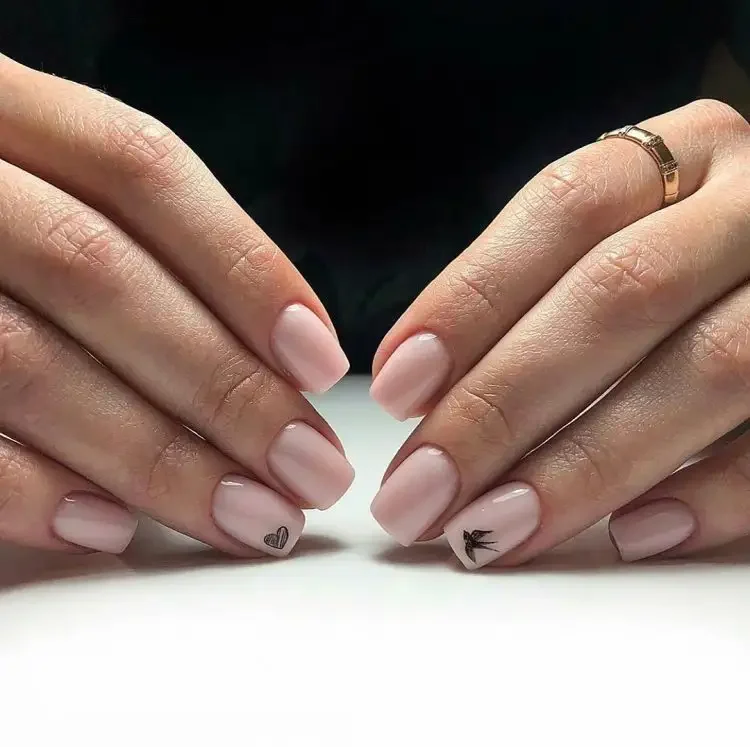
For this finish, I would reach for a sheer pink or milky nude gel polish rather than a fully opaque beige. OPI Bubble Bath or Funny Bunny can create a similar soft foundation, while a very fine nail-art brush and black gel paint are enough for the miniature details. I would also keep a glossy top coat nearby because this particular manicure depends on that smooth, glassy surface. The goal is not to pile on products; it is to make a few carefully chosen details look exceptionally clean.
When I recreate a minimalist manicure like this at home, I start by shaping every nail evenly and gently pushing back the cuticles. After applying a thin base coat, I use one or two very sheer layers of pink, allowing each layer to cure properly. Once the color is set, I add the tiny line-art accents with the smallest brush I can comfortably control. A steady hand matters more than complicated technique here. I finish with a glossy top coat and clean around the edges before curing.
I especially like this style for everyday summer plans because it does not compete with anything else I am wearing. A printed dress, denim, office neutrals, or even a swimsuit and oversized button-down all work with it. Have you ever noticed how one tiny detail can make a simple manicure feel much more expensive? That is the trick here. The nails stay understated, but the little accents give them a story.
Milky Pink Short Nails for an Effortless Everyday Look
There is something incredibly satisfying about a short manicure covered in one perfectly even shade. This version uses a soft milky pink that sits between translucent nude and delicate pastel, giving the nails a clean, healthy-looking appearance. The short rounded-square shape makes the manicure especially wearable, while the smooth glossy finish catches the light without becoming overly shiny. I would call this the definition of a no-fuss nude: simple enough for every day, but polished enough to make your hands look instantly put together.
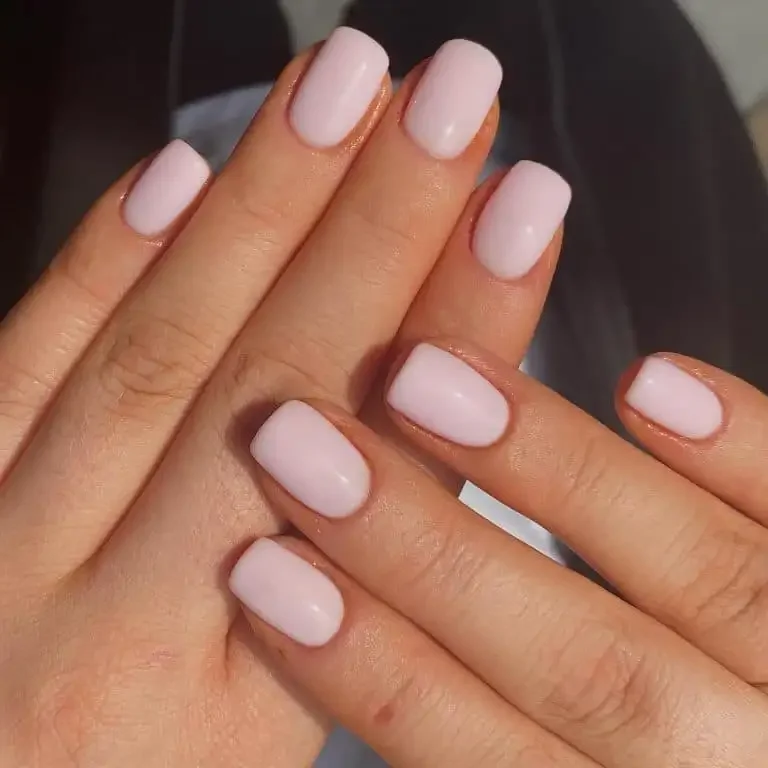
I would choose a creamy sheer pink polish with a slightly cool or neutral undertone for this look. Essie Ballet Slippers is a classic option for a translucent effect, while OPI Bubble Bath can create a warmer, slightly pinker result depending on the number of coats. For a gel version, a milky builder or sheer gel color can give the nails a similar softly diffused finish. I would keep the layers thin because too much product can make a short manicure look bulky.
The preparation is almost more important than the color itself. I file the nails into a softly rounded square, making sure the free edges are even from side to side. After cuticle care and a base coat, I apply two very thin layers of milky pink, checking the surface from different angles before curing. If I want a little more coverage, I add a third whisper-thin layer rather than one heavy coat. A glossy top coat pulls everything together and gives the manicure that fresh-from-the-salon effect.
This is one of those designs I would happily wear for weeks because it fits into almost every part of my routine. It looks appropriate with work clothes, casual weekend outfits, and those last-minute summer plans where you have five minutes to get ready. If you prefer your manicure to make your hands look refined rather than decorated, this is a very safe place to start.
Glossy Pink Almond Nails with a Soft Sunset Aura
Now we move from barely-there simplicity into something a little more playful while keeping the minimalist spirit intact. These elongated almond nails have a translucent pink base with soft washes of creamy white and pale yellow toward the tips. The colors blend into one another rather than forming obvious blocks, creating an airy aura-like effect. The high-shine finish makes the surface look almost glassy, while the tapered almond shape adds length and elegance. I love how the design feels delicate from a distance but reveals more color the closer you look.
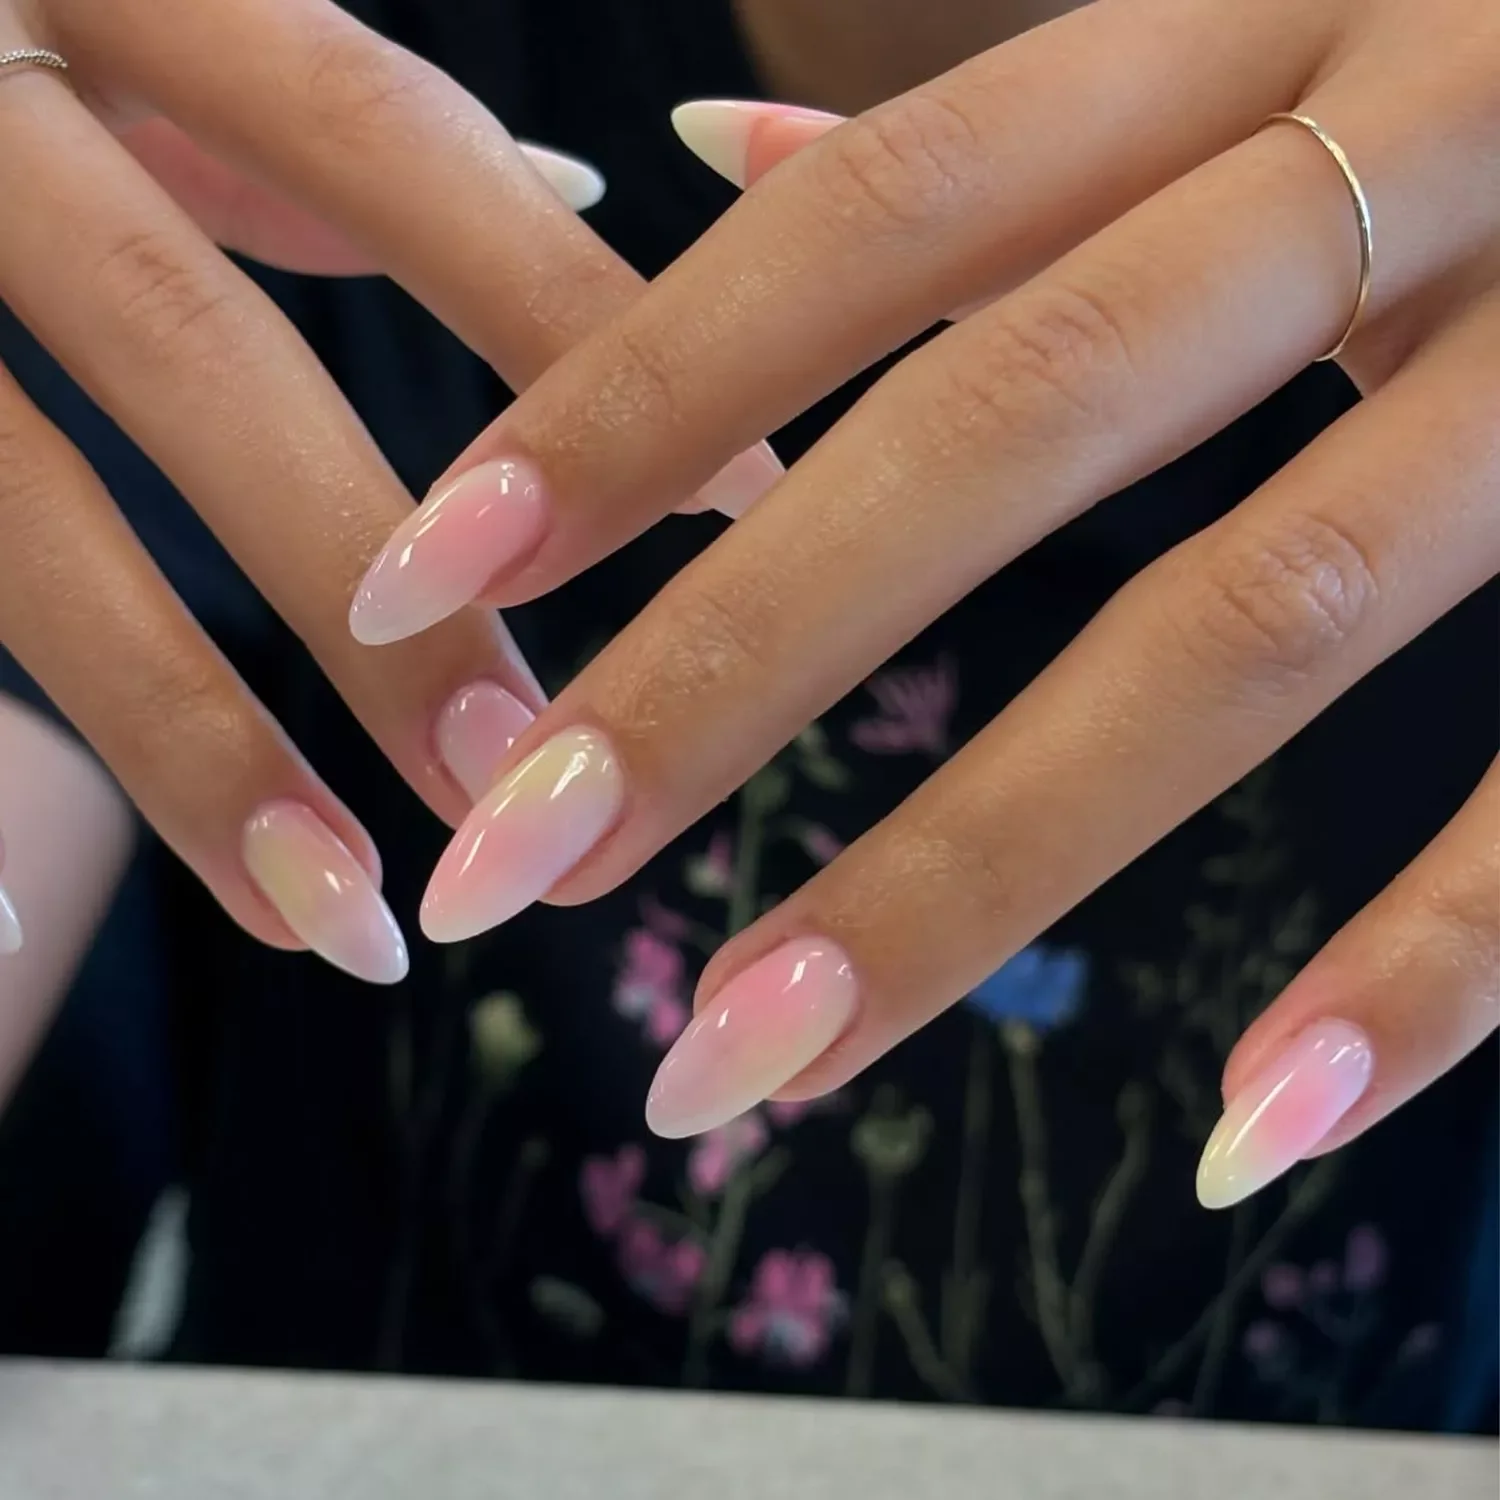
To achieve this effect, I would use a sheer pink base followed by very soft white, pale butter-yellow, and possibly a touch of peachy nude. Gel polishes are particularly useful because their workable texture makes blending easier before curing. A small sponge or soft blending brush can help diffuse the colors, while a high-gloss top coat creates the wet-look finish. The colors should remain muted; if the yellow becomes too saturated, the manicure quickly loses its sophisticated quality.
I would begin by creating a balanced almond shape, keeping the sides straight enough to make the nails look elongated without producing an overly sharp point. After the base layer, I would apply the translucent pink and cure it. Then I would gently place tiny amounts of white and pale yellow onto selected areas, blending the edges until there are no obvious lines between the shades. The secret is knowing when to stop. One more layer can easily turn an ethereal design into something much heavier.
This is the manicure I would choose when I want minimalist nails with a little summer personality. The pale yellow reminds me of late-afternoon sunlight, while the pink keeps everything soft and wearable. It would be gorgeous with white cotton, pale denim, or a simple neutral dress. And honestly, if a manicure can feel both clean and a little dreamy, I am sold.
Sheer Nude Almond Nails with a Barely-There Finish
A classic nude manicure does not need decoration when the shape and finish are this beautiful. These almond nails are long enough to create an elegant silhouette but remain relatively natural-looking because the color is so close to the skin. The polish has a warm, translucent nude-pink quality, allowing the natural nail to subtly influence the final result. The surface is glossy and smooth, and there are no visible patterns or embellishments competing with the simplicity of the design. It is quiet, but definitely not boring.
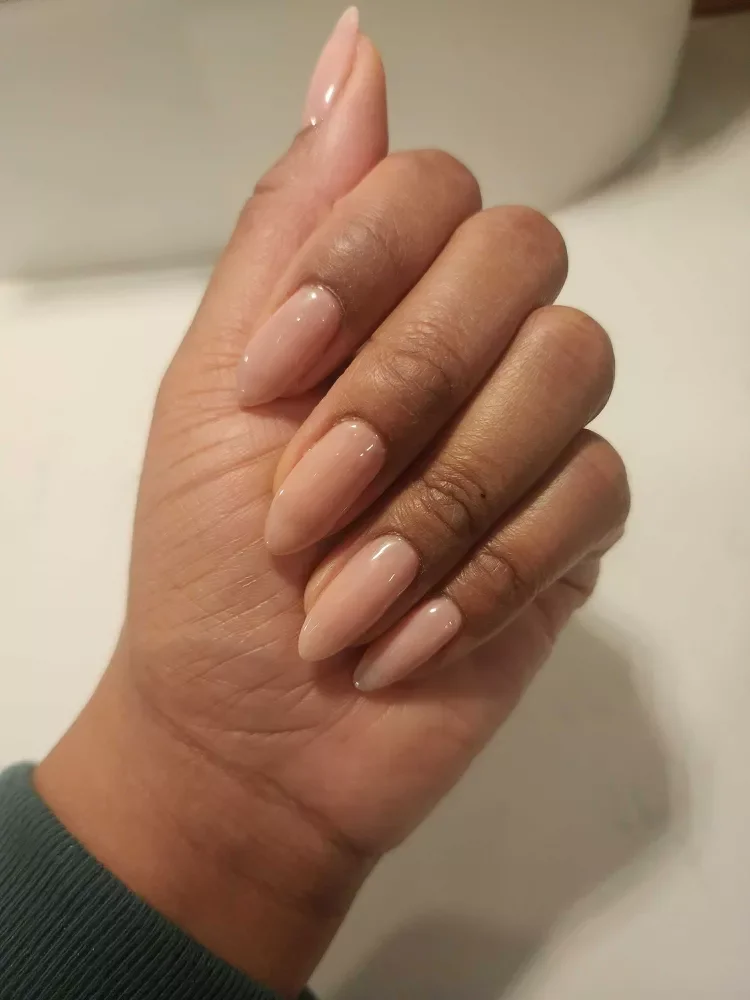
For a similar manicure, I would look for a sheer beige-pink or warm nude that can be layered gradually. CND Vinylux Romantique or OPI Put It in Neutral are good references for this type of soft nude family, although the exact shade should always be adjusted to the skin tone. I prefer a color that looks slightly transparent rather than completely opaque because that gives the manicure a more natural finish. A nourishing cuticle oil is also worth adding to the routine because hydrated skin makes a minimalist manicure look even cleaner.
At home, I would first shape the nails into a smooth almond, paying attention to keeping both sides symmetrical. After buffing very lightly and applying base coat, I would use one thin layer of nude followed by another if additional coverage is needed. I would resist the temptation to make the color completely opaque. The beauty is in seeing a little natural depth underneath. After the top coat has cured, I would massage cuticle oil around the nail plate and let the whole manicure settle before reaching for anything too demanding.
I have always thought this kind of nude is the manicure equivalent of a really good white shirt: it simply works. It can look elegant with jewelry, relaxed with denim, and polished with office clothes without needing to change anything. For anyone who wants a manicure that quietly makes their hands look longer and more refined, this almond shape and sheer nude combination is hard to beat.
Modern French Nude Almonds with a Delicate White Edge
French manicure territory can feel familiar, but the proportions make all the difference. Here, a sheer nude-pink base follows the natural shape of the nail, while a slim white French edge traces the almond tip. The line is delicate rather than dramatically thick, which keeps the overall design light and contemporary. A few tiny reflective accents near the base add a subtle point of interest without taking the manicure away from its minimalist character. The result is elegant, clean, and especially flattering on an elongated nail shape.
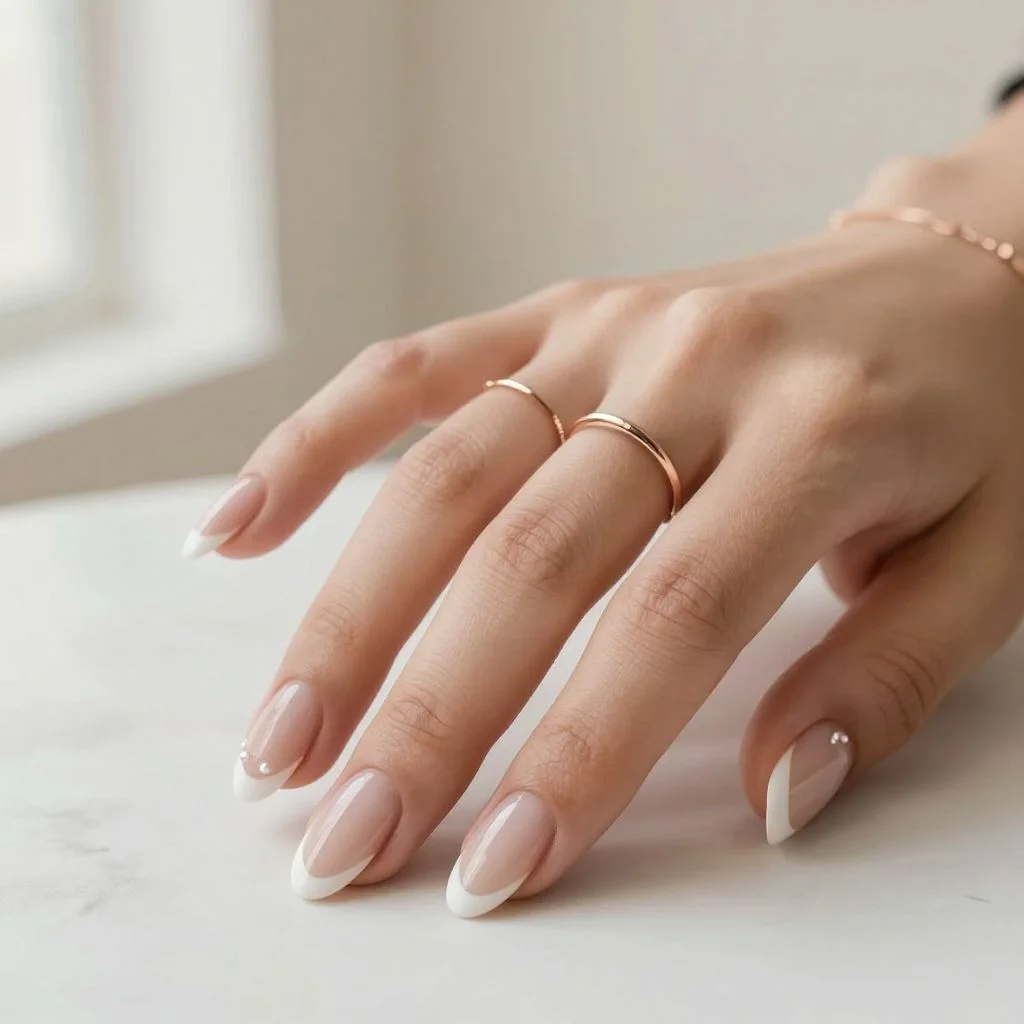
I would use a sheer nude-pink base and a crisp white gel polish for the French tips. A fine liner brush gives me more control over the curved edge, although French-tip guides can be helpful if freehand lines feel intimidating. For the tiny accents, I would use miniature rhinestones or a pinpoint of reflective nail decoration secured with nail adhesive or gel. The materials are simple, but precision is everything. A glossy top coat should cover the finished design smoothly without flooding the cuticle area.
I usually start by perfecting the almond shape before thinking about the French detail. Once the nude base is cured, I mark the thinnest possible smile line across each tip, working slowly from one side toward the center and then repeating from the other side. I check the nails together rather than finishing one completely before moving on to the next. That little habit helps keep the French tips visually balanced. Finally, I add the tiny accents sparingly and seal everything with top coat.
This is the version of a nude French manicure I would choose for a summer event when I want something timeless but not predictable. It works beautifully with gold jewelry, soft tailoring, vacation outfits, and even a simple tank top because the nails bring their own polish to the look. Would I wear it every day? Absolutely. The design has just enough detail to feel special, while the nude base keeps it firmly in everyday territory.
Sheer Nude Almond Nails with Delicate French Tips
I love the quiet sophistication of this manicure because it gives a classic French manicure a softer, more modern finish. The nails have an elongated almond shape with a translucent nude-pink base that allows the natural nail to remain part of the look. Most of the tips are finished in a creamy off-white shade, while a few feature an ultra-thin silver shimmer detail that catches the light without taking over. The result is delicate rather than decorative, and the slightly varied tips keep the manicure from feeling too predictable.
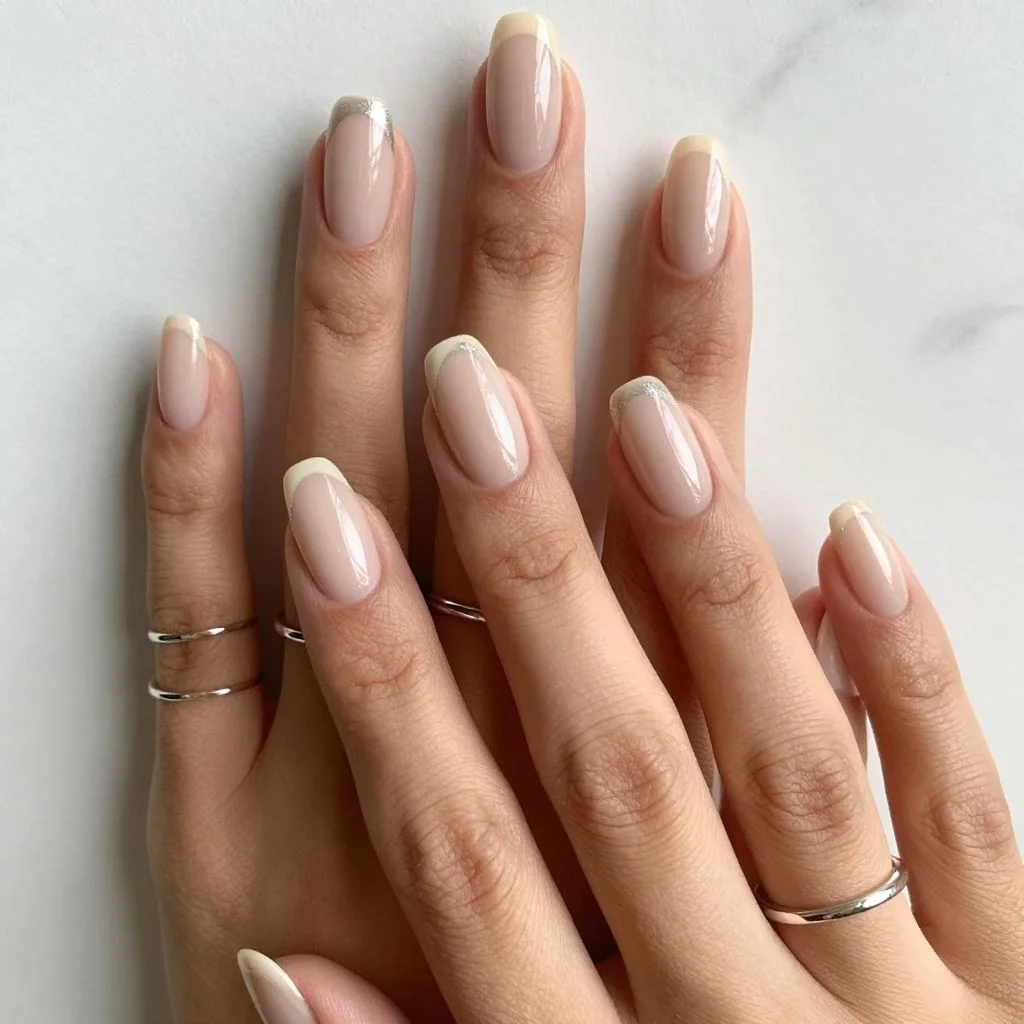
For this look, I would reach for a sheer pink or milky nude gel polish, a soft ivory-white shade for the French tips, and a fine silver glitter polish or chrome pigment for the occasional accent. A high-shine top coat is essential because the glossy surface makes the nude base look smoother and gives the manicure that fresh salon finish. I would also keep a fine liner brush nearby for creating the narrow tip with more control.
I start by shaping the nails into a soft almond, keeping the sides balanced and the point gently rounded rather than sharp. After cuticle care and a thin base coat, I apply one or two sheer layers of nude polish, allowing the natural nail to show through. I then add the creamy French tips with a very fine brush, keeping them thin enough to preserve the minimalist effect. On selected nails, I would add a restrained touch of silver shimmer before sealing everything with top coat.
This is the kind of manicure I would choose when I want my hands to look instantly put together without committing to a bold color. I especially like how the silver detail appears almost accidentally when the light hits it. It would work beautifully with white linen, denim, soft neutrals, or even a simple black dress. Sometimes the smallest detail does the most work.
Short Natural Nude Nails with a Glossy Finish
Short nails can look incredibly elegant when the color is kept sheer and the shape is neat. Here, the manicure stays close to the natural nail with a softly rounded square shape and a translucent pink-beige finish. The polish is glossy but not heavily opaque, so the natural variation of the nails remains visible. I like that quality because it makes the manicure feel believable and easy rather than overly perfected.
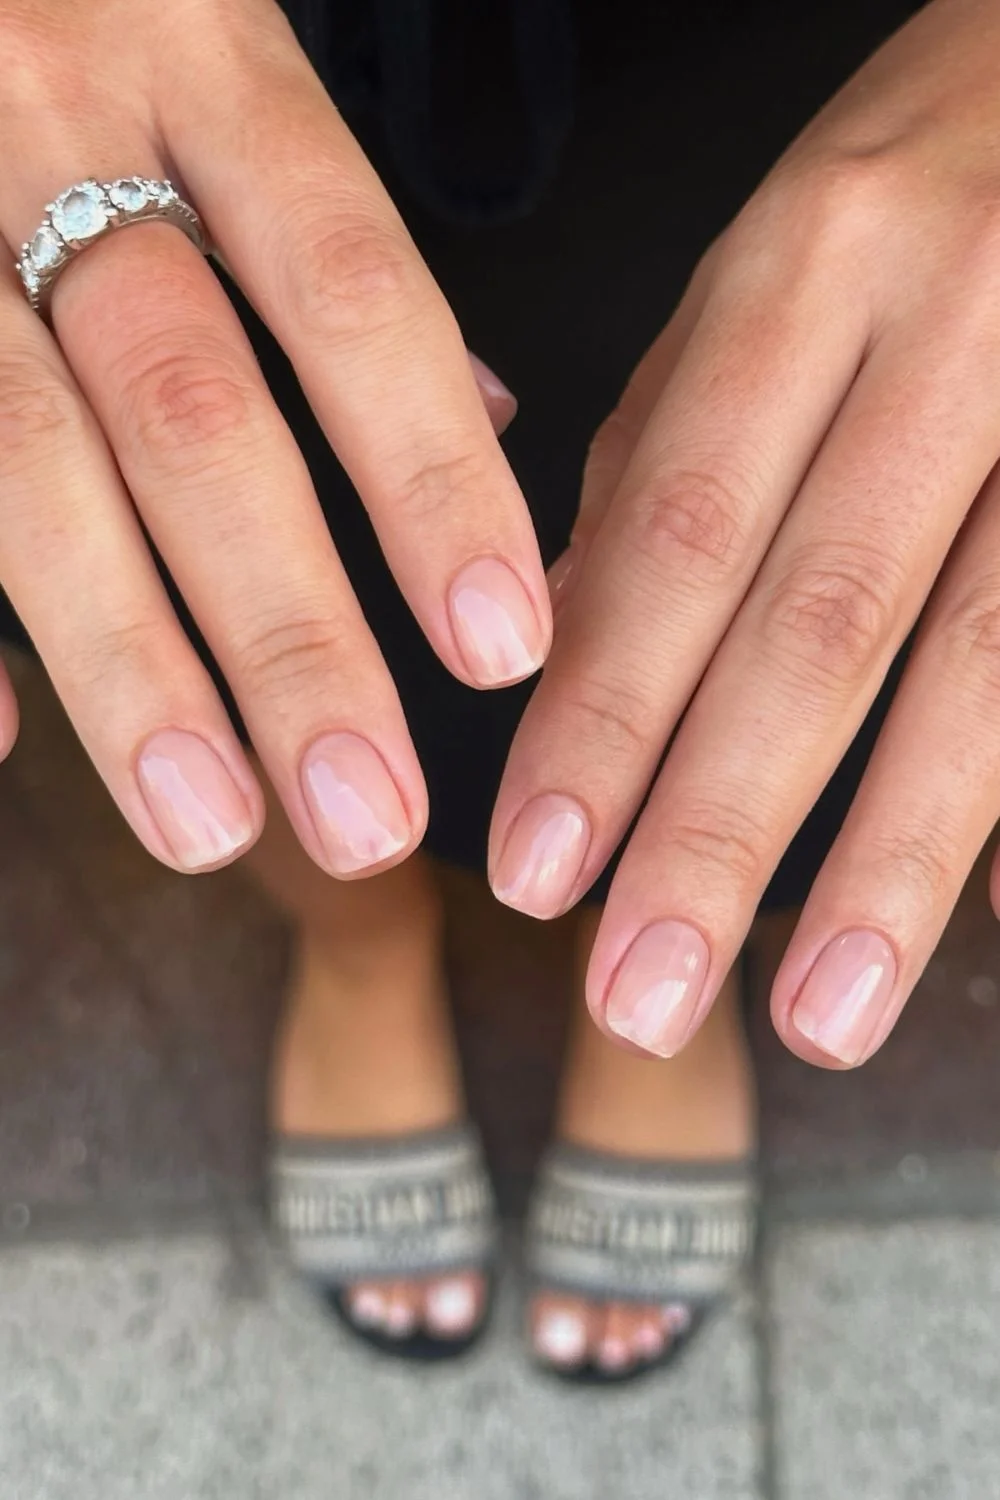
I would keep the product list wonderfully simple for this version: a gentle base coat, a sheer blush-nude polish, and a glossy top coat. A shade similar to OPI Bubble Bath, Essie Ballet Slippers, or a comparable sheer pink can create the same soft effect, although the final color will naturally vary depending on the nail underneath. The goal is not to completely cover the nail but to give it a healthier-looking wash of color.
At home, I would first file the nails into a consistent short squoval shape, paying attention to the corners so they remain softly rounded. After pushing back the cuticles and lightly preparing the nail surface, I would apply a thin base coat followed by one sheer layer of pink. If more coverage is needed, I would add a second very thin coat rather than one thick layer. A generous but controlled layer of glossy top coat brings everything together and gives those short nails a surprisingly polished finish.
I have always thought this is one of the easiest manicures to underestimate. It does not shout for attention, but somehow the hands look cleaner and more elegant immediately. It is also incredibly practical for everyday life because there is no complicated artwork to worry about as the nails grow. For a busy summer week, that simplicity is a pretty convincing argument.
Soft Blush Squoval Nails with a Barely There French Edge
This manicure takes the natural nude idea and gives it just enough definition to feel finished. The nails are short-to-medium in length with a softly squared shape and subtly rounded corners. A translucent pink-beige base creates a healthy-looking wash of color, while the free edges carry a delicate pale finish that reads almost like a very understated French manicure. The glossy surface adds dimension, especially across the center of each nail where the light reflects in a clean vertical line.
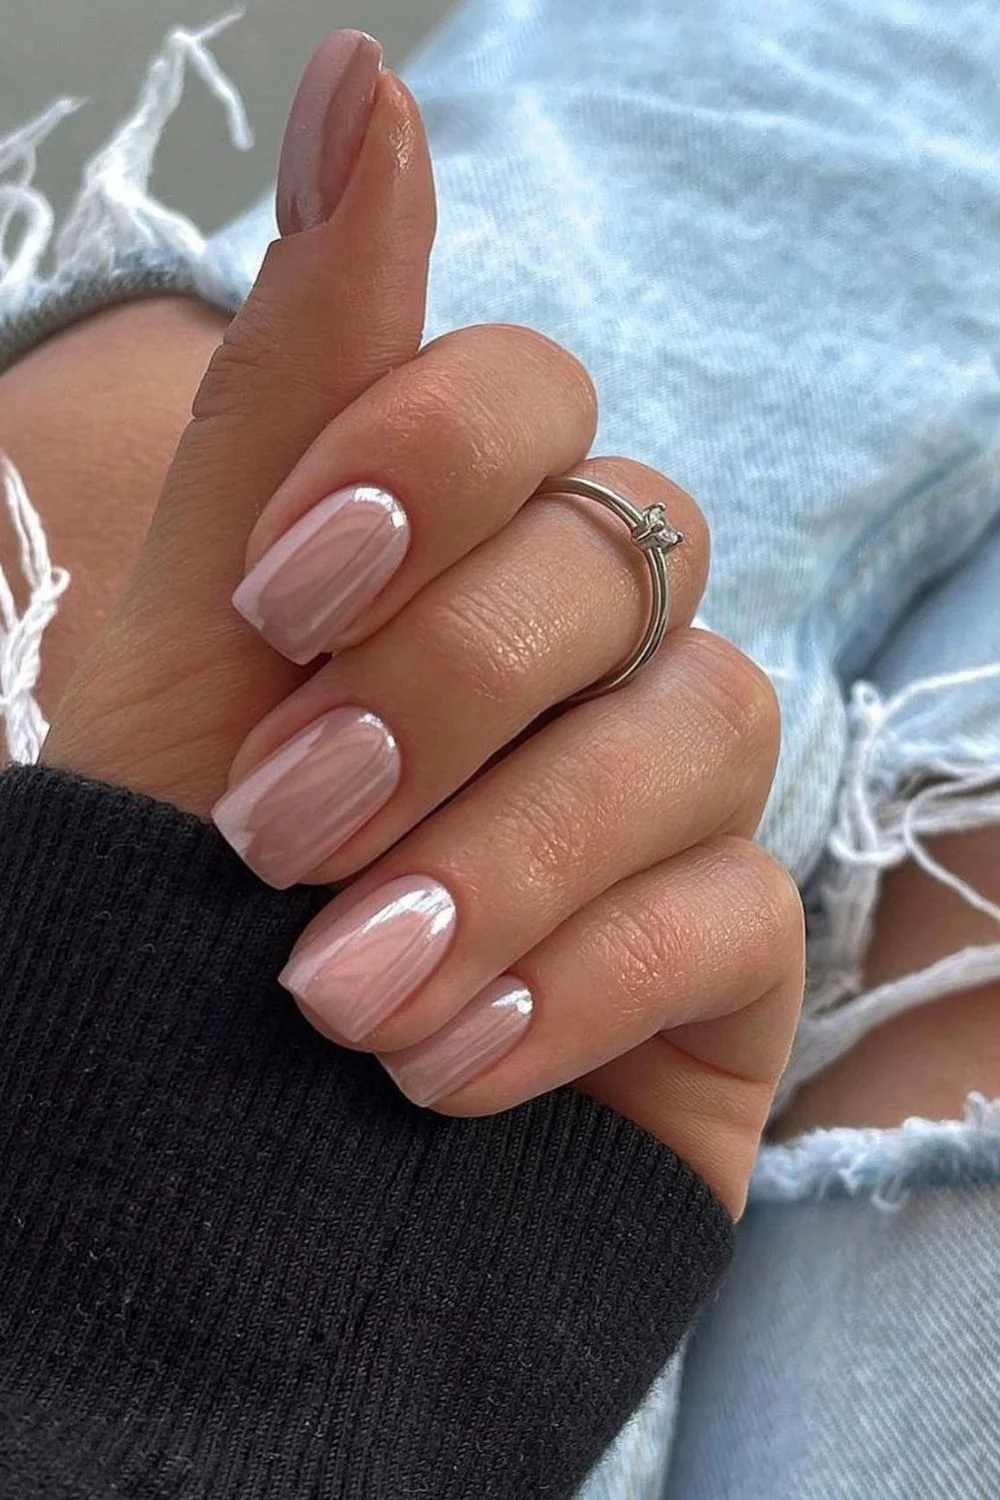
For the color, I would choose a sheer pink nude with neutral undertones rather than a strongly peachy or beige polish. A creamy white for the tips is enough to define the free edge without creating a high-contrast French manicure. I would also use a ridge-filling base if the natural nail has visible unevenness because sheer colors tend to reveal every little detail. The final step is a smooth glossy top coat, preferably one that leaves a glass-like shine without making the nails look bulky.
I would begin by gently shaping the nails into a soft squoval, then prep the cuticles and remove any excess oil from the nail plate. One thin coat of sheer nude creates the foundation, followed by another coat if I want a slightly rosier finish. For the tips, I would use a fine brush and follow the natural curve of each nail instead of forcing a perfectly identical line. That small decision makes the result look much more natural.
This is a manicure I can imagine wearing on repeat throughout summer. It has enough polish for an office, enough softness for a casual weekend, and enough shine to look beautiful with jewelry. Have you noticed how a simple nude manicure can make rings and bracelets look even more intentional? That is part of the appeal here. Nothing competes with anything else.
Milky Pink Almond Nails for an Effortless Everyday Look
A milky pink almond manicure is one of those looks that manages to feel feminine without becoming overly sweet. The medium-length nails are tapered into a smooth almond shape, while the color stays in that beautiful space between translucent nude and soft pink. The finish is creamy, glossy, and clean, with enough opacity to blur the natural nail slightly while still preserving an airy appearance. There is no elaborate decoration, and honestly, that is exactly why it works.
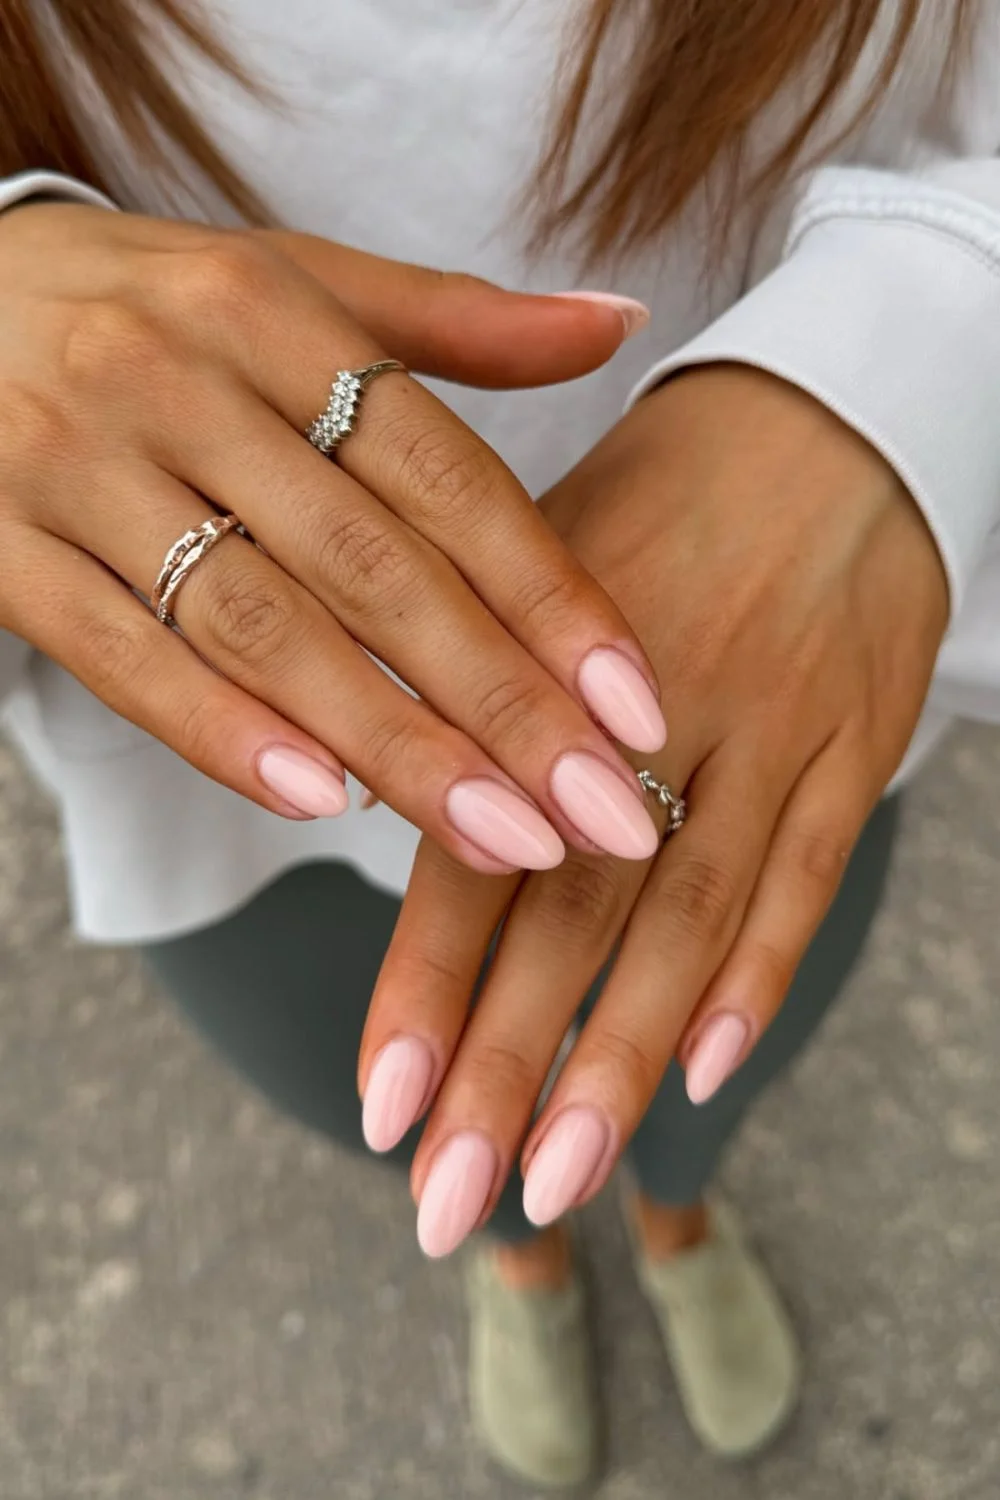
I would choose a milky pink gel polish with a neutral or slightly cool undertone for this style. Products such as OPI Funny Bunny or similar sheer milky shades can create the right starting point, although layering is what really determines the final effect. I like using a strengthening base underneath, especially when wearing longer almond nails, followed by two very thin coats of color. A glossy top coat gives the surface that smooth, reflective finish that makes minimalist nails look expensive without needing extra embellishment.
To recreate it at home, I would first refine the almond shape by gently tapering the sides toward a softly rounded tip. After cuticle preparation, I would apply a thin base coat and cure it if I am working with gel. Two delicate layers of milky pink usually create enough coverage while keeping the manicure light. I would finish by carefully sealing the free edge with top coat because that small step can help maintain the clean appearance of the manicure.
This is probably the most versatile version of the group for me. I could wear it with a cotton sundress, tailored trousers, a swimsuit and oversized shirt, or my favorite everyday jeans without changing anything. It also has that lovely summer quality of looking fresh in bright daylight and softly luminous in the evening. If the goal is a manicure that quietly makes everything else look more polished, this one absolutely gets my vote.
A minimalist nude manicure proves that everyday nails don’t have to be boring to feel effortless. I love how soft pinks, creamy neutrals, delicate accents, and subtle metallic details can completely change the mood while still keeping the look polished and easy to wear. Whether you prefer a barely-there finish or a little artistic detail, there’s plenty of room to make nude nails feel personal. So, why not give your usual manicure a softer, fresher update? Sometimes the simplest set is the one you end up wearing on repeat.

