
When fall arrives, I always want my manicure to feel a little more polished, but not necessarily darker or heavier. French tips are perfect for that shift because the shape stays familiar while the colors, lines, finishes, and little details can completely change the mood. But how do you make a French manicure feel fresh for fall instead of simply repeating the same classic white tip? And what if you want something elegant enough for everyday wear but interesting enough to catch attention? I pulled together a mix of modern ideas that play with contrast, metallic accents, unexpected color, and refined finishes. From barely-there neutrals to black, green, silver, and vivid color combinations, these looks prove that French tips have plenty of room to evolve.
Soft French Tips With Fine Gold Accents
I love how this manicure takes the familiar French tip and gives it a delicate fall-ready finish. The nails have a soft pinky-nude base with clean white tips, and the almond shape keeps everything looking elongated and graceful. What makes the design stand out is the addition of very thin gold lines placed across several nails. Some of the lines follow the curve of the tip while others create a subtle layered effect, giving the manicure a jewelry-like quality without making it feel overly decorated. The glossy finish pulls the whole look together and makes the nude base look especially fresh.
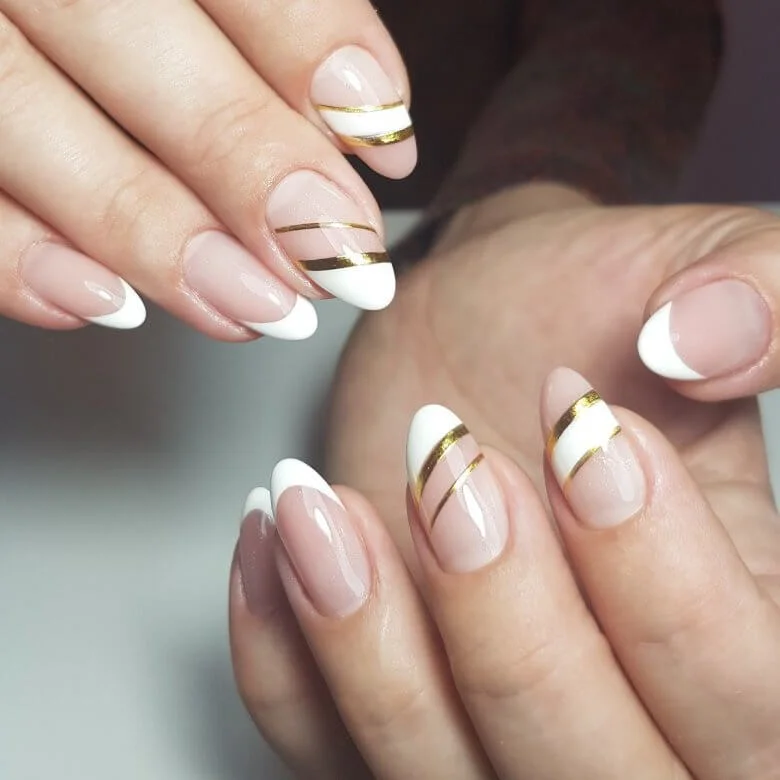
For this style, I would start with a sheer pink or milky nude gel polish, followed by a crisp white gel for the French tips. A fine gold striping polish or metallic nail-art gel is enough to create those narrow lines. I would also keep a very fine detail brush nearby, because precision matters more than having a huge collection of products here. A glossy top coat gives the final result that smooth, glassy finish that makes the gold accents look even cleaner.
At home, I would shape the nails into a soft almond first and carefully even out the free edge. After applying the nude base and curing it, I would create the white tips with a fine brush rather than trying to make one thick sweep of polish. Once that layer is secure, I would add the gold lines with minimal pressure. This is one of those designs where less product gives a much prettier result. I would finish with top coat and make sure the gold details are fully sealed.
This is the kind of manicure I would choose when I want my nails to quietly look expensive without announcing themselves. The gold feels especially lovely once fall wardrobes start bringing in cream sweaters, camel coats, soft brown accessories, and gold jewelry. It also has that rare quality of working for both a regular workweek and a dinner reservation. If you like classic French nails but want one small twist, this is an easy place to start.
Electric Orange and Cobalt French Tips
Here is where the French manicure gets much more playful. The nails use a translucent pink-nude base with rounded almond tips decorated in vivid orange, hot pink, and intense cobalt blue. Instead of covering the entire free edge with one color, the shades are divided into graphic sections, creating a curved, almost color-blocked effect. The result feels energetic and contemporary while the neutral base keeps the manicure from becoming visually overwhelming. The long almond shape gives those saturated colors plenty of room to show their personality.
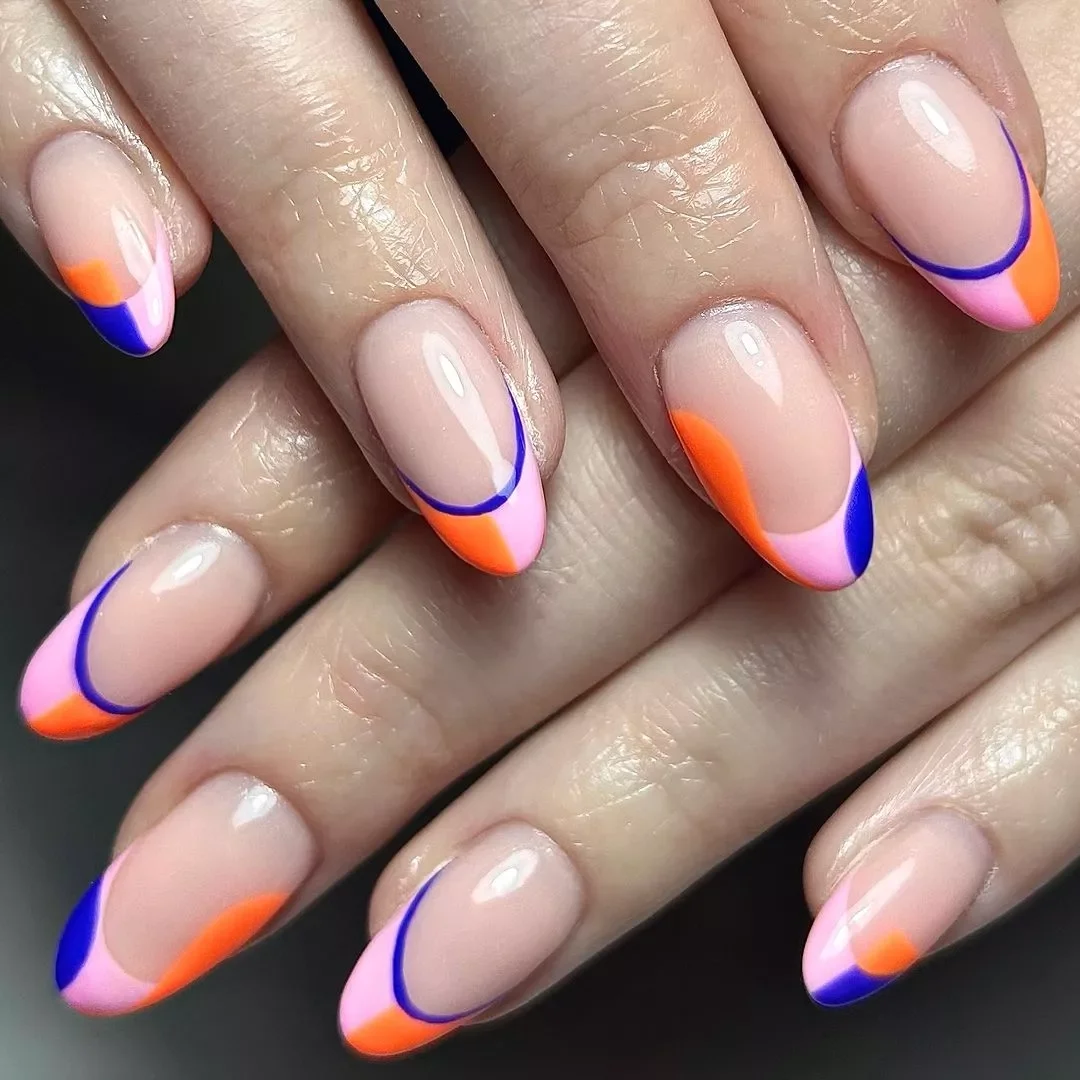
I would reach for a sheer nude-pink gel, a vivid orange, a bright pink, and a saturated royal or cobalt blue. A thin liner brush is particularly useful for the blue outlines because the curves need to look deliberate and smooth. I would also use a high-shine top coat to emphasize the contrast between the translucent base and the stronger tip colors. There is no need for shimmer here; the color itself does all the work.
To create the look, I would begin with the nude base and cure it completely. Then I would map out the curved sections of the French tip using a fine brush, building each color separately and curing between shades if necessary. I would keep the lines thin around the edges so the design remains crisp rather than bulky. Once everything looks balanced, I would apply a generous but controlled layer of glossy top coat. For a home manicure, I would definitely work one nail at a time if the design starts feeling tricky.
I especially like this version for someone who usually wears neutral clothes but wants her manicure to bring a little energy into the season. It has a playful late-summer feeling, yet the deeper blue makes it surprisingly easy to transition into fall. Would I wear this to a quiet coffee run? Absolutely. Would it also work with a black blazer and jeans? Even better.
Black French Tips With a Glossy Contrast
Black French tips instantly change the personality of a manicure, and this version gets the balance just right. The nails alternate between glossy black full-color nails and soft nude nails finished with curved black tips. The short-to-medium almond shape keeps the dark color sophisticated rather than severe, while the shiny finish makes every detail look incredibly clean. I also like the contrast between the almost bare-looking nude base and the solid black accents. It creates a modern manicure without relying on complicated nail art.
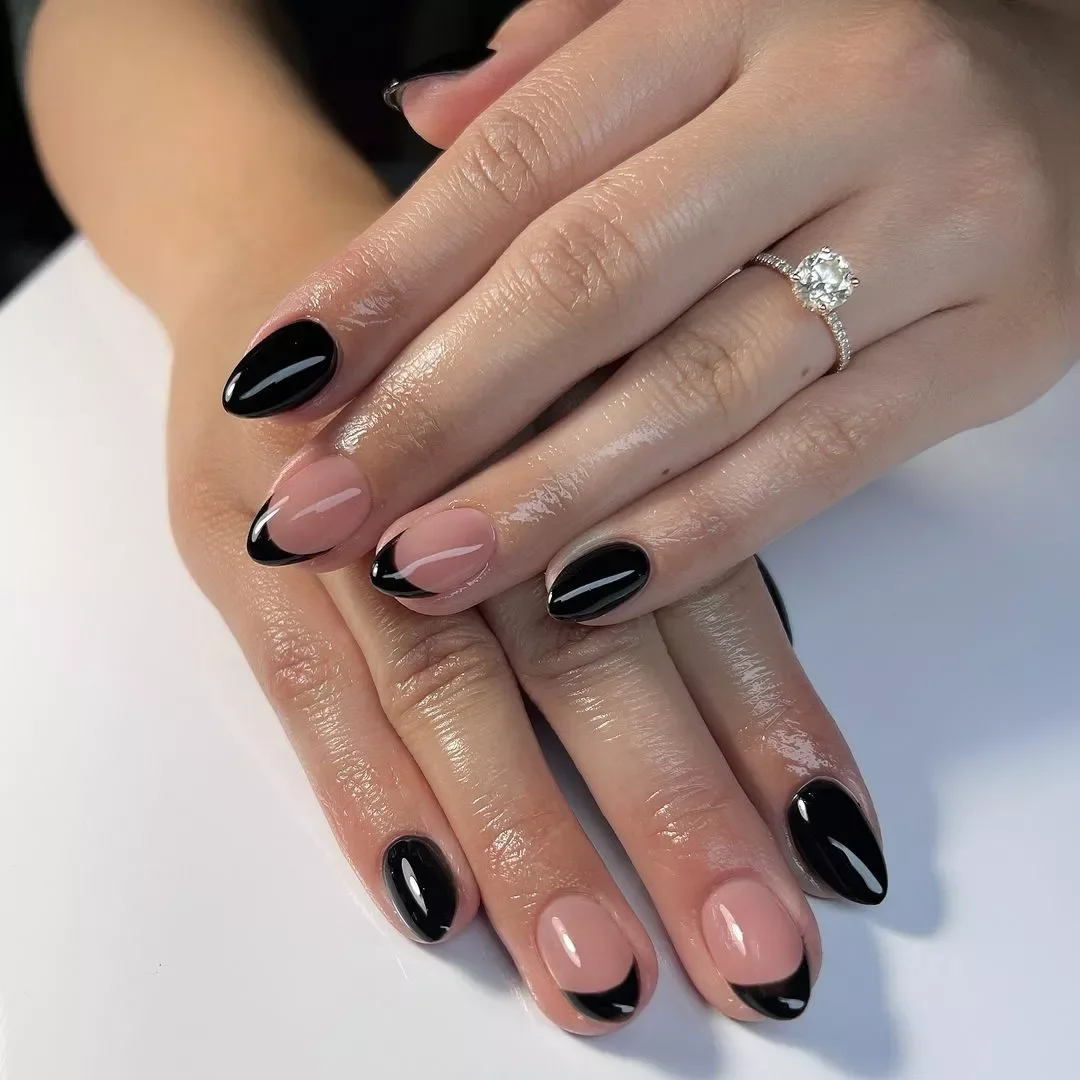
The materials are beautifully simple: a sheer nude or blush gel polish, a rich black gel polish, a fine French-tip brush, and a glossy top coat. I would choose a highly pigmented black so the tip can be completed in a controlled layer instead of repeatedly building up color. A thin detail brush makes it easier to follow the natural curve of the nail and keep the tips consistent.
I would first apply the nude base to the nails that will receive French tips and cure it thoroughly. For the black tips, I would outline the desired curve before filling in the free edge, which gives me more control over symmetry. The remaining nails can be painted fully black, creating the alternating pattern. After curing, I would finish every nail with the same glossy top coat so the manicure feels cohesive. If the black looks slightly uneven under strong light, I would rather correct it before top coat than try to hide it afterward.
For me, this is one of the easiest ways to make French tips feel genuinely fall appropriate. Black works with nearly everything in my closet, and the nude sections keep the manicure from feeling too heavy. I have always thought black French tips look particularly good with silver jewelry and simple outfits because the nails become the unexpected detail. It is sleek, confident, and wonderfully uncomplicated.
Classic French Tips With a Tiny White Detail
Sometimes the most beautiful manicure is the one that barely asks for attention. This soft French design uses a translucent pink-nude base and traditional white tips on an elongated almond shape. One accent nail introduces a delicate white decorative detail over the nude base, adding just enough personality to break up the uniformity. The white tips are rounded and carefully proportioned, so they follow the natural shape of the nails rather than looking too wide. The glossy surface gives the manicure that fresh, just-finished appearance I always associate with a beautifully maintained set.
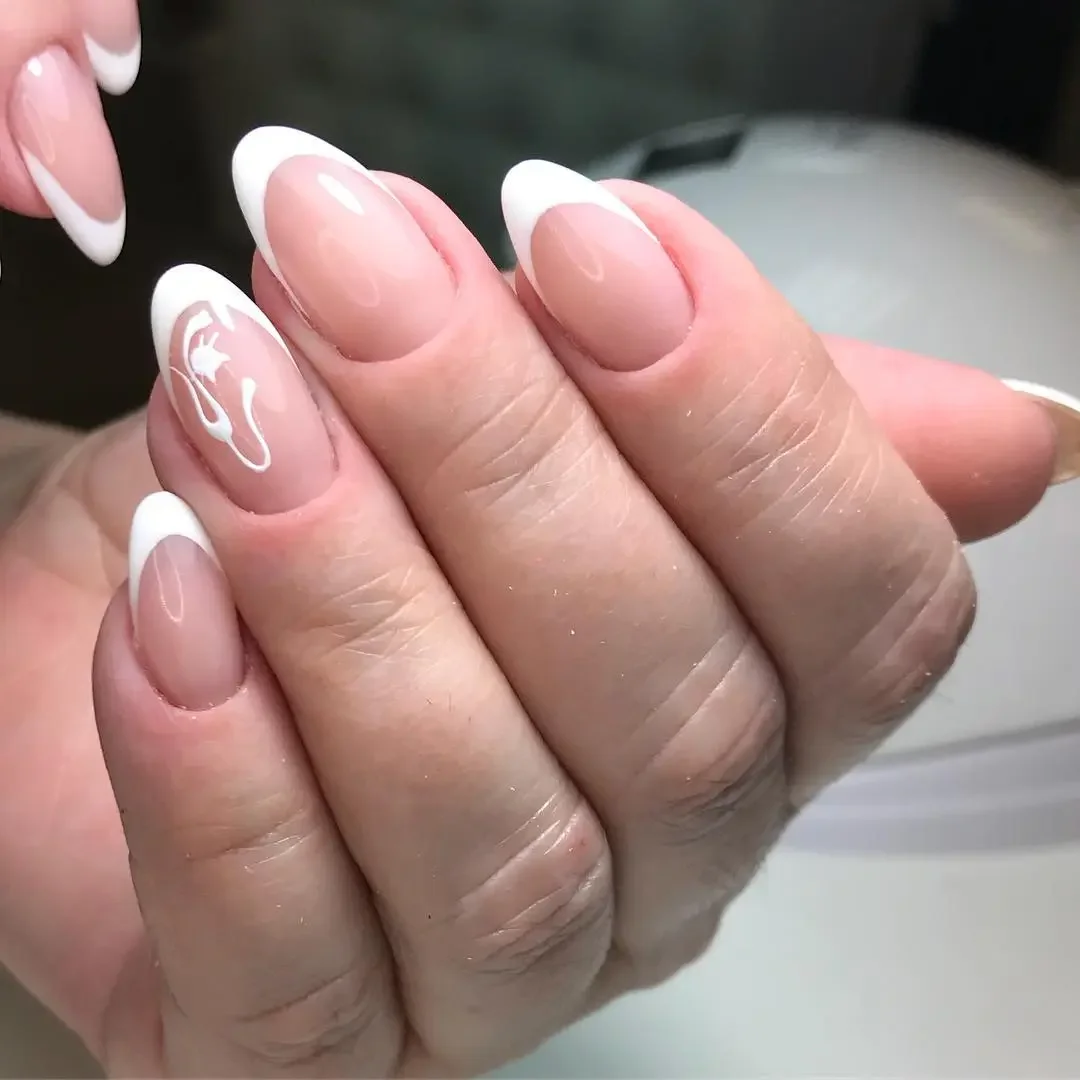
I would keep the product list minimal: a sheer pink or nude base, opaque white gel polish, a fine detailing brush, and a glossy top coat. For the tiny accent artwork, I would use the same white polish rather than introducing another shade. That keeps the design soft and cohesive. A good nail cleanser and lint-free wipes are also helpful before the final top coat because a clean surface makes delicate details look much sharper.
I would shape the nails into an almond silhouette and apply a thin layer of sheer nude polish. Once cured, I would create the white tips with a curved brush, making sure the smile line is similar across the set. The accent design should be added with a very fine brush and only a small amount of polish. I would avoid trying to perfect every tiny stroke in one movement; small controlled touches are much easier. A glossy top coat completes the manicure and gives the pale colors a beautiful depth.
This is the manicure I would recommend when someone says, “I want French tips, but I don’t want them to look basic.” It still feels timeless, yet the tiny accent makes the set more personal. In fall, I can see it working beautifully with soft knits, simple gold jewelry, and understated makeup. It is polished enough for almost any setting, which is exactly why I keep coming back to versions of this look.
Clean White French Tips on an Almond Shape
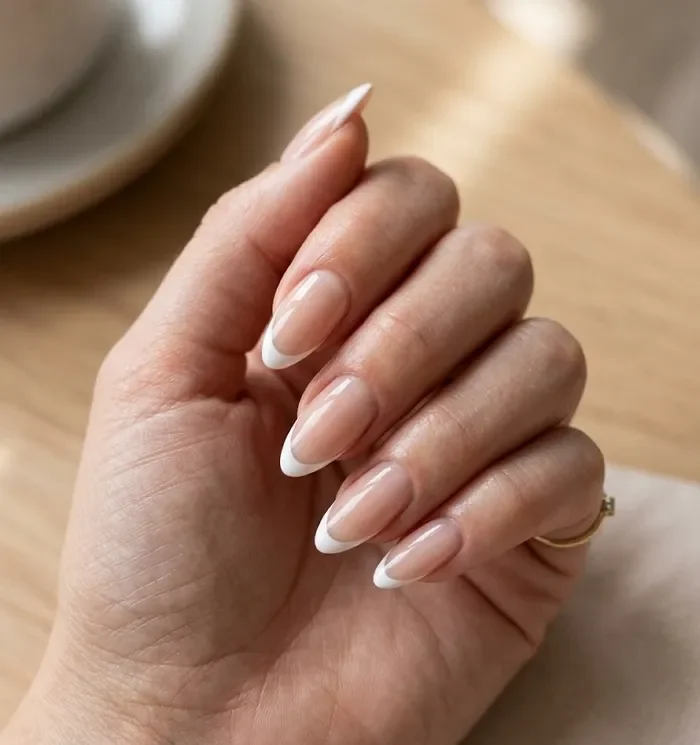
There is something incredibly satisfying about a perfectly proportioned French manicure, and this one keeps the focus on shape and finish. The base is a soft, translucent pink that allows the natural-looking nail bed to remain visible, while the white tips curve neatly along the almond-shaped edges. The tips are not excessively thick, which gives the nails a longer and more refined appearance. Everything is glossy, smooth, and uncomplicated. It is the kind of manicure that can make even a very simple outfit feel more finished.
For this version, I would use a milky pink or sheer blush base, a clean white gel polish, and a glossy top coat. If I were creating the set at home, I would also use a thin French brush and a small cleanup brush with a little gel-safe cleanser. The quality of the white matters because a streaky formula can make an otherwise elegant manicure look uneven.
I would start by preparing the nail plate carefully and shaping every nail to the same almond profile. After the sheer base is cured, I would paint the white tips with a light hand, following the natural curve of each nail. I find it easier to work from one side of the smile line toward the center and then repeat from the other side. After correcting any tiny imperfections, I would cure and seal the entire set with glossy top coat.
I could wear this manicure almost anywhere, which is probably its biggest advantage. In fall, it looks especially fresh against darker clothing because the white tips create a clean contrast without competing with the outfit. If you have been collecting elaborate nail ideas but secretly want something simpler, this is your reminder that simple does not have to mean boring.
Sheer Pink Nails With Refined Black Tips
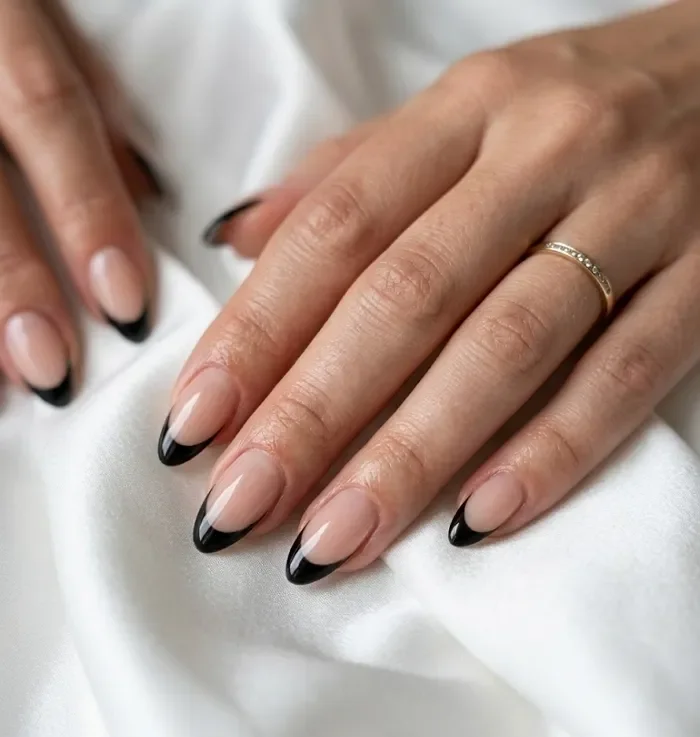
Black French tips can look surprisingly delicate when they are painted over a translucent pink base and kept extremely narrow. That is exactly what makes this manicure work. The almond-shaped nails have a soft nude-pink center with slender black tips that trace the outer edge. The line is clean and slightly curved, creating an elegant frame around the nail rather than a heavy block of color. The high-gloss finish adds even more sophistication.
I would use a sheer pink base coat, a strongly pigmented black gel, a fine liner brush, and a glossy top coat. The black should be dense enough to cover in one controlled pass, especially because a thin French tip does not leave much room for correction. I would also keep a small cleanup brush nearby for sharpening the inner curve before curing.
The technique is straightforward but requires patience. I would apply the sheer base first and allow it to cure completely before starting the black detail. Then I would lightly sketch the shape of the tip and fill it in with the liner brush, keeping the line narrow and consistent. If one side looks thicker than the other, I would correct it before curing. Once the French tips are finished, I would seal everything with a glossy top coat.
I love this particular interpretation for fall because it has a slightly sharper attitude than a traditional white French manicure without becoming dramatic. It would look fantastic with charcoal knitwear, a tailored coat, or even a simple white shirt. The black edge does the styling for you, which is always a nice bonus when I want my manicure to feel intentional without requiring much effort.
Minimal White French Tips With a Natural Finish
This manicure takes the classic French formula back to its cleanest form. The nails are elongated into a soft almond shape, with a sheer pink base and narrow white tips that follow the natural curve of each nail. There are no extra decorations, no glitter, and no competing colors. That restraint makes the manicure feel exceptionally fresh. The slightly translucent base also keeps the look softer than a fully opaque pink-and-white combination.
I would choose a sheer blush or neutral pink gel, a soft but opaque white, and a high-gloss top coat. If the natural nail bed already has a healthy pink tone, I would use only one very thin layer of base color. A French-tip brush is the main tool I would rely on because it allows me to create a curved smile line without making the white section too thick.
I would prepare the nails carefully, paying attention to the cuticle area and creating a consistent almond shape. After applying the sheer base, I would paint each white tip with a curved motion, adjusting the width according to the individual nail. This is important because forcing every tip to have exactly the same thickness can actually make the manicure look less natural. Once the tips are cured, I would apply top coat from cuticle to free edge.
This is one of those looks I would save for a busy week when I still want my hands to look polished. It goes with everything and does not compete with rings, watches, or statement sleeves. For fall, I particularly like the clean contrast against deeper neutrals such as espresso, navy, gray, and burgundy. Sometimes a fresh French tip is all the seasonal update I need.
Emerald Green French Tips for Fall
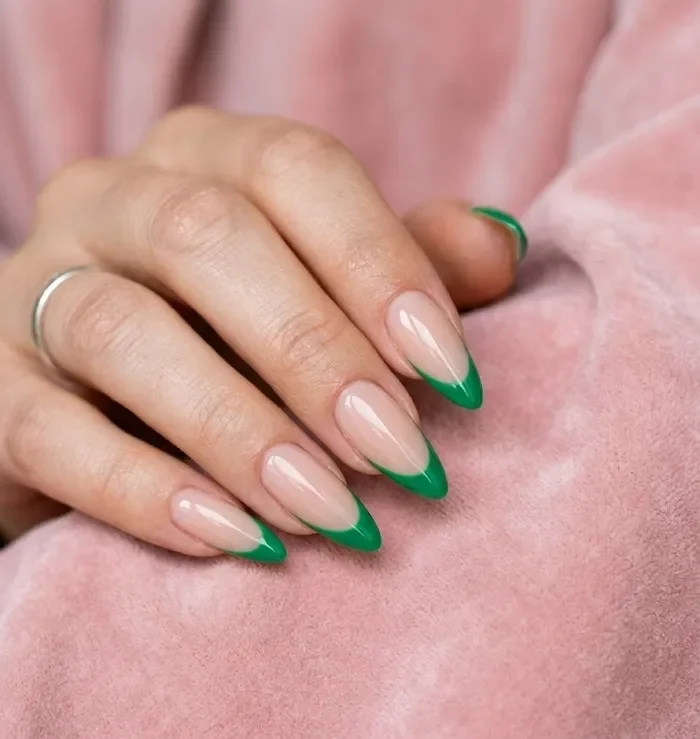
Now we are getting into the colors I really want to wear when the season changes. These almond-shaped nails keep the base sheer and pink while replacing traditional white French tips with a rich emerald green. The green is concentrated along the tips, creating a vivid but controlled contrast against the natural-looking base. Because the color appears only on the free edge, the manicure still feels elegant rather than overly bold. The glossy finish makes the green look particularly deep and polished.
For this design, I would use a translucent pink base and a saturated emerald or forest-green gel polish. A fine French brush is ideal for controlling the curved tip, while a glossy top coat keeps the green looking smooth and jewel-like. I would avoid adding several other colors because the beauty of this manicure comes from the simplicity of the green against the nude base.
I would shape the nails into a soft almond and apply the pink base in a very thin layer. Once cured, I would use the green polish to trace the tip, starting with the outer edges and carefully connecting them through the center. I would cure the design before adding the top coat so the green stays crisp. If I wanted a slightly softer fall interpretation, I would choose a muted forest green; for more impact, a jewel-toned emerald works beautifully.
Green French tips have become one of my favorite ways to make a neutral manicure feel seasonal without turning it into a literal fall-themed design. There are no leaves or obvious seasonal symbols, yet the color instantly feels richer. I would wear this with cream, denim, chocolate brown, or even a simple black outfit. It is a small change with a surprisingly strong effect.
Soft Pink French Tips With Sparkling Edges
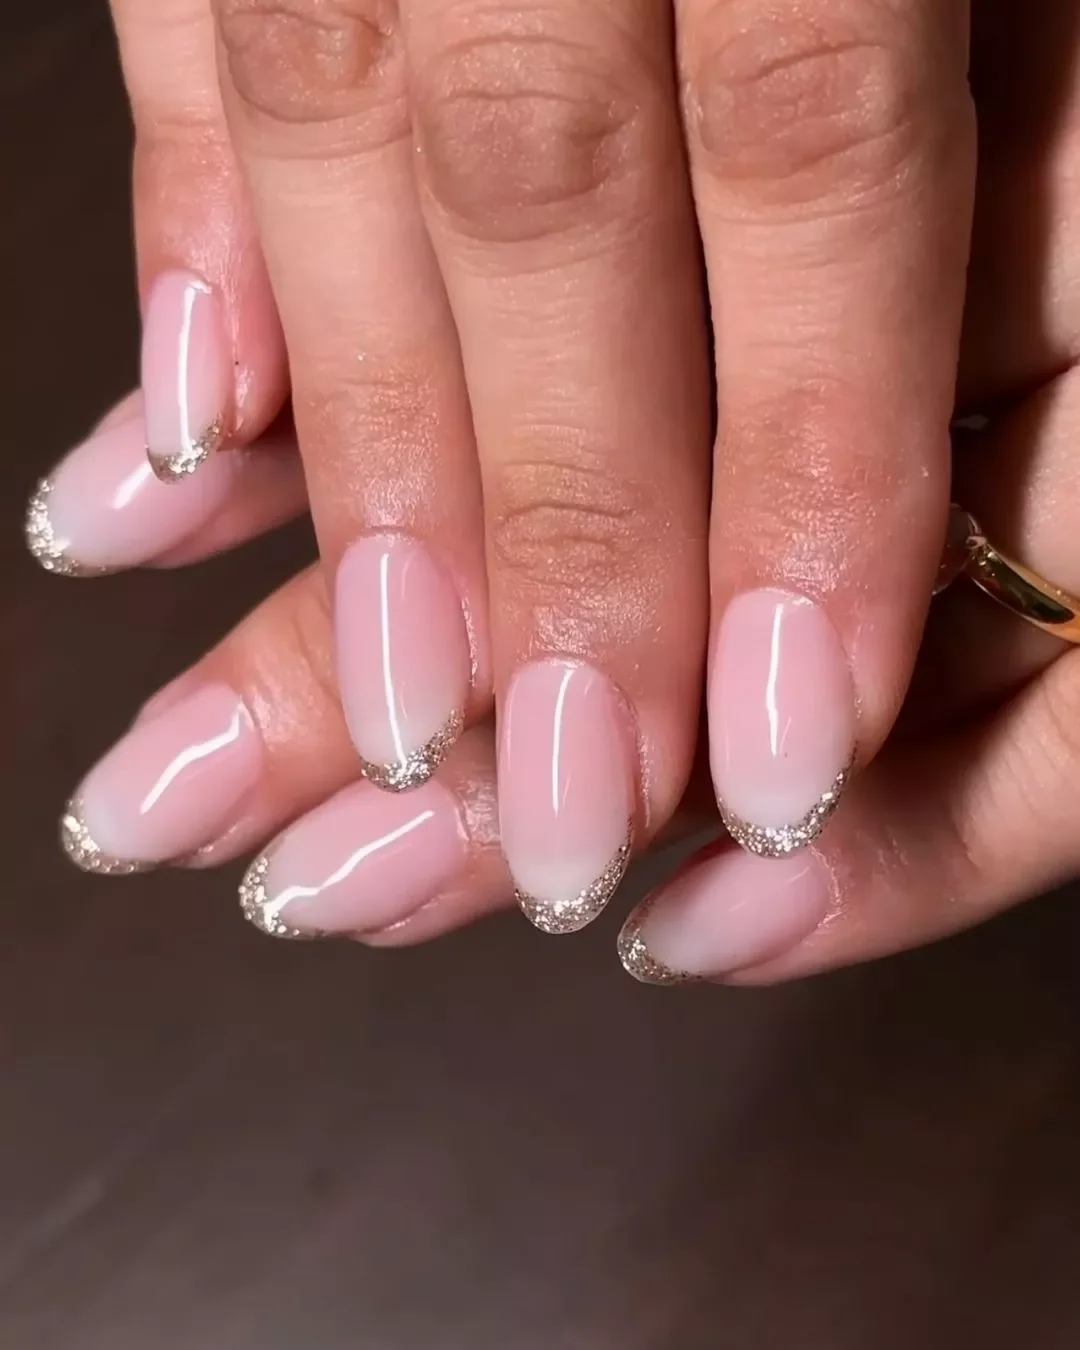
This manicure adds sparkle in the most controlled way possible. The nails have a soft milky-pink base with elongated almond tips, while fine silver glitter traces the outer edge of each nail. Rather than filling the tips with glitter, the design uses it as a delicate border, so the pink center remains clean and luminous. The effect is feminine and polished, but the tiny reflective detail gives it more personality than a plain French manicure.
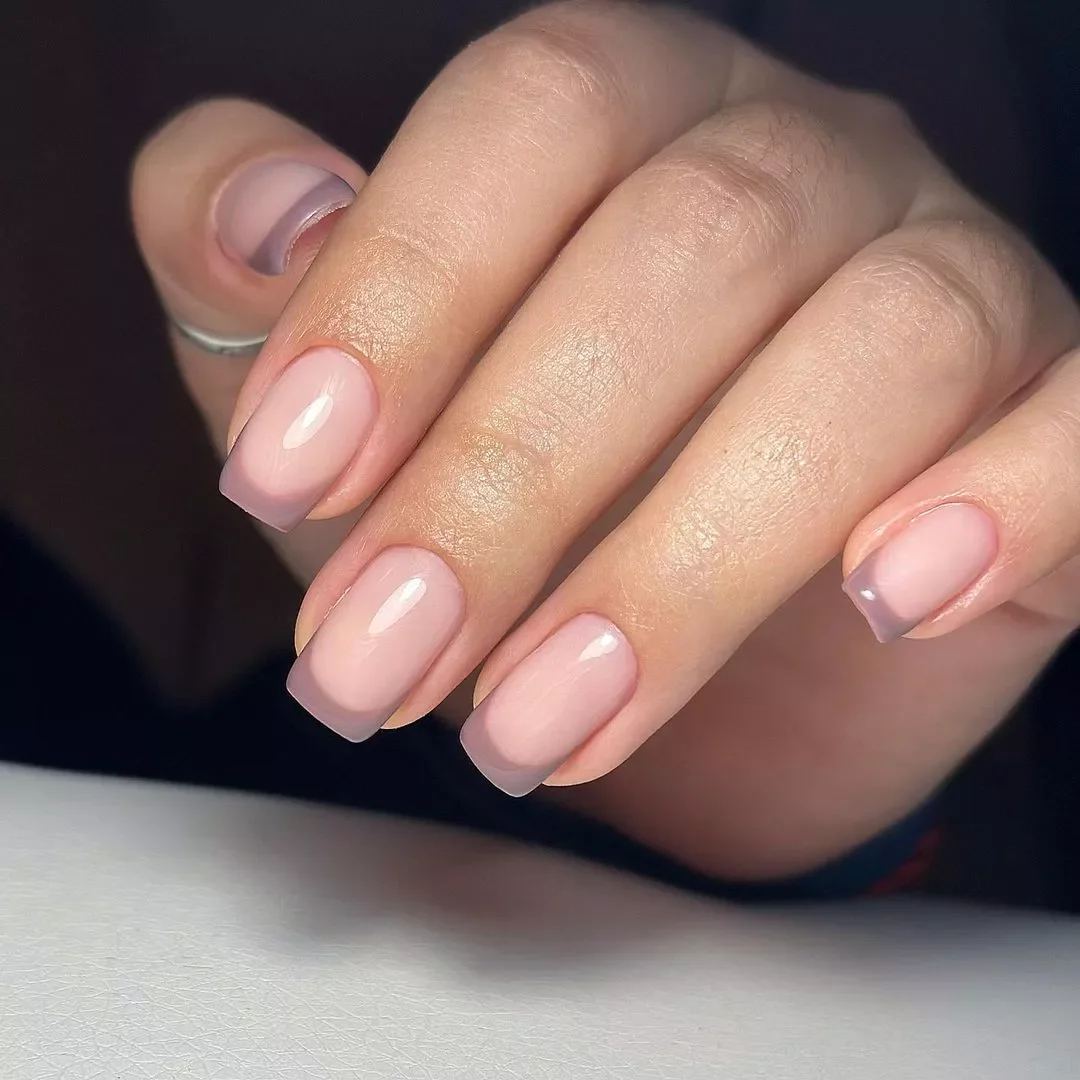
I would use a translucent pink or milky nude gel, fine silver glitter gel or silver glitter polish, a narrow detail brush, and a glossy top coat. For a more refined result, I would choose very fine glitter rather than large reflective particles. The goal is a delicate shimmer that catches the light when the hands move, not a thick glitter stripe.
I would begin with the pink base and cure it completely. Then I would use a fine brush to apply the silver glitter along the curved outer edge of each almond tip. I would keep the line as thin as possible and check each nail from several angles before curing. Once the glitter is secure, I would add top coat carefully so the surface stays smooth and the glitter does not create texture.
This is the kind of French manicure I would happily wear from early fall straight into holiday season. It feels special without being tied to one particular celebration, which makes it much more versatile. I also like how the silver detail changes depending on the light; sometimes it is barely there, and then suddenly it sparkles. That little surprise is exactly what makes a manicure memorable.
White Almond Tips With a Fine Metallic Edge
For a more fashion-forward take on French tips, I love the contrast between an opaque white base and a very fine metallic border. The nails are long and almond-shaped, with the entire surface covered in a smooth, milky white polish. Along the pointed edge sits a narrow silver-gray glitter line that defines the silhouette without overwhelming it. The combination is crisp, elegant, and slightly futuristic while still remaining wearable.
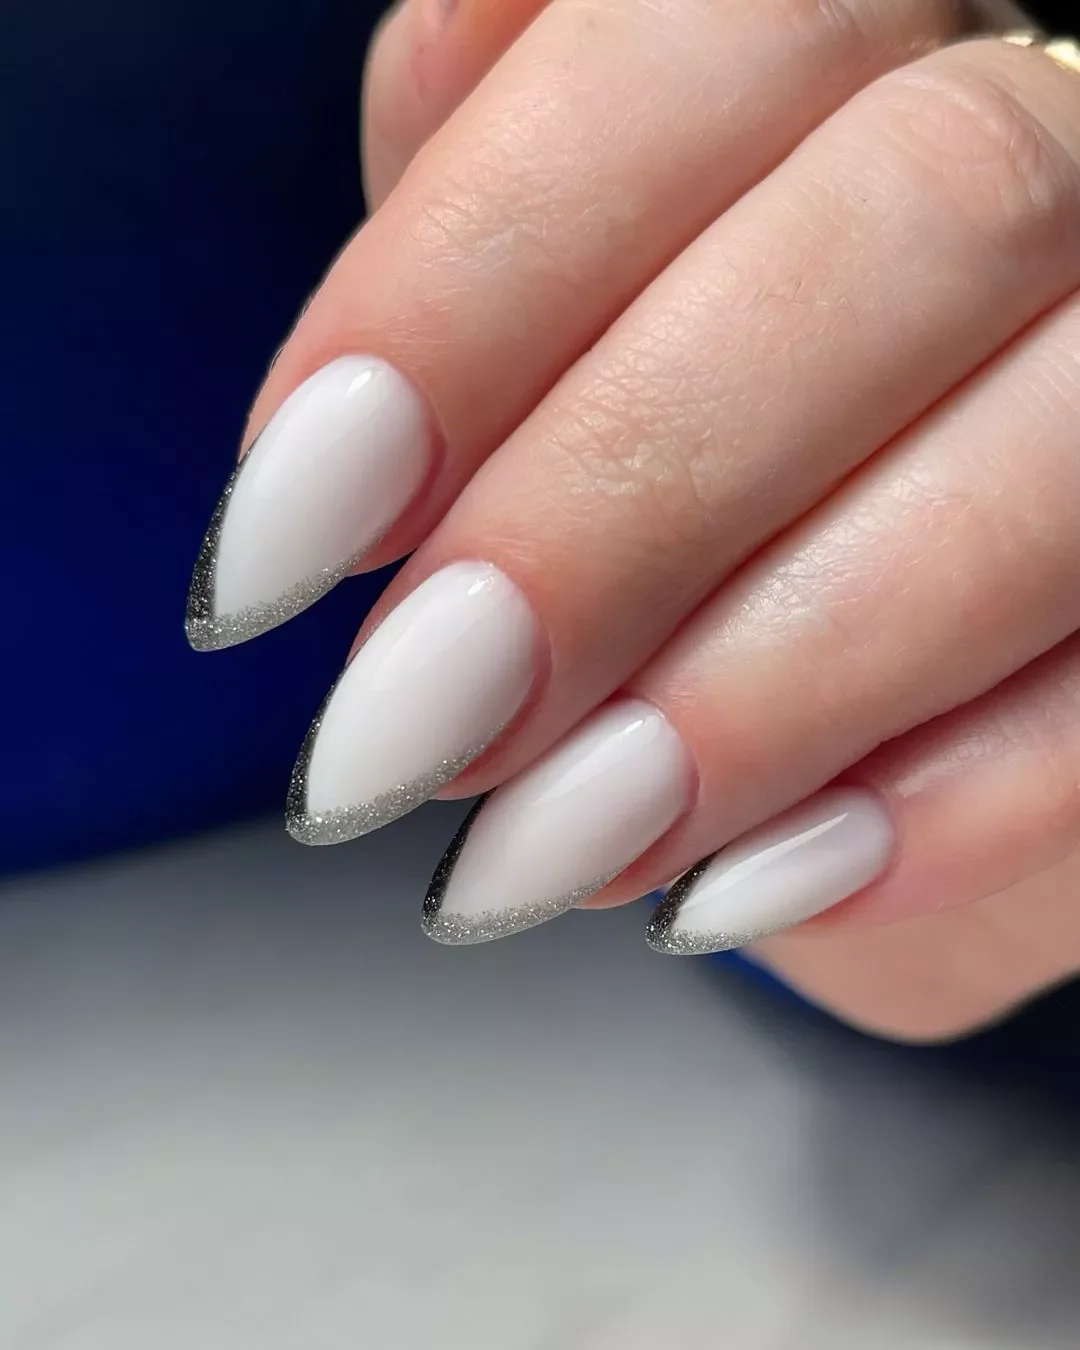
I would use an opaque milky-white gel polish, fine silver or silver-gray glitter gel, a detail brush, and a glossy top coat. The white should have enough coverage to look smooth in one or two thin layers. For the metallic edge, I would use a very fine glitter formula so the line remains delicate and follows the almond shape precisely.
I would shape the nails carefully because this design depends heavily on symmetry. After applying and curing the white base, I would trace the very edge of each nail with the metallic glitter using a thin brush. I would work slowly around the curve and avoid depositing too much product at the point of the almond. After curing, I would apply a glossy top coat over the entire nail. If the metallic edge looks uneven, I would correct it before sealing because the clean outline is the main feature of the design.
I see this manicure as the dressier cousin of the classic French tip. It would be beautiful for a fall event, an evening out, or simply one of those weeks when I want my nails to feel a little more polished than usual. The white keeps it clean, while the metallic edge adds just enough sparkle. And honestly, that balance is hard to beat.
Soft Pink French Tips With A Polished Finish
I always appreciate a French manicure that gets the proportions exactly right, and this soft pink version does just that. The nails have a clean, softly squared shape with gently rounded corners, while the sheer pink base keeps everything looking fresh and feminine. The crisp white tips create a classic contrast without becoming too stark, and the glossy finish gives the manicure that freshly-polished effect I love for fall. It feels neat, elegant, and surprisingly versatile.
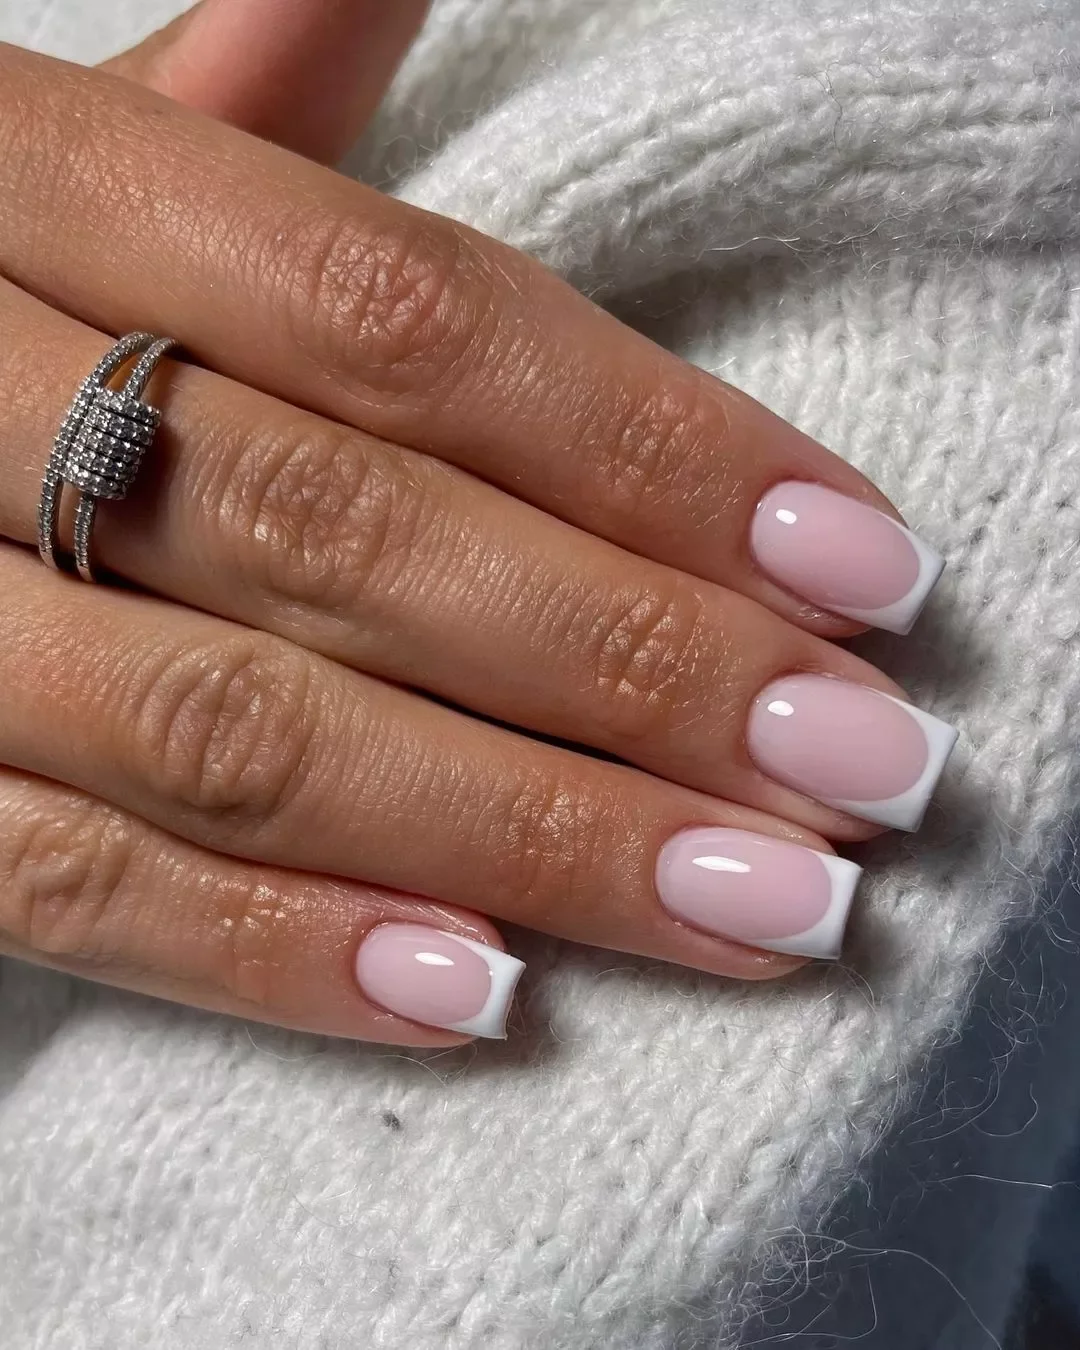
For this look, I would reach for a sheer milky-pink gel polish, a crisp white gel for the tips, a fine liner brush or French-tip guide, and a high-shine top coat. Brands such as OPI, Gelish, CND, or DND have plenty of nude-pink and white shades that can create a similar combination. I would keep the pink slightly translucent rather than choosing a completely opaque pastel because that gives the manicure its delicate, natural depth.
When I recreate a French manicure like this at home, I start by shaping every nail evenly and gently pushing back the cuticles. After applying a base coat, I add one or two thin layers of sheer pink, curing each layer properly if I am using gel. Then I create the white tips with a fine brush, working slowly from one side toward the center and repeating from the other side. A glossy top coat brings everything together, and honestly, that final shine is where the magic happens.
I would wear this manicure with chunky fall knits, tailored coats, or even a simple white shirt and jeans. It is one of those designs that never asks too much from an outfit. If I wanted something dependable for a busy month, this would be near the top of my list because the soft base keeps regrowth less noticeable while the white tips still make the manicure feel finished.
Matte Black French With A Soft Pink Accent
This manicure takes the French idea in a much moodier direction. The nails are almond-shaped, and most of each nail is covered in a velvety matte black finish, while a slim pale pink edge follows the tip. I really like that unexpected reversal: instead of placing the darker shade at the very edge, the black becomes the main visual element and the pink creates a delicate outline. It feels especially right for early fall when I start reaching for darker clothes but still want something feminine.
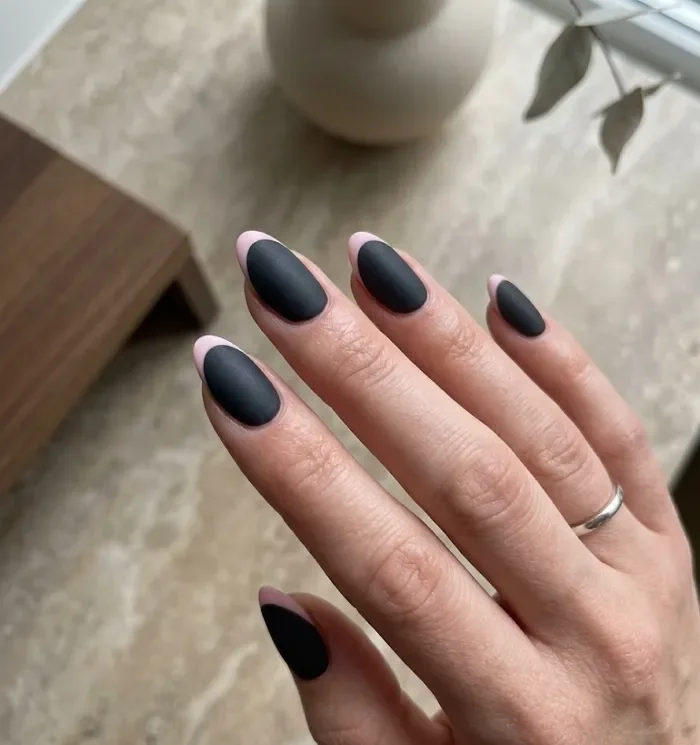
I would use a soft blush-pink gel for the narrow tips, a highly pigmented black gel polish for the main surface, and a matte top coat. A detail brush is useful for keeping the pink edge precise, especially around the curved almond tip. If the black polish is naturally very glossy, the matte top coat becomes essential because the contrast between the velvety surface and the subtle pink border is what makes the design work.
I would begin with the usual nail preparation, then apply the pink French detail first and cure it. After that, I would carefully fill the rest of the nail with black, leaving the pink border exposed. Thin coats are much easier to control than one thick layer, particularly with highly pigmented black polish. Once everything is cured, I would finish with matte top coat and check the sidewalls before curing the final layer.
For me, this is the kind of manicure that instantly changes the mood of a look. It has a little edge without going completely gothic, and that makes it easy to wear during fall. I could see it working beautifully with charcoal sweaters, leather accessories, or a simple black blazer. Sometimes the smallest flash of pink is all it takes to soften a dramatic color.
Milky White French Tips With A Playful Cow Print
I love the way this manicure mixes a clean French base with an intentionally irregular animal-inspired detail. The nails have a soft, pale base and a classic white French tip, but the edges are decorated with small black-and-brown cow-print shapes. Because the pattern is concentrated around the tips rather than covering the entire nail, the design stays surprisingly sophisticated. The rounded shape also helps soften the contrast and keeps the overall effect approachable.
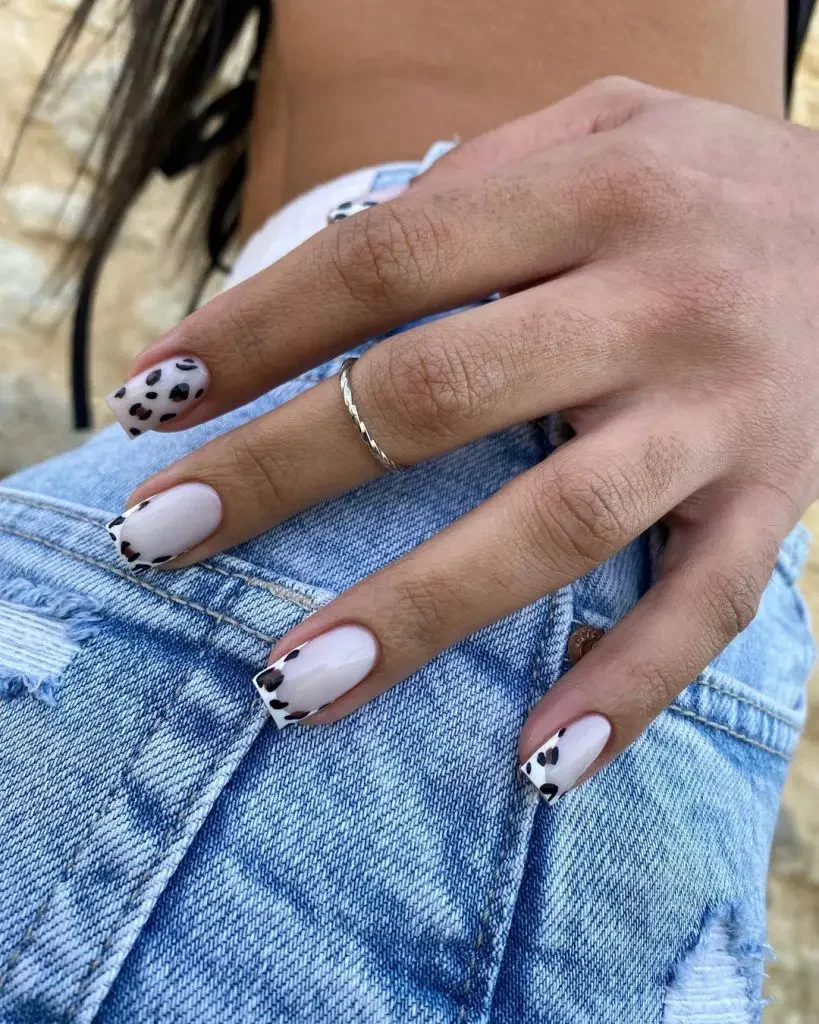
To recreate it, I would use a sheer ivory or milky nude base, a creamy white polish for the French tips, and black and warm brown detail colors for the spots. I prefer using a dotting tool or tiny nail-art brush for irregular shapes because perfectly symmetrical spots would make the design look less natural. A glossy top coat is a good finishing choice here because it makes the pale base look almost glassy.
I would shape the nails first, apply the sheer base, and then create the white French tips. Once that layer is cured or completely dry, I would add a few uneven black and brown spots along the white area, varying their size and direction. I would resist the urge to cover every available space. Leaving some white visible is what gives the manicure that light, editorial quality.
I think this is a fun choice for anyone who wants animal print for fall without committing to a full statement manicure. The creamy white keeps it polished, while the little spots add personality. I could easily wear it with denim, camel tones, chocolate brown, or black, which makes it much more practical than it might initially seem.
Graphic French Tips With Black Geometric Details
Here is where a traditional French manicure gets a sharp little twist. The nails have a glossy pink-nude base and clean white tips, but black geometric shapes interrupt the French line on selected nails. Thin white curves cross through the darker accents, creating a graphic effect that feels almost like tiny modern artwork. I especially like the balance: most of the manicure remains classic, while just a few nails carry the visual surprise.
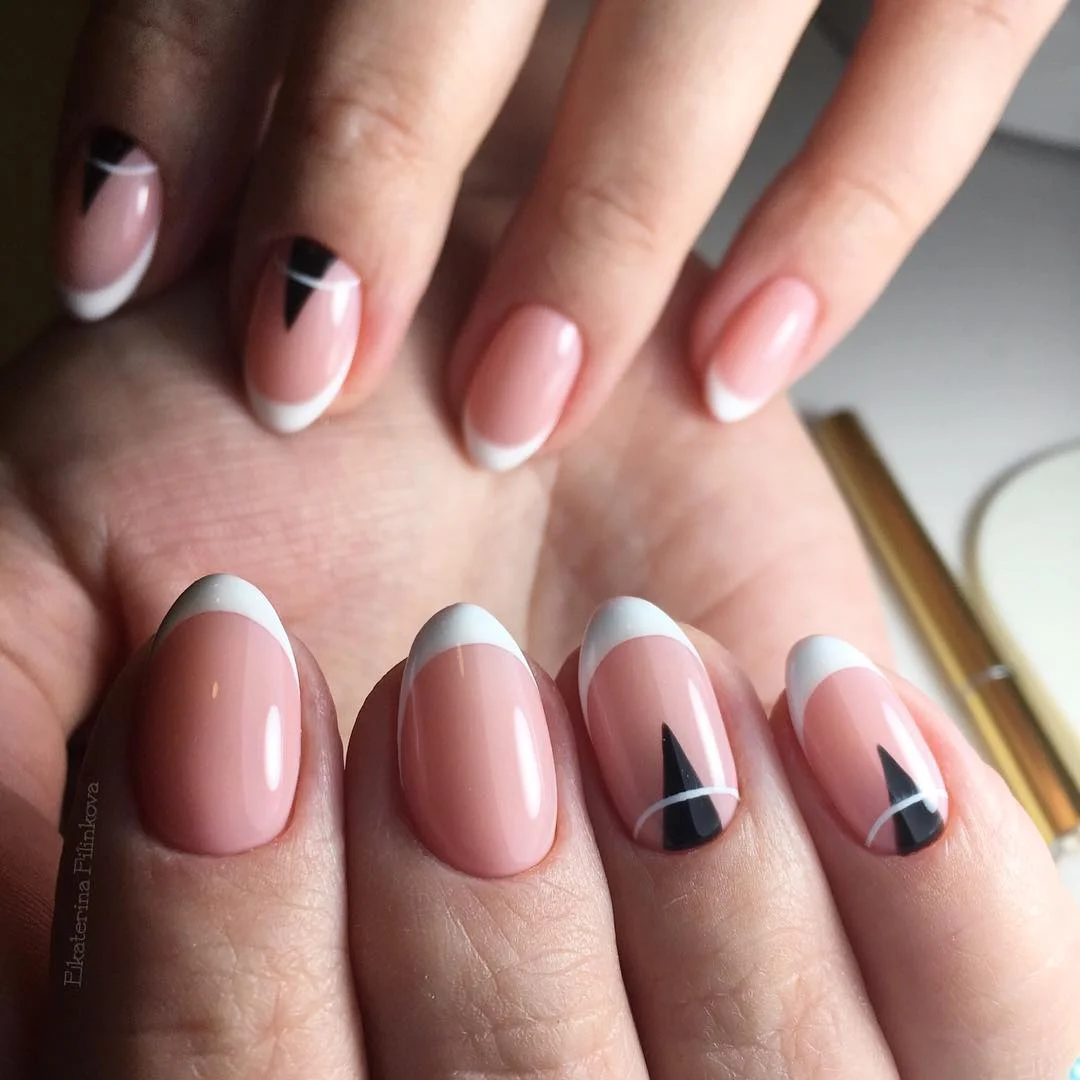
For the color palette, I would keep things simple with a translucent blush base, pure white, and deep black. A very fine nail-art brush is important for the narrow curved lines, while a small angled brush can help create the black triangular sections. I would also keep a good glossy top coat nearby because the high-shine finish makes the pink base and graphic details look much cleaner.
I would start with the pink base and create a consistent white French tip across all the nails. Once that is secure, I would add the black geometric shapes to two or three accent nails rather than trying to decorate everything. The thin white line can then be drawn across the black section with a steady hand. If I were doing this myself, I would take my time between layers because tiny imperfections become much more obvious in geometric nail art.
This is one of my favorite directions when I want a manicure that feels modern but still office-friendly. The black details bring a little fall sophistication without making the nails heavy. I would pair this design with simple gold jewelry and neutral clothing so the manicure gets to have its moment.
Blush French Manicure With Architectural Black Accents
This design keeps the traditional French manicure at its heart but adds a clever architectural detail near the tips. The nails are short-to-medium and softly rounded, with a glossy blush-pink base and curved white French tips. On selected nails, black triangular shapes rise from the tip and are crossed by fine white lines. The result feels structured but delicate, which is a combination I find particularly appealing.
I would choose a neutral pink that closely resembles the natural nail, along with a soft white and intensely pigmented black. For the black shapes, I would use a fine detail brush with a sharp point so I can create crisp edges. The white line needs an even finer brush or nail-art pen because it should remain noticeably thinner than the French tip.
My approach would be to complete the pink base and white French tips first. Then I would add the black triangles to the accent nails, keeping their placement consistent enough to look intentional but not so identical that the manicure feels mechanical. After the black has dried or cured, I would draw the thin white curves over the darker sections. A glossy top coat finishes the look beautifully.
I see this as a great transitional manicure for fall because it does not depend on a specific seasonal color. The black and white details provide contrast, while the blush base keeps everything soft. If I wanted something that could survive several weeks of changing outfits, this would be a very easy choice.
Black French Tips With Delicate Snake Art
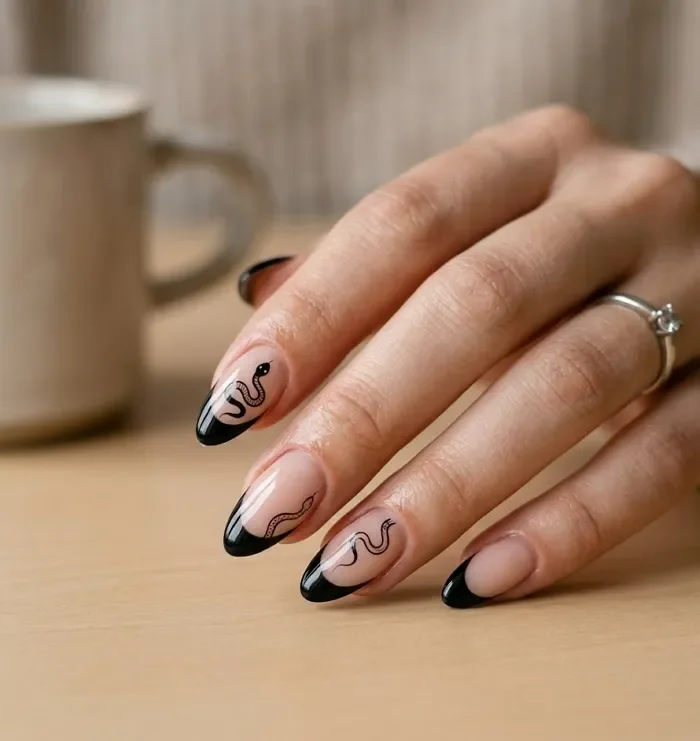
Black French tips already have a sophisticated fall personality, but the tiny snake motifs make this manicure much more intriguing. The almond-shaped nails have a sheer nude base with sleek black tips, while fine winding lines create subtle snake-like illustrations across selected nails. I love that the artwork is delicate rather than oversized. It gives the manicure a slightly mysterious quality while preserving the clean structure of the French design.
I would use a translucent nude or pink-beige base, a rich black gel polish, and a very fine liner brush for the artwork. The black needs to be opaque enough for the French tips to look sharp after one or two thin coats. For the snake lines, I would use a separate detail brush so the larger tip brush does not make the illustration too thick.
I would create the nude base first and carefully shape the black French tips once the base is finished. After curing, I would draw the snake motif with one continuous, gently curved line whenever possible. That helps the design look fluid instead of segmented. I would finish with a glossy top coat, making sure the artwork is completely sealed.
This is the kind of manicure I would choose when I want something that feels a little unexpected for fall. It works with black dresses, oversized sweaters, denim, and even minimalist workwear. The snake details are there when you look closely, but they do not dominate the manicure, and that restraint is exactly what makes the design feel current.
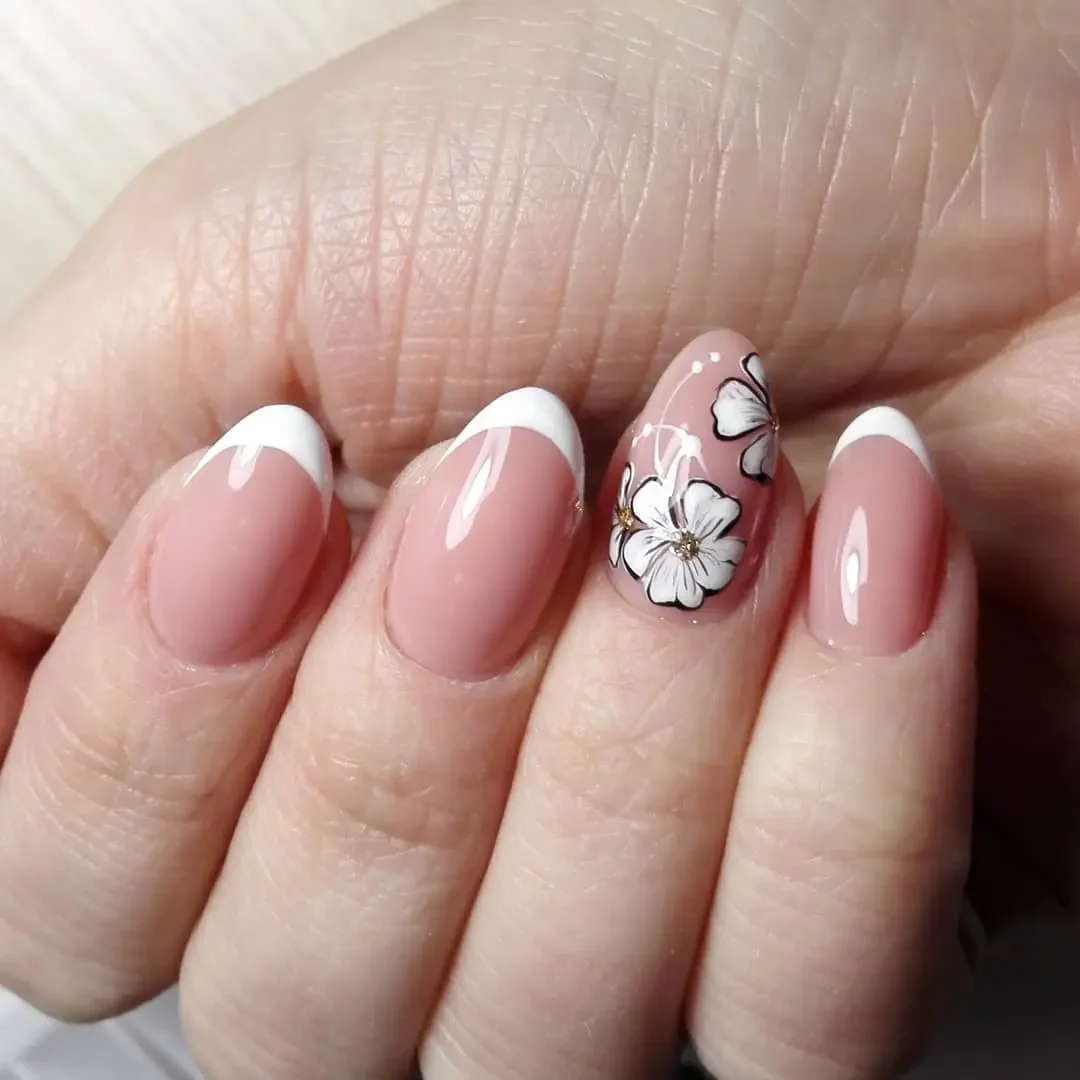
Classic White French With Tiny Black Florals
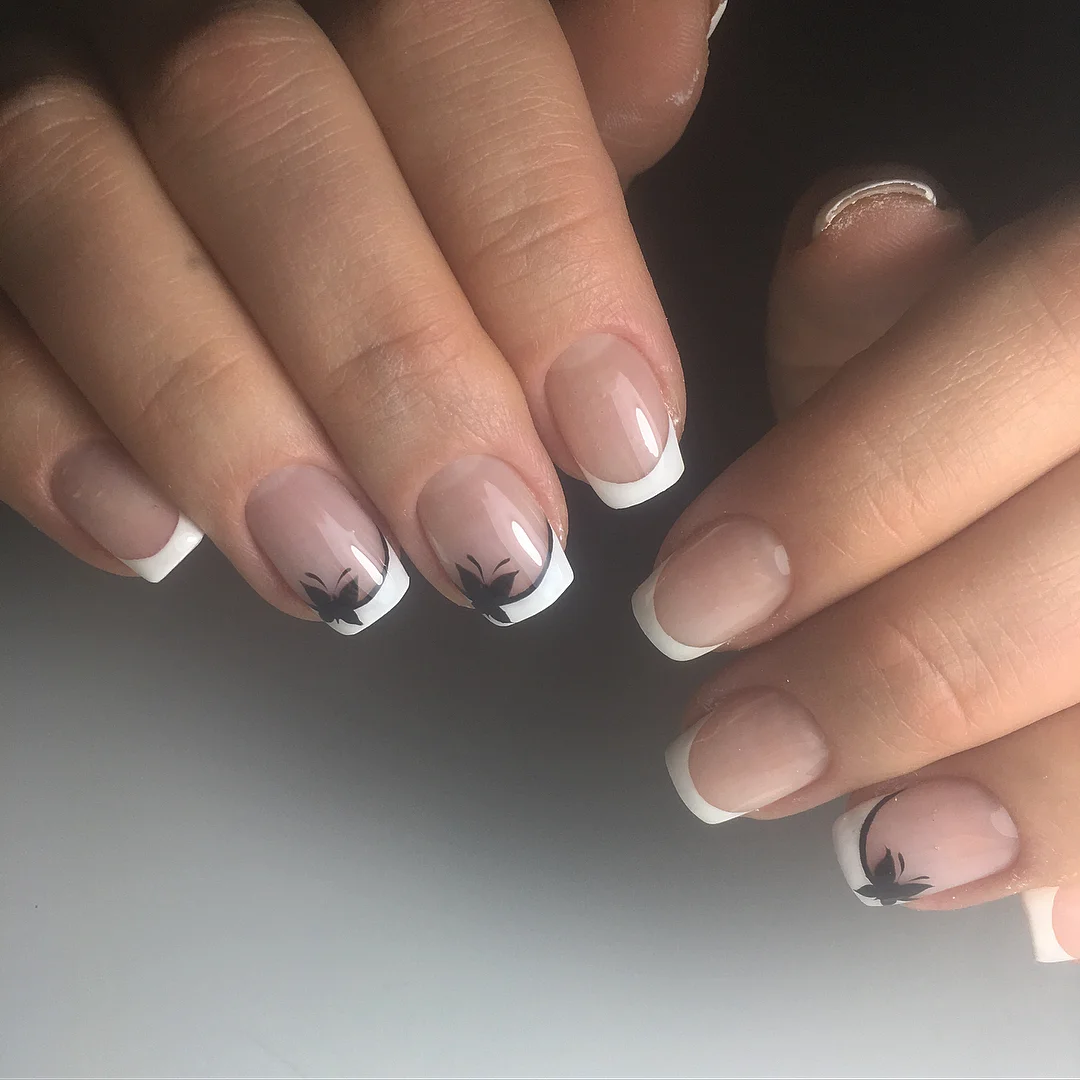
There is something charming about pairing an ultra-clean French manicure with tiny black floral silhouettes. The nails have a glossy pink-nude base and softly rounded white tips, while small dark botanical shapes sit along the French edge on selected nails. The contrast is crisp but not severe because the floral details are so small. To my eye, it feels like a classic manicure with a slightly artistic finish.
I would keep the supplies minimal: sheer pink base polish, white French-tip polish, black nail-art gel, a fine detailing brush, and glossy top coat. The black should be dense enough to create clear petals or leaves without requiring several thick layers. I would avoid glitter or extra embellishment here because the beauty of the design comes from its simplicity.
After preparing the nails, I would apply the sheer pink and then build the white French tips. Once the tip is cured, I would use a tiny brush to create the floral silhouettes near the border. I like placing the flowers slightly differently on each accent nail rather than copying an identical pattern. It makes the manicure feel hand-painted and relaxed.
I think this style is particularly pretty for the early part of fall when I am not quite ready for deep seasonal colors. The pink and white combination keeps the manicure fresh, while the black accents give it enough contrast for cooler weather. It would also be an easy choice for someone who usually wears classic nails but wants to experiment with nail art.
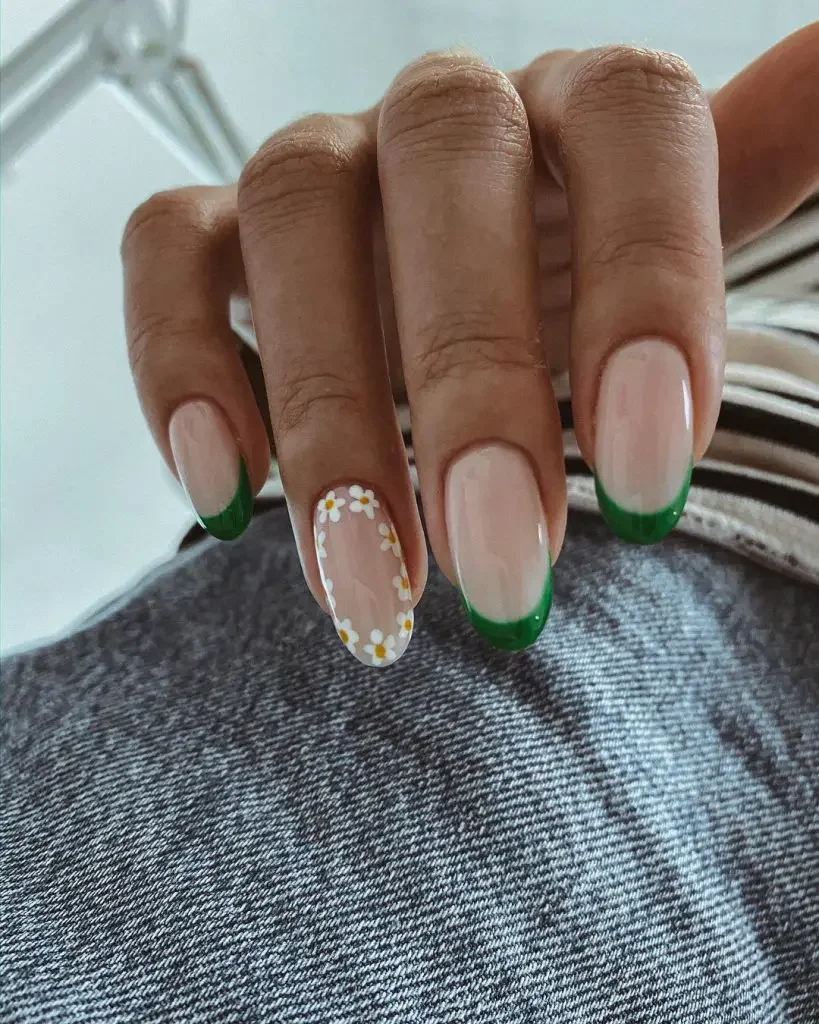
Green French Tips With A Delicate Floral Border
Green is such an easy fall color, and I like seeing it used in a French tip rather than as a full-color manicure. Here, the nails have a natural-looking nude base with rich green tips, while one accent nail features a tiny floral border in white and yellow. The rounded shape keeps the green from feeling too heavy, and the floral detail gives the manicure a cheerful little interruption.
For this design, I would choose a sheer nude or pink-beige base, a deep medium green for the French tips, and white and yellow for the miniature flowers. A fine French brush will help create the green edge, while a tiny dotting tool can make the petals much easier. I would use a glossy top coat because it keeps the green looking rich and makes the small floral details stand out.
I would begin with the neutral base and carefully map out the green French tips so they remain similar across the hand. On the accent nail, I would create tiny white petals around small yellow centers, following the perimeter rather than filling the entire surface. The goal is to keep the floral border airy. Too many flowers would quickly compete with the green tips.
For me, this is one of the most wearable ways to bring a seasonal color into a French manicure. The green feels grounded enough for fall, but the little flowers keep the design from becoming too serious. I would especially love this with cream sweaters, denim, olive clothing, or simple gold jewelry.
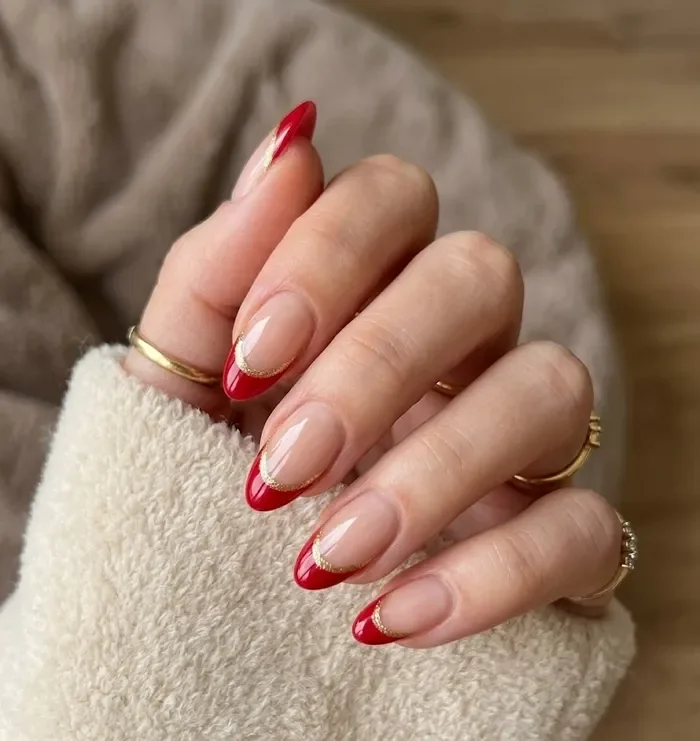
Red French Tips With A Fine Gold Outline
A red French tip immediately makes a manicure feel richer, and the fine gold outline takes it one step further. The nails are almond-shaped with a glossy nude base, while the red tips follow the natural curve of the nail. A delicate gold line separates the red from the nude, adding just enough shimmer to catch the light. I think this combination is practically made for fall evenings.
I would use a sheer nude or blush base, a deep classic red, and a thin gold glitter or metallic liner. The red should be rich rather than neon because deeper reds sit beautifully alongside fall fabrics and warm neutrals. For the gold line, I would choose a fine detailing brush or metallic nail-art polish that can create a narrow, controlled border.
I would first apply the nude base and shape the almond tips carefully. After creating the red French edge, I would let that layer settle before adding the gold line directly along the boundary between the two colors. The gold does not need to be thick; in fact, I prefer it almost hairline-thin. A glossy top coat seals the layers and gives the whole manicure a smooth finish.
This is the manicure I would save for dinners, celebrations, or those first chilly evenings when everything suddenly feels a little more glamorous. Red already has plenty of personality, so the nude base keeps it balanced. The gold detail is the tiny finishing touch that makes the whole look feel dressed up without becoming overly elaborate.
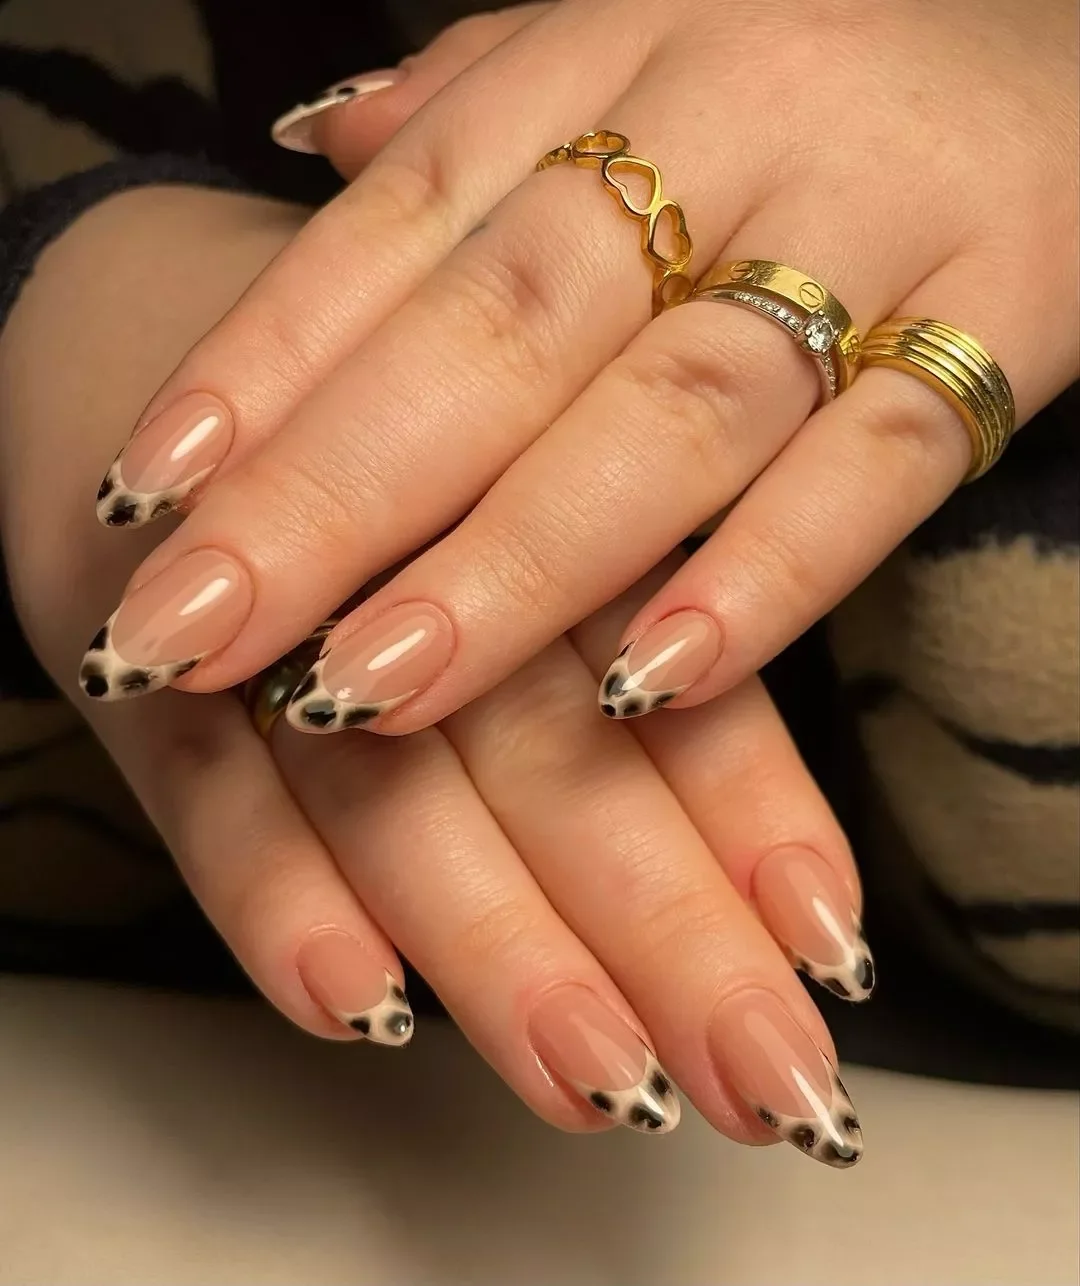
Nude Almond French With Animal Print Tips
Animal print gets a refined update when it is limited to the French tip. These almond-shaped nails have a glossy nude base and pale, almost translucent tips decorated with irregular black and brown markings. Because the pattern stays at the very edge, the manicure still has the elongated, clean appearance I expect from a French design. I especially like the way the nude base allows the natural shape of the nails to remain part of the look.
For the manicure, I would choose a sheer beige-pink base, a creamy neutral for the tip, and black and brown polishes for the animal-print details. A small dotting tool and fine nail-art brush would be enough to create the irregular markings. I would keep the background of the tip light and translucent rather than using a strong opaque color because that gives the pattern a softer, more sophisticated finish.
I would start with the nude base and then lightly map the French area along each almond tip. Once the pale tip is complete, I would add uneven black and brown spots, concentrating them toward the outer edge. I would intentionally vary their size and shape. Animal print looks much better when it is imperfect, so I would not try to make every mark identical.
I would absolutely consider this one for fall because it feels fashionable without locking me into a single seasonal color. It works with brown, black, cream, denim, and even red, which gives it plenty of outfit flexibility. If classic French feels too predictable but a full animal-print manicure feels like too much, this is the middle ground I would choose.
Soft Pink French Tips With Golden Glitter
I love how this manicure takes the familiar French tip and gives it a softer, more delicate fall personality. The short rounded-square nails are covered in a translucent blush-pink base, while the tips are finished with a fine sweep of champagne-gold glitter. The combination feels polished rather than flashy, and the glossy finish keeps everything looking fresh and feminine.
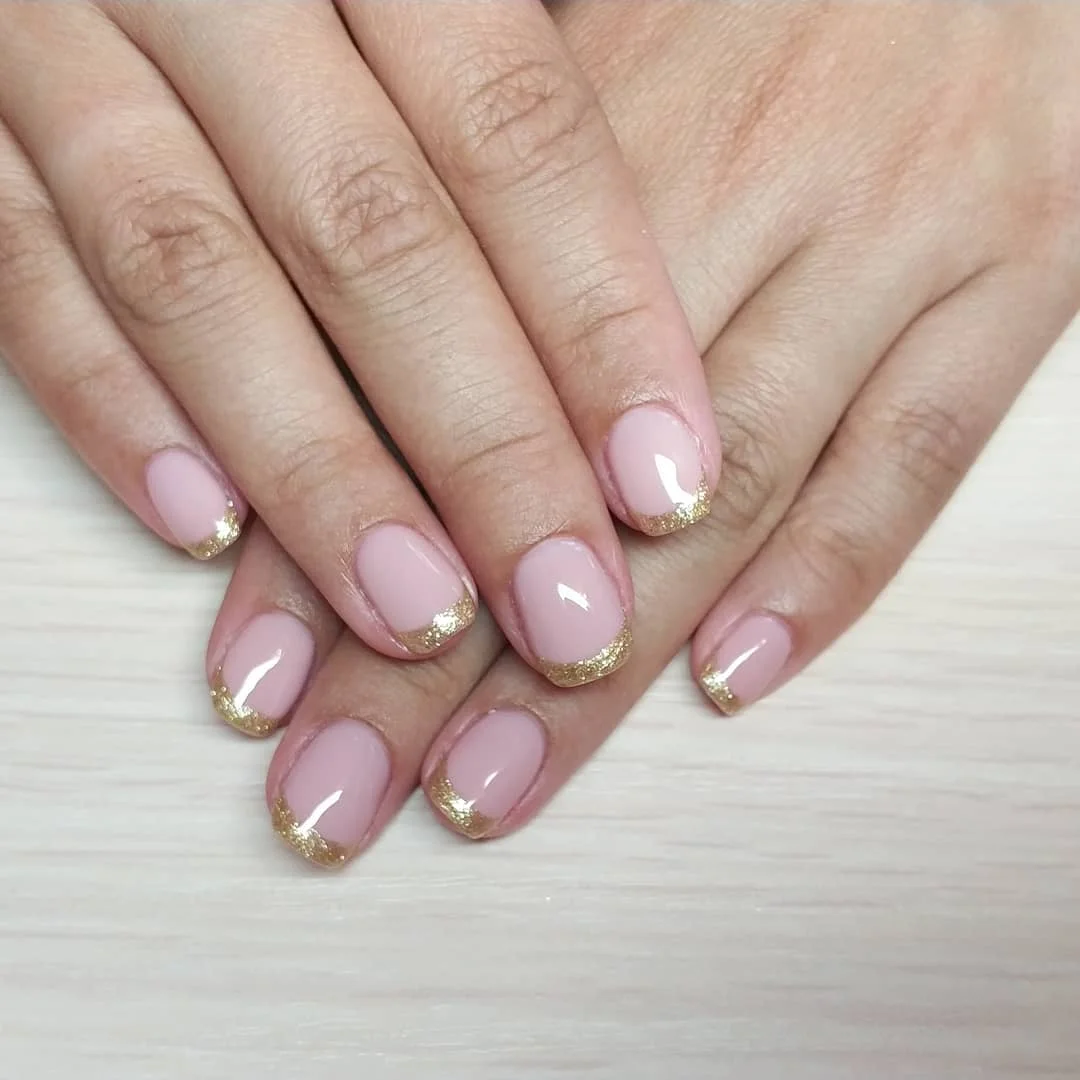
For this kind of look, I would reach for a sheer pink gel such as OPI Bubble Bath or CND Shellac Romantique, plus a fine gold glitter gel for the tips. I prefer a very fine glitter instead of chunky particles because it follows the curved edge of the nail beautifully. A glossy top coat is essential here; it pulls the whole manicure together and makes the gold details catch the light.
I would start by shaping the nails into a short, softly rounded square and preparing the cuticles carefully. After a thin layer of sheer pink, I would build the French tips with a fine detail brush, keeping the glitter line slim and even. Two thin coats of top coat give the manicure that smooth, glassy finish I always look for.
This is one of those designs I could wear through the entire fall season without getting tired of it. The pink keeps it understated, while the gold adds just enough warmth for sweaters, neutral coats, and autumn evenings. If a classic French manicure feels a little too plain, this is my favorite way to give it a subtle glow.
Blush French With Delicate Floral Detail
Here I would keep the French tip extremely soft, using a translucent blush base with rounded white-pink tips. The standout detail is a single accent nail decorated with tiny white flowers, subtle green touches, and delicate golden accents. I especially like the contrast between the clean French manicure and the almost miniature botanical artwork.
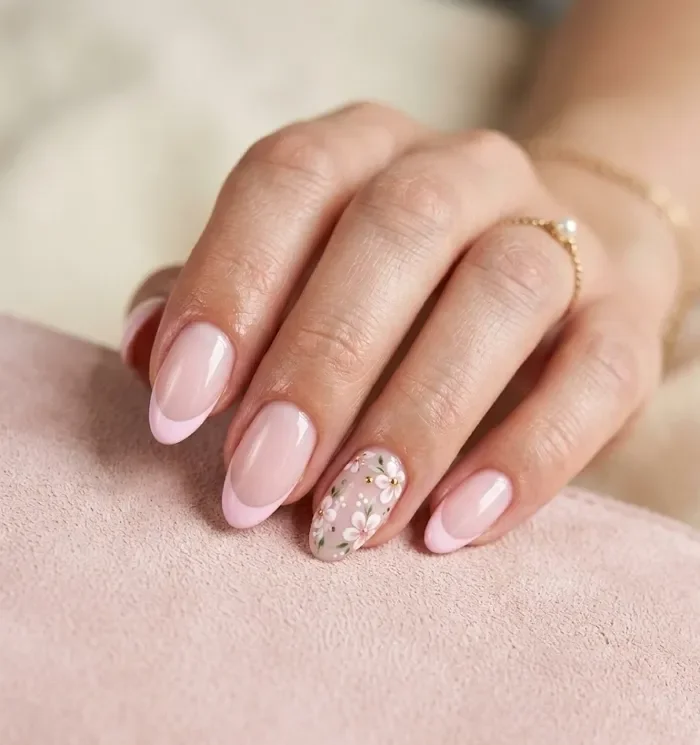
I would use a milky pink base such as Essie Ballet Slippers or a similar sheer gel shade, along with a soft white for the French tips. For the accent nail, I would add a fine nail-art brush, white and muted green gel colors, and tiny gold detailing. The goal is not to cover the nail with decoration but to leave enough negative space for the floral pattern to breathe.
I would paint the sheer base first and cure it before adding the French tips. On the accent nail, I would create the tiny flowers with small dots and fine strokes, then add a few understated leaves and gold touches. A generous but controlled layer of glossy top coat helps preserve the tiny details and gives the entire set a smooth finish.
I find this version especially charming for early fall, when I still want something delicate but am starting to move away from summer brights. It feels romantic without becoming overly sweet. Would I wear it to brunch, a wedding, or an ordinary workweek? Absolutely. That versatility is exactly what makes it work.
Cool White French Tips On A Soft Gray Base
This manicure proves that French tips do not have to rely on warm beige or pink. The nails feature a cool, almost translucent grayish-white base with crisp white tips, creating a clean contrast that feels especially sophisticated. The elongated oval shape adds softness, while the glossy surface gives the manicure that perfectly finished salon effect.
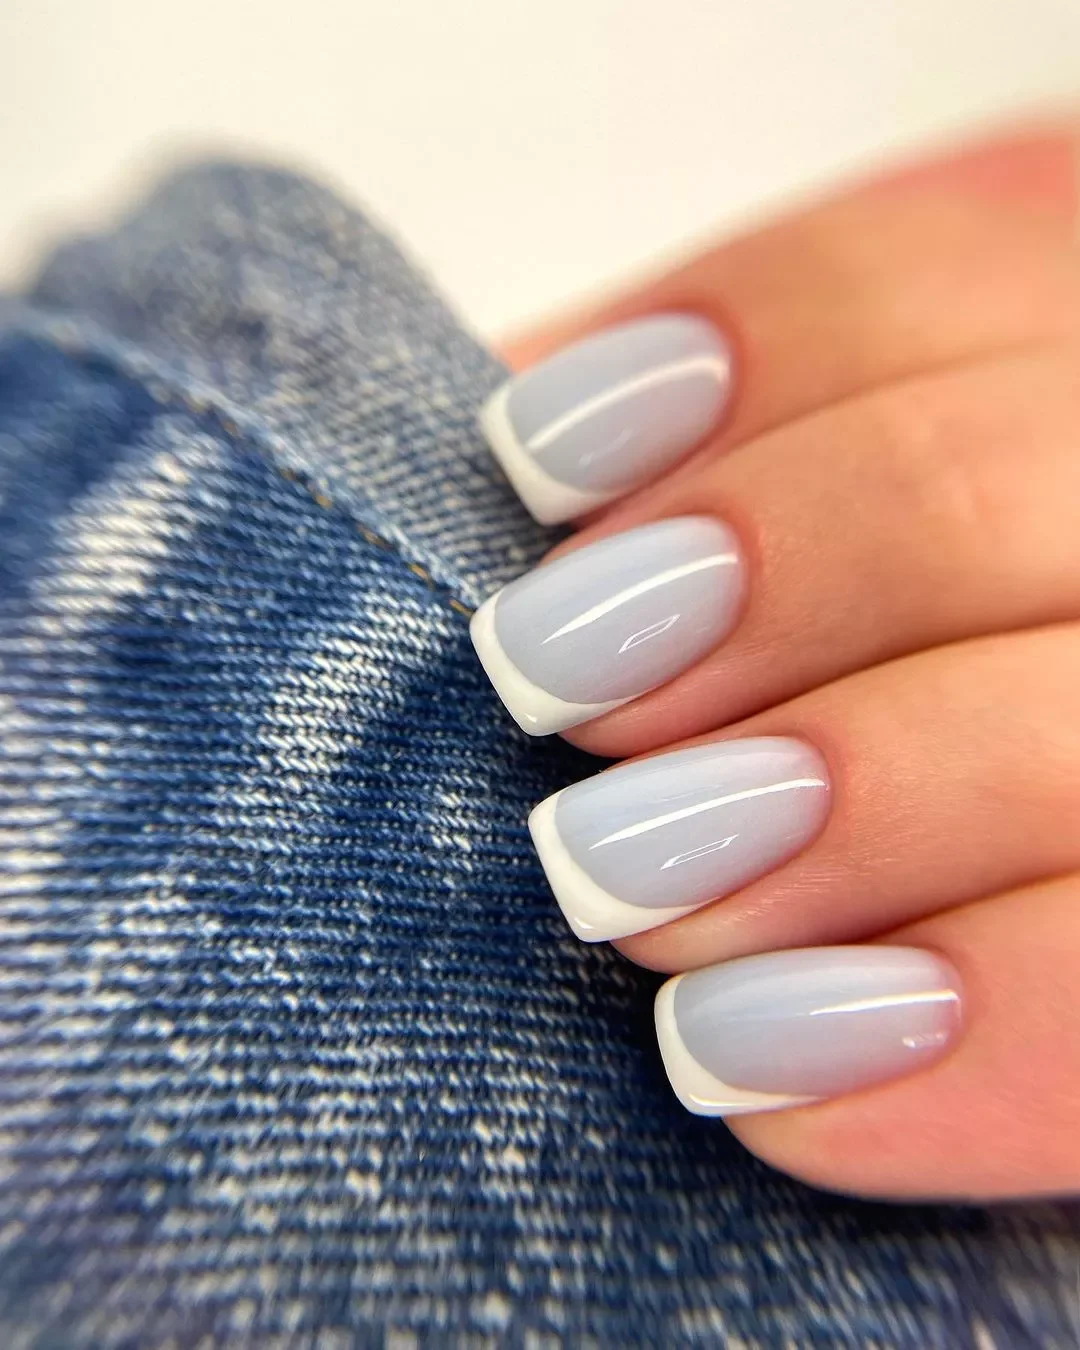
I would choose a cool sheer gray or milky white gel for the base and a clean white gel for the tips. Gelish Arctic Freeze or OPI Alpine Snow can work beautifully for the French edge, while a translucent gray-beige base keeps the result from looking too stark. I would also keep the top coat highly glossy because the reflective finish is part of the design.
I would shape the nails into a smooth oval first, then apply the translucent base in very thin layers. Once cured, I would carefully draw the white tips, following the natural curve rather than making them too thick. The trick for me is keeping every tip visually balanced; a slightly uneven smile line can change the whole look.
This is the kind of manicure I reach for when I want my nails to feel crisp and modern without relying on complicated art. The cooler palette works beautifully with fall denim, charcoal knits, silver jewelry, and tailored basics. It has that quiet, put-together feeling that never really goes out of style.
Classic French With A Playful Blue Accent
The classic French manicure gets a small creative twist here. Most of the nails have a sheer pink base and traditional white tips, while one accent nail introduces a playful abstract design in blue, white, and yellow. The tiny circular details and flowing lines make the manicure feel artistic without taking away from its polished foundation.
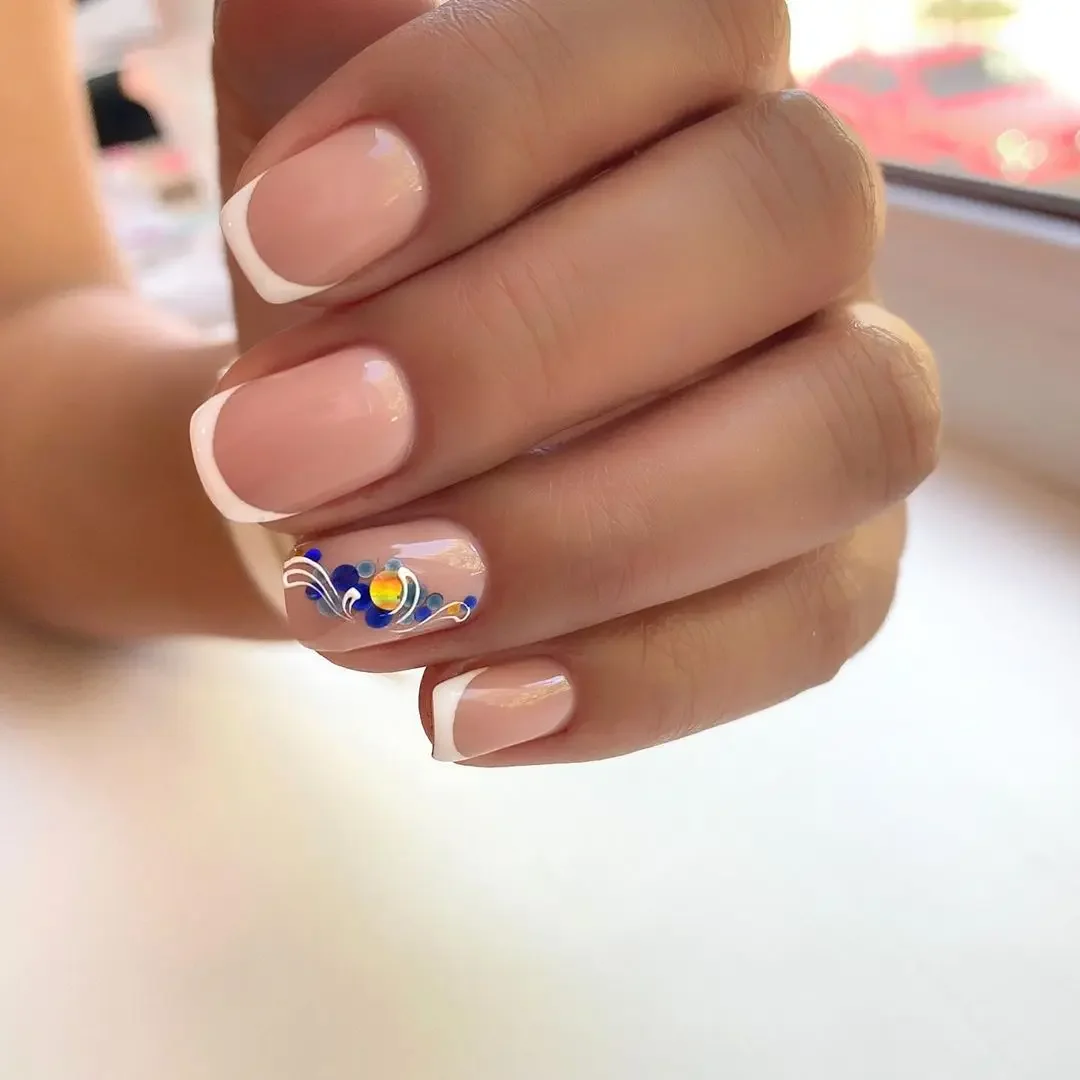
For the base, I would use a translucent pink such as CND Shellac Beau or a comparable soft nude-pink. A crisp white gel creates the French tips, while navy or cobalt blue, a small amount of yellow, and a fine white detail gel can recreate the accent. I would also keep a very thin liner brush nearby because the curved lines need a light touch.
I would build the classic French manicure first and leave the accent nail until the end. After creating the abstract blue and yellow shapes, I would add the delicate white curves and small details. I like finishing with a high-shine top coat because it visually unifies the traditional and artistic elements.
Personally, I love this idea for someone who wants a French manicure but does not want every nail to look identical. The blue detail gives the set personality, while the pink-and-white base keeps it easy to wear. For fall, I would even swap the bright blue for a deeper navy or muted denim shade.
Plum French Tips With Botanical Nail Art
Deep plum is one of those colors that instantly makes a manicure feel more autumnal. Here, rich burgundy-plum nails alternate with nude French tips, while the accent nails feature intricate botanical artwork in dark lines and muted purple tones. Tiny silver embellishments add another layer of detail without overwhelming the design.
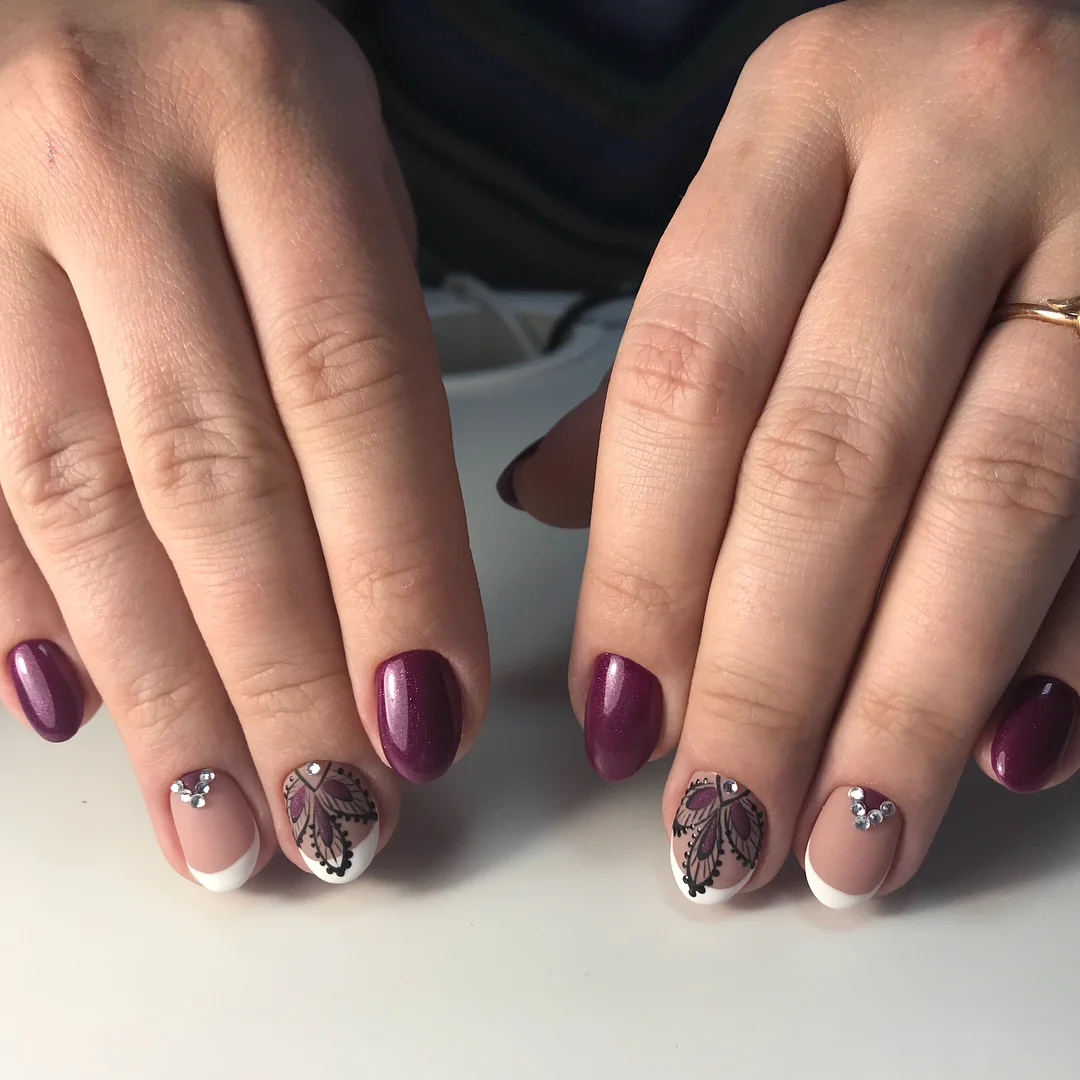
I would use a deep berry or plum gel polish for the solid nails and a natural nude-pink for the French bases. A soft white creates the French tips, while black, burgundy, and muted purple art gels work well for the botanical pattern. Small silver crystals or metallic studs can be added sparingly to finish the accent nails.
I would begin by applying the nude base to the French nails and the plum color to the solid ones. After curing, I would create the white tips with a fine brush, then work slowly through the botanical pattern using very thin lines. I would place the tiny silver details last and seal everything carefully with top coat.
This manicure feels made for fall evenings. I can easily see it with a black blazer, burgundy sweater, or a simple gold ring. It has more personality than a plain dark manicure, but the traditional French elements keep the result elegant rather than busy.
Glittery Lavender French With A Wintery Finish
This version feels like the moment fall begins drifting toward winter. The base is a sheer lavender-gray with a fine shimmer running through it, and the tips are outlined in soft white. The short rounded-square shape keeps the sparkle restrained, so the manicure looks luminous rather than heavily glittered.
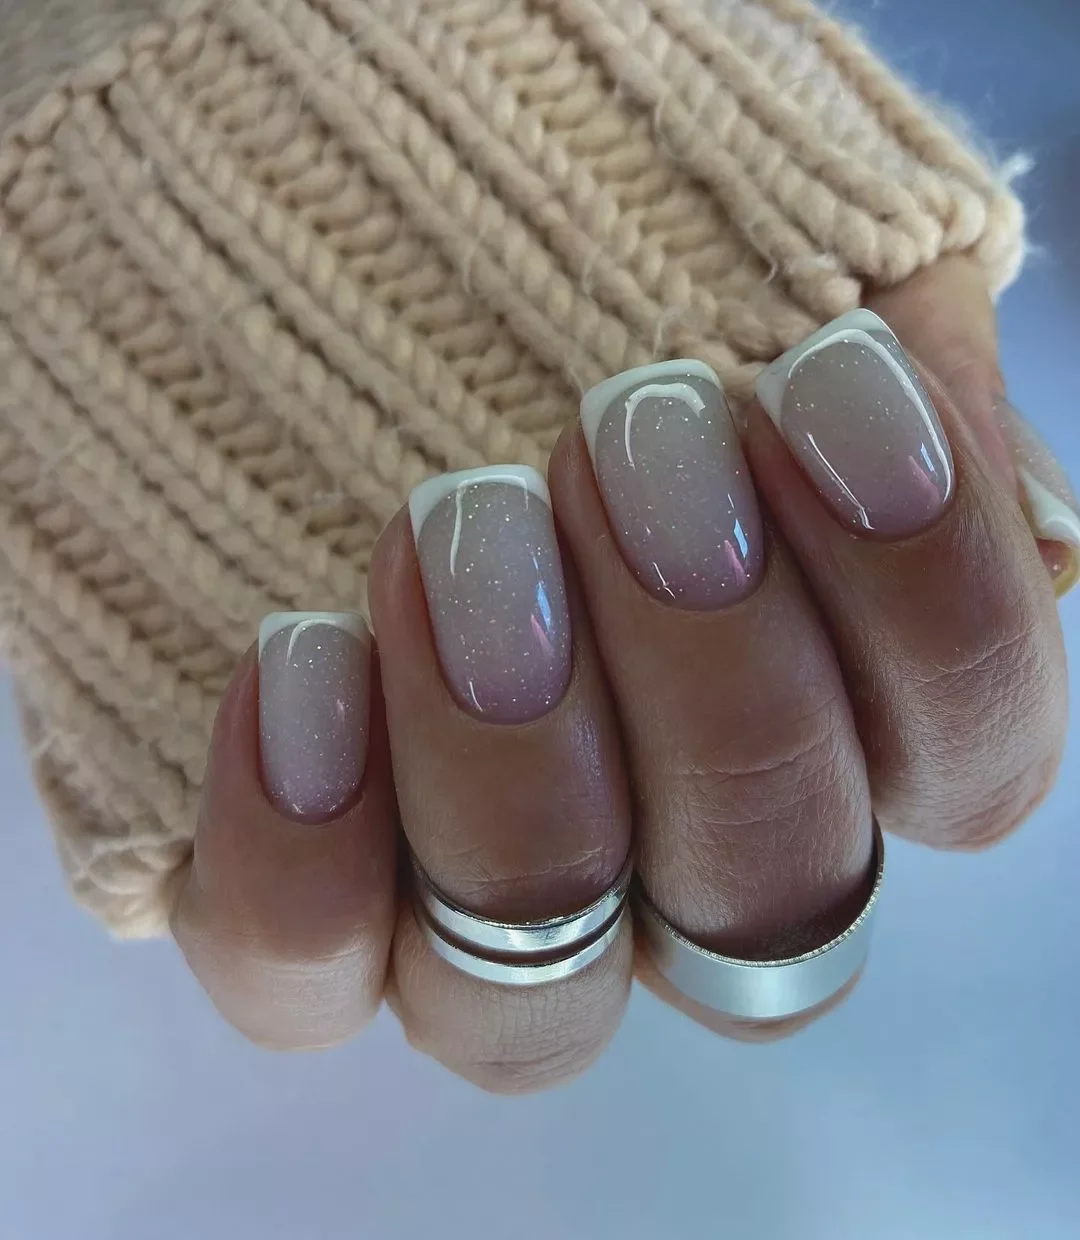
I would use a translucent lavender or cool mauve gel with very fine reflective shimmer and a soft white gel for the tips. A product with micro-glitter is ideal because larger particles could make these short nails appear visually crowded. I would finish with a clear glossy top coat to bring out the tiny reflective particles.
I would shape the nails evenly, apply the sheer shimmer base, and cure each layer completely. The white tips should be relatively thin and follow the natural nail curve. If I wanted an even more refined effect, I would add a second transparent layer over the entire design before the final top coat.
I especially like this palette for the later part of fall. It has the softness of a neutral manicure but introduces that cool, sparkling feeling I start craving as the days get shorter. It is subtle enough for everyday wear but catches the light beautifully when you move your hands.
Mixed French Tips In Blush And Slate Gray
Why choose one French color when two can work together? This manicure combines classic blush-pink French tips with a pair of cool slate-gray nails. The contrast is simple but surprisingly effective, especially because the same rounded shape keeps the entire set cohesive.
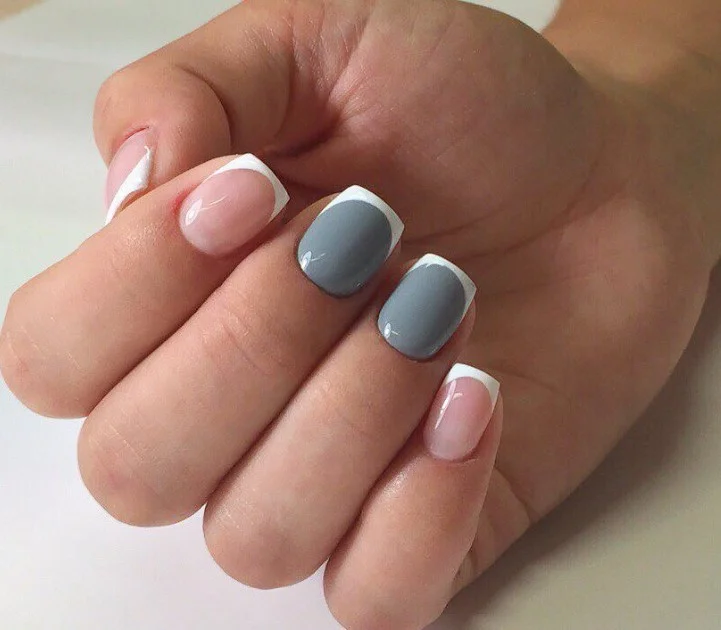
I would use a sheer pink base, a soft white French-tip gel, and a medium slate-gray polish for the accent nails. OPI Put It In Neutral can provide the soft nude effect, while a gray shade with a cool undertone creates the modern contrast. A glossy top coat keeps the color combination looking sleek.
I would paint the pink base across the French nails first, then carefully add the white tips. The gray nails can remain completely solid, which makes the manicure much easier to recreate at home than a fully detailed nail-art set. I would finish each nail with a smooth layer of top coat, paying particular attention to the free edge.
This is exactly the kind of design I would recommend when someone tells me they want something modern but does not want glitter, crystals, or complicated artwork. The gray gives the traditional French manicure a cooler edge, making it especially good for fall wardrobes filled with denim, knitwear, and gray accessories.
Pastel French Tips With A Colorful Edge
The soft pink base here acts almost like a blank canvas for a collection of pastel French tips. Each nail carries a different delicate color, including pink, mint, pale blue, and lavender. The colors are subtle enough to remain sophisticated, but together they make the manicure feel playful and fresh.
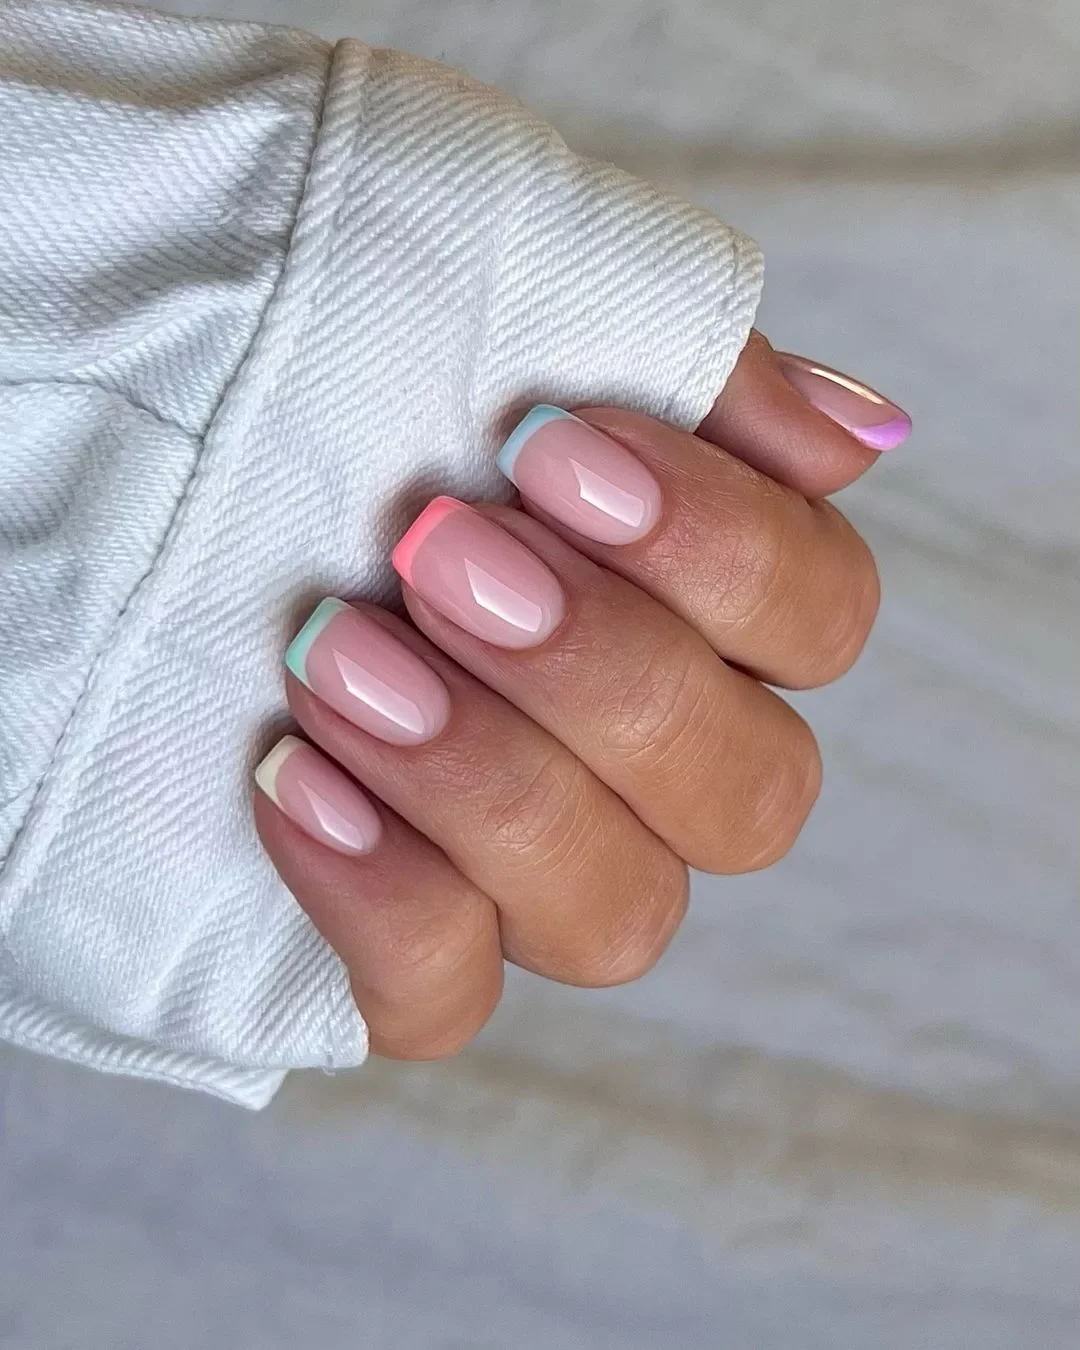
I would choose a sheer blush-pink base and several pastel gel polishes with similar intensity. The most important thing is keeping the colors balanced; I would avoid pairing one extremely bright shade with several very muted ones. A glossy top coat brings the different tips together and keeps the manicure looking intentional.
I would prepare the nails, apply the sheer pink base, and then paint each French tip in a different pastel shade. For short nails, I would keep the colored edge relatively thin because that helps preserve the elongated appearance of the nail. Once everything is cured, I would seal the design with a glossy top coat.
Although the colors feel playful, I think this manicure can transition beautifully into fall when the shades are chosen carefully. Soft sage, dusty blue, muted lavender, and pale rose look lovely with autumn neutrals. It is a little unexpected, which is exactly why I would choose it when a standard French manicure starts feeling too predictable.
Lime French Tips With Tiny Botanical Details
This manicure brings a surprisingly fresh twist to the fall French tip. The base remains natural and glossy, while the tips are finished in a vivid lime green. One accent nail carries delicate botanical linework and tiny pale details, creating a connection between the bold French edge and the softer nude base.
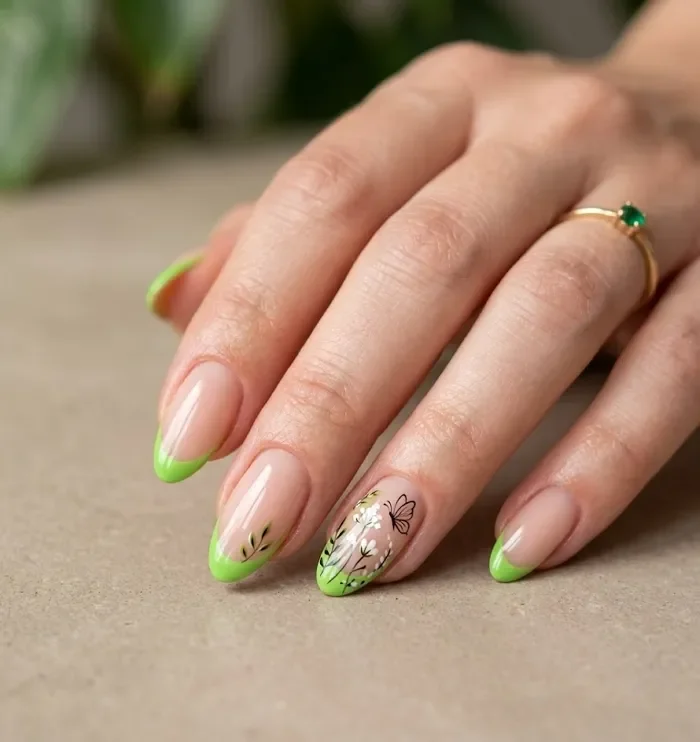
I would use a sheer nude-pink base with a bright lime or chartreuse gel for the tips. For the accent nail, I would add black or dark green liner gel, white detailing gel, and a small selection of green shades. The colors do not need to be identical, but I would keep the artwork delicate so the lime tip remains the main statement.
I would apply the nude base first and allow it to cure before creating the green French tips. A fine liner brush makes it easier to keep the curved edges clean. For the accent nail, I would draw the botanical elements with extremely thin strokes, then add tiny white details before sealing the entire manicure with top coat.
This is the design I would choose when I want to break away from the usual fall palette. Lime may not be the first shade that comes to mind for autumn, and that is exactly what makes it interesting. Paired with cream, denim, chocolate brown, or soft gray clothing, it can look surprisingly chic rather than summery.
Minimal Blush French With Modern Geometric Detail
The final look brings the French manicure back to its cleanest form, but there is one small design element that changes everything. The nails have a soft blush base and crisp white tips, while one accent nail features a fine geometric line that follows the French edge. The result is minimal, precise, and very polished.
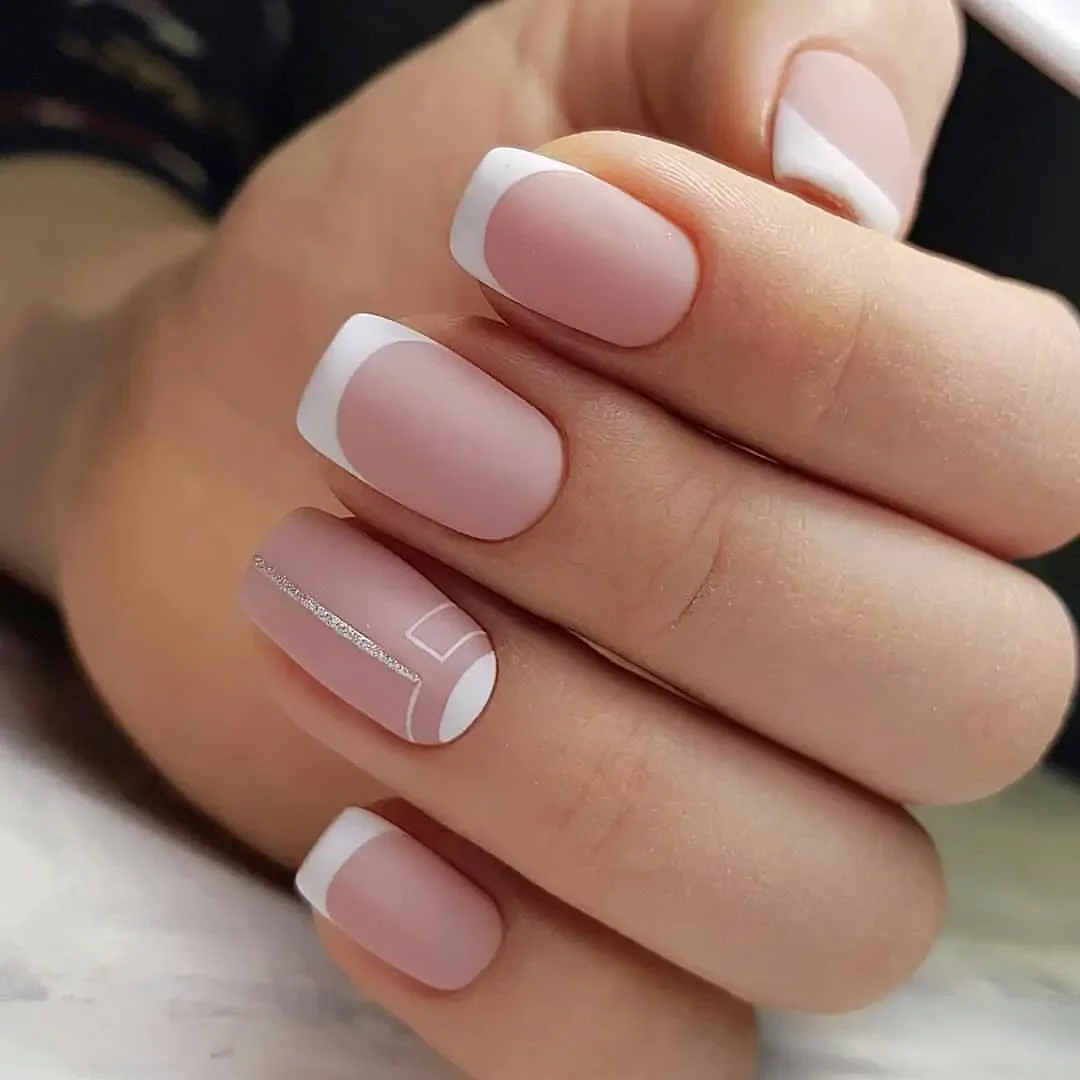
I would use a translucent blush or milky nude gel, a bright white for the French tips, and a thin silver or white liner gel for the geometric accent. A narrow detailing brush is the key tool because the decorative line needs to remain delicate. I would also choose a high-gloss top coat to keep the design looking smooth and modern.
I would start with a carefully shaped short-to-medium square nail, then apply the sheer blush base. After creating the white French tips, I would add the geometric line to one accent nail, keeping the spacing consistent with the rest of the manicure. The final top coat should be applied in a thin, even layer so the raised detail does not disappear under too much product.
I always come back to designs like this when I want my manicure to look expensive without actually being complicated. The clean pink-and-white palette works with practically everything, while the tiny geometric detail gives it enough personality for fall. Sometimes the smallest change is the one that makes a familiar French manicure feel completely new.
Fall French tips do not have to stay classic. I love how a simple nude base can take on a completely different mood with black, emerald green, crisp white, playful color, or a touch of metallic sparkle. Whether you prefer something understated or want your manicure to make a little statement, there is plenty of room to personalize the French look. So, which version would you try this fall? Sometimes all it takes is one unexpected detail to make a familiar manicure feel brand new.

