
I have always loved a manicure that looks instantly recognizable without feeling overworked, and polka dots do exactly that. One tiny circle can change the entire mood of a set, whether it is scattered over a sheer base, tucked into a French tip, or repeated in a candy-colored pattern. But how do I keep dots looking chic instead of overly cute? And which color combinations actually make this trend feel fresh for summer? These are the little details I keep coming back to when scrolling through nail inspiration.
What makes polka dot nails so appealing to me is their flexibility. I can make them delicate and barely there, graphic and high-contrast, colorful enough for vacation, or surprisingly sophisticated with a restrained palette. The technique is also approachable, which makes this one of those trends I would happily try at home rather than save forever on Pinterest.
Sheer Pink Nails With Deep Purple Polka Dots
I love how softly this manicure starts and how confidently it finishes. The almond-shaped nails have a translucent milky-pink base that lets a hint of the natural nail show through, while crisp white tips create a subtle French effect. Deep purple dots are scattered across the surface in different sizes, giving the design a playful rhythm without making it look crowded. To my eye, that combination of sheer pink, white, and plum feels especially pretty when I want something feminine but not predictable.
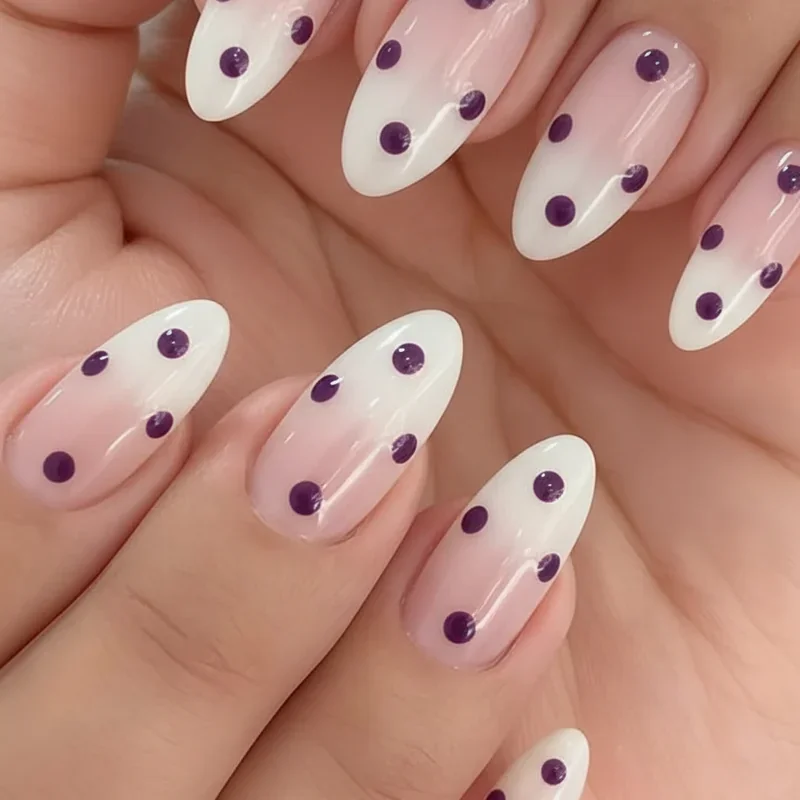
For a similar result, I would start with a sheer pink gel polish such as OPI Bubble Bath or a comparable translucent blush shade, then add a soft white for the tips. For the dots, I would choose a rich eggplant or plum polish rather than a bright purple. A dotting tool is ideal because it makes it easy to create both tiny and larger circles, while a glossy top coat pulls everything together.
I would shape the nails into a tapered almond first, then apply the sheer pink base in thin layers. Once that has cured, I would carefully create the white tips and cure again before placing the purple dots. I prefer slightly irregular spacing here because perfectly symmetrical dots can make the manicure feel too mechanical. A final glossy top coat is important; it gives the surface that smooth, glassy finish that makes the colors look more polished.
This is one of those designs I would choose when I want my manicure to have personality but still work with almost everything in my closet. The purple dots provide just enough contrast to make the nails noticeable, while the transparent base keeps the overall look light. For a summer dinner, a weekend away, or simply a mood boost on an ordinary Tuesday, this one has the right amount of fun.
Soft Pink Polka Dots With a Coffeehouse Mood
There is something wonderfully nostalgic about these soft pink nails covered with neat white dots. The almond shape keeps the design elegant, while the muted rosy base gives the manicure a cozy quality that feels almost like a favorite café drink. The white dots are small and evenly distributed, creating a delicate pattern rather than a loud statement. I especially like the way the dots follow the length of each nail, visually emphasizing the elegant silhouette.
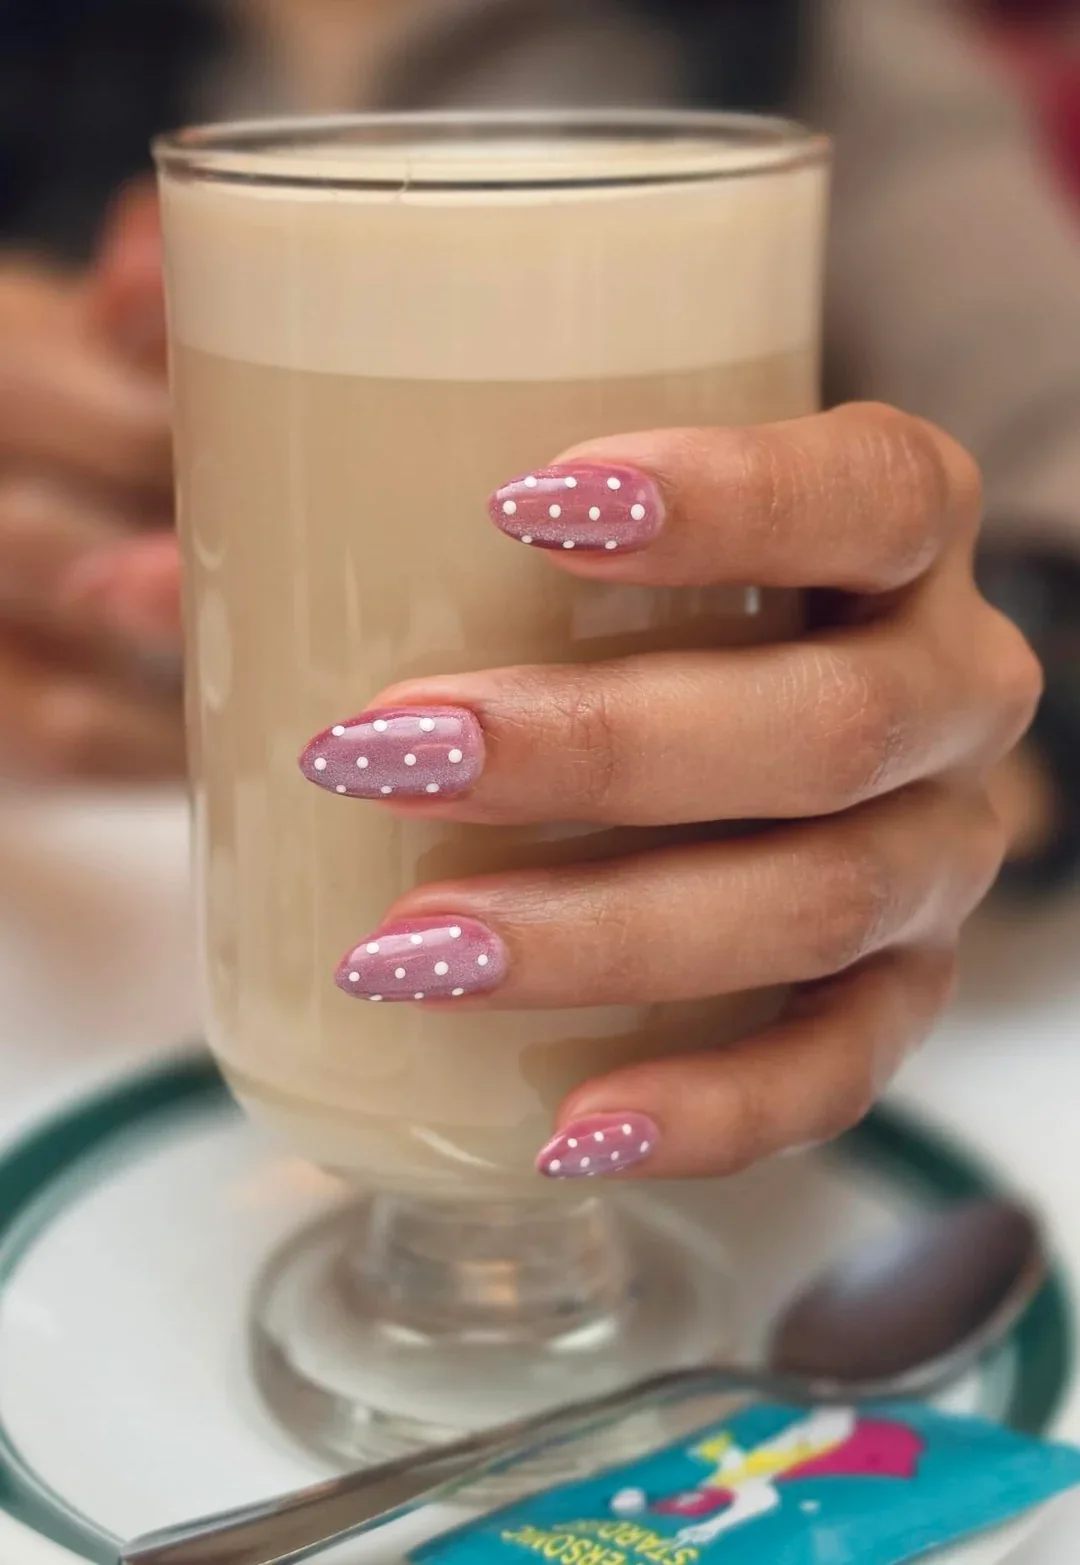
I would use a dusty rose or muted mauve polish for the base and an opaque white for the dots. A small dotting tool, toothpick, or even the rounded end of a fine manicure tool can work for the pattern. If I wanted a softer finish, I would choose a creamy pink instead of a highly saturated one, then finish with a clear high-shine top coat.
My approach would be simple: prep the nails, refine the almond shape, apply two thin coats of pink, and allow the base to become completely dry or cured. Then I would place the white dots in rows, keeping the size consistent from nail to nail. The trick is not to rush the placement. I would rather pause between a few dots than end up with a crowded pattern that loses its airy quality.
For me, this is the kind of manicure that proves polka dots do not have to scream for attention. They can whisper. I could easily wear this design to work, brunch, or a summer event and never feel like it was competing with my outfit. It has that rare quality of looking playful at first glance and polished once you really notice the details.
Black and Pink French Polka Dot Nails
This manicure takes the polka dot idea in a much more graphic direction. Soft pink nails create the base, while glossy black French tips frame the free edge and carry small white dots across the dark sections. I like the contrast because the pink keeps the look delicate while the black gives it structure. The almond shape makes the French detail particularly flattering, creating a long, clean visual line through the fingertips.
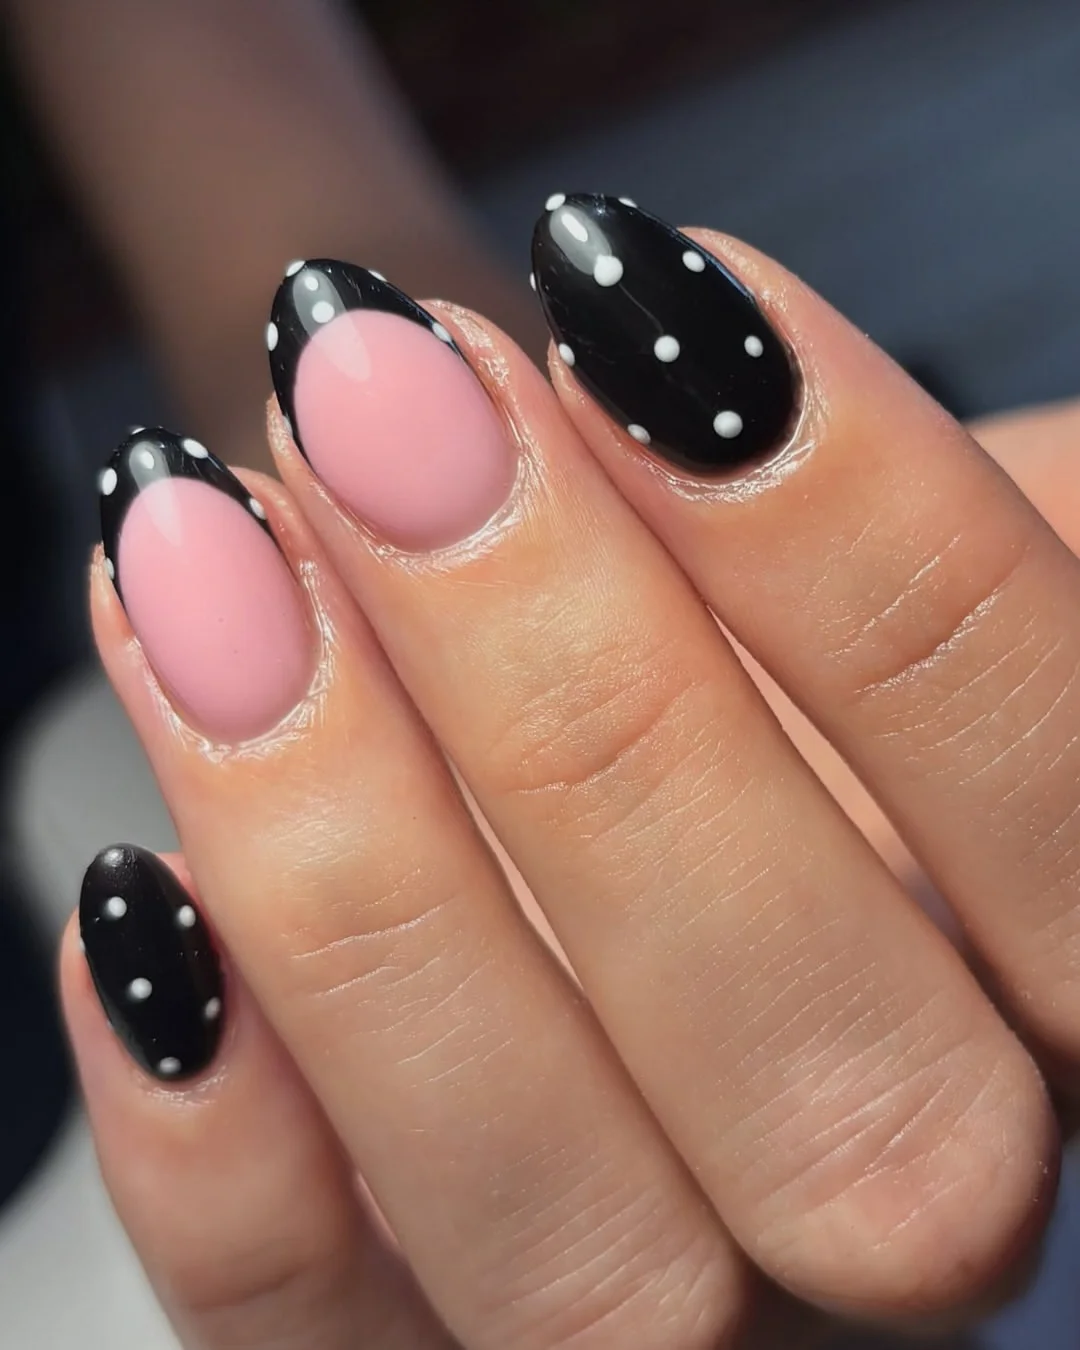
I would reach for a sheer or milky pink base, a dense black polish for the French tips, and a bright white polish for the dots. A thin liner brush can help define the curved French edge, while a small dotting tool makes the white accents much easier to control. For this particular design, I would keep the finish glossy rather than matte because the shine adds a modern quality to the black.
After shaping and prepping the nails, I would apply the pink base and let it cure. I would then paint the black tips, using the natural curve of each nail as a guide rather than trying to force every tip into an identical shape. Once cured, I would add the white dots in different positions across the black area. One final layer of top coat seals the design and makes the contrast especially crisp.
I see this as the polka dot manicure for someone who likes a little attitude. It has the sweetness of pink but the confidence of black, which makes it much more versatile than a purely pastel design. If classic French nails feel too familiar lately, this is a clever way to shake them up without abandoning the silhouette altogether.
Classic White Polka Dots on a Clean Base
I keep coming back to the simplicity of a white-and-black polka dot manicure. Here, a soft natural base is paired with white nails covered in tiny black dots, creating a clean pattern that feels almost like a minimalist print. The almond shape gives the design a graceful foundation, while the small dots add enough visual interest to keep the manicure from looking plain. It is simple, but definitely not boring.
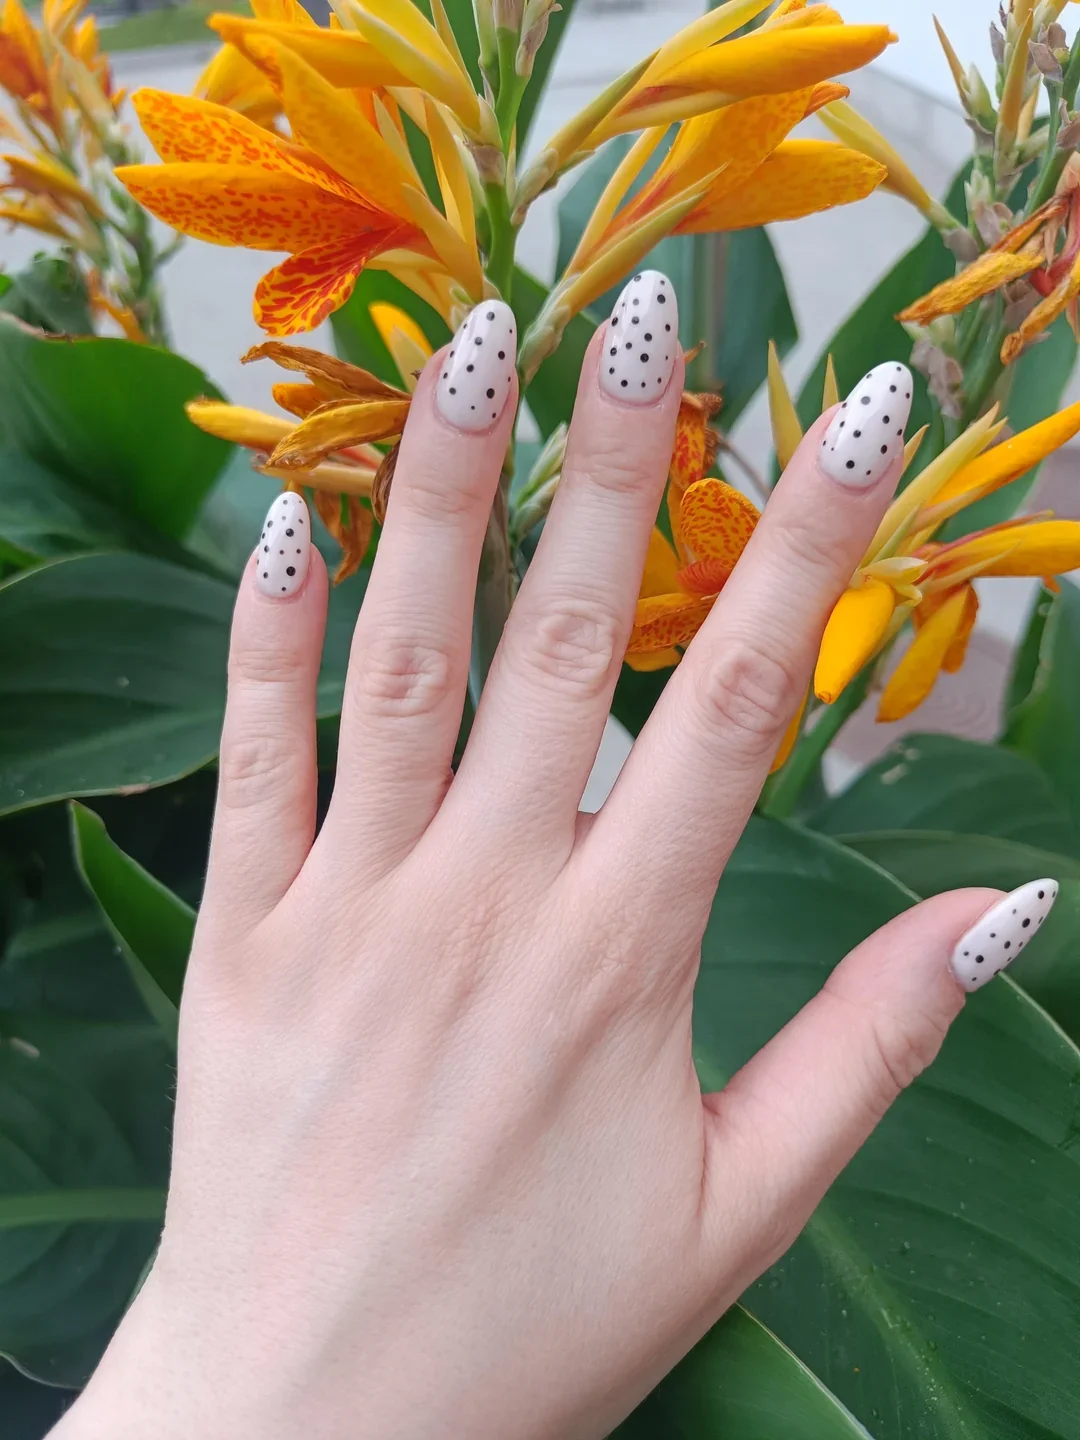
For this version, I would use a sheer nude or translucent pink base, an opaque white polish, and a true black polish for the dots. The dots should be relatively small, so I would choose a fine dotting tool rather than a large one. A high-gloss top coat is the finishing touch I would not skip because it helps the black details look sharp against the pale base.
I would begin with the nude base and cure it completely before applying the white layer toward the tips or over the full nail, depending on the desired effect. Then I would place the black dots one at a time, slightly varying their position while keeping the overall spacing balanced. If I make a dot too large, I would correct it before the polish sets rather than trying to disguise it later.
This is probably one of the easiest versions of the trend to style. I could wear it with denim, a simple white tee, a tailored blazer, or a colorful summer dress. That is exactly why I like it: the manicure has a distinct point of view, yet it never demands that the rest of the look be complicated.
Pastel Confetti Polka Dots on Almond Nails
Now we are getting into the fun part. These almond nails use a translucent nude-pink foundation covered almost completely with pastel dots in shades of pink, yellow, blue, green, and lavender. Because the colors are soft and slightly milky, the finished manicure has the charm of confetti without becoming visually overwhelming. The glossy surface adds another layer of dimension, making each little dot look almost like a tiny bead beneath glass.
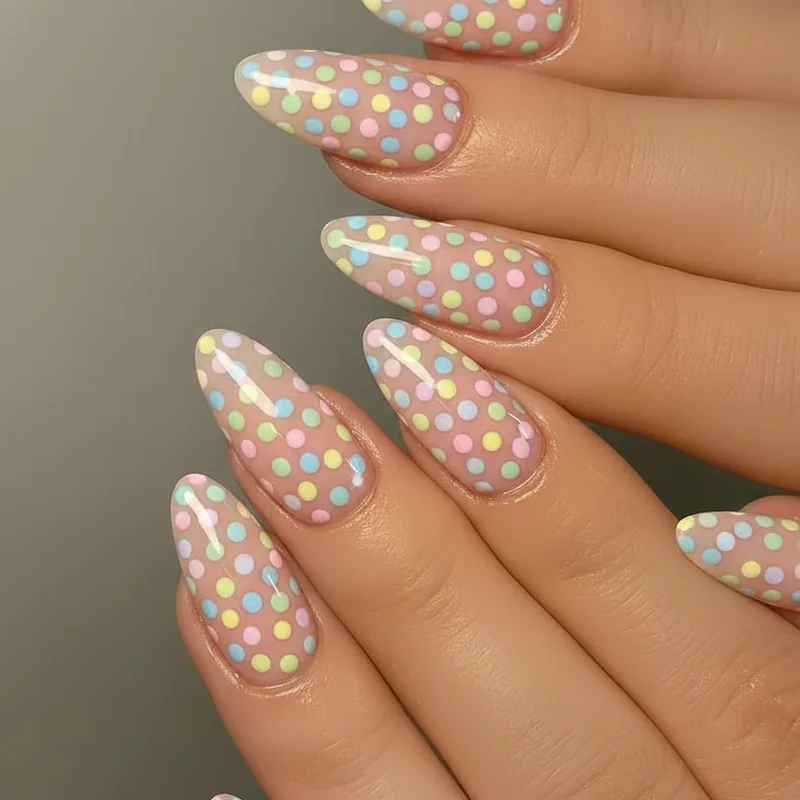
I would build this manicure around a sheer nude or blush base and then gather several pastel shades. OPI, Essie, CND, and Gelish all offer soft colors that can be mixed into a palette like this, although I would choose the exact shades according to the season and wardrobe. A small dotting tool is essential here because using the same tool for every color keeps the circles consistent.
I would apply the sheer base first and cure it, then work color by color rather than trying to place random dots from several bottles at once. I would start with the larger circles and use smaller ones to fill the gaps. The secret is leaving tiny areas of the base visible; without those breathing spaces, the design can quickly turn into visual clutter.
Personally, I would save this manicure for a sunny weekend, vacation, or any moment when I want my hands to feel cheerful. It has a youthful energy, but the muted pastel palette keeps it sophisticated enough for grown-up styling. Sometimes a little color is exactly what the season calls for.
Milky Almond Nails With Tiny Black Dots
This design feels like the quietest member of the polka dot family, and that is precisely why I like it. A translucent milky base follows the natural almond shape, while small black dots are placed across each nail in an airy pattern. The contrast is strong, but the scale of the dots keeps the result refined. There is no need for glitter or elaborate artwork when the spacing does all the work.
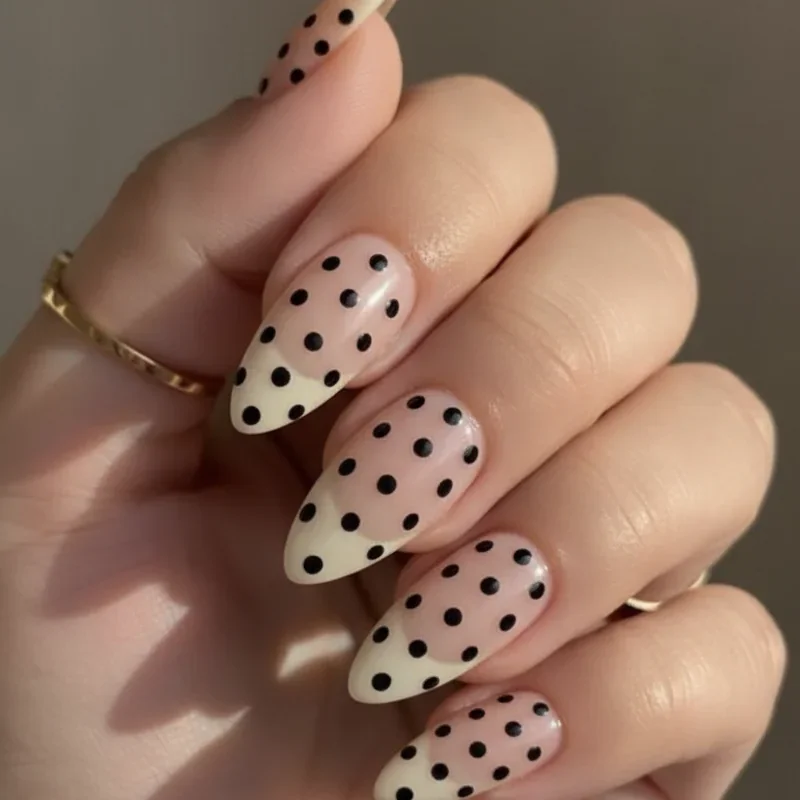
I would choose a milky white or translucent pink polish for the base and a deep black polish for the pattern. A fine dotting tool gives the most control, especially around the edges where a heavy dot could visually shorten the nail. I would also keep a glossy top coat nearby because this particular manicure depends on a smooth, clean finish.
Once the nails are shaped, I would apply one or two thin coats of the milky color. After curing, I would place the dots in a loose pattern rather than strict rows. I like starting near the center and then adding dots toward the edges, checking the balance after every few placements. It is surprisingly easy to overdo a minimalist design, so restraint matters here.
This would be my pick when I want polka dots without feeling particularly playful. The black-and-milky combination works beautifully with neutral clothes and looks especially crisp against summer skin. It is proof that a trend can be expressive and understated at the same time.
Hot Pink Nails With Cheerful Yellow Dots
Here the polka dot manicure becomes unapologetically bright. The nails are coated in a vivid hot pink, then finished with evenly spaced yellow dots that pop against the saturated background. The rounded almond shape softens the intensity slightly, while the glossy finish makes the color look juicy and fresh. I immediately think of warm-weather plans, bright accessories, and the kind of manicure that catches attention when holding an iced drink.
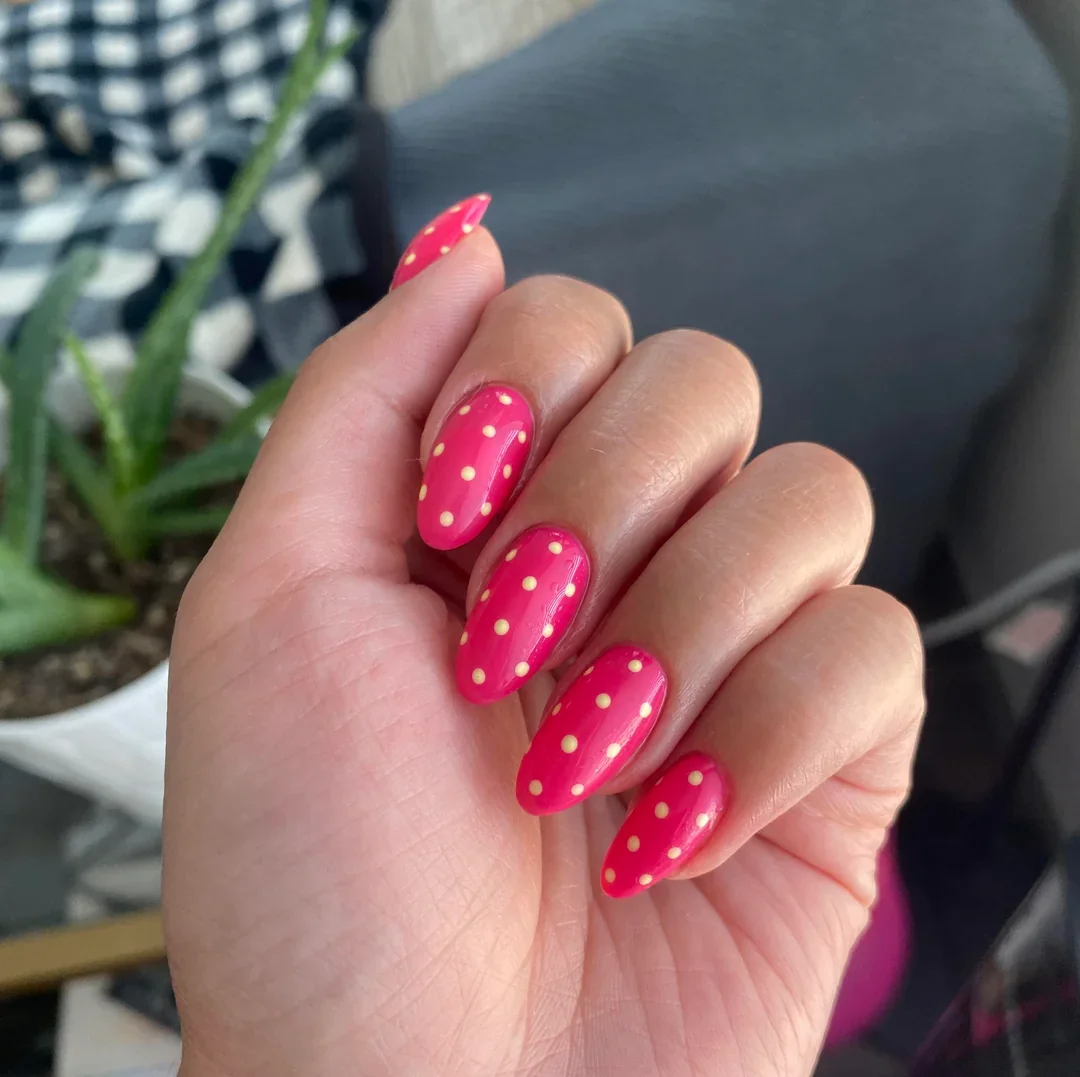
I would use a highly pigmented hot pink polish and a sunny yellow shade with enough opacity to remain visible over the base. For gel manicures, I would choose colors that cure evenly without becoming too thick around the dots. A medium-size dotting tool should be enough, although I would keep a smaller one available for correcting the edges.
I would apply two coats of pink, curing each layer thoroughly. Then I would place the yellow dots in staggered rows, keeping the distance between them fairly consistent. The design becomes much cleaner when I rotate the nail slightly as I work, checking that the dots follow the curve of the nail rather than drifting toward one side.
I would wear this when my outfit needs one unapologetically happy detail. Hot pink can be surprisingly versatile in summer, especially when paired with white, denim, tan, or even another saturated accent. The yellow dots make the manicure feel carefree without requiring complicated nail art skills.
Chocolate Brown Nails With Fine White Dots
This manicure makes polka dots feel unexpectedly sophisticated. A deep chocolate-brown base covers the almond nails, while delicate white dots are scattered across the surface in a dense but orderly pattern. The result has a retro-inspired quality, but I would not call it old-fashioned. The glossy brown finish gives the design a richer, more current feel, especially when paired with simple jewelry.
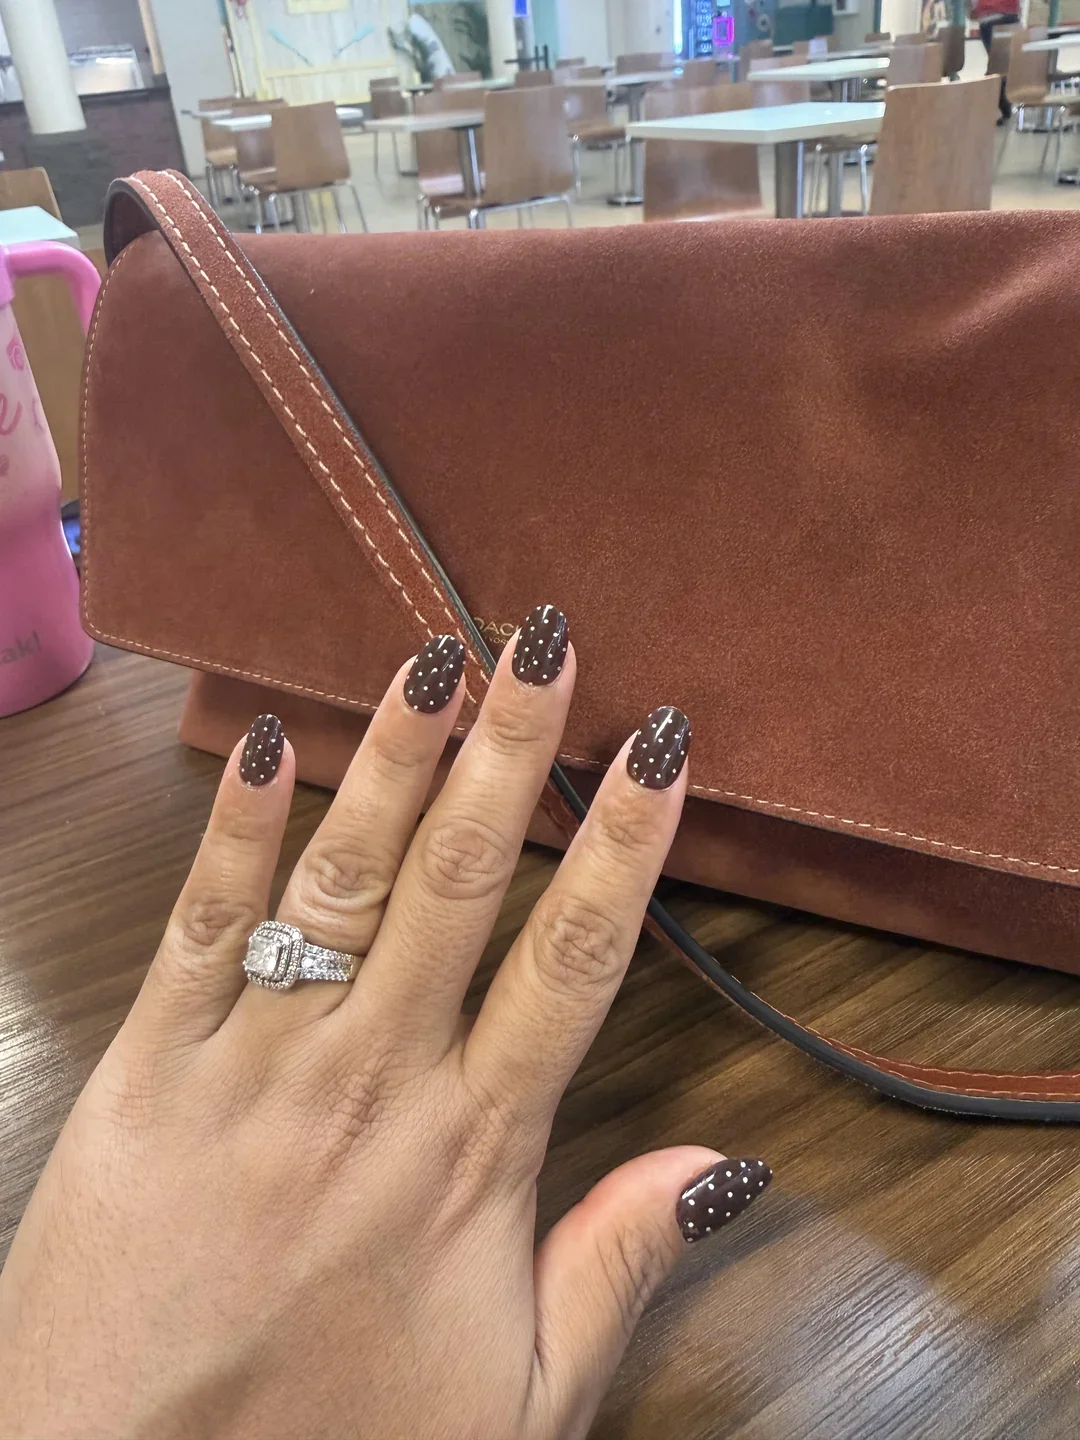
I would choose a glossy espresso or chocolate-brown polish and a soft white for the dots. If the brown is extremely dark, I would make sure the white polish is highly opaque so the pattern remains crisp after one application. A small dotting tool is the easiest option, and I would finish with a plumping glossy top coat to emphasize the depth of the brown.
The application itself is straightforward. I would prep the nails, apply the brown base in two thin coats, and cure completely before adding the dots. For this denser pattern, I would work from one side of the nail toward the other, alternating dot positions so that the pattern stays balanced. I would avoid making every dot identical because tiny differences give the manicure a more organic finish.
This is the design I would choose when I want something richer for late summer evenings or the transition into fall. Chocolate tones have a natural elegance, and the white dots keep them from feeling too serious. Add a simple gold ring and the whole manicure suddenly looks very intentional.
Sheer Nails With Sparkling Blue Dot Accents
Not every polka dot has to be painted in a flat cream or black. This delicate manicure uses a translucent, slightly pearlescent base with scattered blue accents that catch the light. The dots appear jewel-like against the pale surface, giving the nails a subtle shimmer without turning the design into a full glitter manicure. The short rounded shape also makes the look feel easy and wearable.
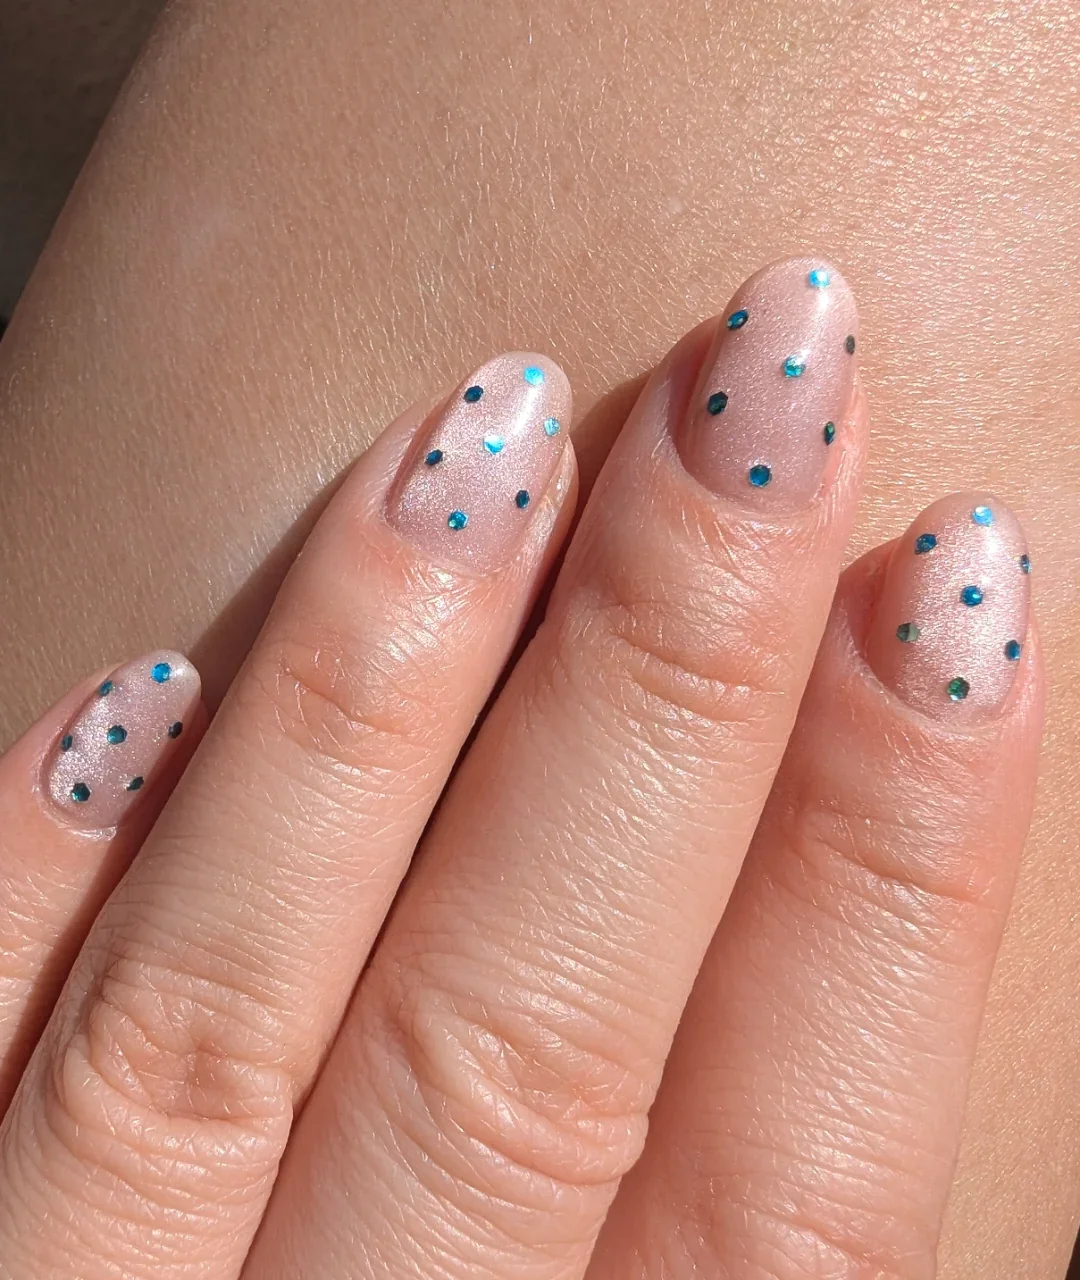
I would start with a sheer pink polish containing a fine pearl or shimmer effect, then add small blue metallic or glittering dots. A deep teal-blue and a lighter electric blue can be combined if I want a little variation. For tiny accents like these, I prefer a fine dotting tool because it lets me control both the placement and the amount of product.
I would apply the sheer base in thin coats until the nails have the level of translucency I like. Once cured, I would place the blue dots randomly but intentionally, leaving plenty of negative space between them. I would then seal everything with a glossy top coat, taking care not to drag the dots while brushing over them.
I especially like this interpretation for someone who normally chooses neutral manicures but wants to experiment. The color is there, but it is not shouting. Under natural daylight, those little blue accents can catch just enough light to make the manicure feel special, which is sometimes all I want.
Minimal Nude Nails With Micro Black Polka Dots
The final look brings the trend back to its most wearable form. Long, softly squared nails are covered in a translucent nude-pink base, with tiny black dots placed around the surface and particularly near the edges. The effect is delicate, graphic, and surprisingly sophisticated. I like that the natural-looking base does most of the visual work while the black dots provide a tiny dose of contrast.
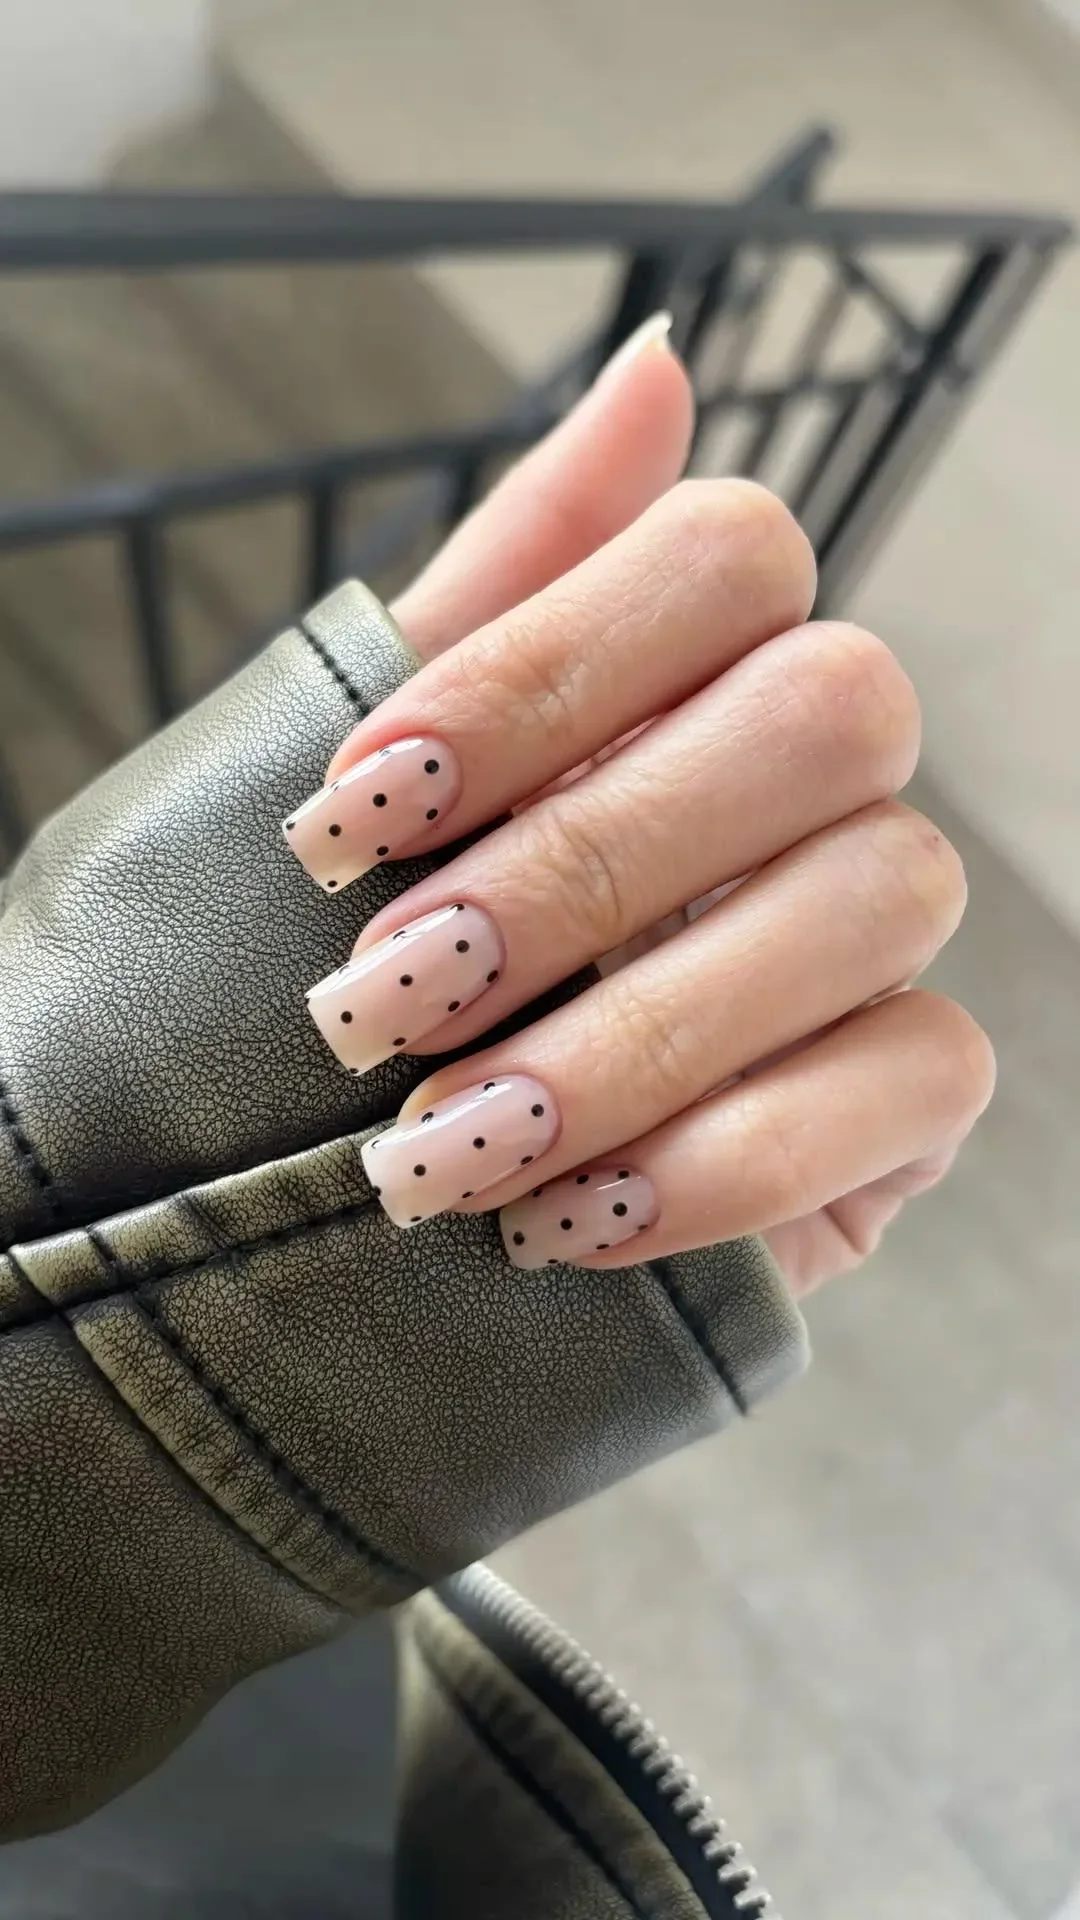
For this manicure, I would use a neutral pink-beige sheer polish, a highly pigmented black polish, and a fine dotting tool. The base should remain translucent enough to preserve that clean, natural appearance. I would also use a glossy top coat rather than anything textured because the beauty of this design is its smooth, almost glass-like finish.
I would shape the nails into a soft square or squoval, depending on the natural nail, then apply the nude base. After it cures, I would create tiny black dots with the smallest practical dotting tool, concentrating some around the perimeter while allowing others to float closer to the center. I would check each nail from a distance before sealing the design; that quick step helps me catch any area that looks too empty or too crowded.
This is the version I would recommend when someone tells me she wants to try the polka dot trend but does not want to feel like she has completely changed her style. It is subtle enough for everyday wear and distinctive enough to make a manicure feel freshly considered. Sometimes the smallest detail has the biggest effect, and these micro dots make that case beautifully.
Soft Almond Polka Dots With a Barely There Base
I keep coming back to this kind of manicure when I want something playful without making my hands feel overly decorated. The almond shape is long enough to create an elegant silhouette, while the milky nude base keeps everything soft and wearable. Black dots are scattered across the nails in different sizes, with a few tiny accents sitting between the larger circles. I love that the pattern is deliberately irregular; it feels more modern than perfectly measured rows and gives the manicure that effortless, slightly spontaneous quality that works so well with summer outfits.
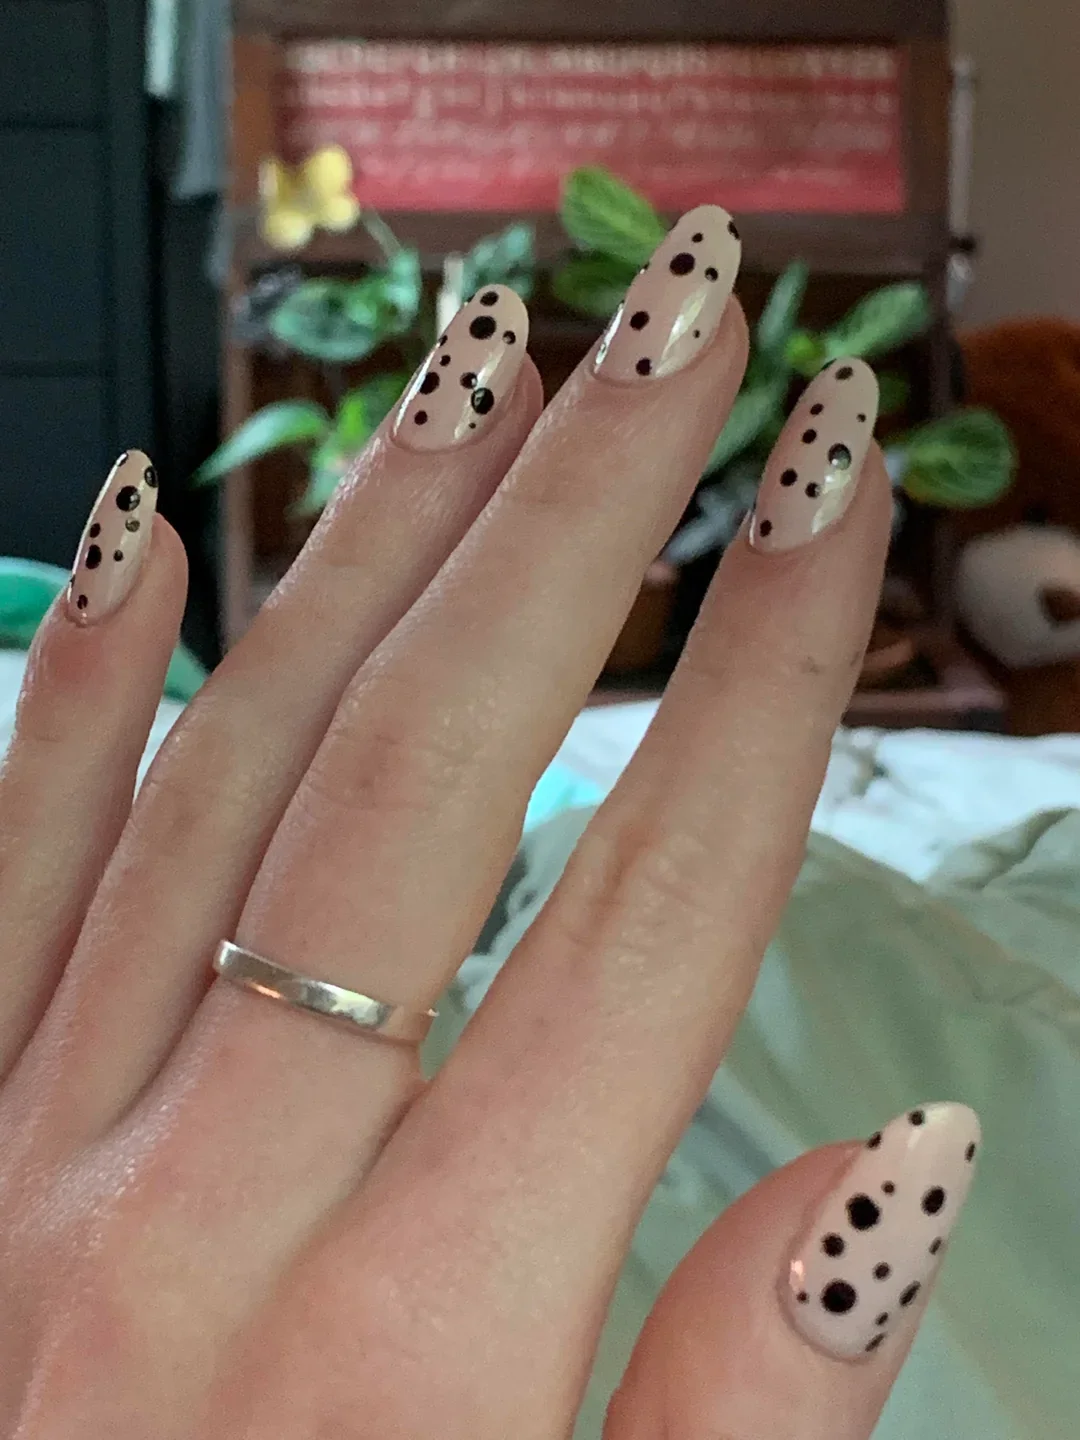
For this look, I would start with a sheer beige or milky nude gel polish, something like OPI Bubble Bath or a similar neutral with a little more coverage. For the dots, I would use a deep black such as OPI Black Onyx, Essie Licorice, or a comparable gel shade. A dotting tool with two different ball sizes makes the pattern much easier to control, although the rounded end of a fine manicure tool can work too. I would finish with a high-shine top coat so the neutral base stays glossy and the black details look crisp.
I like to build the design over a carefully shaped almond nail because the tapered sides make the scattered dots look balanced rather than crowded. After applying and curing the nude base, I would place a few larger dots first, then fill the open areas with smaller ones. There is no need to make every nail identical. In fact, I think the charm comes from changing the spacing slightly while keeping the same black-and-nude palette. Once everything is cured, I would seal the surface with top coat and make sure the free edge is covered.
This is one of those manicures I could wear for weeks without getting tired of it. The contrast is strong enough to catch attention, but the neutral background keeps it from competing with jewelry, denim, or a favorite summer dress. If you usually hesitate before trying nail art, this is a surprisingly easy place to start.
Cherry Red Nails With Delicate White Dots
A rich cherry-red manicure already has plenty of personality, so adding tiny white dots gives it a completely different mood. I especially like the way the dots are distributed across the deep red surface rather than arranged into a strict geometric pattern. The rounded nail shape softens the intensity of the color, while the glossy finish makes the whole manicure look almost lacquered. It has that sweet-meets-polished quality that can take a simple red manicure somewhere much more interesting.
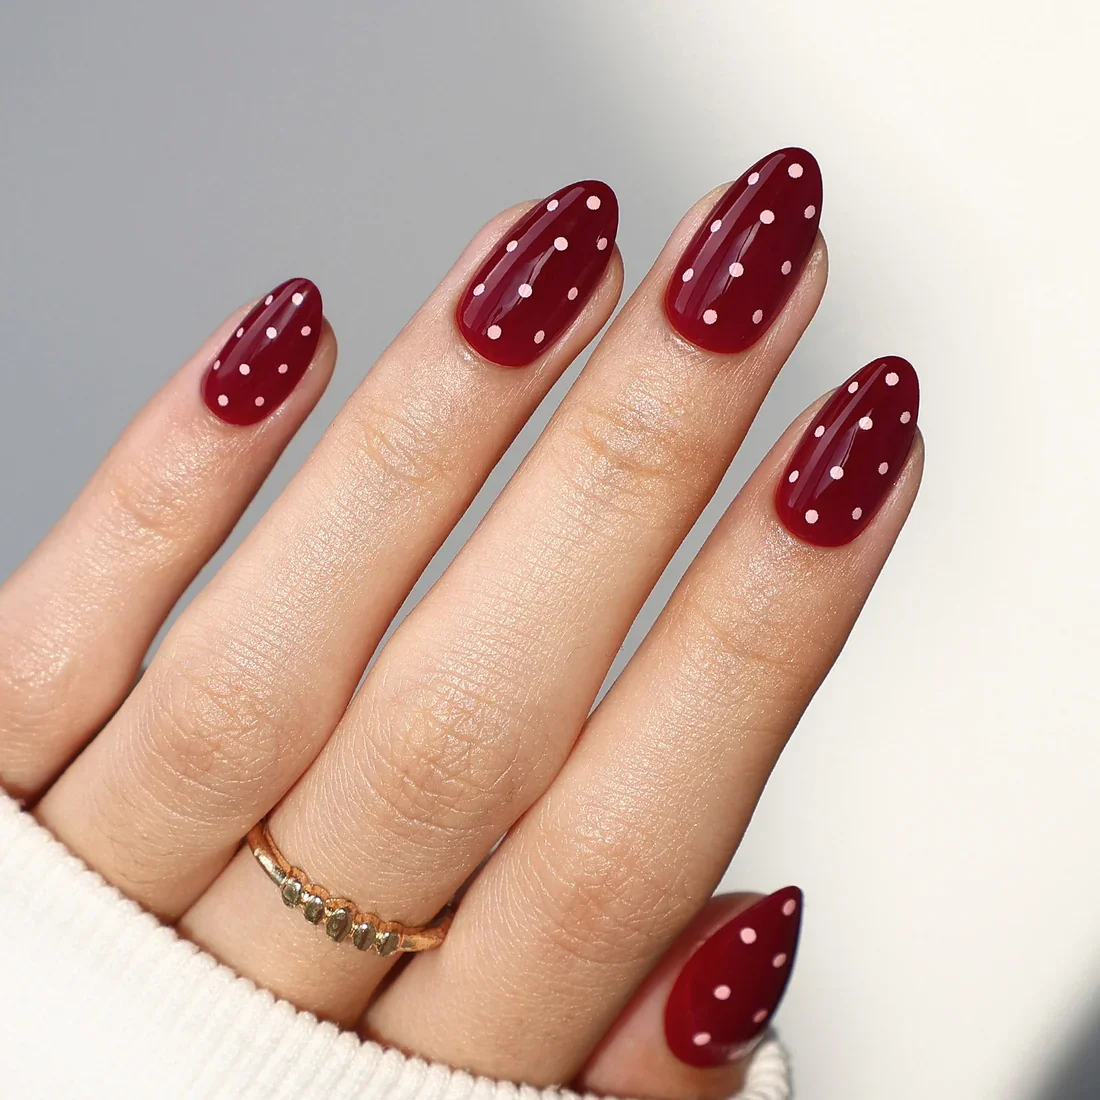
I would reach for a saturated burgundy or cherry gel polish for the base, such as OPI Malaga Wine or a similar deep red. A creamy white polish works beautifully for the dots; OPI Alpine Snow is an easy reference point. I would also keep a small dotting tool nearby because the tiny circles need a relatively controlled amount of polish. A glossy top coat is essential here. On such a rich base, shine makes the color look deeper and helps the white details stand out.
My favorite way to recreate this at home is to apply two thin coats of red rather than one thick coat. Once the color is completely cured, I would use the dotting tool to add small white circles, varying their position slightly from nail to nail. I would avoid dragging the tool because that can turn a clean dot into a little comma. Let the dots settle for a moment, cure according to the polish system, and finish with top coat.
I could easily see this design becoming a fall favorite too, but there is something unexpectedly fresh about wearing cherry red with white during warmer months. It feels cheerful without becoming sugary. If you love red nails but want a small change from the classic solid manicure, this is exactly the kind of detail I would try first.
Black And White Dots For A Crisp Statement
There is something wonderfully graphic about black nails covered with tiny white dots. The short rounded-square shape keeps the design practical, while the intense black base gives the manicure a much stronger visual impact. I like the contrast between the dark polish and the evenly spaced white circles because it makes even a simple dot pattern feel intentional. It is playful, but definitely not timid.
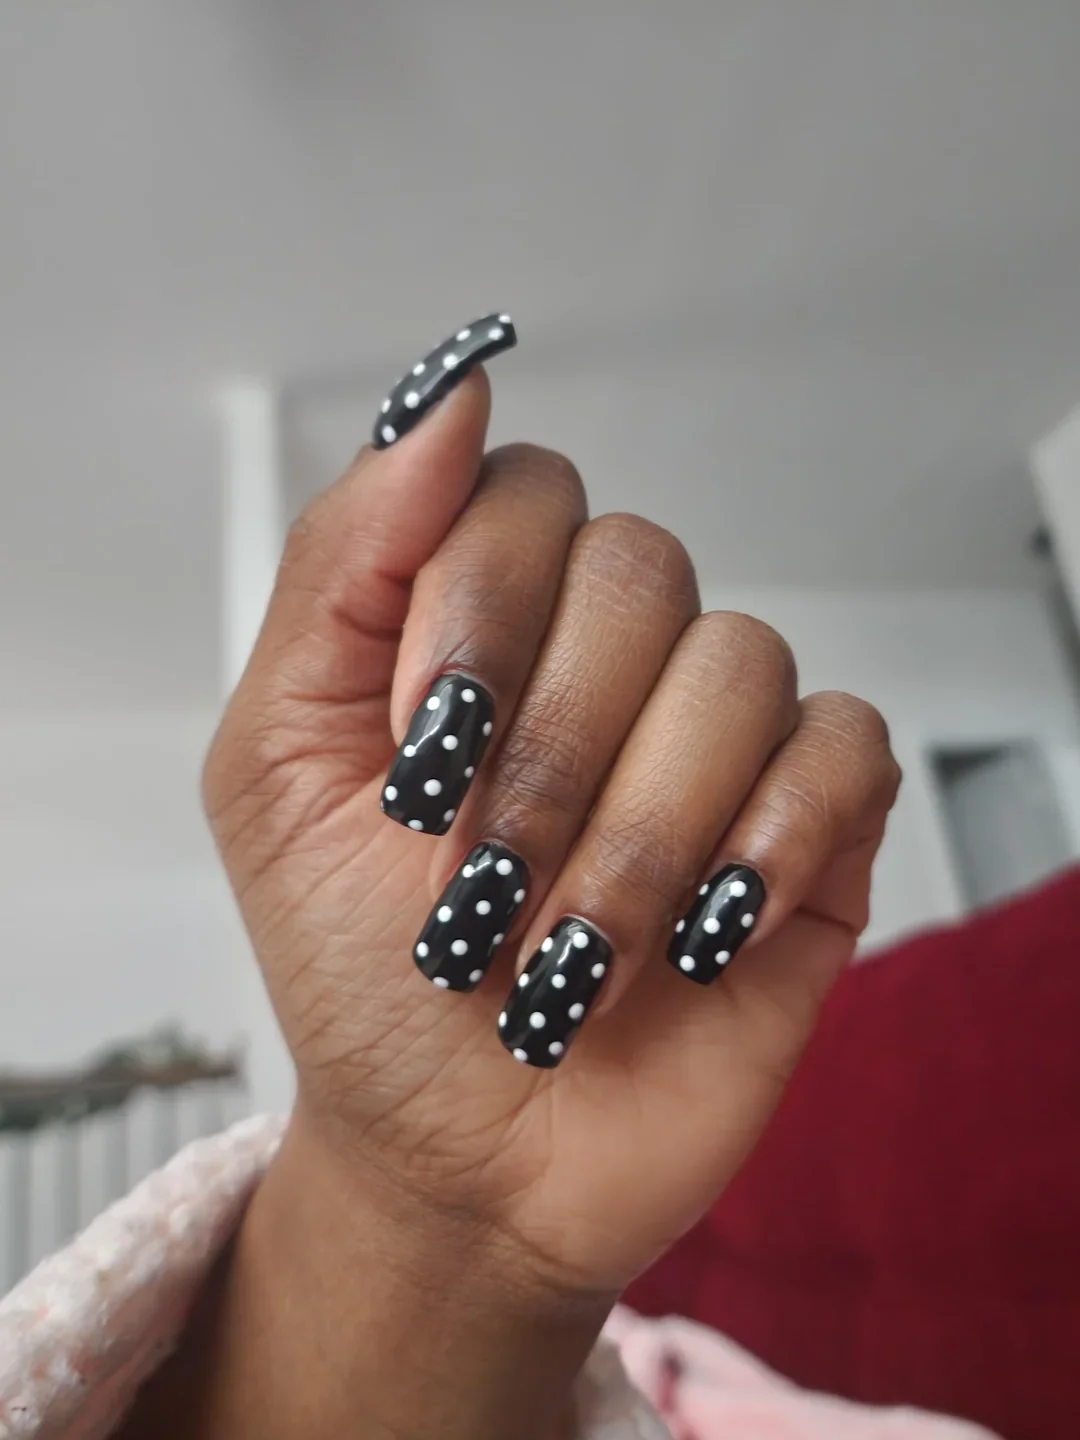
For the base, I would choose a highly pigmented black gel, such as Gelish Black Shadow or OPI Black Onyx. The white dots need to be opaque, so I would use a creamy white rather than a translucent polish. A medium and small dotting tool would give me enough flexibility to create the different circle sizes. Because black polish can reveal uneven application easily, I would also use a smooth, self-leveling top coat.
I would shape the nails first, keeping the length relatively short so the manicure stays close to the proportions of the design. After two thin coats of black, I would cure the surface and place the white dots in loose rows. I would keep the spacing fairly consistent here because the orderly pattern complements the stronger base. A final glossy layer pulls everything together and gives the dots that clean, almost printed appearance.
For me, this is proof that polka dots do not have to look delicate. Black and white can make the same basic motif feel graphic, confident, and surprisingly chic. I would wear this with a simple outfit and let the manicure do the talking.
Sheer Pink Nails With Tiny White Confetti Dots
When I want nail art that whispers rather than shouts, a translucent pink base is usually where I look first. Here, the nails have a soft blush finish that allows the natural nail to remain part of the design, while tiny white dots trace loose paths across the surface. The rounded almond shape adds a graceful finish, and the glassy shine makes the manicure feel especially clean. It is subtle enough for everyday wear but still has that little detail that makes you look twice.
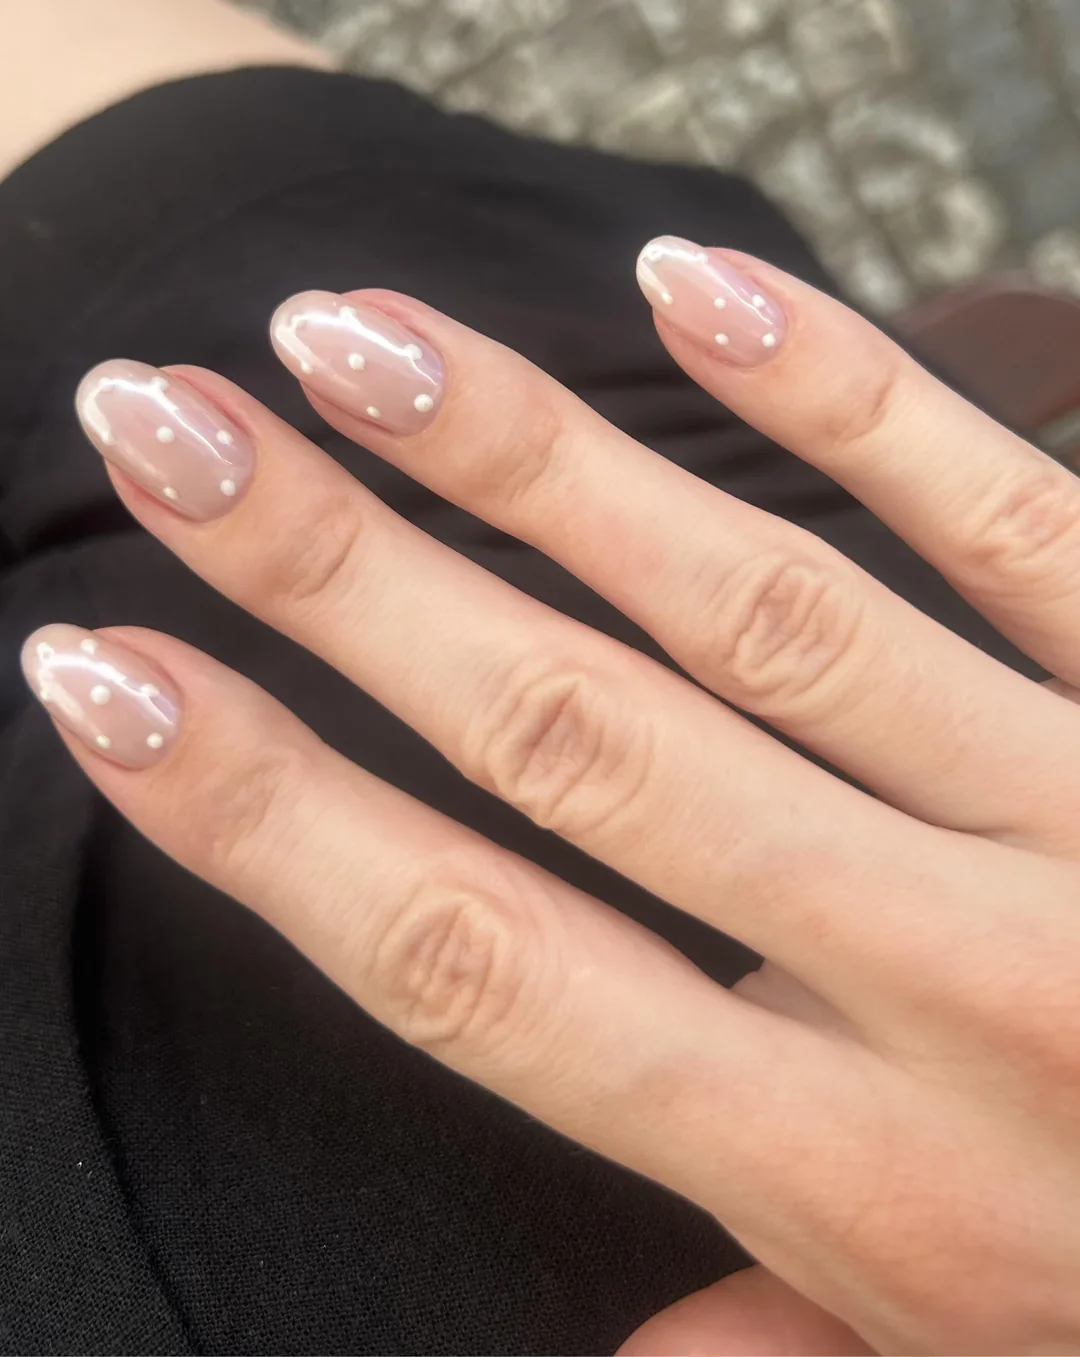
I would use a sheer pink such as OPI Funny Bunny layered with a very soft blush tint, or a comparable semi-transparent gel designed to mimic the natural nail. For the dots, I would use an opaque white polish and a very fine dotting tool. The trick is not to overload the tool. Tiny amounts of polish create much cleaner circles and help prevent the dots from spreading under the top coat.
I would apply the sheer base in thin layers until I reached the level of translucency I liked. After curing, I would place the white dots in small clusters and curved trails rather than filling the entire nail. I would leave plenty of negative space between them because that is what keeps the design airy. A glossy top coat should be floated gently over the surface so the tiny dots remain rounded and defined.
I especially like this version for days when I want my manicure to look polished without feeling like an accessory. It would be beautiful with linen, a white button-down, or even a simple swimsuit and gold jewelry. Sometimes the smallest detail really does make the biggest difference.
Cool Blue Dots On A Translucent Neutral Base
A little blue can completely change the personality of a polka dot manicure. The translucent neutral base here gives the nails a clean, almost glass-like foundation, while soft blue dots add a cool accent. Some of the detailing has an almost fluid quality, which stops the manicure from feeling like a simple repeating pattern. The shorter rounded shape also makes the design particularly easy to adapt for natural nails.
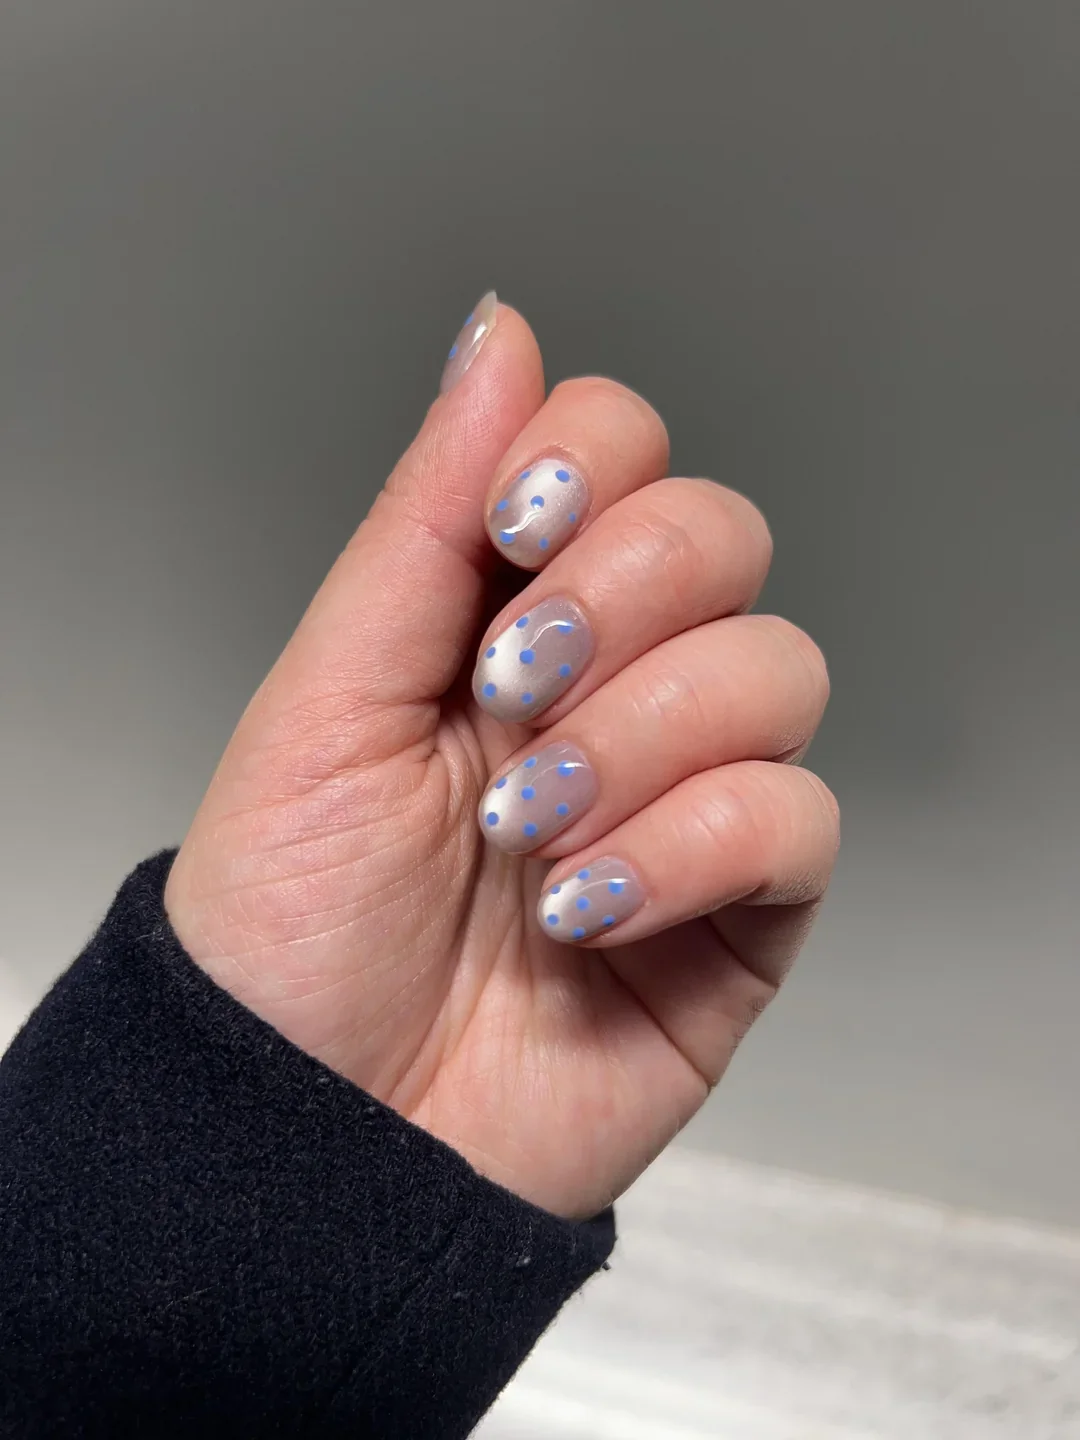
For the base, I would choose a sheer pink-beige or translucent nude gel. A pastel or medium baby-blue shade works beautifully for the dots, while a tiny amount of white can be used for the delicate curved accents. I would keep the finish glossy because the transparency is part of the appeal. A fine liner brush and a small dotting tool would be enough to create the complete look without needing a large collection of nail-art supplies.
I would begin with the sheer base and cure it thoroughly before adding the blue details. First, I would place the dots at varying distances from the cuticle and sidewalls. Then I would add a few fine curved strokes, keeping them delicate rather than trying to create perfectly symmetrical shapes. This is one design where restraint matters. Too many elements would quickly cover the translucent base and take away the airy effect.
This feels like a lovely transition manicure when I am craving color but do not want to commit to a full bright set. Blue also has an easy summer quality without being tied to one particular outfit. If your wardrobe is mostly neutrals, these tiny blue accents can add just enough personality.
Sunny Yellow Nails With Playful Pink Polka Dots
This is the manicure I would save for a day when subtlety simply is not on the agenda. The soft yellow base has a warm, cheerful quality, while vivid pink dots create a fun contrast across the almond-shaped nails. The dots are small enough to keep the yellow visible, which is important because the background color is doing much of the visual work. Together, the shades feel energetic, youthful, and made for sunny weather.
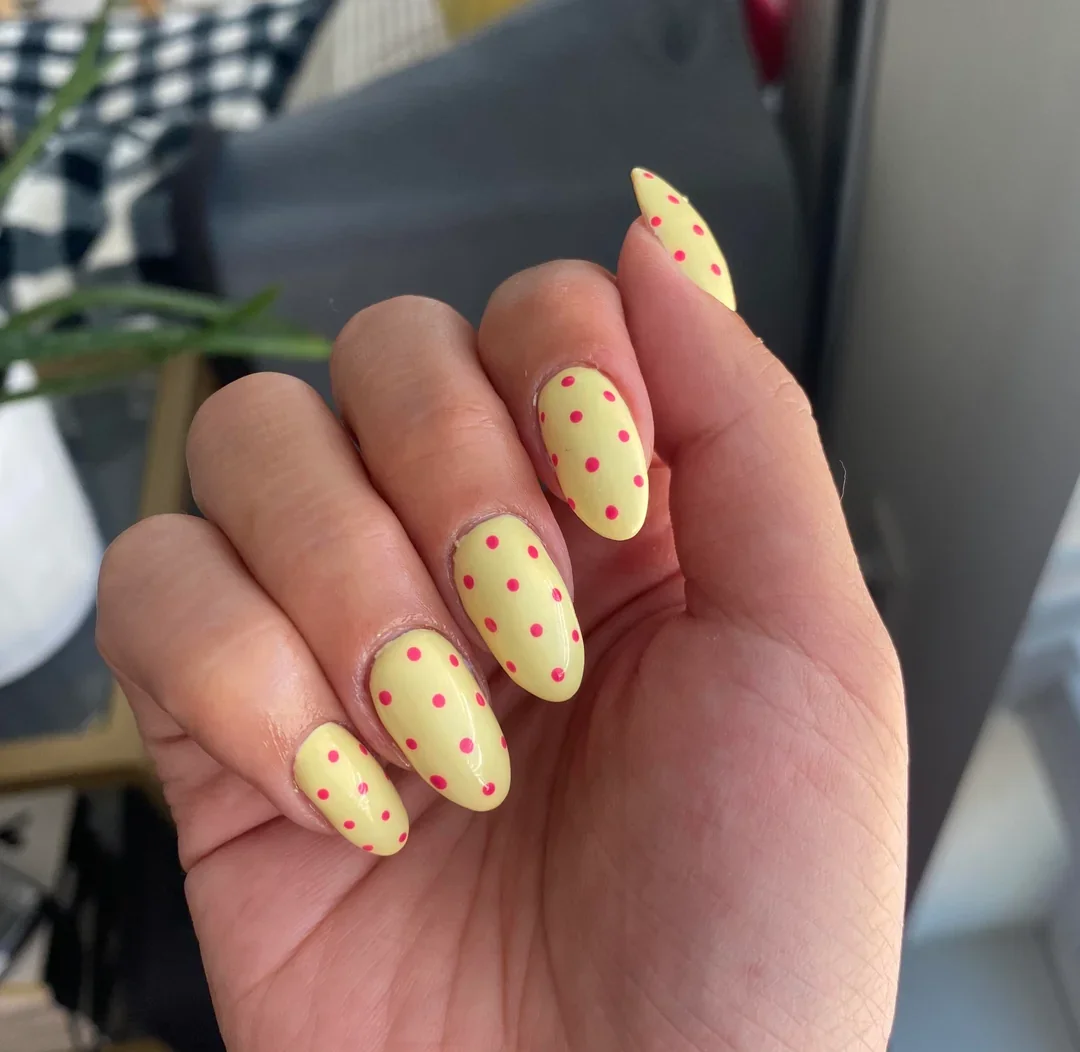
I would choose a creamy pastel yellow gel rather than an extremely neon shade, because it gives the pink dots a softer backdrop. OPI Banana Bandana or a similar buttery yellow would be a good starting point, paired with a hot pink or raspberry gel for the dots. I would use a small dotting tool and a glossy top coat. If the yellow is slightly streaky after the first coat, I would add a second thin layer instead of applying one heavy coat.
After shaping the nails into a soft almond, I would apply two thin layers of yellow and cure each layer properly. The pink dots can then be placed randomly, but I would pay attention to the edges so the design does not become too concentrated around the center. I like leaving little areas of uninterrupted yellow because they give the eye somewhere to rest. Once the dots are cured, a glossy top coat brings out the creamy quality of the yellow.
I would wear this manicure on vacation, during a weekend away, or honestly just on an ordinary Tuesday when I need a mood boost. That is one of my favorite things about nail color: it does not need a special occasion. Sometimes a tiny burst of yellow and pink is enough to make getting dressed feel more fun.
Rose Gold Shimmer With Tiny Black Dots
This manicure takes polka dots into a more sophisticated direction. Instead of a flat neutral base, the nails have a delicate rose-gold shimmer that catches the light underneath tiny black dots. The shorter rounded shape keeps the effect refined, while the metallic surface adds just enough dimension to make the dots feel almost suspended over the nails. I like this when I want something decorative but still easy to pair with everyday jewelry.
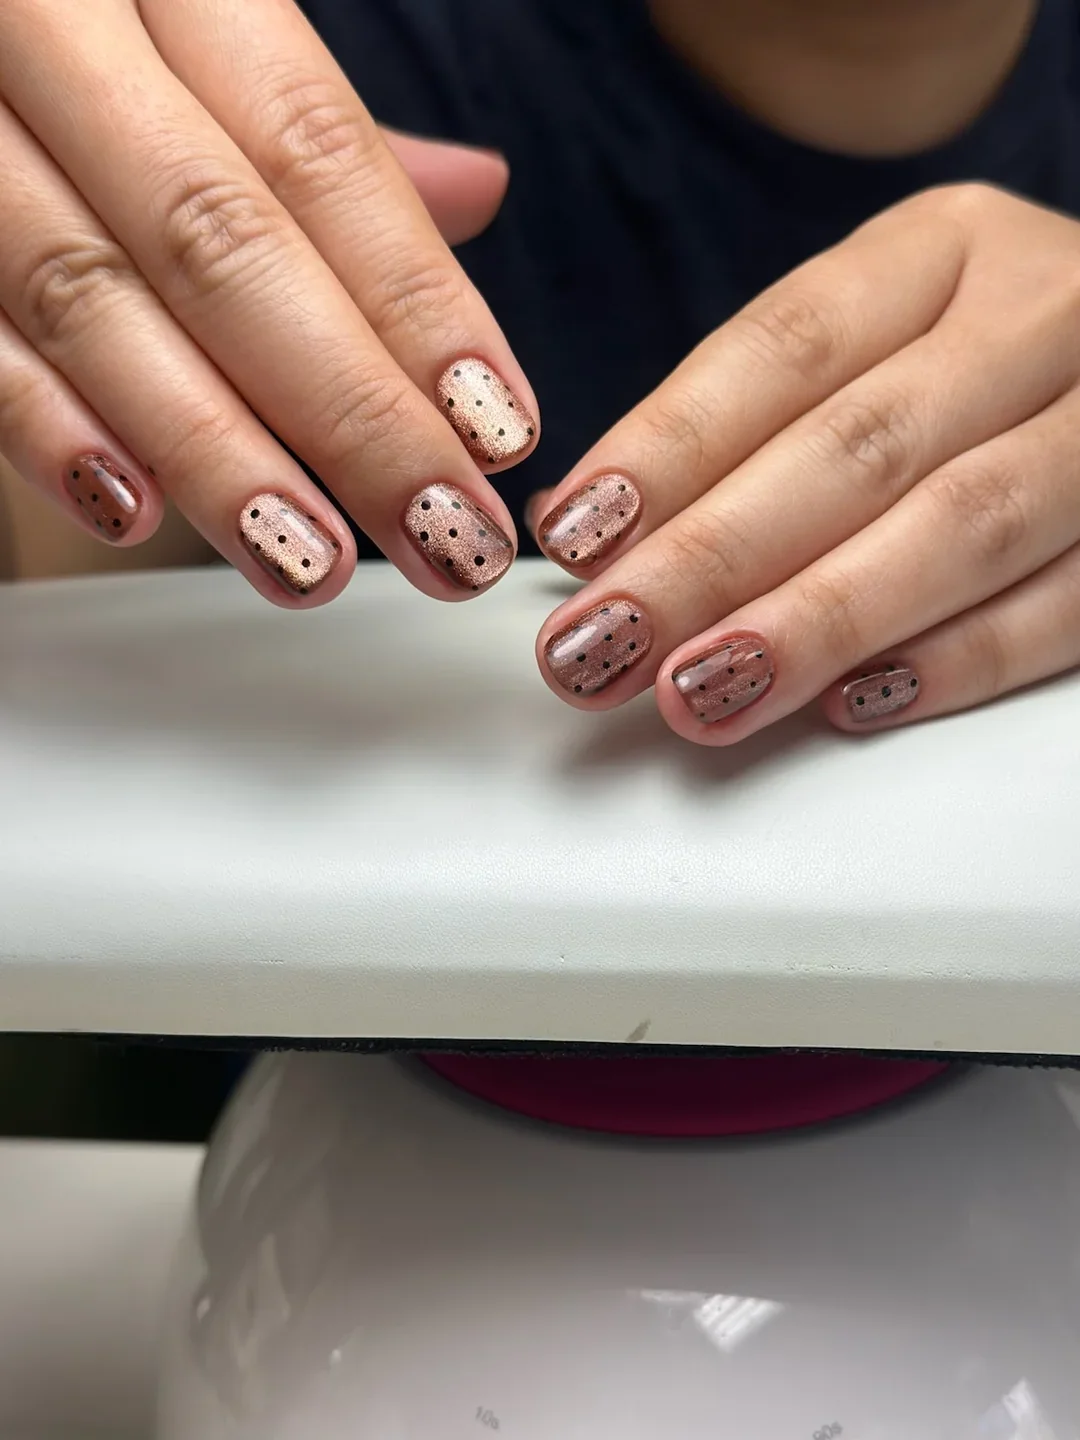
I would look for a rose-gold shimmer polish with a fine metallic finish rather than chunky glitter. A shade similar to Essie Penny Talk can create that warm metallic effect, although a softer rose-gold gel would work just as well. For the dots, I would use a true black gel and a small dotting tool. A smooth glossy top coat will protect the metallic base and prevent the surface from feeling textured.
I would keep the application neat and relatively minimal. After the rose-gold base is cured, I would add small black dots in loose rows, making sure they remain proportional to the shorter nails. I would resist the temptation to add more embellishment because the shimmer already gives the manicure plenty of interest. One final layer of top coat should leave the surface smooth and reflective.
This is probably the version I would choose for an evening event when I wanted something more interesting than a solid metallic manicure. The black dots give the rose-gold polish a little attitude. It is delicate, but there is still a wink of playfulness underneath all that shine.
Translucent Mauve With Multicolor Micro Dots
There is a lovely barely-there quality to this manicure. The translucent mauve-pink base lets the natural nail show through, while tiny dots in several soft colors appear almost like miniature confetti. Because the embellishments are small and scattered, the overall effect stays sophisticated instead of becoming visually busy. The short rounded nails make it especially wearable, too.
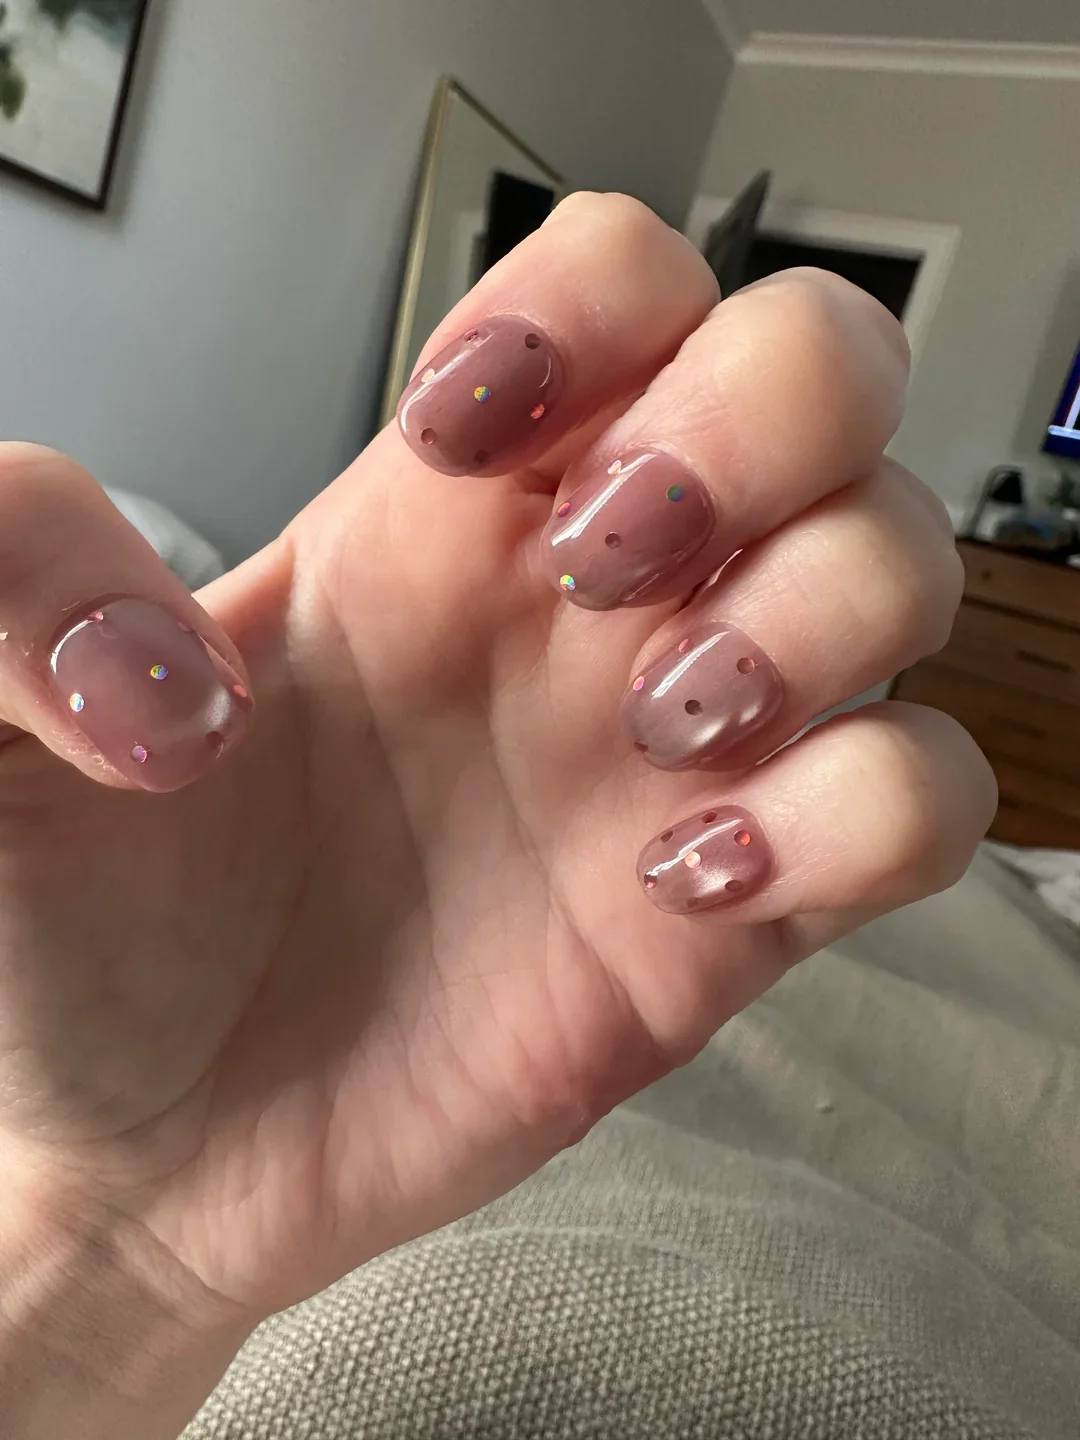
I would use a sheer mauve or jelly-pink polish for the base and collect a few micro shades for the dots: muted pink, soft coral, chocolate, and a touch of iridescent color. This is a great opportunity to use leftover nail-art colors because the dots do not need to match perfectly. A very small dotting tool gives the most delicate result, while a glossy top coat enhances the transparent base.
I would apply one or two thin coats of the jelly color, depending on how much natural nail I wanted showing. After curing, I would place the tiny dots one at a time, changing the color and location as I move across the nails. I would keep the dots relatively sparse so the translucent base remains visible. The finished surface should be smooth, glossy, and almost glassy.
I love this kind of design for someone who wants color without choosing one single color. It feels personal because the little dots can be customized around whatever shades you already love. And because the base is so sheer, the manicure can grow out more gracefully than a very opaque design.
Pink Micro French Tips With Black Polka Dot Edging
A French manicure becomes much more playful when the tip is soft pink and the border is made from tiny black dots. The base remains close to natural, creating plenty of negative space, while the dotted edge gives the nails a graphic finish. I particularly like the way the design follows the natural curve of each nail instead of creating a heavy straight line. It is delicate from a distance and much more detailed up close.
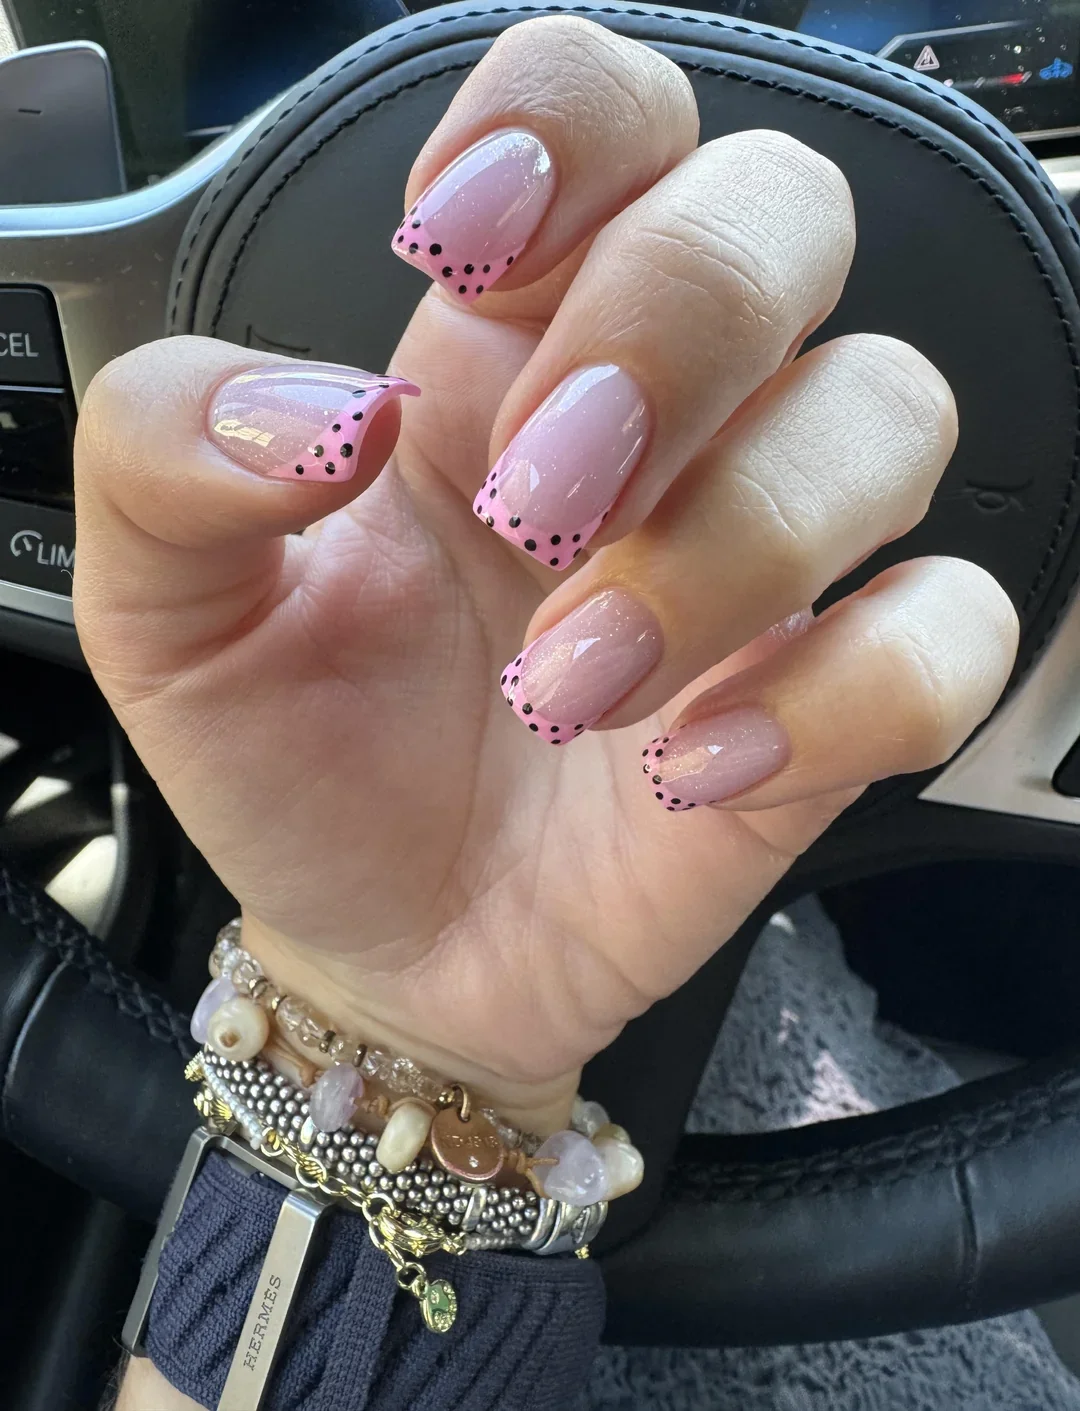
I would start with a sheer nude-pink base, then use a soft pink gel for the French tips. A black gel with a very fine dotting tool is all that is needed for the border. For the cleanest finish, I would also keep a thin liner brush available to refine the pink tip before adding the dots. A high-gloss top coat works best because it keeps the negative space looking fresh and polished.
I would apply the sheer base first, then create the pink French tips with a fine brush or French-tip guide. Once the pink is cured, I would add tiny black dots along the lower edge of the tip, spacing them closely enough to create a dotted outline without letting them merge together. I would work slowly around the curve rather than trying to complete the entire line in one movement.
This feels like one of the most versatile ideas in the set because it combines the familiarity of French nails with a much more unexpected detail. I could wear it to work, dinner, or a summer celebration without feeling as though the manicure was too themed. It has just enough personality to make a classic feel new again.
Mixed Black And White Polka Dot French Tips
For a final twist, I would take the French manicure idea and break the symmetry completely. The nude base stays clean and understated, but the tips alternate between black and white, with polka dots layered into the curved edges. Some nails carry a darker tip while others keep the white dominant, creating a mismatched effect that still feels cohesive. The elongated almond shape gives the design a sleek finish and makes the contrasting tips especially noticeable.
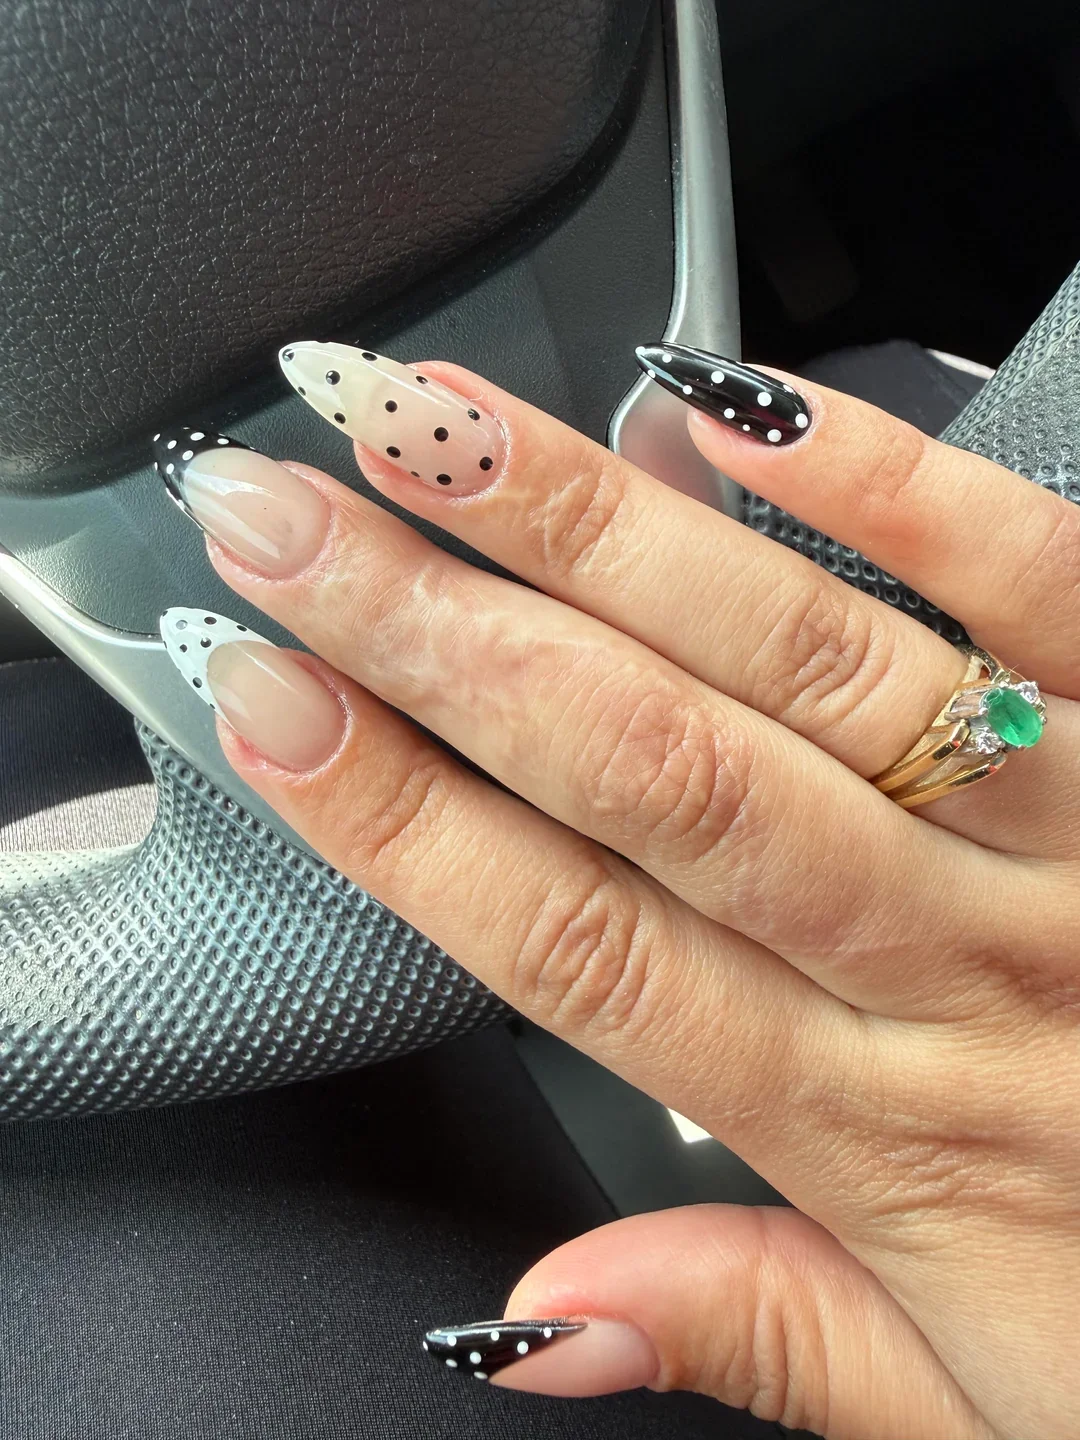
I would use a sheer nude or pink-beige base, a highly pigmented black gel, and an opaque white gel. A fine liner brush helps define the curved French tips, while a small dotting tool creates the individual circles. I would keep both the black and white finishes glossy so the two colors have the same visual weight. If I wanted a slightly softer version, I would swap stark white for a creamy ivory.
The easiest approach is to create the nude base first and then map out the French curves before filling them in. I would alternate the colors from nail to nail instead of trying to make every tip identical. After curing the tips, I would add the contrasting dots along the French area, keeping the dot sizes small enough that the original curve remains visible. A final top coat smooths everything into one polished surface.
Black Dotted French Tips With a Soft Pink Base
I love how this manicure takes the familiar French tip and gives it a little attitude. The nails have a short, softly rounded shape with a sheer milky-pink base, while the black tips create a crisp curved border. Tiny white dots are placed across the black section, almost like delicate pearls against the dark polish. The contrast is strong, but the transparent pink base keeps everything polished and wearable rather than heavy.
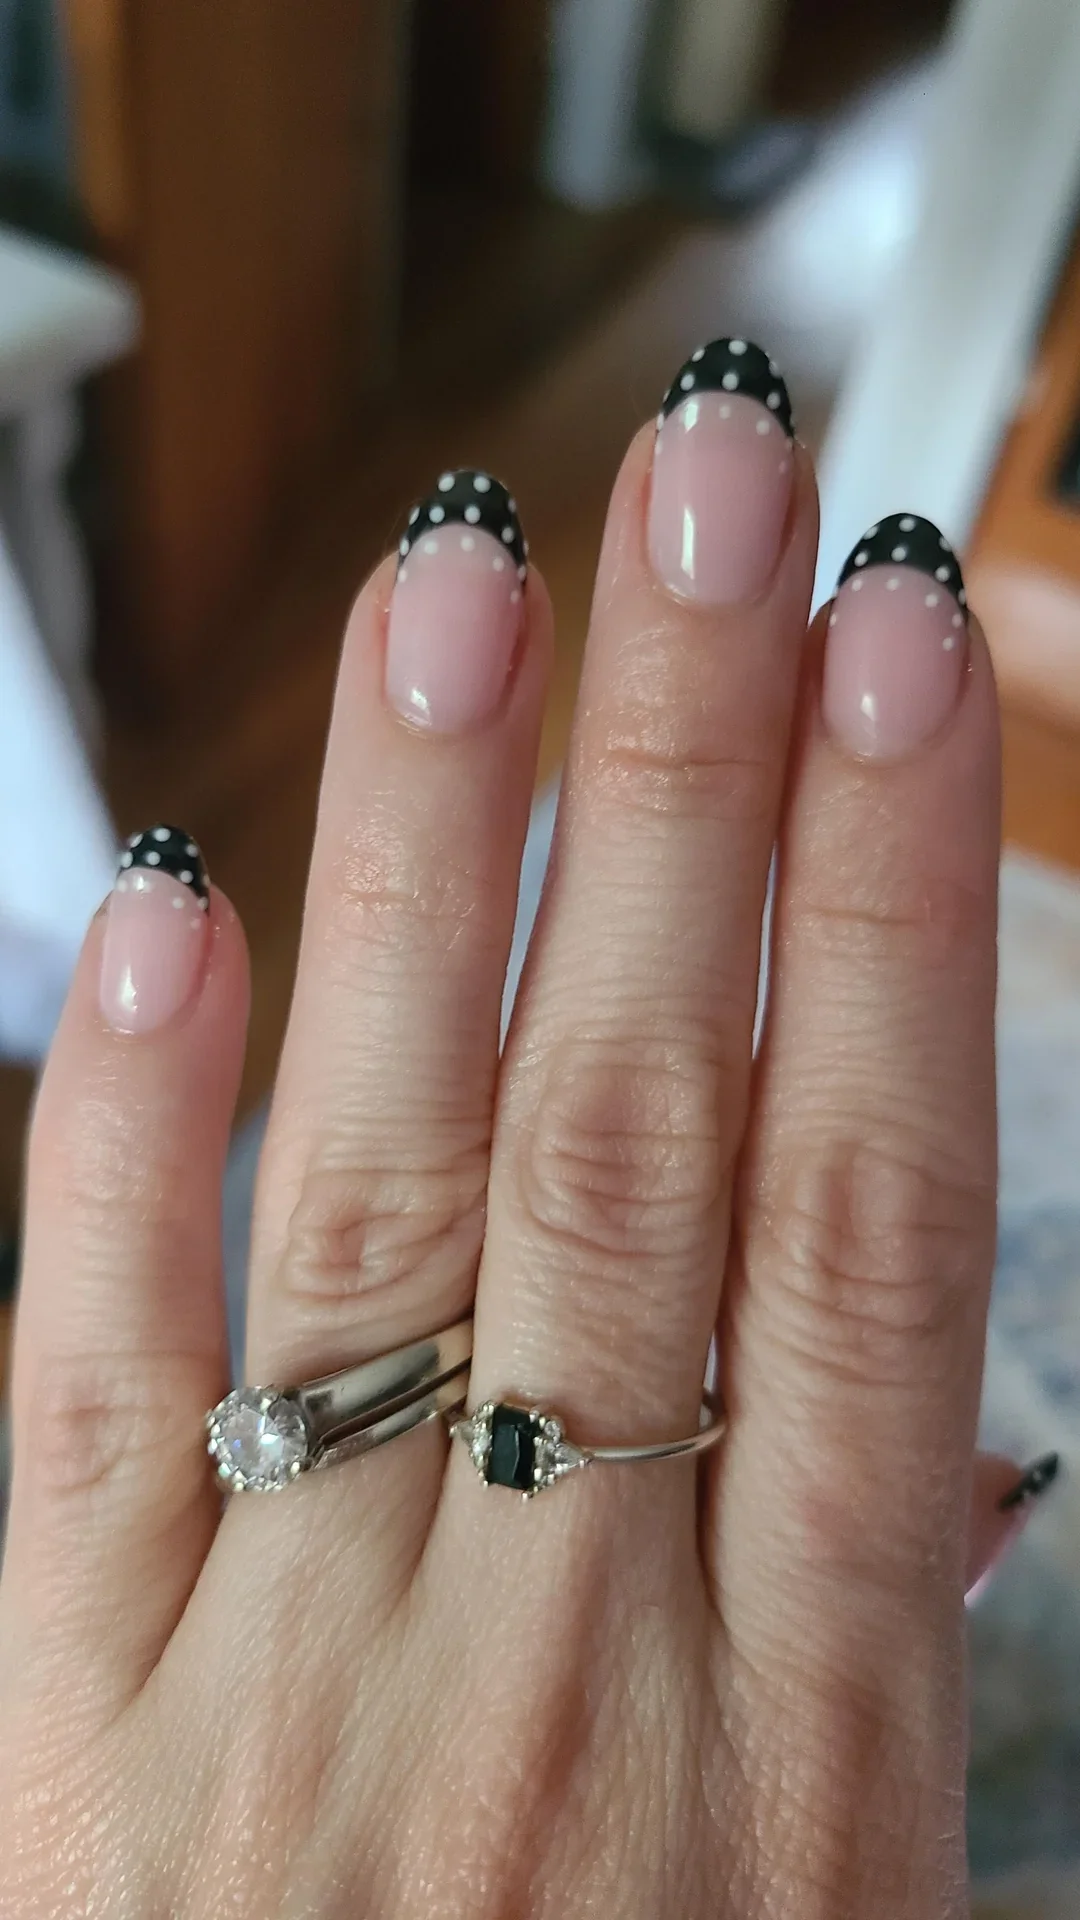
For this look, I would start with a sheer pink or neutral gel polish that lets a hint of the natural nail show through. A glossy black gel polish creates the curved tips, and a small dotting tool is enough to make the white details. I would also keep a high-shine top coat nearby because this design really benefits from that smooth, glassy finish. The beauty is that the color palette is incredibly simple: pink, black, and white.
At home, I’d shape the nails first and apply a thin layer of sheer pink. Once it is cured, I’d carefully paint the black French tips, working from one sidewall toward the other to keep the curve balanced. After curing again, I’d use the smallest end of a dotting tool to place tiny white dots over the black area. I wouldn’t try to make every dot perfectly identical. A little variation keeps the manicure looking handmade in the best possible way.
This is the kind of manicure I could wear when I want my nails to look put together without committing to a loud design. I also like that the black detail visually defines the nail shape, while the pink base keeps the overall effect light. If you normally think French manicures are too predictable, this tiny dotted twist might be enough to change your mind.
Milky Pink Nails With Delicate White Dots
Here, the polka dot idea becomes much softer. The nails are an elongated oval shape with a translucent pink base and an almost wet-looking glossy finish. Small white dots are scattered across each nail, with a few following gentle lines rather than sitting in a rigid grid. I especially like the combination of the creamy pink background and bright white details because it feels fresh, feminine, and incredibly easy to wear.
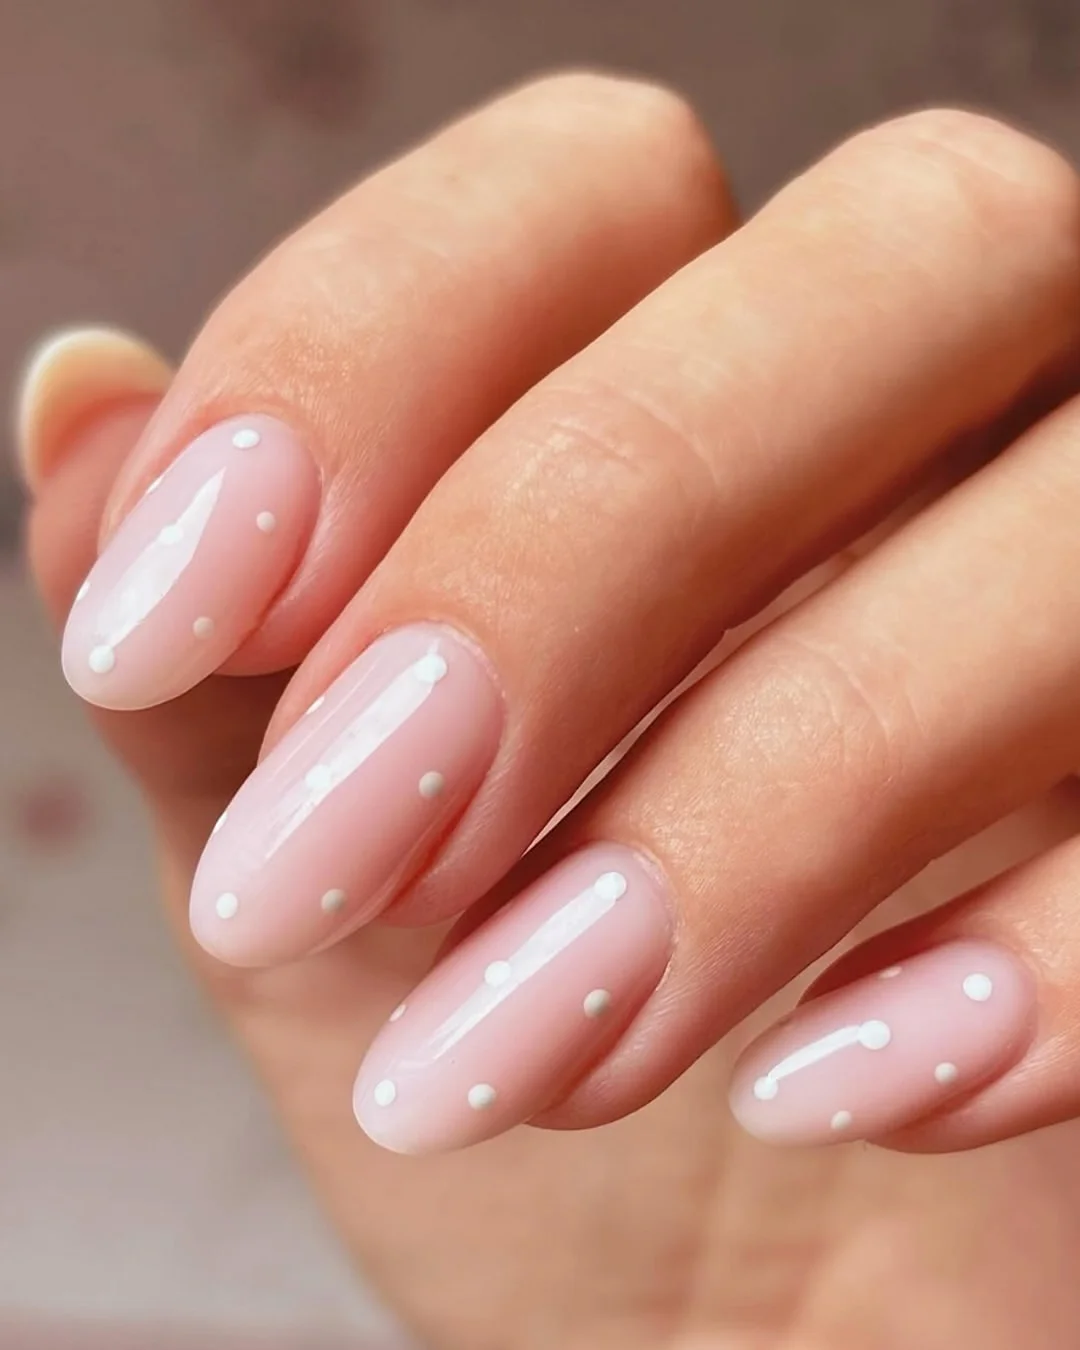
I would reach for a translucent blush-pink gel, something close to a natural nail shade but with enough color to create that soft rosy veil. For the dots, an opaque white polish works beautifully. A tiny dotting tool is preferable to a brush because it gives those little circles their clean, rounded shape. One generous layer of glossy top coat pulls the whole manicure together and makes the dots appear almost suspended beneath the shine.
My approach would be deliberately relaxed. After preparing the nails and applying the pink base, I’d cure it and begin placing white dots at different points across the surface. I’d vary their size slightly and leave some negative space around them rather than filling every inch. This is one of those designs where restraint makes the difference. Too many dots can quickly change the mood.
I can see myself choosing this version for warm-weather weekends, vacations, brunches, or simply one of those weeks when I want my manicure to feel cheerful without screaming for attention. It has that clean Pinterest quality that looks lovely with everything from denim to a simple white dress. And honestly, sometimes the tiniest detail is the one that makes a manicure feel new.
Almond Dots With Black and White French Details
This version turns polka dots into a much more graphic statement. The nails are long and pointed almond shapes, with a translucent nude-pink foundation that keeps the length from feeling too intense. Several nails feature white French tips covered in tiny black dots, while another carries a pale base with white dots and a contrasting black tip. The result is playful but surprisingly sophisticated because the design has a clear visual structure.
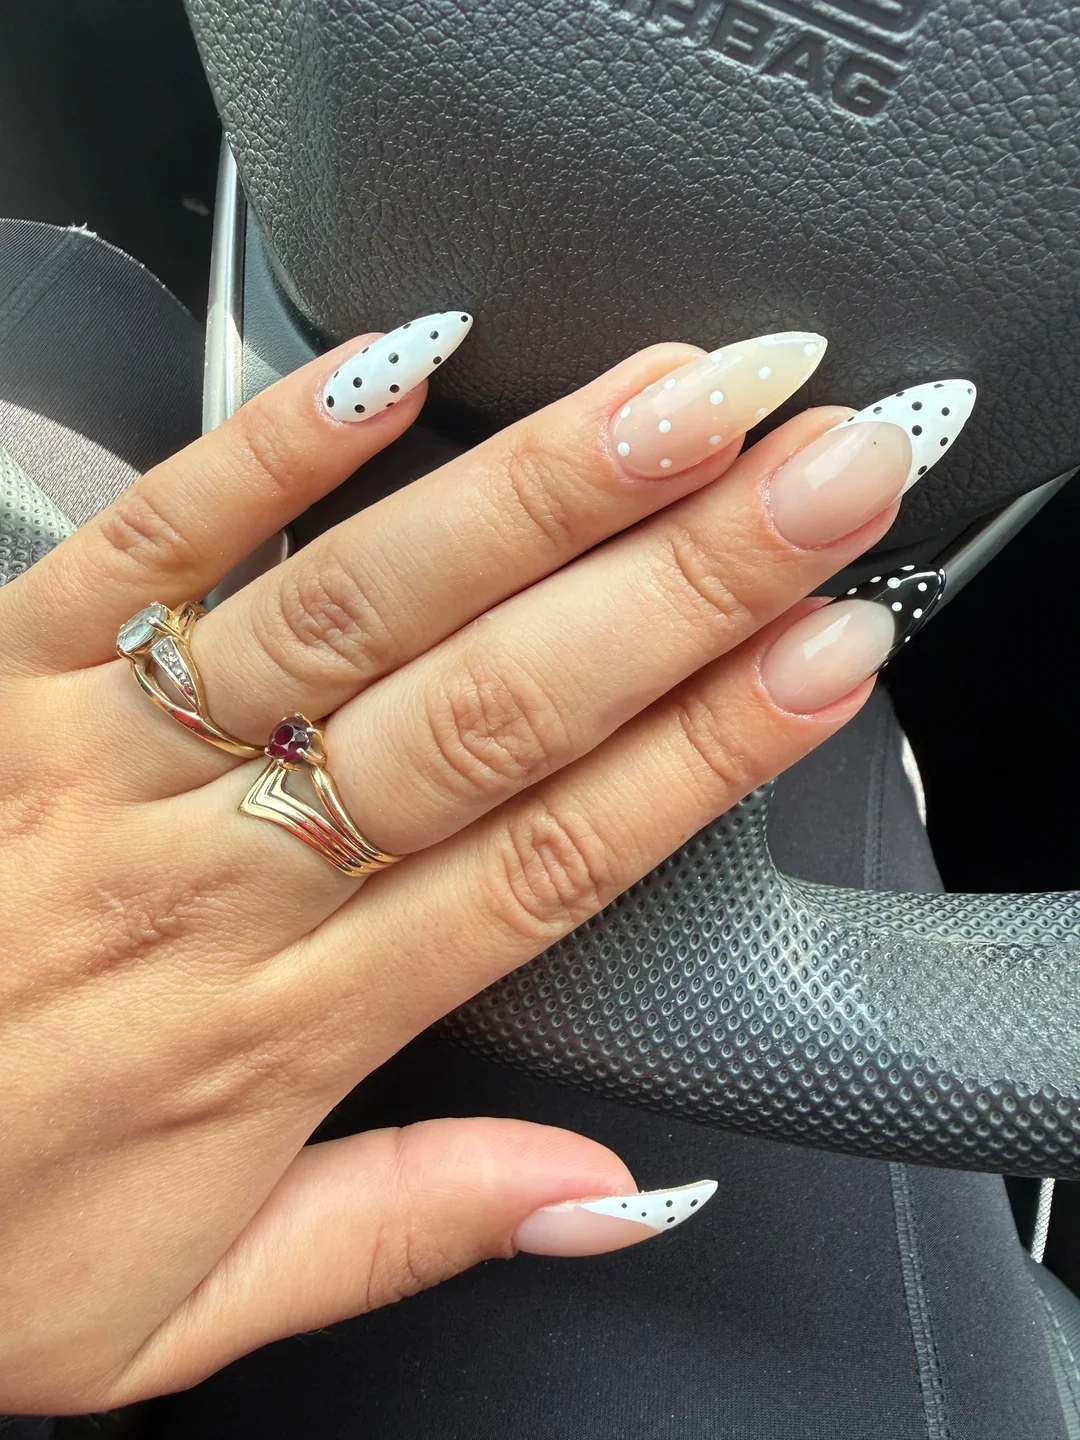
I’d use a sheer nude or pink-beige base as the foundation, followed by a clean white gel polish for selected French tips and a deep black for the dotted details. A fine French-tip brush can help create the tapered edges, while a dotting tool makes the polka dots much easier to control. Because the nails are long, I’d finish with a durable glossy top coat to protect both the free edge and the artwork.
The trick I’d use here is not to decorate every nail in exactly the same way. I’d create the white French tips first, cure them, and then add black dots in evenly spaced but slightly varied positions. On the accent nails, I’d reverse the color balance with white dots or a black tip. That small change keeps the manicure dynamic without introducing another color.
Long almond nails naturally make a statement, so I think this design works best when the rest of the look is relatively clean. I’ve always liked manicures that have one playful element but still feel intentional, and this one definitely has that quality. It’s polka dots with a sharper fashion-editorial edge.
Soft Pink Nails With Tiny Metallic Dots
The mood shifts completely with this delicate manicure. The nails are medium-length almonds with a translucent blush-pink finish, and tiny metallic dots are sprinkled across the surface. Instead of using bold circles, the design relies on minuscule reflective accents that catch the light whenever the hands move. The effect is almost jewelry-like, especially against the soft pink background.
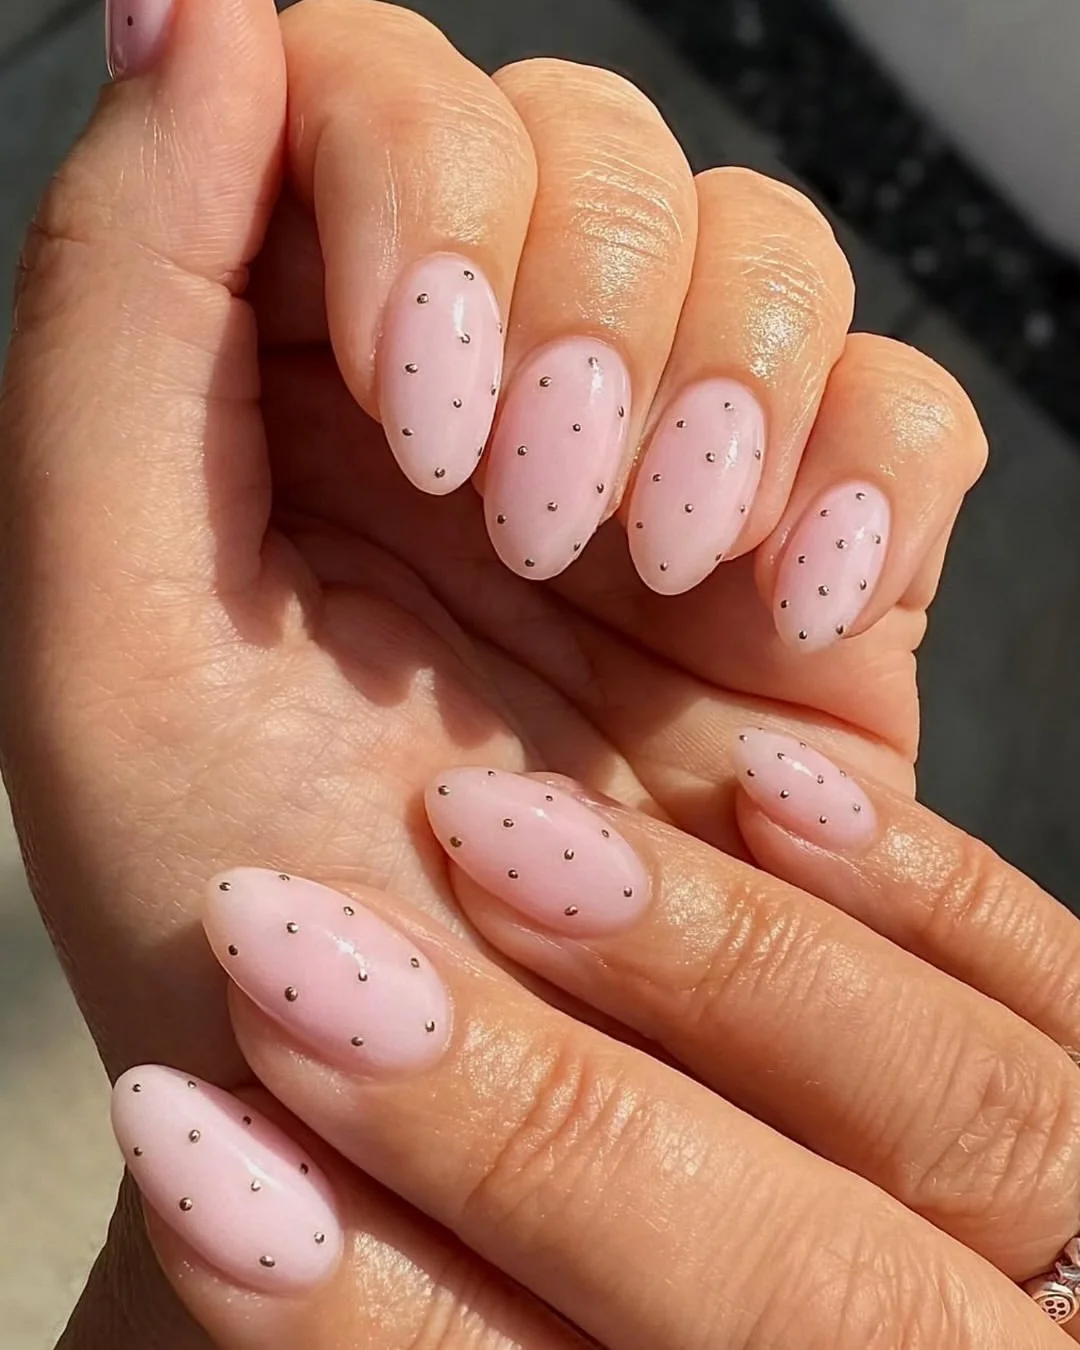
For the base, I’d choose a sheer pink gel with a milky quality rather than a fully opaque pastel. Tiny silver or champagne-toned metallic studs can recreate the dimensional dot effect, although small metallic polish dots can work if a flatter finish is preferred. I’d also use nail art adhesive or a suitable gel for securing embellishments, followed by a glossy top coat around them.
I’d keep the application neat and simple. After curing the pink base, I’d pick up each tiny embellishment with a wax pencil or fine tweezers and place it while the adhesive layer is still workable. I’d avoid creating perfect rows and instead scatter the dots organically across the nails. Once everything is secure, I’d carefully seal the surrounding surface without flooding the embellishments.
This is probably my favorite choice when I want polka dots but don’t want the obvious black-and-white contrast. The tiny metallic accents give the manicure a dressed-up feeling without adding rhinestones or elaborate artwork. It would be especially pretty for an evening event, but I think it could just as easily become an everyday signature.
Sheer Nude Stiletto Nails With Black Polka Dots
If you like your manicure with a little more drama, this is where I’d look. The nails are long, narrow, and pointed, with a warm nude-beige base that closely follows the natural tone of the nail. Small black dots are distributed from the base toward the pointed ends, creating a playful pattern across the entire nail. Because the background is so understated, the black dots become the main event.
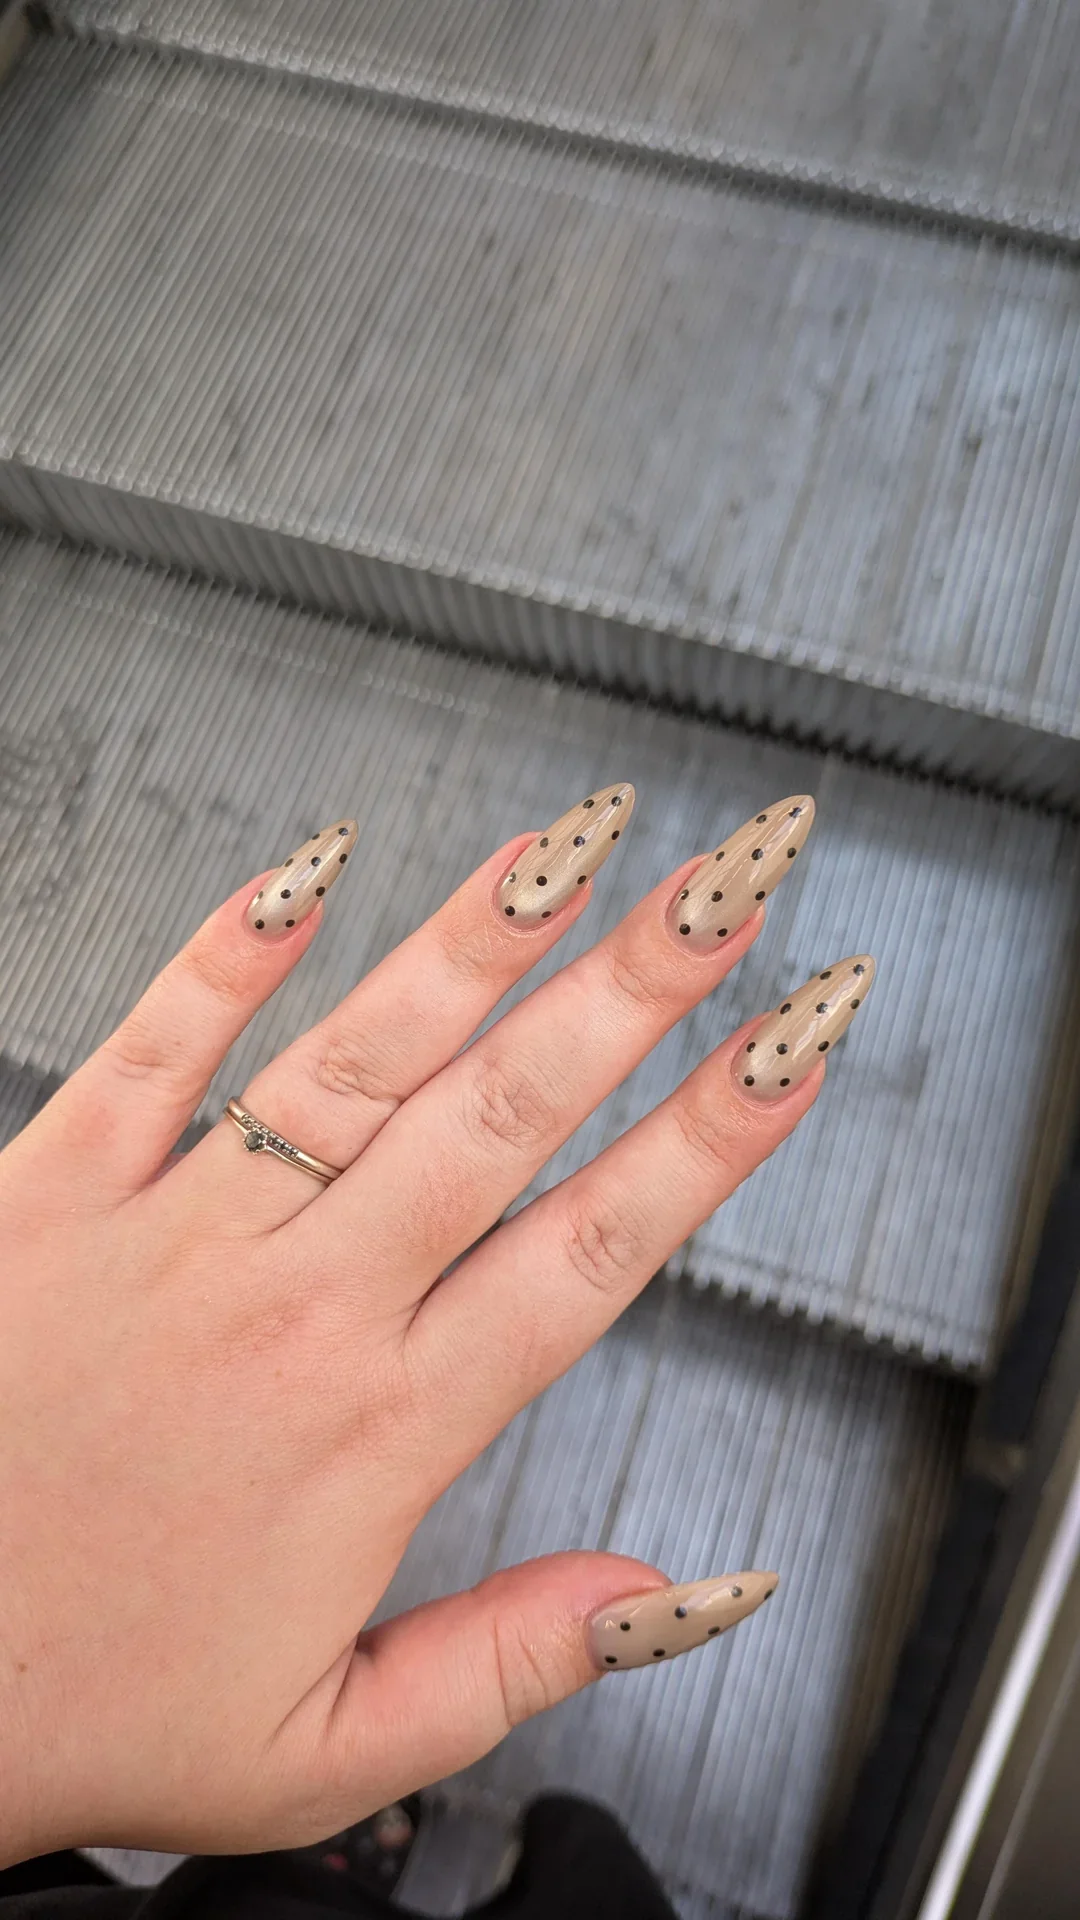
I’d begin with a neutral nude gel polish that has a slightly translucent finish. The exact nude should be chosen according to the natural undertone of the skin, because the simplicity of the design makes the base shade particularly noticeable. For the dots, I’d use a highly pigmented black polish and a fine dotting tool. A thick, glossy top coat would be my final step to keep the long nails looking smooth.
For application, I’d first make sure the stiletto shape is symmetrical before adding any decoration. After the nude base is cured, I’d place the black dots in staggered positions rather than creating a strict checkerboard. Starting with fewer dots is easier because I can always add more. Once the pattern looks balanced, I’d cure the design and finish with top coat.
I think this is such a good example of how a simple motif can completely change the personality of a manicure. The dots are uncomplicated, but the long pointed shape gives them a stronger fashion feel. Would I choose this length for an especially busy week? Probably not. But for a vacation, party, or moment when I want my hands to do a little more talking, absolutely.
White Polka Dots Over a Natural Almond Manicure
This final take brings the trend back to something soft and effortless. The nails have a neat almond shape and a sheer pink-nude base, while small white dots are scattered across the surface. Some dots are slightly larger than others, and the spacing feels intentionally loose. There is no French tip, no metallic decoration, and no extra color competing for attention, which makes the manicure feel exceptionally clean.
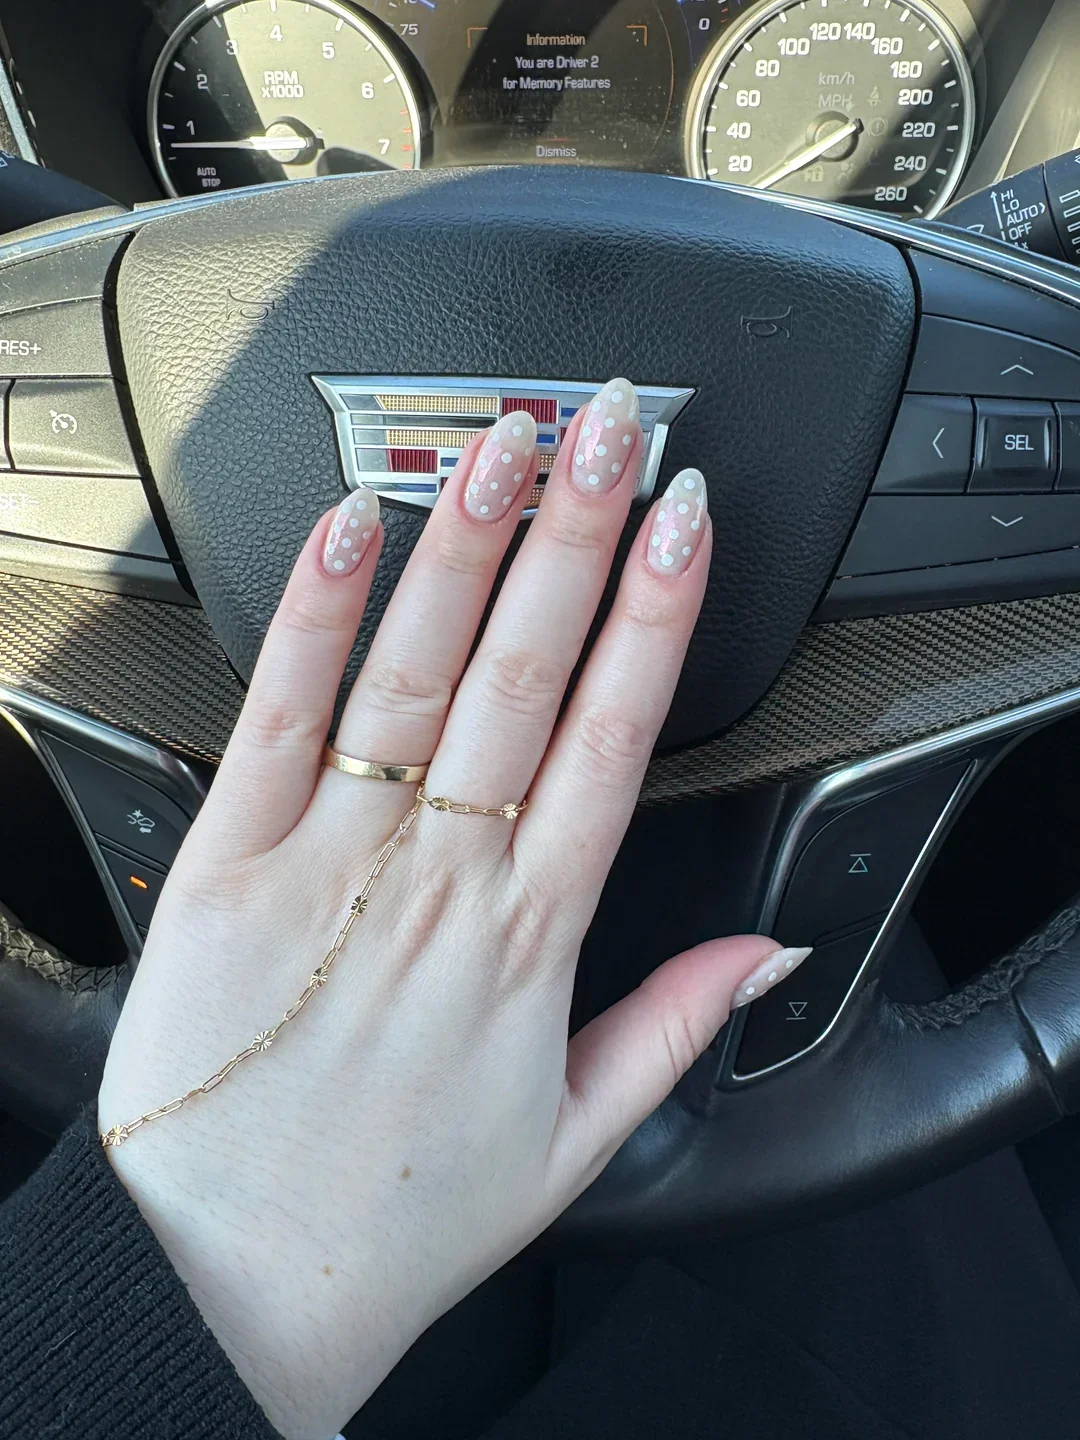
I’d use a translucent nude-pink polish with a glossy finish and an opaque white gel polish for the dots. A small dotting tool is really all I’d need for the artwork. If I wanted the dots to look especially crisp, I’d make sure the base was completely smooth before beginning the design. A good glossy top coat is essential here because shine helps the pale manicure look fresh rather than flat.
My technique would be almost meditative. I’d apply the nude base, cure it, and then start adding dots from the center of each nail outward. I’d change their placement slightly from nail to nail instead of copying one exact pattern. After curing the dots, I’d add top coat with a light hand so the artwork stays sharp and doesn’t become visually blurred.
For me, this is the easiest version of the polka dot nails trend to live with. It feels youthful without being childish, decorative without being complicated, and polished enough for everyday wear. If you’ve been saving nail-art inspiration on Pinterest but keep choosing plain nude polish at the appointment, this could be the perfect middle ground: familiar, pretty, and just playful enough.
Polka dot nails prove that a simple detail can completely change the mood of a manicure. From delicate nude designs to bold pink, chocolate, and colorful versions, this trend gives me endless ways to play with my style. I love that the dots can be tiny and understated or big enough to become the main attraction. Whether you are planning a summer refresh or simply want something new for your next salon appointment, there is a polka dot look worth trying. Pick your favorite color combination, grab a dotting tool, and let your nails have a little fun.

