
Nail trends have a way of refreshing your entire look without requiring a closet makeover. So, which trending nail colors are worth trying right now, and what designs can make a simple manicure feel more special? From sheer pinks and milky whites to rich chocolate browns, vivid magenta, and shimmering purple, this season’s palette leaves plenty of room for personality. I especially love how these shades work across different nail shapes, lengths, skin tones, and personal styles without feeling too predictable. Whether you prefer minimalist elegance or a manicure with a little extra sparkle, there is an idea here that can easily become your next salon save. Ready to find the color or design that makes you want to book that manicure?
Sheer Pink With a Crisp White French Tip
I keep coming back to this combination because it gets the balance exactly right. The base is a translucent blush pink with a glossy, almost jelly-like appearance, while the tips are finished in a clean white French design. The nails are moderately long with a soft square shape, giving the manicure a classic silhouette without making it feel dated. The pink remains visible through the white detail, which creates that fresh, healthy-looking effect I always want from a polished manicure. It is delicate, but definitely not boring.
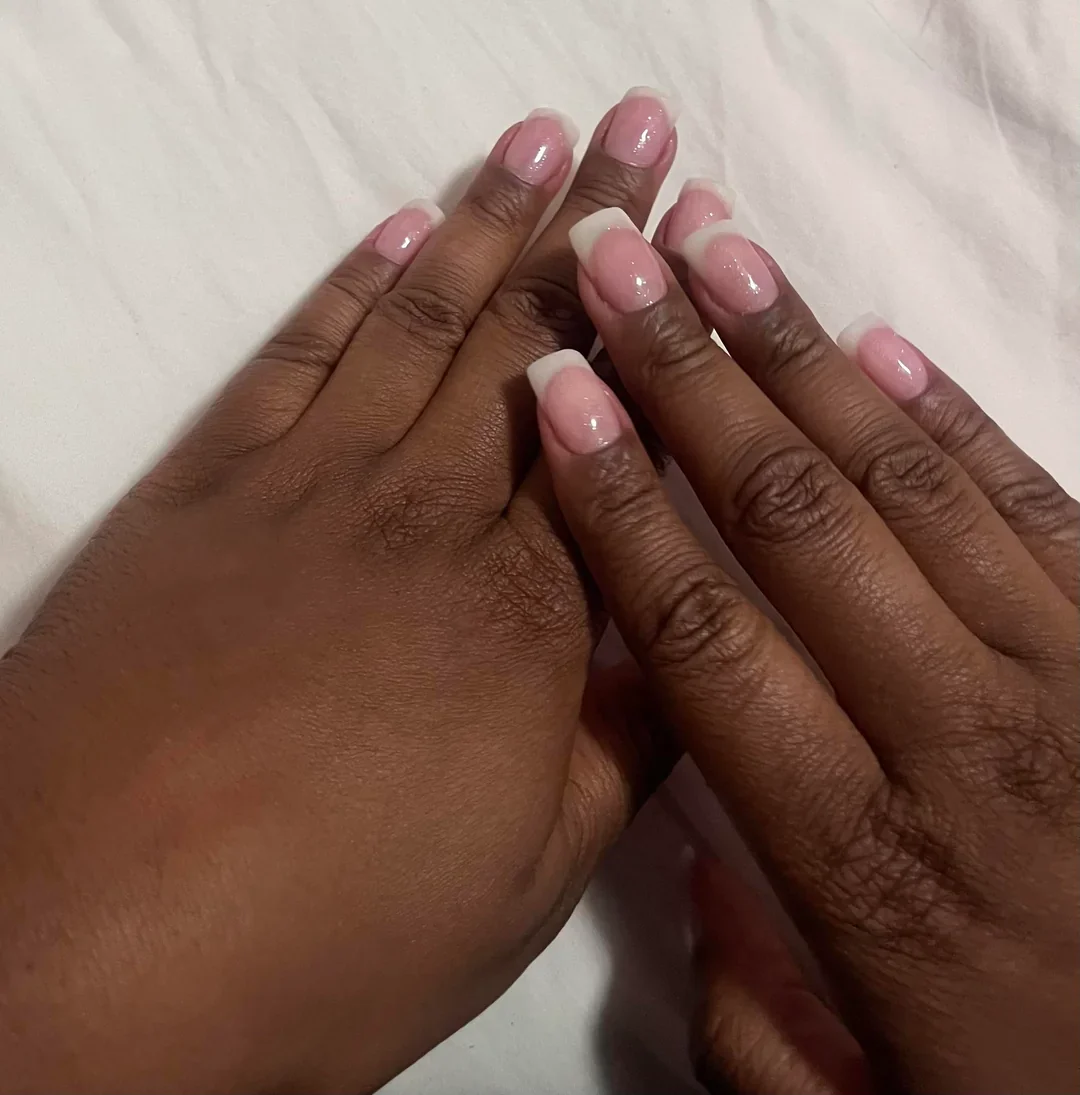
For this look, I would start with a sheer pink or milky blush gel polish rather than a fully opaque nude. A shade similar to OPI Bubble Bath, Funny Bunny layered with a touch of pink, or a comparable sheer builder-gel tint can create the soft foundation. For the tips, I would use a crisp white gel such as OPI Alpine Snow or another highly pigmented white. A glossy top coat is essential here because the shine is part of the design, not an afterthought.
I would shape the nails evenly first, keeping the corners softly squared rather than extremely sharp. After the base coat and two very thin layers of translucent pink, I would cure each layer before creating the French tips with a fine liner brush or French-tip guide. The white should follow the natural curve of the nail instead of looking too thick. One glossy top coat brings everything together. Want a manicure that works for brunch, an office day, and a summer wedding? This is one of the easiest choices to say yes to.
I especially like this version when I want my hands to look polished without having the manicure compete with my outfit. The contrast between the soft pink and white also works beautifully across different skin tones because the colors can be adjusted warmer or cooler. For me, it is the kind of manicure that quietly makes everything look more put together. Sometimes that is exactly what I want.
Soft Pink Almond Nails With Tiny Floral Details
Soft pink takes on a completely different personality when it is paired with a longer almond shape and the tiniest decorative accent. Here, the nails have a smooth, rounded almond silhouette and a creamy pink finish that looks fresh rather than heavily saturated. A miniature white flower sits near the tip of one nail, adding a delicate detail without turning the entire manicure into a floral theme. I love that restraint. The design feels feminine and playful, but the solid pink remains the star.
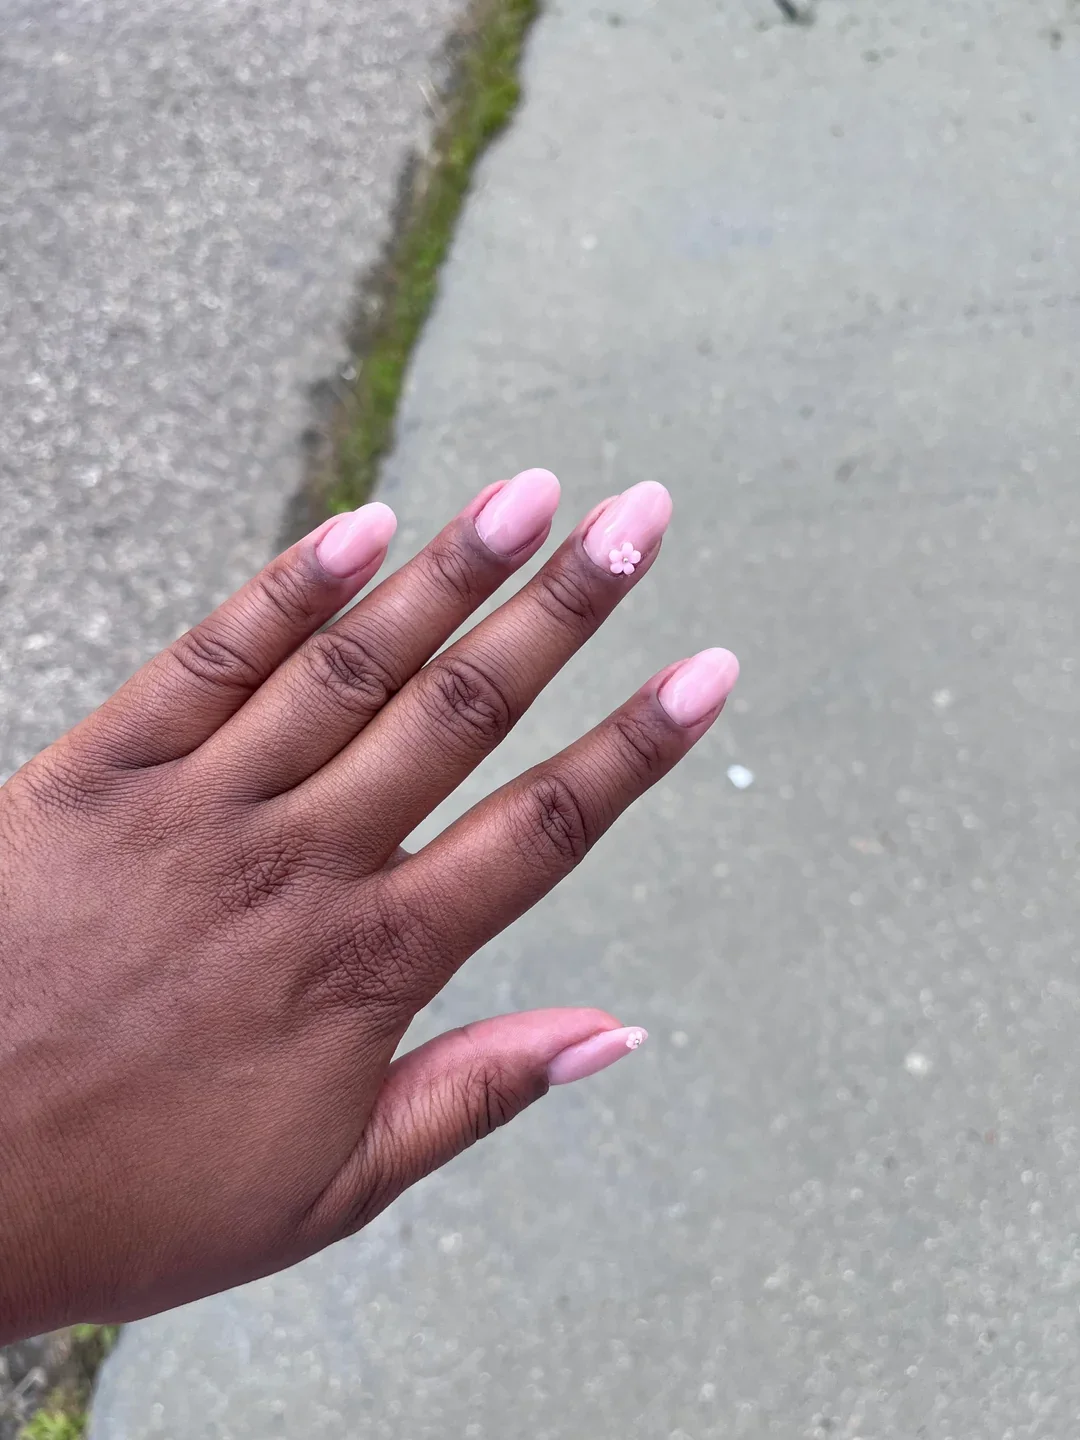
I would use a creamy pastel pink gel polish with enough coverage to look intentional in one or two coats. A shade from the Essie Gel Couture or OPI pink family could work beautifully, depending on how cool or warm I wanted the final color. For the tiny flower, I would reach for white gel paint and an ultra-fine dotting tool. A small amount of clear builder gel or nail adhesive can also help secure a raised embellishment if the flower is created with tiny gel petals rather than painted.
I would file the nails into a symmetrical almond shape, then apply the pink base evenly from the cuticle toward the tip. Once cured, I would place the little flower slightly off-center on one accent nail. Five tiny dots can create the petals, with an even smaller dot in the middle. The trick is knowing when to stop. Too many flowers would change the mood completely, while one small detail keeps the manicure sophisticated.
This is one of those ideas I would choose for a warm-weather weekend when I want something cheerful but still easy to wear. The pastel pink has a soft seasonal feeling, and the tiny flower gives it that little unexpected moment. I can also see this working beautifully for a birthday, bridal shower, vacation, or simply one of those weeks when a pretty manicure feels like a mood booster.
Mocha Brown With a Clean Glossy Finish
Rich brown has become one of my favorite alternatives to traditional nude polish, and this manicure shows why. The nails are medium length with a softly squared shape, and the color is a smooth taupe-brown with subtle rosy undertones. There is no glitter, artwork, or complicated decoration competing with the shade. The result feels understated but expensive-looking, especially because the polish is applied with a remarkably even glossy finish. It is proof that a single color can carry an entire manicure.
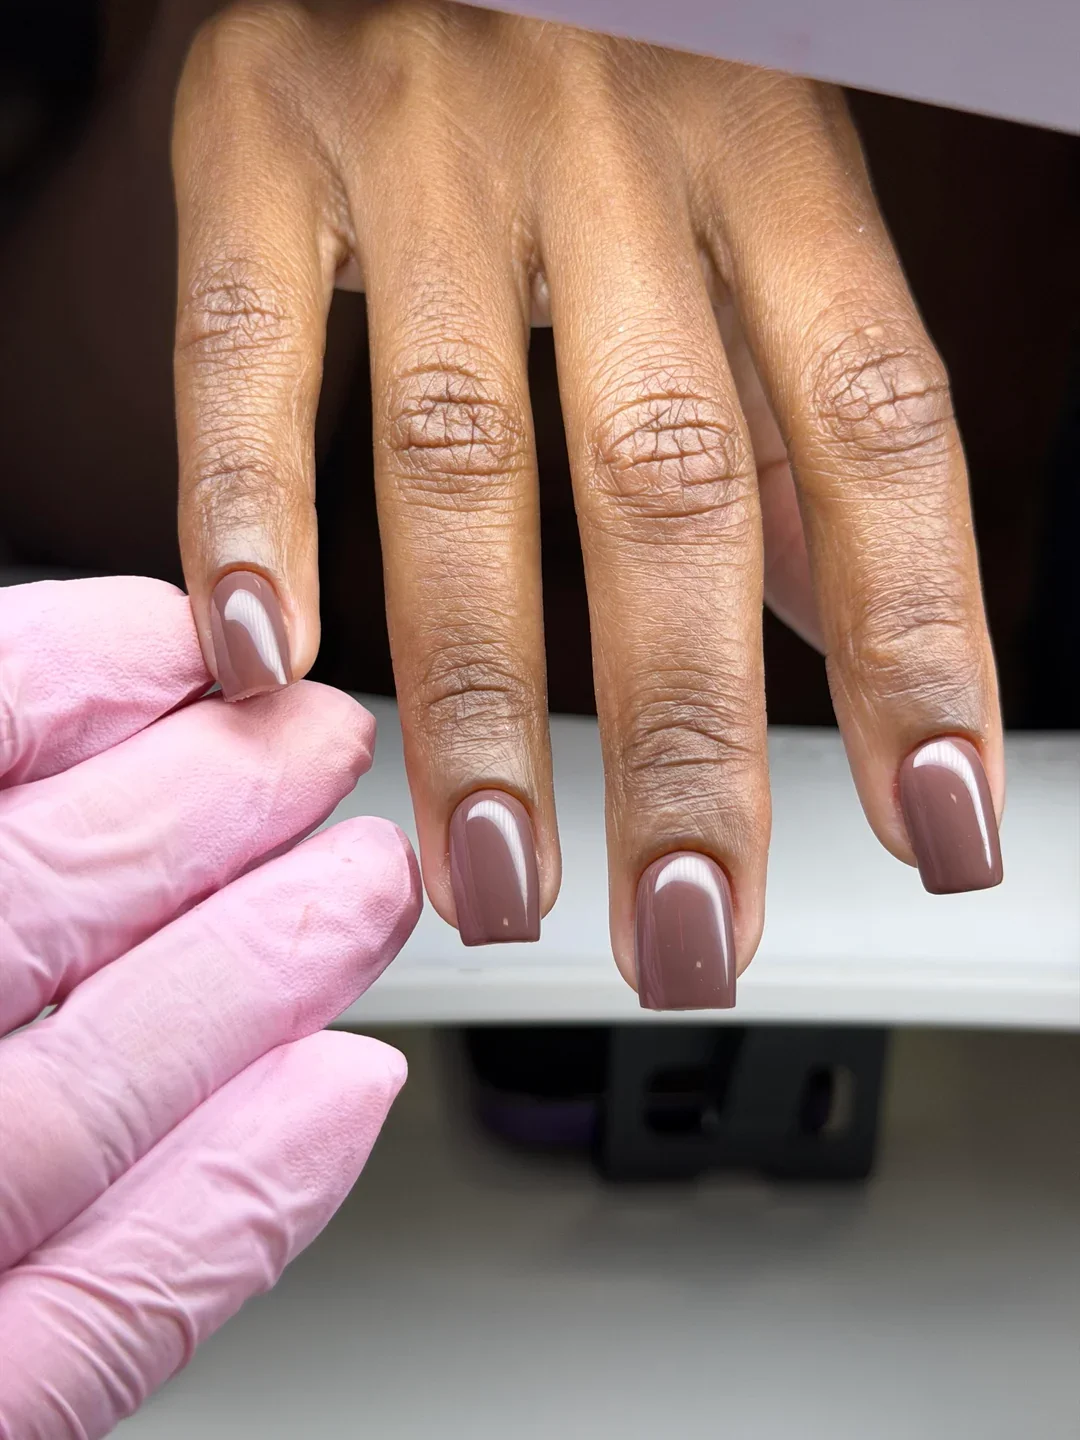
To recreate the color, I would look for a medium mocha or cocoa-brown gel polish with a neutral-to-warm undertone. OPI Chocolate Moose or a similar muted brown can give the right starting point, although I would adjust the shade depending on the skin tone and desired depth. A high-shine top coat will make the color look richer and smoother. I would also keep a precise cleanup brush nearby because darker neutrals show uneven edges more easily than sheer colors.
My approach would be deliberately simple. After preparing the nails and applying a thin base layer, I would apply two controlled coats of brown, keeping each layer thin enough to cure properly. I would clean around the cuticle before curing the final coat, then finish with a glossy top coat. If the nails are naturally uneven, a thin layer of builder gel underneath can create a smoother canvas without adding excessive thickness.
I love this kind of brown for the transition between summer and early fall, when I start craving deeper colors but do not necessarily want something dramatic. It also pairs effortlessly with denim, cream, black, gold jewelry, and warm neutrals. If classic beige feels too predictable but a bold color feels like too much commitment, mocha is the sweet spot.
Milky White Almond Nails That Let the Shape Shine
There is something incredibly clean about a glossy milky-white manicure on long almond nails. The color here is soft rather than stark, with enough translucency to keep the nails looking dimensional. The almond shape elongates the fingers, while the uniform finish gives the manicure a calm, refined quality. I would call this one of those designs where the technique matters more than decoration because every curve and edge is visible.
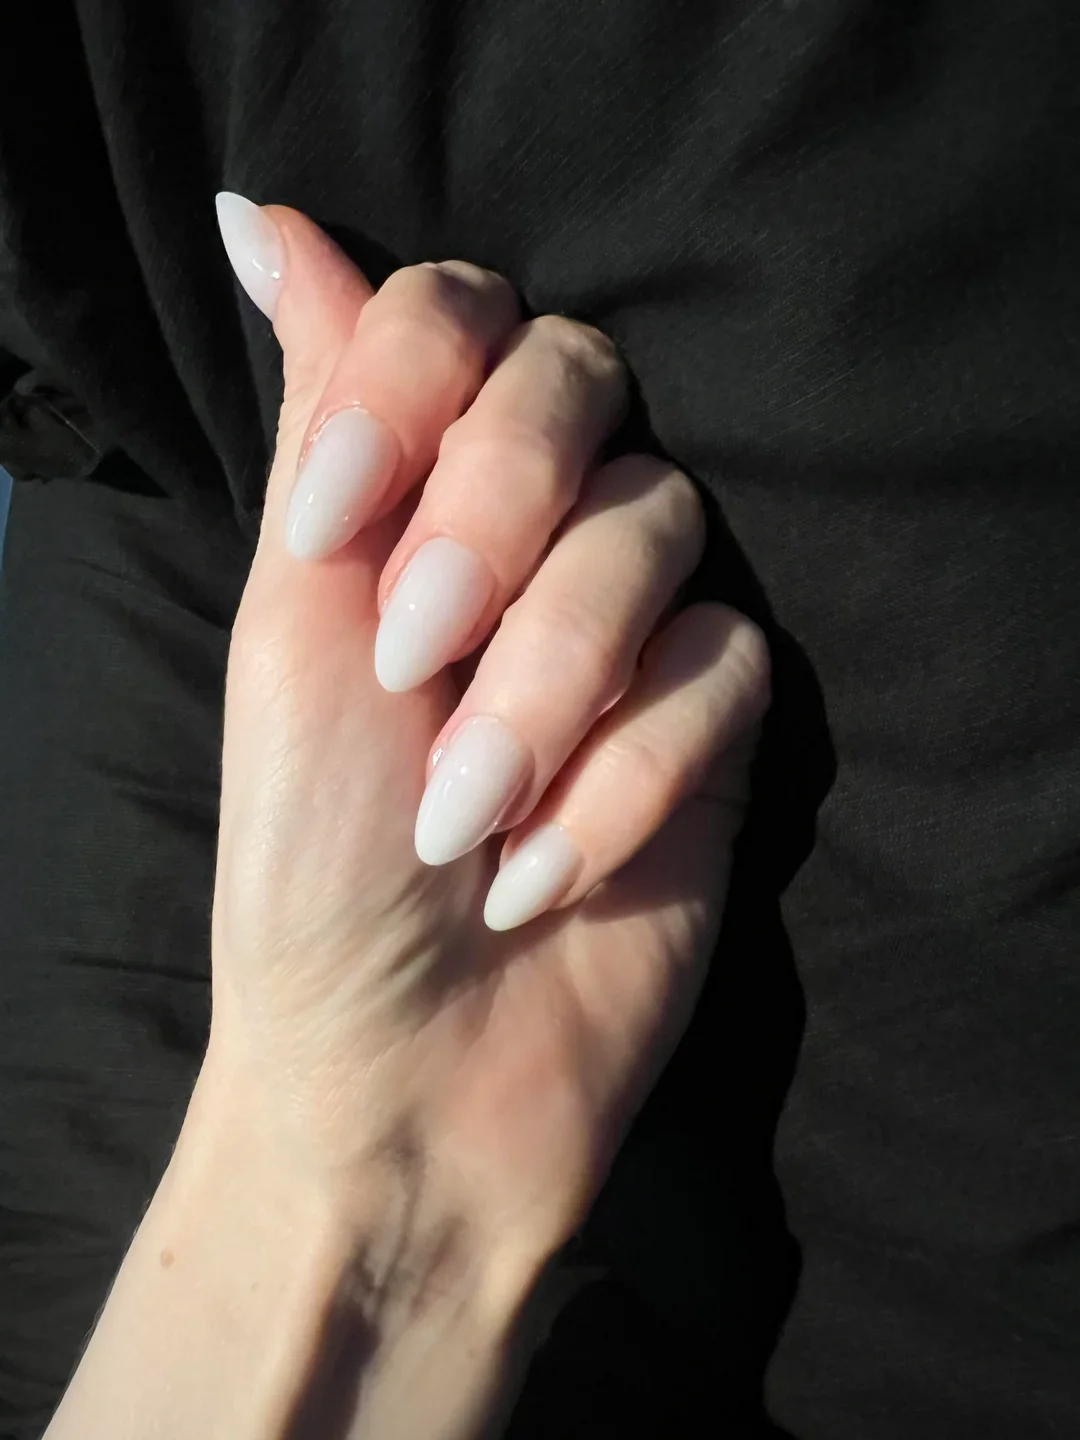
For the base, I would choose a milky white gel polish or a sheer white builder gel. OPI Funny Bunny, DND Daisy White layered lightly, or a similar translucent white can create different versions of the same effect. I would avoid an extremely opaque correction-white unless I wanted a much stronger statement. The glossy top coat should be smooth and glassy, because even tiny surface imperfections become noticeable against a pale finish.
I would spend most of my preparation time getting the almond shape symmetrical. Once the nails are cleaned and shaped, I would apply a thin base and then build the milky color gradually. Two very thin coats usually look more sophisticated than one thick layer. After curing, I would seal everything with a glossy top coat and check the sidewalls before the final cure. That last little inspection can make a big difference.
This is a manicure I would happily wear when I want my nails to look fresh without following a complicated design trend. It feels particularly lovely in summer because it echoes white linen, clean sneakers, and minimal jewelry. At the same time, it transitions beautifully into any season. Sometimes the most modern choice is simply getting the basics incredibly right.
Blush Pink With a Dark Chocolate Micro French
A tiny dark French edge changes the entire attitude of a soft pink manicure. The base is a translucent nude-pink that allows the natural nail to remain part of the design, while a very thin chocolate-brown line traces the free edge. The nails are short and softly squared, which makes the contrast feel especially wearable. Instead of the usual white French tip, the darker border gives the manicure a subtle graphic quality without becoming heavy.
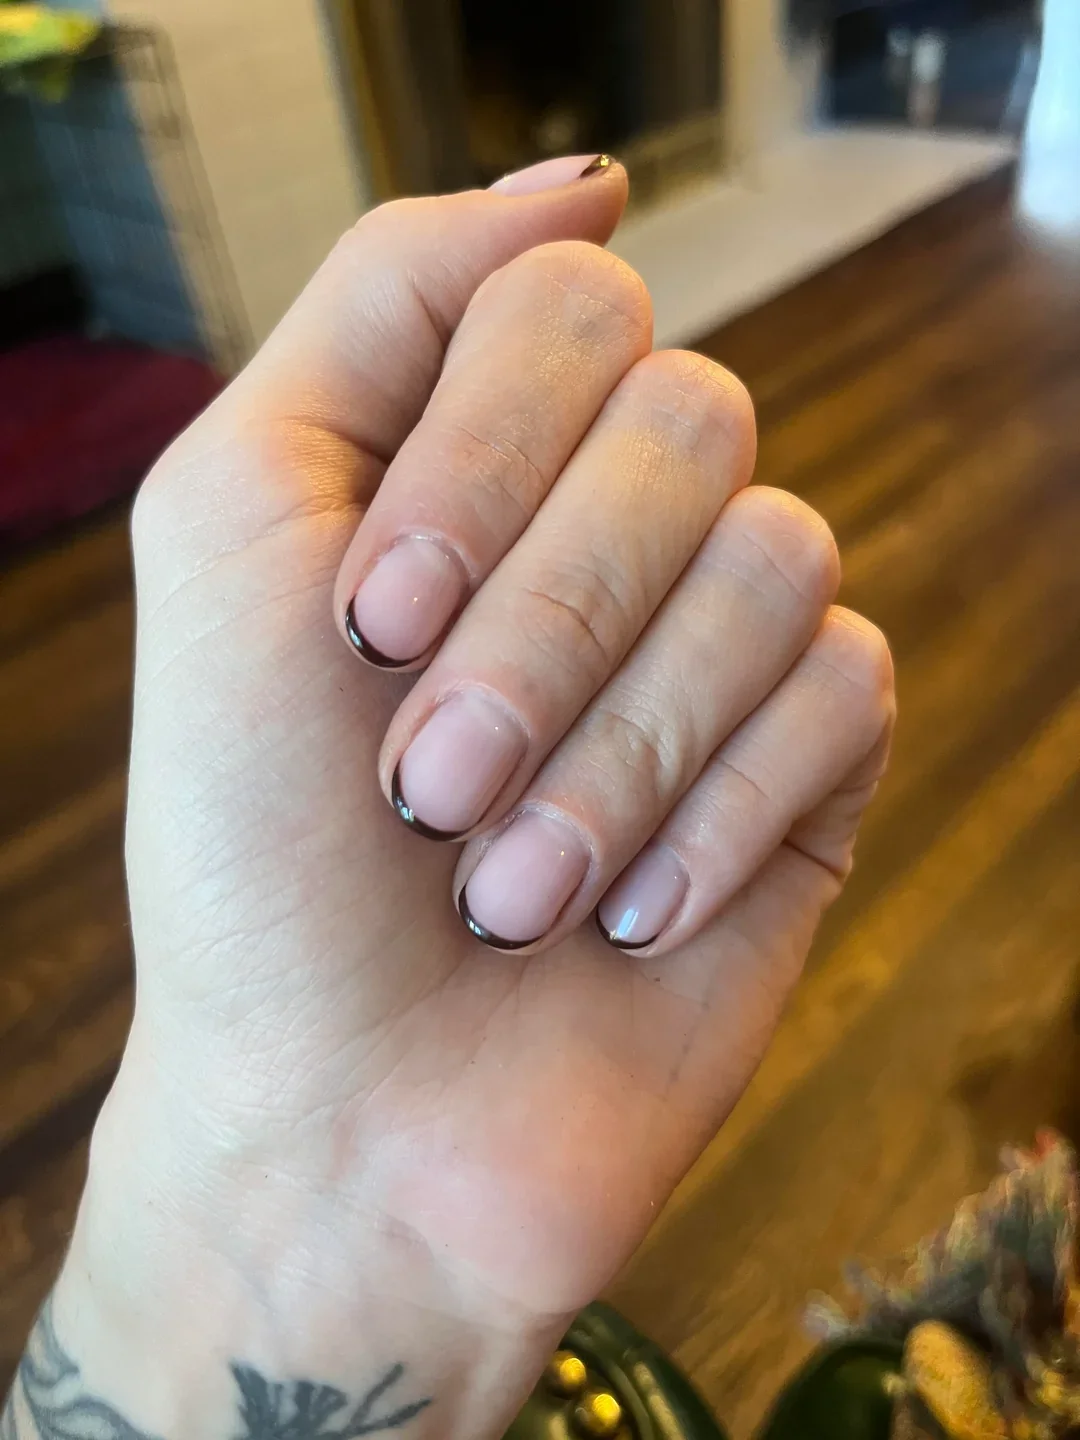
I would use a sheer blush or pink-beige base and a highly pigmented dark brown gel for the tips. A color similar to OPI Put It in Neutral can provide the neutral foundation, while a deep espresso shade creates the fine outline. I would also keep a detail brush and a small amount of acetone or gel cleanser available for cleanup. With micro French work, precision matters more than the number of products.
I would begin by creating a very even sheer base and curing it completely. Then I would use a fine liner brush to draw the chocolate line, working from one side toward the center and then repeating from the opposite side. Keeping the brush loaded with just enough product helps prevent the line from becoming bulky. Once the tips are balanced, I would cure them and finish with a glossy top coat.
I think this is one of the smartest ways to experiment with darker colors without committing to a full brown manicure. The brown edge gives the nails personality, while the pink base keeps everything soft. It is especially easy to style with neutral clothing, gold accessories, or a simple monochrome outfit. One tiny line can do a surprising amount of work.
Blush Pink Short Nails With a Delicate Rose Accent
Short nails can look incredibly polished when the color and proportions are handled well. This manicure uses a muted dusty-pink base across a compact, rounded-square shape, then adds a small white rose motif to one accent nail. The artwork is fine and ornamental rather than bold, almost like a miniature line drawing. I like how the design stays concentrated on one nail instead of repeating the flower across every finger.
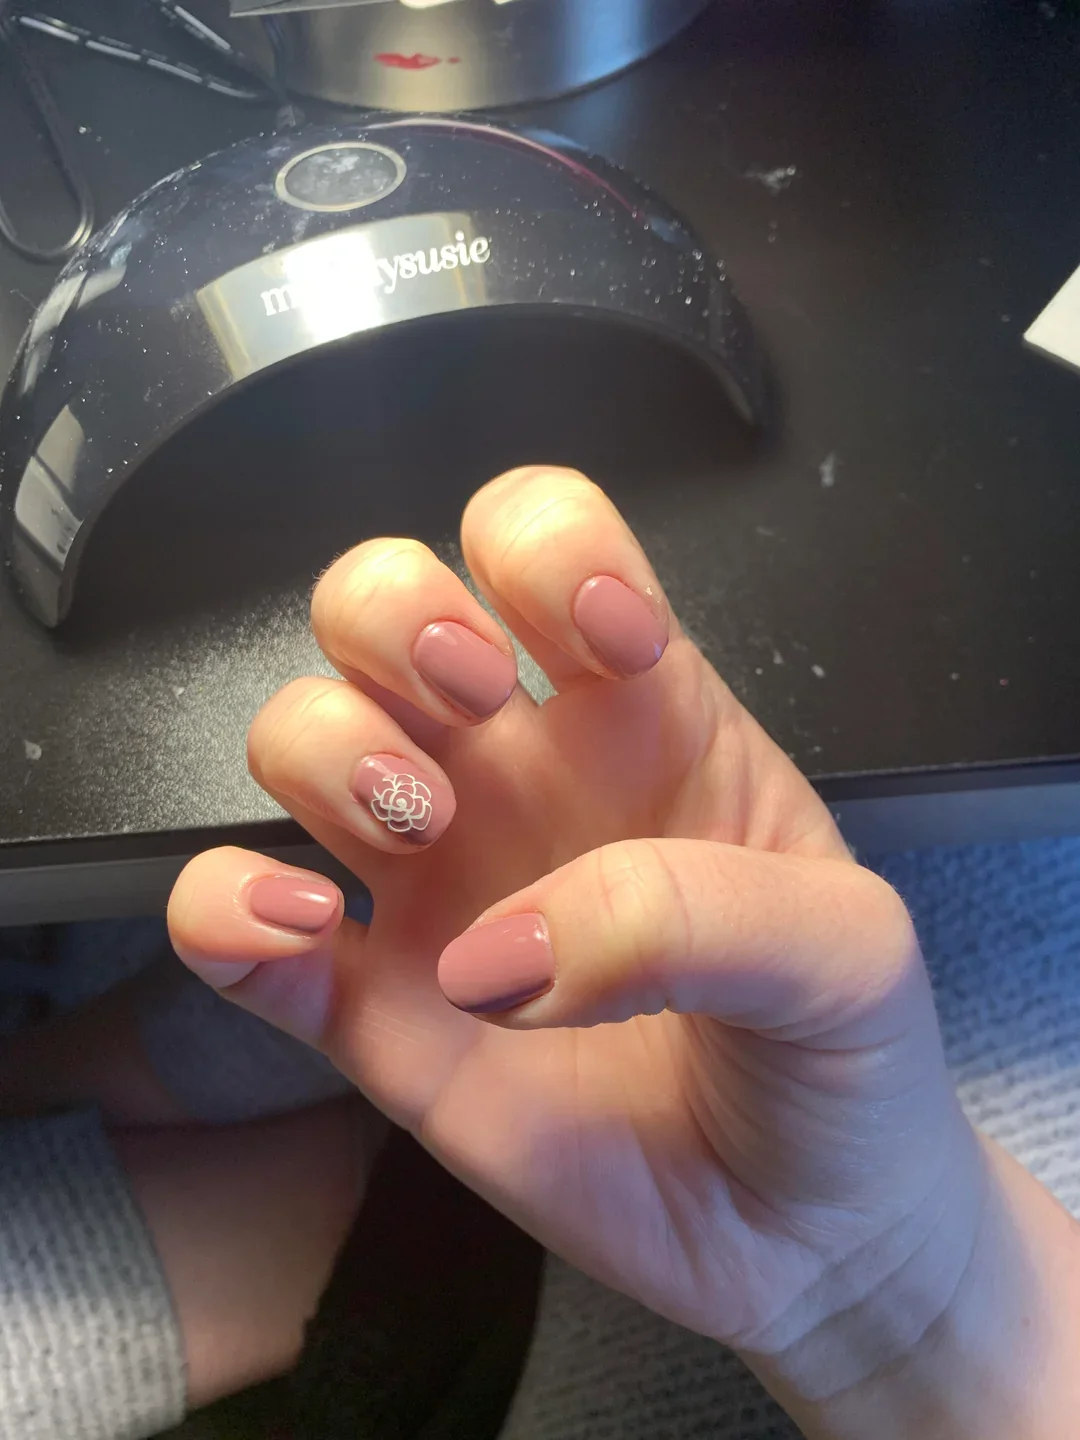
For the base, I would choose a muted rosy nude with a creamy finish. Something in the OPI Put It in Neutral or Essie Ballet Slippers family can be adjusted with a small amount of pink or mauve depending on the desired depth. For the rose, I would use a fine white nail-art gel and a detail brush. A glossy top coat will preserve the delicate contrast and give the short nails a healthy-looking shine.
After shaping the nails into a neat rounded square, I would apply the rosy base in thin coats. The accent rose can be created with a series of curved lines that overlap slightly to suggest petals. I would not try to make the flower perfectly symmetrical; tiny variations actually make hand-painted details look more natural. Once the artwork is cured, I would seal the manicure carefully, especially around the edges.
This feels like a great option for anyone who loves nail art but does not want long nails. I also appreciate how practical the length is for everyday life. If I had a busy week and still wanted something pretty on my hands, this would be high on my list. The little rose gives the manicure a story without making it fussy.
Glossy Chocolate Almond Nails With a Playful Accent
Deep chocolate brown looks especially sleek on a long almond shape, and this manicure leans into that contrast. Several nails are coated in a rich espresso-brown shade with a glossy finish, while the accent nail introduces a softer pink base and an abstract brown detail with a tiny metallic embellishment. The result is more fashion-forward than a traditional single-color manicure, but the restrained palette keeps it cohesive.
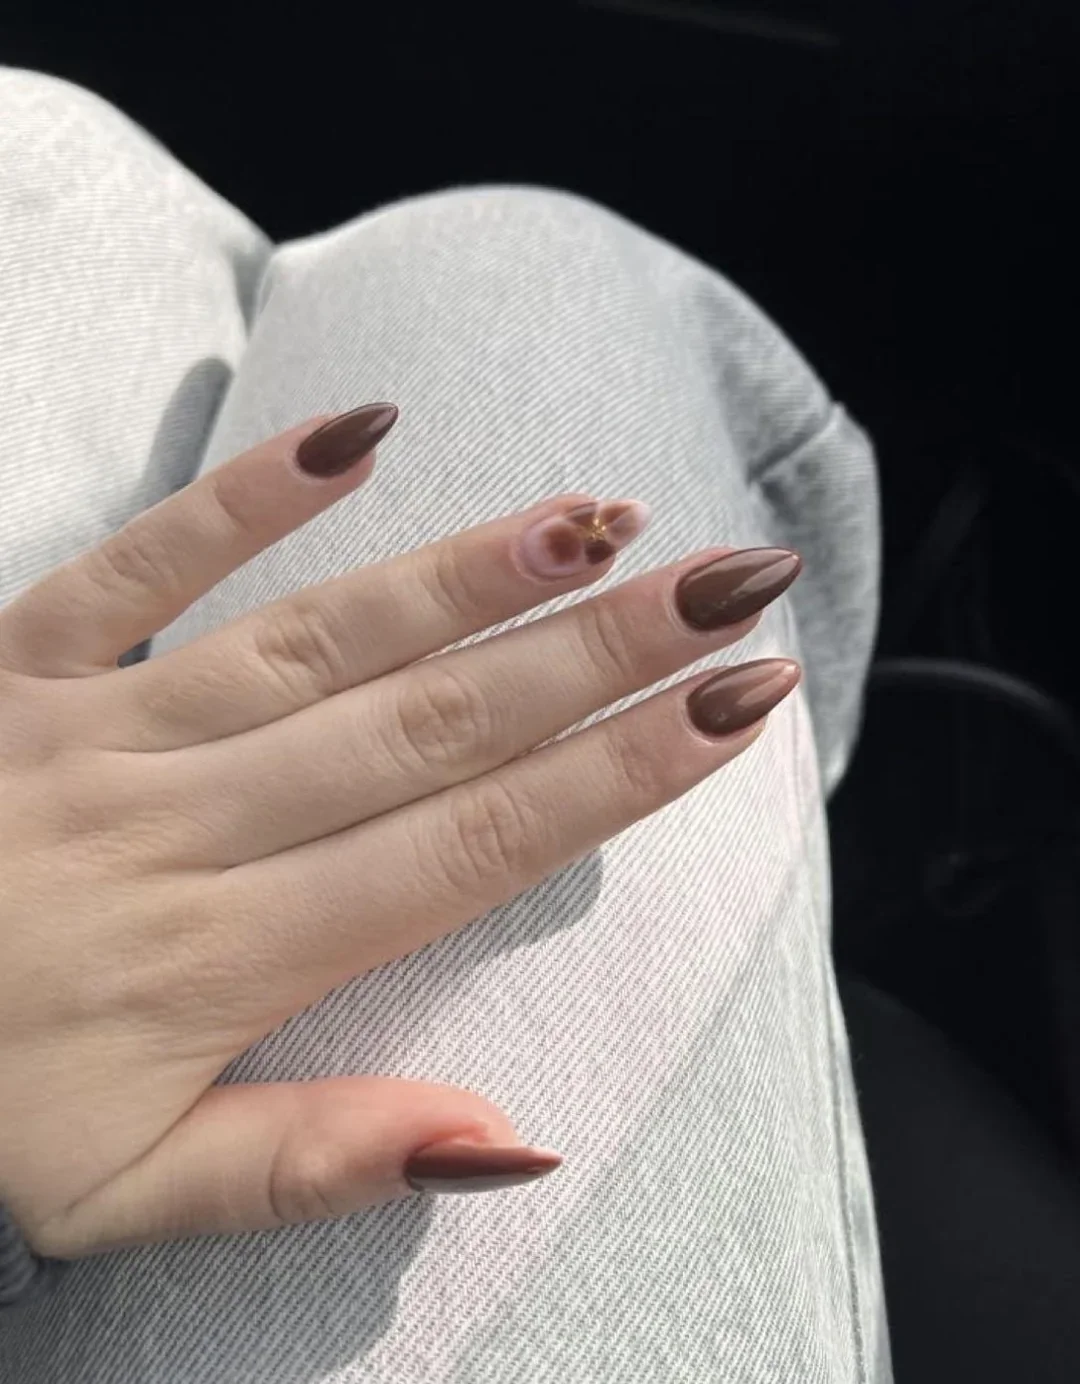
I would choose a dark chocolate gel with a creamy, high-pigment formula for the main nails. For the accent, I would use a sheer blush pink, the same chocolate shade for the decorative detail, and a very small gold or metallic charm. A strong glossy top coat completes the look. The key is keeping the brown consistent across the solid nails and the accent artwork so the design feels intentional rather than random.
I would shape the nails into a long almond first, paying attention to the center line so the tips do not lean to one side. After applying the brown color to the main nails, I would create the accent with a soft pink base and a few abstract brown shapes. The metallic detail should remain tiny; one small piece is enough. I would secure it properly before applying the final top coat around, rather than directly over, a bulky embellishment.
For me, this is where neutral nail design gets interesting. Brown can be soft, elegant, modern, or slightly edgy depending on the finish and shape. The pink accent prevents the manicure from feeling too serious, while the tiny metallic touch catches the light. I would especially save this idea for a dinner date, evening event, or any moment when a simple manicure needs a little more attitude.
Glossy Pink Almond Nails With a Barely-There Finish
The beauty of this manicure is its simplicity. Long almond nails are covered in a soft translucent pink that looks almost like a glossy wash of color over the natural nail. There are no visible decorations, no contrasting tips, and no glitter. Instead, the shape and shine create the visual interest. The finish is smooth enough to reflect light along the center of each nail, making the almond silhouette look even more elongated.
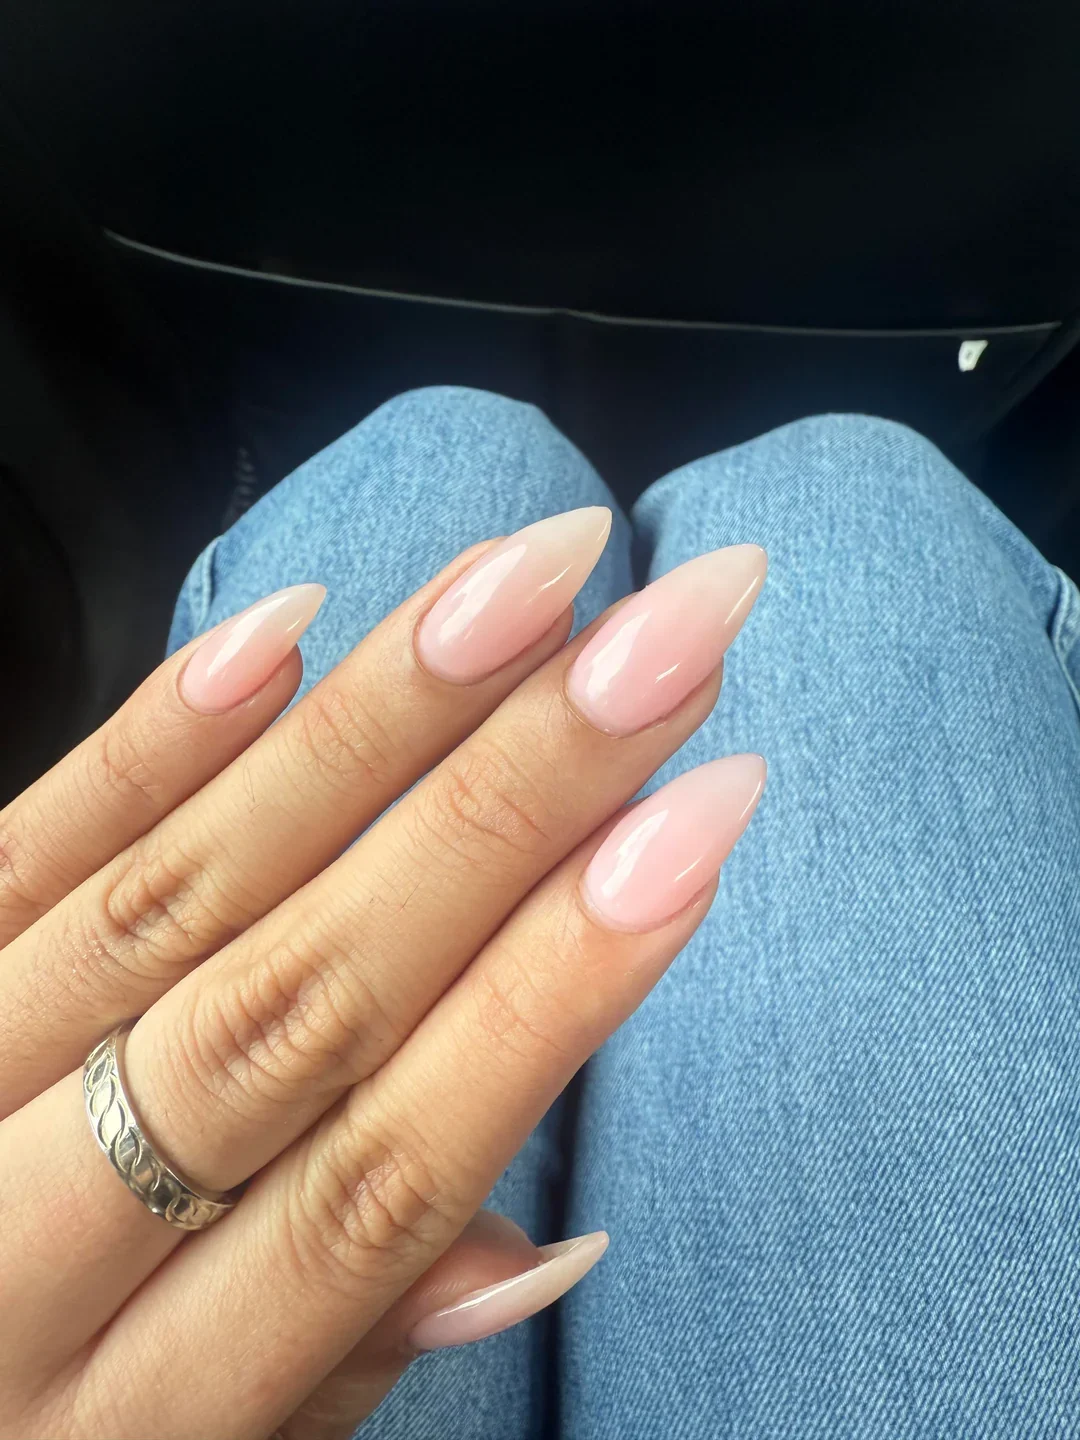
I would use a sheer pink gel polish or tinted builder gel that allows some natural nail tone to show through. Shades similar to OPI Bubble Bath, Essie Mademoiselle, or a custom blend of sheer pink and clear gel can work depending on how much coverage I want. A thick-looking glossy top coat should be avoided; I prefer a smooth, glass-like layer that follows the natural contour of the nail.
I would prepare the nails carefully, then shape each one into a consistent almond. The polish should be applied in thin layers from the cuticle area toward the tip, with enough product to create an even color but not enough to obscure the natural dimension. After curing, I would inspect the surface under good lighting before applying the final shine. With a minimalist manicure, tiny imperfections are much easier to notice.
This is probably the easiest design here to wear with absolutely everything. I love it with denim, especially because the soft pink gives the hands a polished contrast against casual clothing. It also makes sense for anyone who wants to grow out a natural-looking manicure without constantly changing colors. Clean, glossy, and quietly pretty—sometimes that is the whole mood.
Vivid Magenta Shine for a High-Energy Manicure
After all those soft neutrals, a saturated magenta manicure feels like turning the volume up. The nails are short and rounded-square, which keeps the intense pink practical and modern. The color has a luminous, slightly pearly quality that catches light across the surface rather than sitting completely flat. There is no additional nail art because the shade itself provides all the impact.
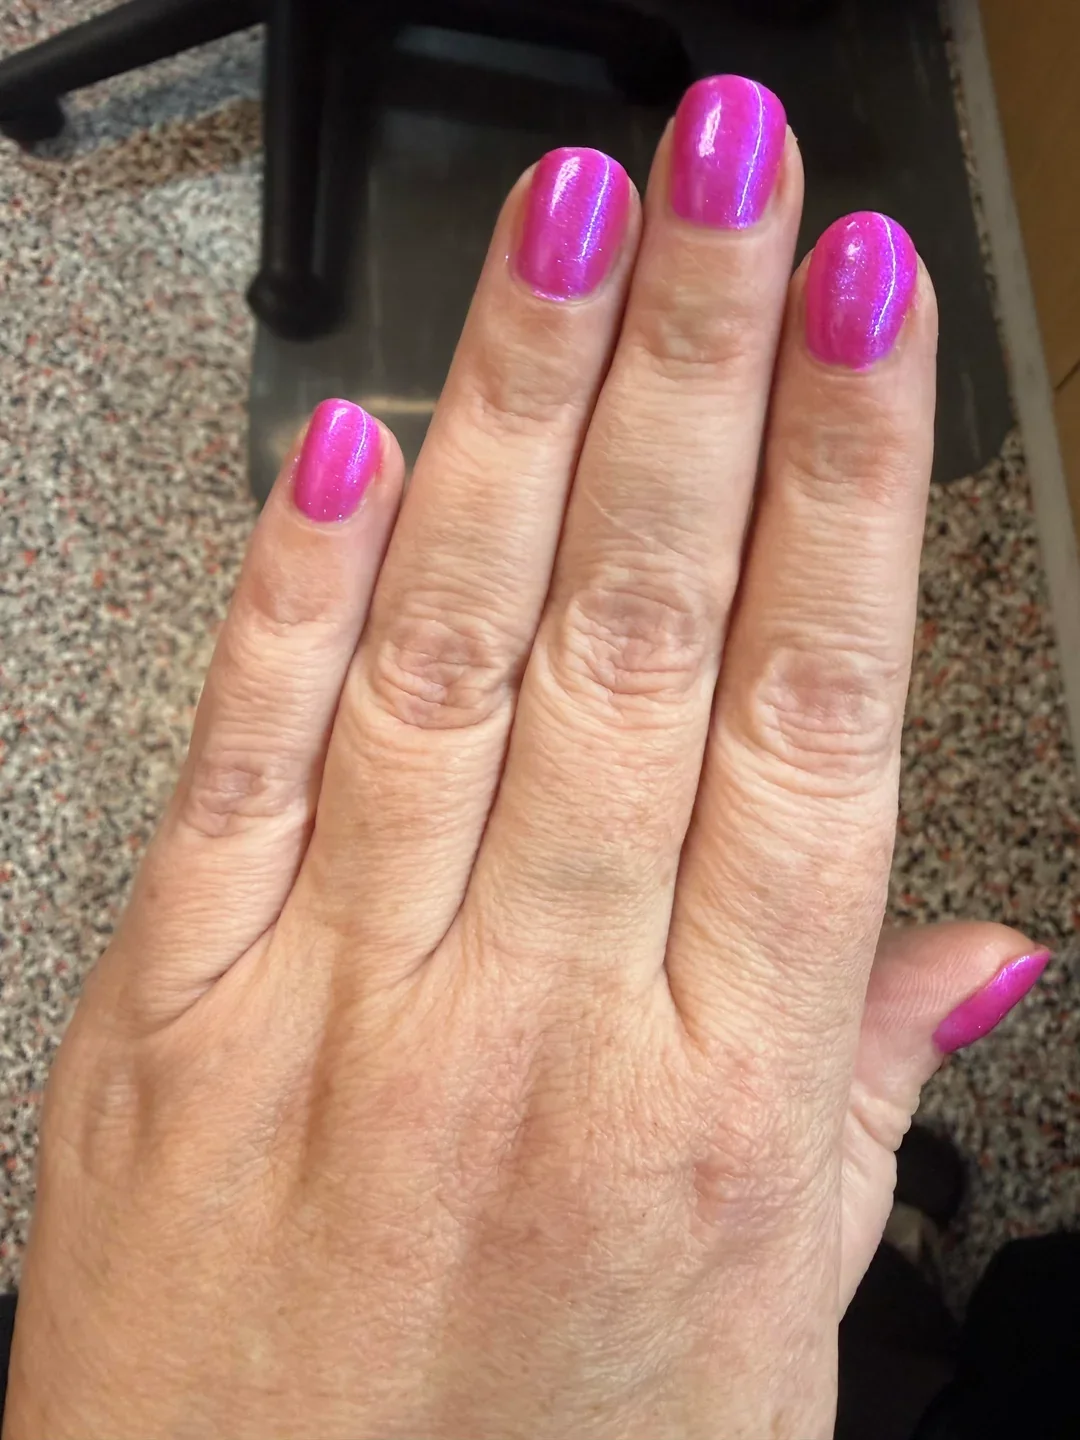
I would choose a vibrant magenta or fuchsia gel polish with a subtle shimmer or reflective finish. A classic pink can work too, but the fine luminosity gives this version much more dimension. I would pair it with a smoothing base coat and a glossy top coat to intensify the reflective quality. If using a highly pigmented formula, thin coats are particularly important to prevent the color from looking thick around the cuticles.
I would keep the application straightforward: shape the nails evenly, apply the base, then layer the magenta until the coverage is completely uniform. I would clean the cuticle line before curing each final layer and finish with a high-shine top coat. Because bright pink can emphasize uneven edges, I would take a little extra time with cleanup rather than trying to rush through the manicure.
This is my pick when a neutral manicure simply is not going to cut it. The color has a playful summer energy, but the short shape keeps it from feeling over-the-top. It would look fantastic with white, denim, black, or even another shade of pink. If you have been wearing beige and nude polish on repeat, this is your sign to have a little fun.
Textured Purple Shimmer for a Jewel-Toned Finish
Purple becomes much more dramatic when it is packed with fine shimmer. This manicure features medium-length rounded nails coated in a rich violet-purple glitter polish with a reflective, almost jewel-like surface. The shape is practical enough for everyday wear, while the color creates an instant evening effect. Against dark clothing, the shimmer looks especially dimensional, catching tiny points of light whenever the hands move.
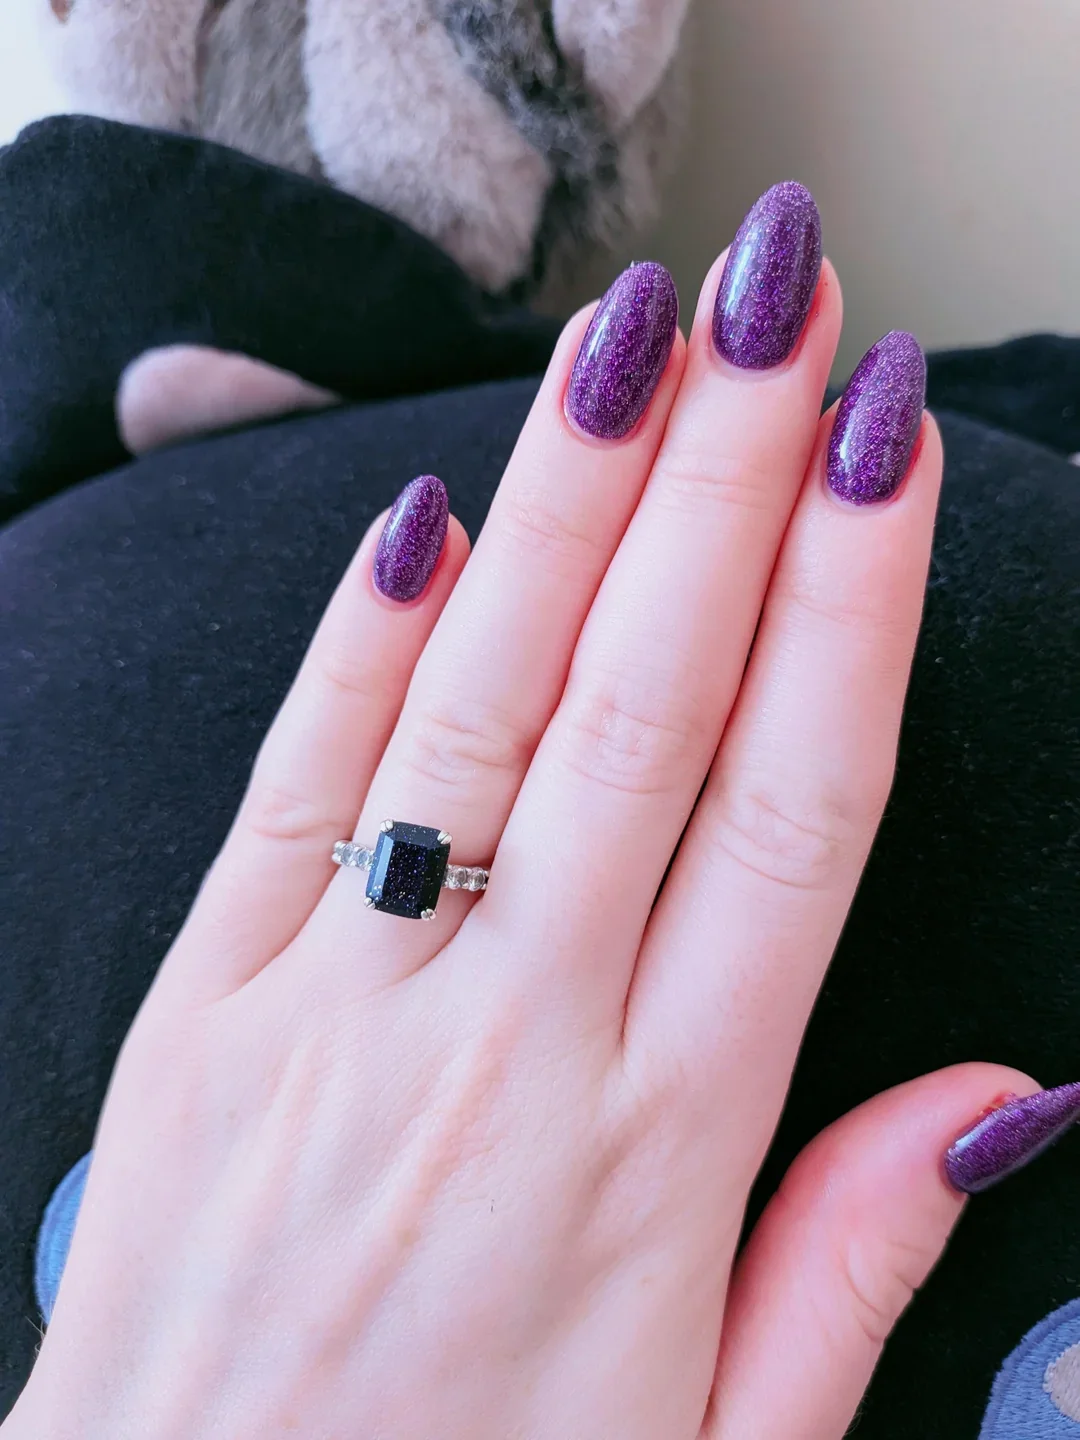
For this look, I would choose a deep purple shimmer or fine glitter gel rather than a chunky glitter. A jewel-toned violet with blue or magenta micro-shimmer will give the nails that dense, sparkling appearance. I would use a smoothing base underneath and a glossy gel top coat designed to encapsulate fine glitter without dulling it. Two thin coats of the purple usually create better depth than one heavy layer.
I would shape the nails into a neat rounded oval, then apply the purple shimmer in controlled coats. If the first layer looks slightly transparent, I would cure it before adding the second rather than trying to build all the coverage at once. The final top coat should be generous enough to smooth the surface but not so thick that it changes the natural shape of the nails.
Molten Copper Almond Nails With A Liquid-Metal Finish
I love how these almond-shaped nails turn a warm copper shade into something that feels almost molten. The color sits somewhere between polished bronze, cinnamon brown, and metallic copper, with a reflective surface that catches the light as the hands move. The elongated almond shape keeps the rich shade looking sleek rather than heavy, while the rounded tip gives the manicure a softer finish. It’s a beautiful choice when I want a neutral-adjacent color but still want my nails to make a statement.
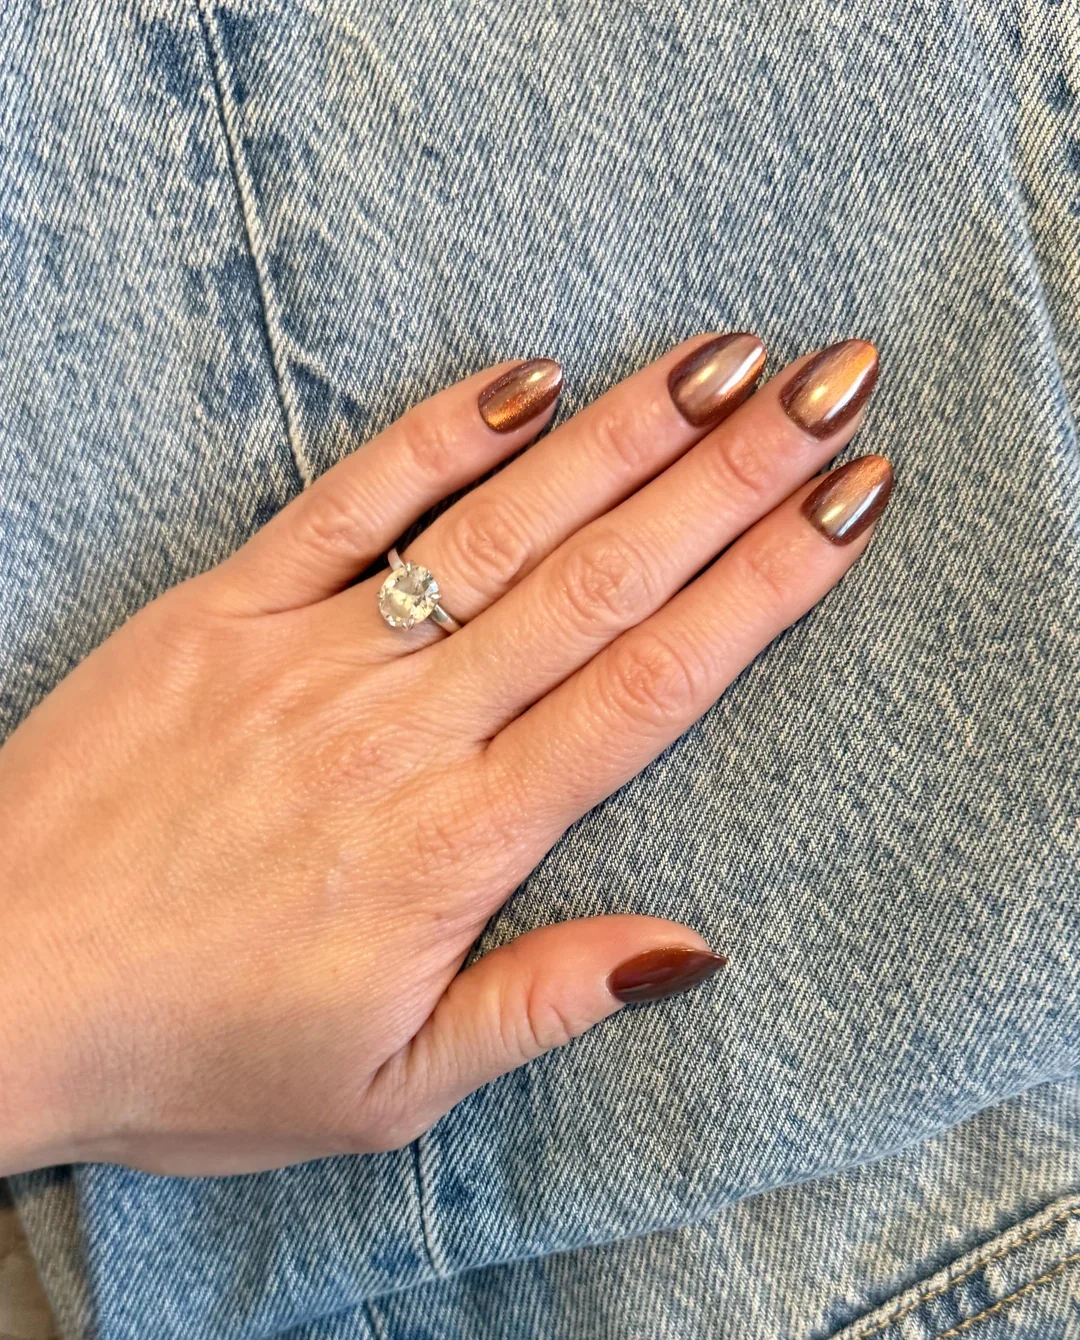
For this effect, I would start with a smoothing base coat and choose a copper or bronze metallic gel polish with strong reflective particles. A sheer warm-brown gel can work underneath if I want more depth, while a chrome powder in copper or rose-bronze can create an even more dimensional finish. I’d also keep a glossy top coat nearby because the shine is a major part of what makes this manicure work.
I would shape the nails into a balanced almond first, paying attention to keeping both sides symmetrical. After preparing the nail plate, I’d apply a thin base coat, cure it, and build the copper color in thin layers rather than applying one thick coat. For an especially reflective result, I’d use a chrome product over the cured color, then seal everything carefully with top coat, making sure the free edge is covered.
I keep coming back to copper because it has that rare ability to feel warm and sophisticated at the same time. I could wear this manicure with denim and a simple sweater, but it would look equally polished with a black evening outfit. For early fall especially, I think this shade hits the sweet spot between understated and attention-grabbing.
Tortoiseshell And Cocoa Nails With Playful Mixed Details
This manicure takes brown into much more creative territory by mixing several related designs across long almond-to-stiletto-shaped nails. I see translucent tortoiseshell tips, creamy nude sections with tiny dark dots, delicate brown stripes, matte cocoa nails, and pale yellow accents working together without becoming chaotic. The varied finishes make the set feel collected rather than overly coordinated. I especially like the way the warm palette keeps every different design connected.
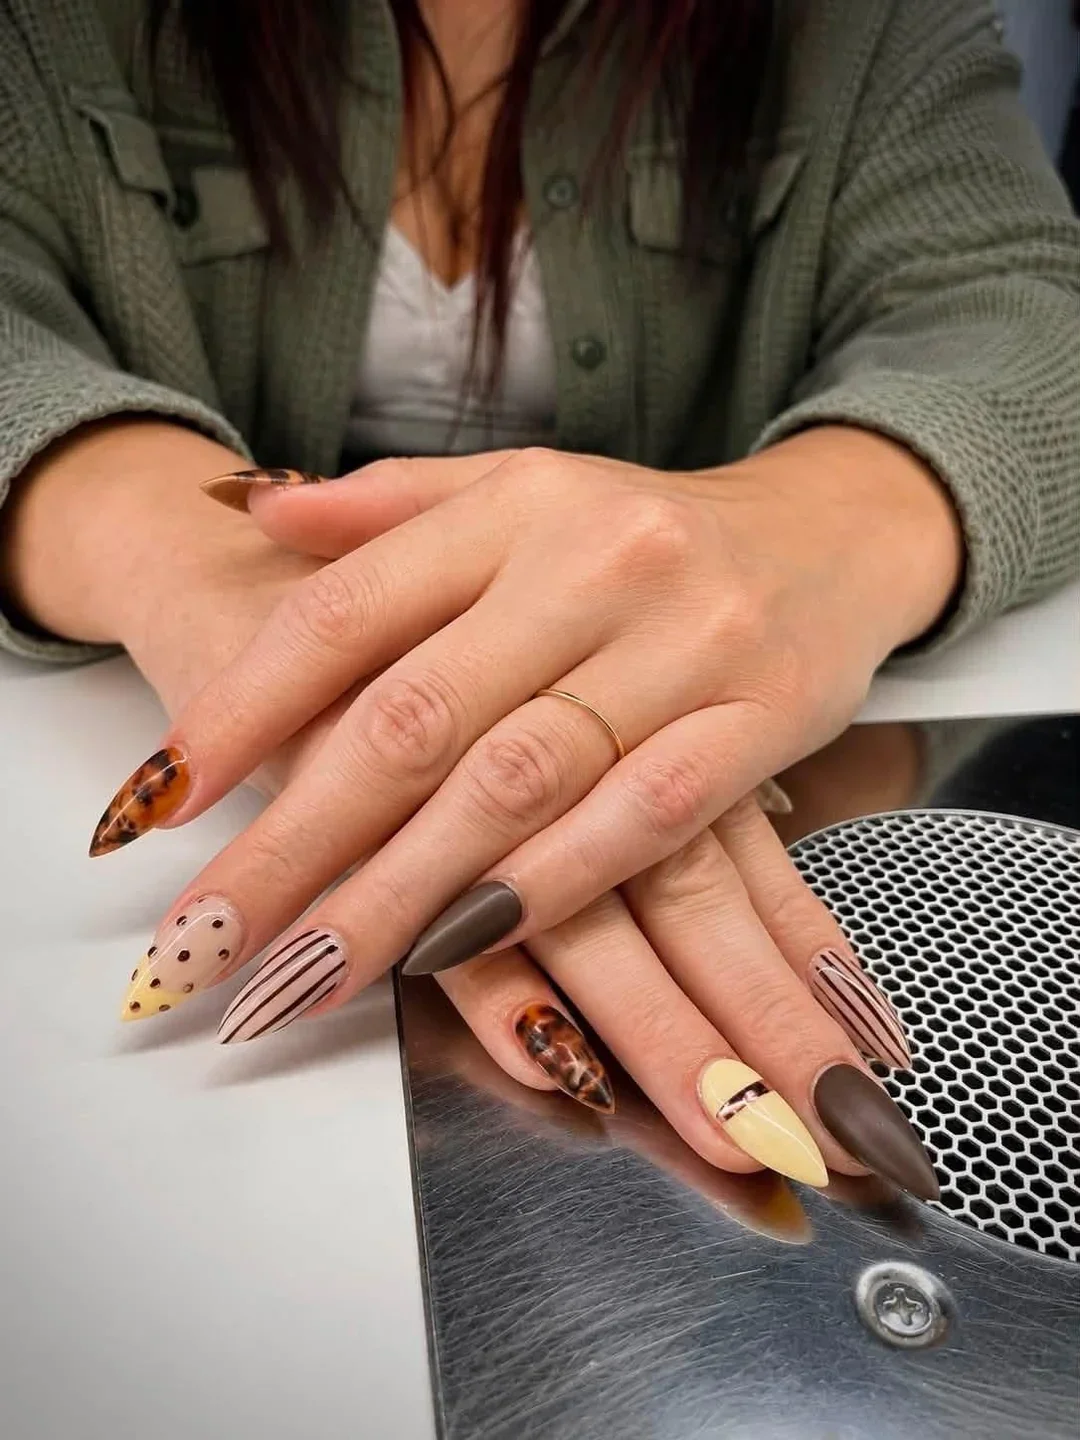
I would use a caramel-brown translucent gel, a deep chocolate shade, creamy beige, soft butter yellow, and a dark brown detailing polish. A matte top coat would be useful for the cocoa nails, while the tortoiseshell elements would need a glossy finish to emphasize their layered, translucent appearance. For the tiny lines and dots, I’d reach for a fine nail-art brush and a dotting tool.
I’d begin with the base colors, leaving the tortoiseshell nails slightly translucent. To create that effect, I’d layer irregular patches of amber and dark brown, allowing some of the base to remain visible rather than trying to make the pattern perfectly even. Then I’d add the stripes, dots, yellow sections, and other accents individually before finishing each nail with either a glossy or matte top coat depending on the design.
This is exactly the kind of manicure I save when I’m tired of seeing the same color on every nail. It gives me several little moments to look at, yet the brown-and-cream palette keeps everything wearable. If I wanted something expressive for a weekend trip or a change of season, this would be high on my list.
Blush Pink Nails With Sculptural Silver And Gold Lines
Soft pink becomes surprisingly edgy when it is layered with metallic curves, tiny embellishments, and abstract line work. I like the combination of a translucent blush base with silver and gold accents because it creates contrast without relying on a dark color. The nails are long and tapered, giving the flowing artwork plenty of room to move across the surface. Small metallic studs add another dimension, almost like miniature jewelry placed directly onto the manicure.
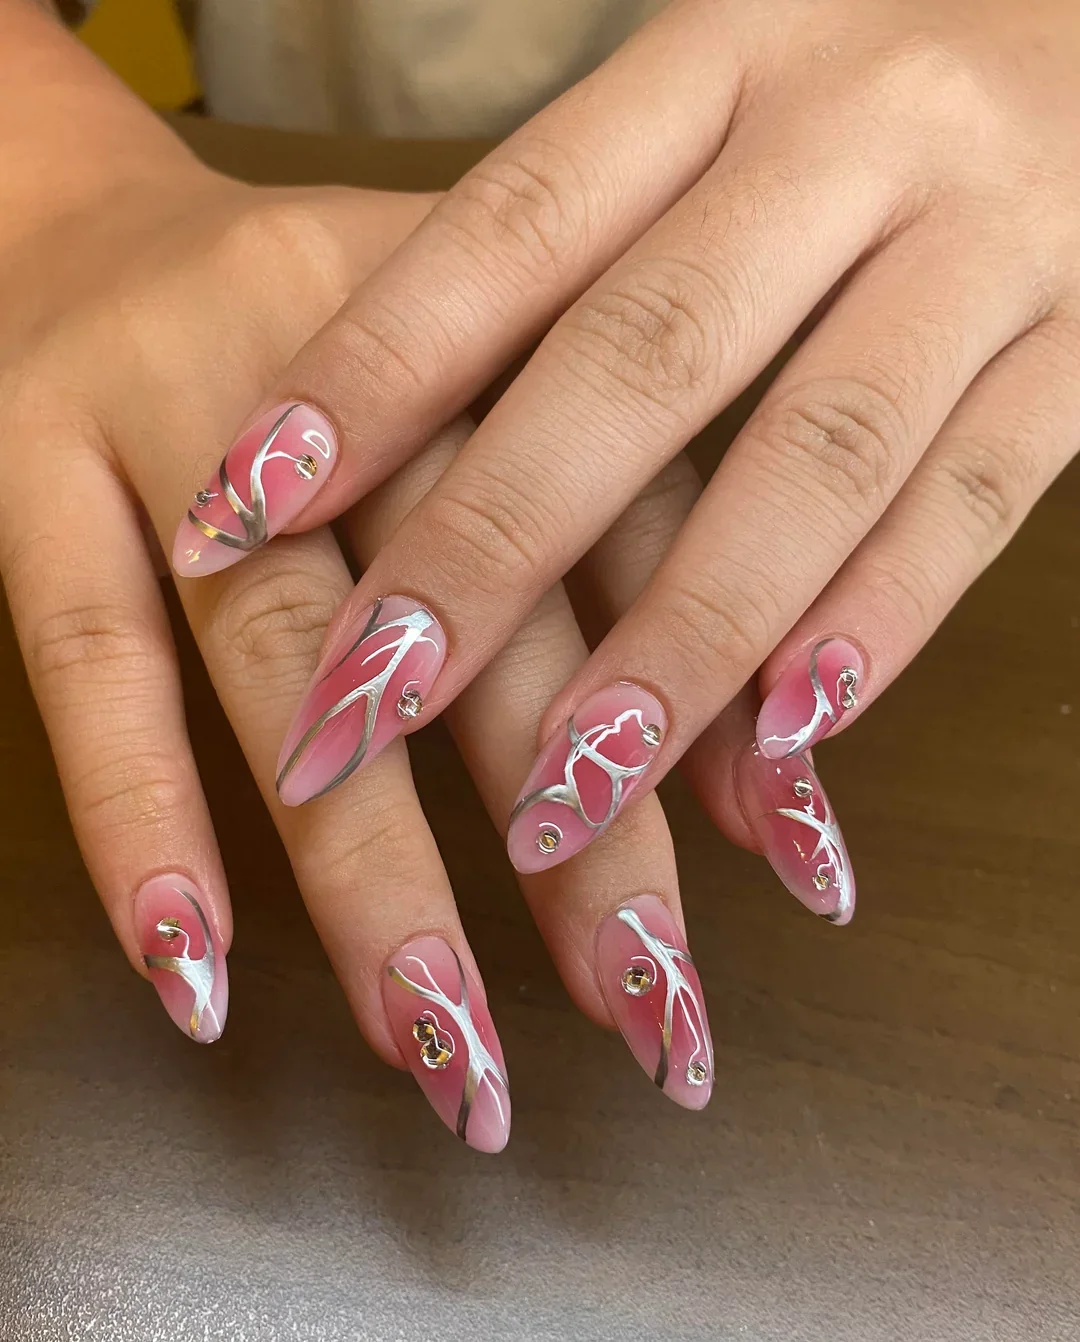
For this look, I’d choose a sheer pink or milky blush gel as the foundation, plus silver and gold metallic gel paints for the abstract lines. Small rhinestones or metal studs can provide the raised details, while a glossy top coat helps the whole design look smooth and dimensional. I’d also use a very fine liner brush because the curved lines need to remain delicate.
I’d first create the sheer pink base and cure it completely. Then I’d draw loose, asymmetrical silver lines, adding occasional gold sections rather than trying to make every nail identical. Once the artwork is cured, I’d place the small embellishments strategically near the curves and seal the design with top coat, taking care not to flood the cuticle area.
I think this is a lovely answer to the question, “How can I make pink nails feel less predictable?” The trick is not necessarily adding more color; sometimes metallic movement does all the work. I’d choose this style for a special dinner, celebration, or any week when I want my manicure to feel a little more artistic.
Dreamy Lavender Nails With Tiny Metallic Swirls
Lavender gives this manicure a completely different energy. The short, rounded nails are coated in a soft periwinkle-lilac base, while delicate silver and pale gold lines create abstract swirls across the surface. Tiny metallic dots and raised details punctuate the artwork, giving the manicure a playful texture without overwhelming the pastel color. I find the shorter length especially appealing because it makes an intricate design feel easier to wear every day.
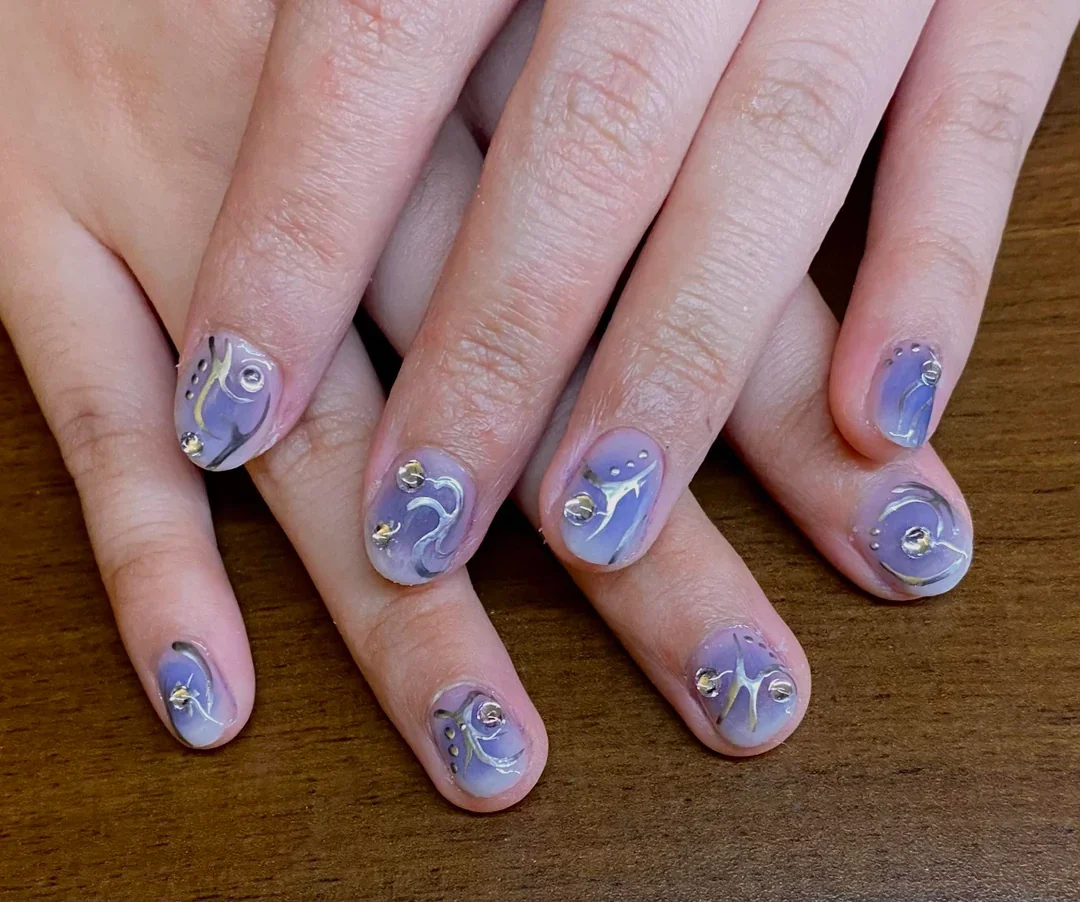
I’d use a muted lavender gel polish with a slightly milky quality, along with silver and pale gold detailing gels. For the raised metallic accents, small studs or flat-back rhinestones would work nicely. A glossy top coat is essential here because it lets the lavender stay luminous and makes the metallic elements catch the light.
I’d keep the base relatively simple and focus on clean application around the cuticles. Once the lavender is cured, I’d draw loose swirls and curved lines with a fine brush, adding the tiny dots afterward. I would avoid making every nail identical; repeating the same visual language while changing the placement makes the set feel more handmade and modern.
I’d wear this manicure when I wanted something feminine without going overly sweet. Lavender also has that wonderful quality of looking delicate in daylight and slightly cooler under evening lighting. For spring and summer wardrobes, especially denim, white, gray, or soft neutrals, I think it would be incredibly easy to style.
Sheer Pink And White Waves For A Soft Modern French Twist
I’m always drawn to manicures that prove minimal does not have to mean boring, and these nails do exactly that. A sheer blush-pink base is paired with creamy white curved lines that sweep across the nails in different directions. Some tips feature soft white shaping, while others let the pink base dominate. The almond shape gives those flowing lines a graceful appearance, almost as though the manicure is moving.
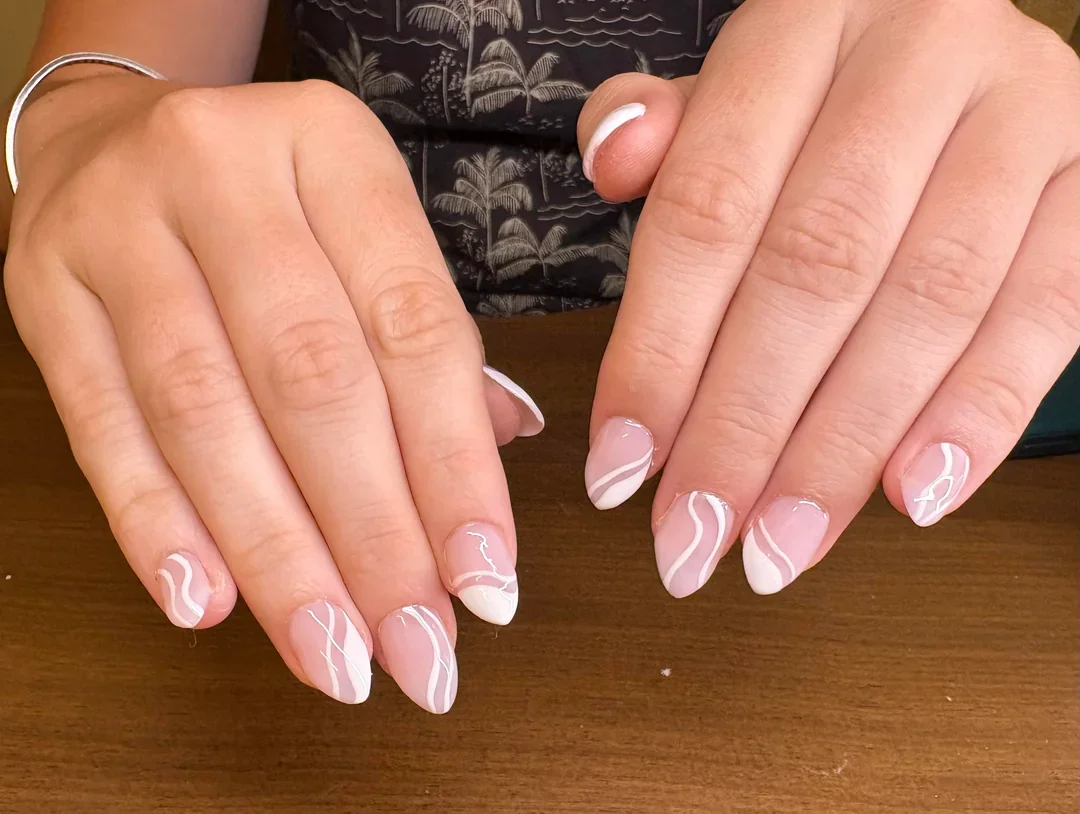
I’d reach for a sheer pink builder or gel polish, an opaque white gel for the waves, and a high-shine top coat. Nothing complicated is required, which is part of the appeal. A very fine liner brush will make it easier to create the narrow curves and keep the white details consistent.
After preparing the nails and applying the translucent pink base, I’d cure the color before adding the white artwork. I’d create each wave in one controlled movement, varying the placement from nail to nail. If I wanted a softer version, I could keep the white lines thin; for a more graphic finish, I’d make a few of them wider and let them overlap visually.
This is one of those designs I could recommend almost without hesitation because it has so much flexibility. I could wear it to work, on vacation, or with an evening outfit without feeling like the nails are competing with my clothes. When I want something polished but still interesting, this kind of abstract French-inspired look usually wins.
Cherry Red Shimmer With A Short Rounded Silhouette
A deep red manicure does not need elaborate artwork to feel special, and this glossy shimmer version is proof. The nails are kept short and rounded, while the red base has a fine metallic sparkle that becomes more visible when the light hits it. Some nails appear slightly brighter and more reflective than others because of the angle, which gives the monochromatic set extra dimension. To me, it feels like classic red after a modern update.
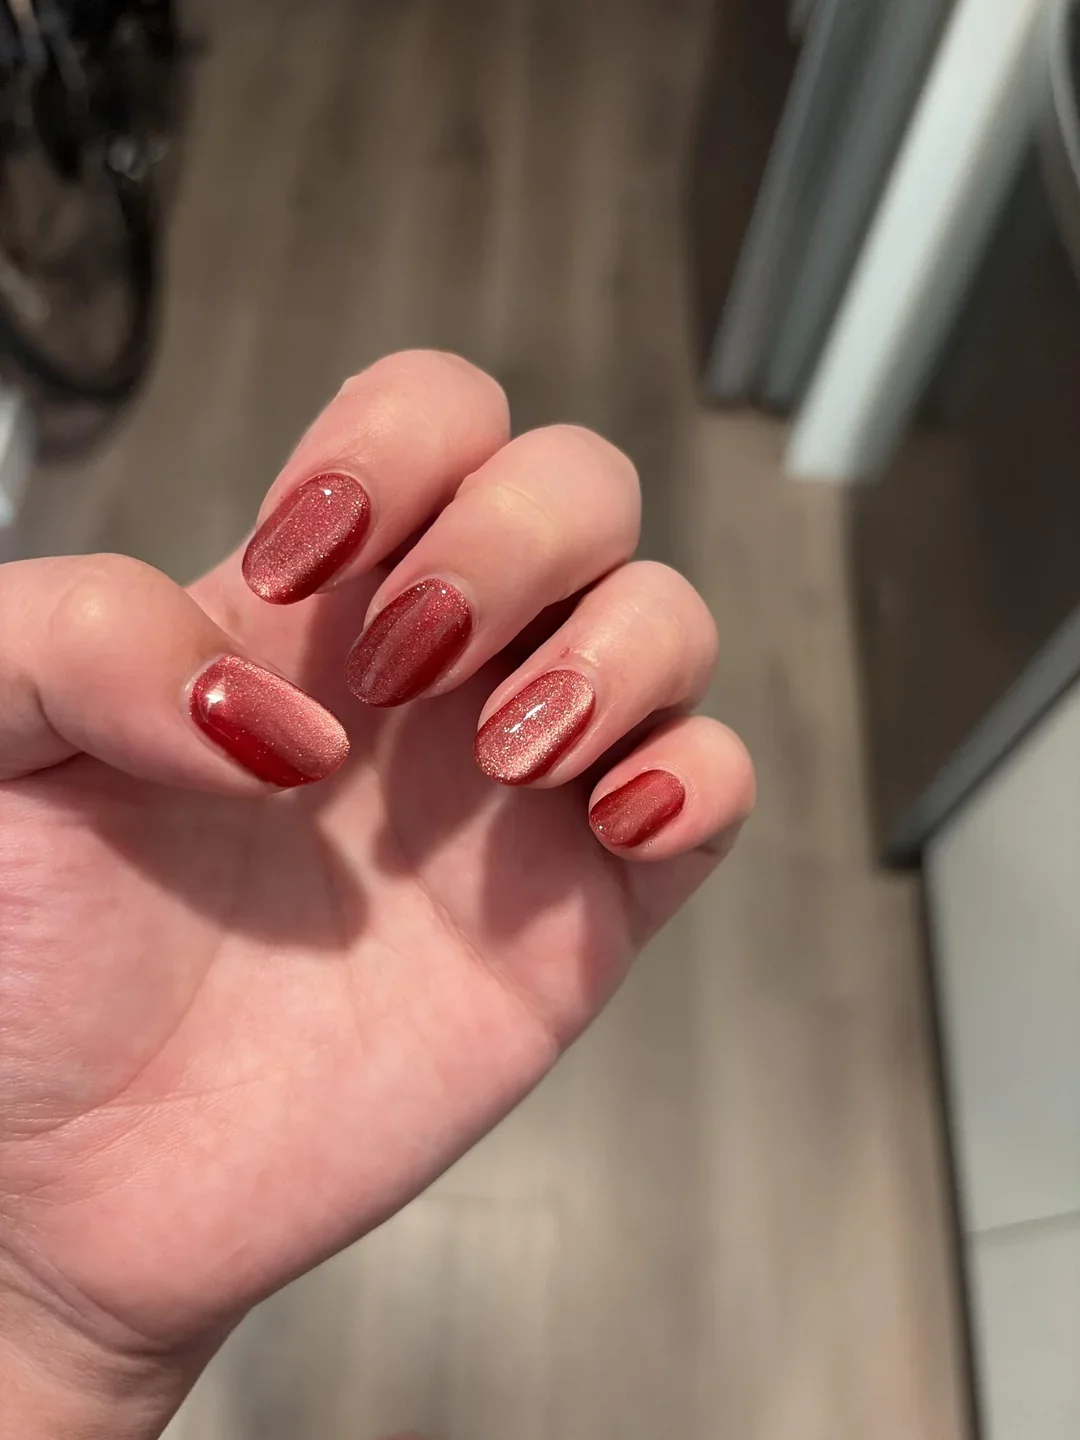
I’d choose a cherry, cranberry, or wine-red gel polish with fine shimmer rather than chunky glitter. A smooth glossy top coat would enhance the reflective particles and make the color look almost jewel-like. For a more customized result, I could layer a sheer red shimmer over a deeper red base to create additional depth.
I’d keep the application very clean because a solid red color leaves little room for uneven edges. After shaping the nails into a short rounded silhouette, I’d apply the base coat followed by two thin layers of shimmer polish. Once everything is cured, I’d add a generous but controlled layer of glossy top coat and check the sidewalls before finishing.
I think short red nails are one of the easiest ways to make a manicure feel instantly pulled together. They work especially well when I’m wearing simple clothes because the color becomes the small statement that finishes everything. If I were choosing one low-effort option for a dinner date or a busy week, this would be a strong contender.
Bronzed Cocoa Almond Nails With A Soft Metallic Glow
Here, brown becomes the star, but the finish keeps it from looking flat. The almond-shaped nails are coated in a warm bronze-cocoa shade with a subtle metallic sheen, creating the effect of polished chocolate under warm light. The color feels rich but still surprisingly neutral, which is why I find it so wearable. Against the natural skin tone, the bronze catches the eye without creating an overly sharp contrast.
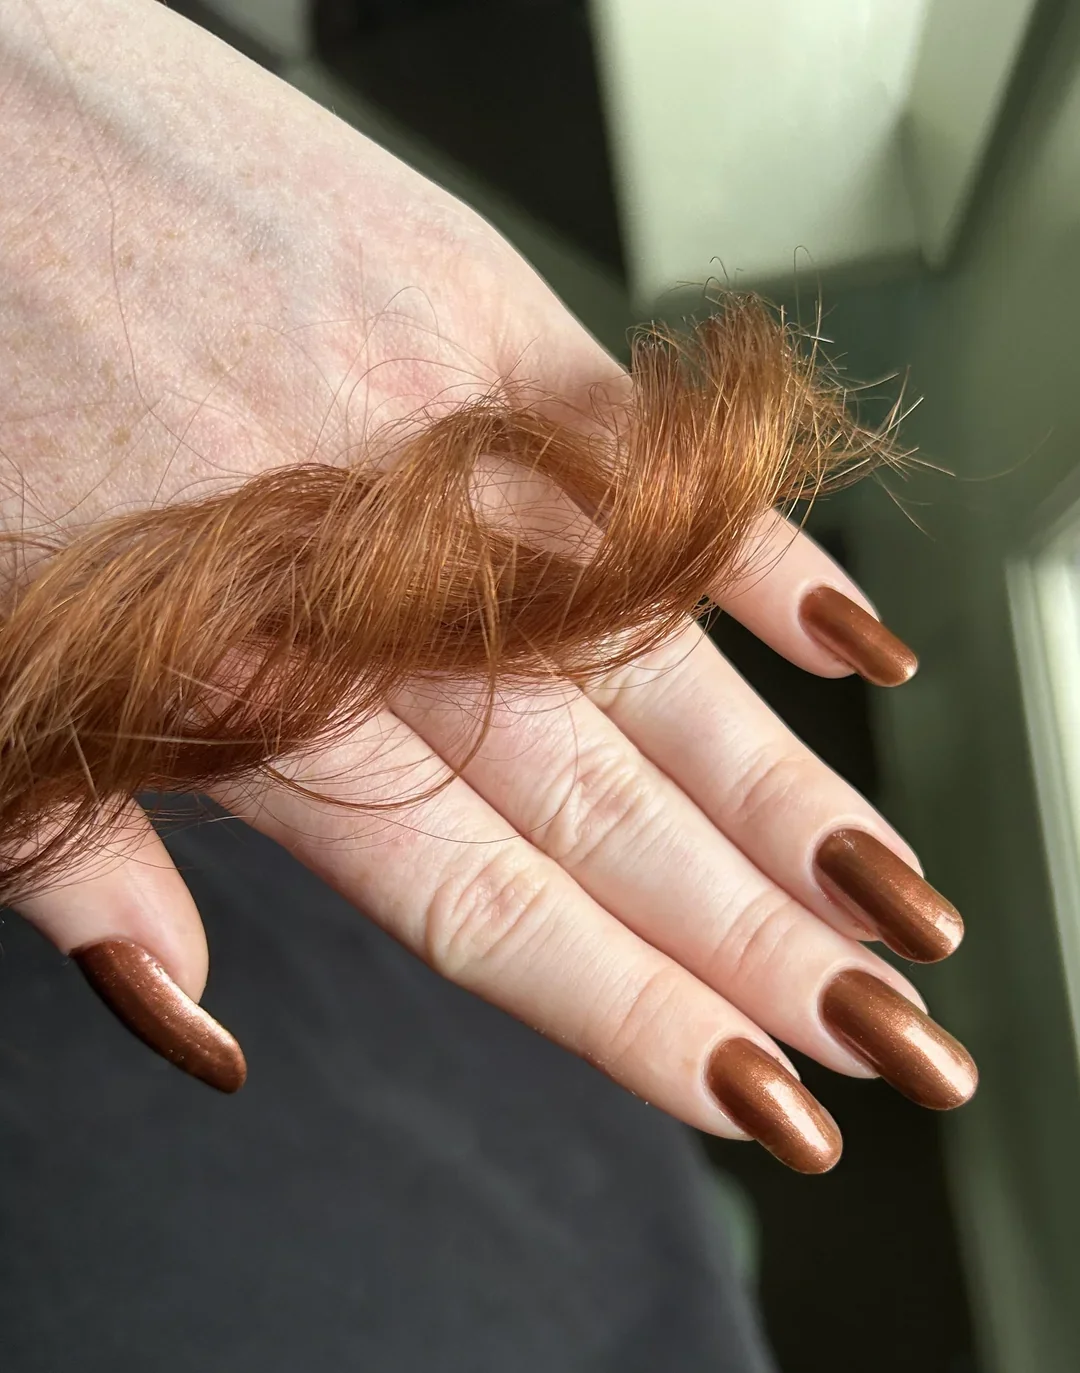
I’d use a medium chocolate-brown gel with bronze or copper shimmer, preferably one with very fine reflective particles. If the available polish is too dark, I could layer a transparent bronze shimmer over a softer brown base. A glossy top coat would preserve the smooth metallic effect and keep the manicure looking freshly finished.
I’d shape the nails into an almond silhouette, making sure the tips are not too narrow. After applying the base, I’d build the brown shade in thin coats and cure each layer properly. The final top coat should be applied evenly from cuticle to free edge because streaks can be especially noticeable over metallic pigments.
This shade feels like the more wearable cousin of a traditional chrome manicure. I could easily see myself choosing it with cream knits, denim, black tailoring, or warm neutrals. When I want brown nails but don’t want them to feel ordinary, a little bronze shimmer changes everything.
Gold Chrome Almonds With A Mirror-Like Shine
Gold chrome takes a classic metallic manicure and pushes it into full statement territory. These almond nails have a highly reflective champagne-gold finish that looks almost liquid across the surface. There is very little decoration, and that restraint is exactly what makes the manicure work. The elongated shape gives the chrome enough visual space to create a sleek, uninterrupted reflection.
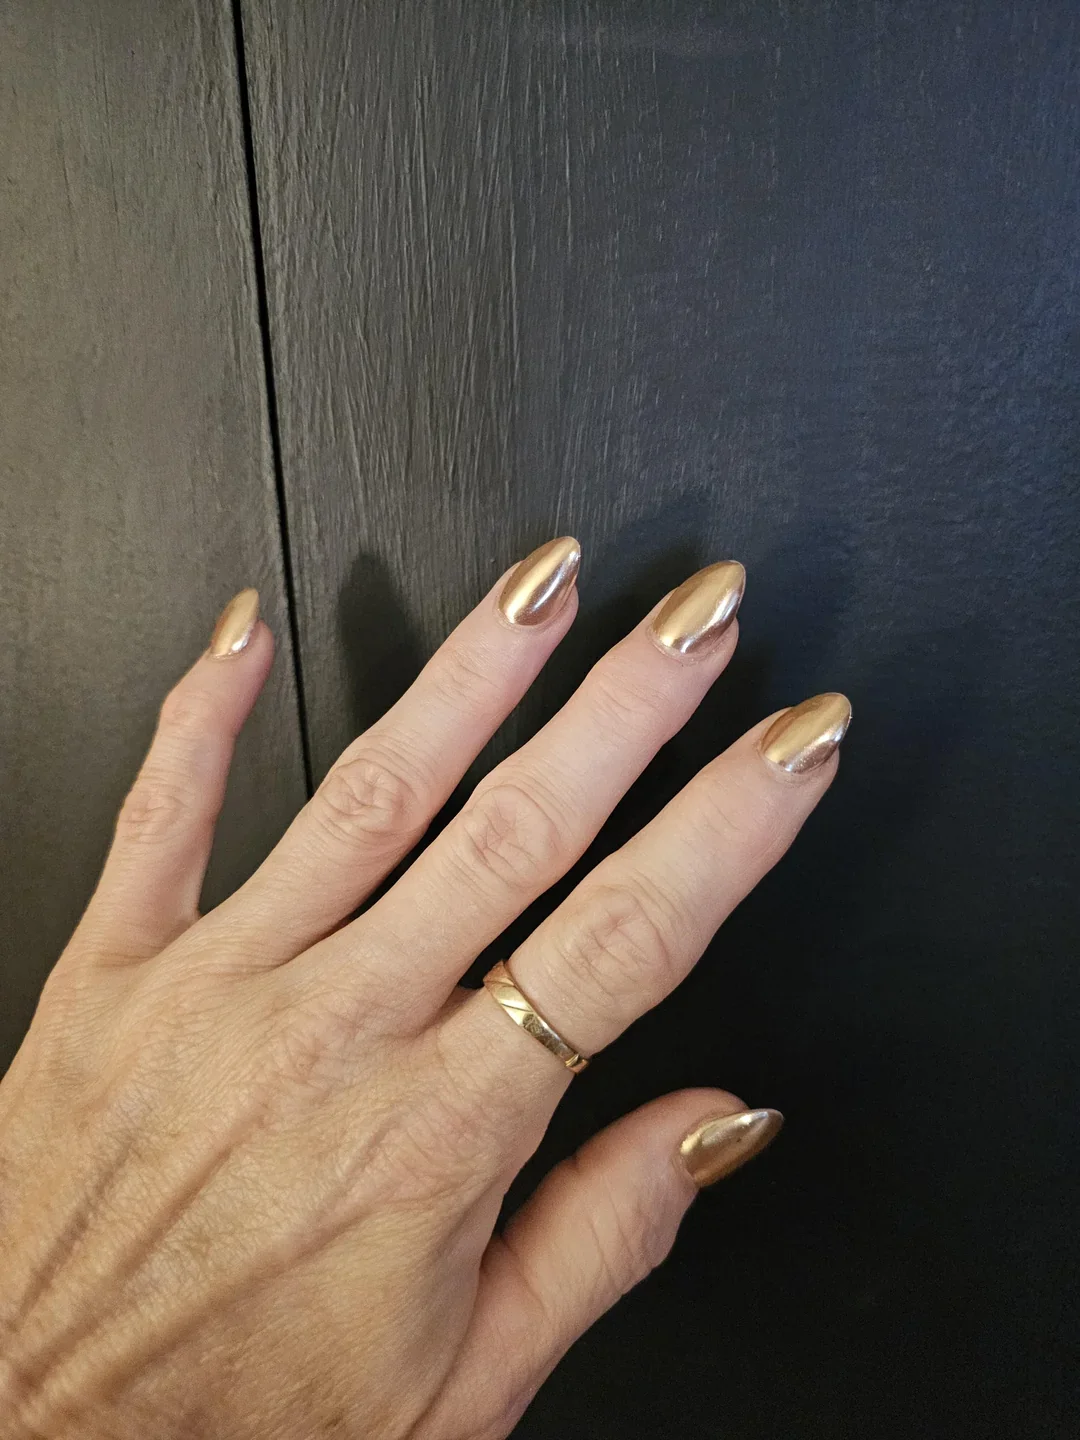
I’d start with a smooth nude or neutral base, followed by a chrome-friendly top coat and fine gold chrome powder. Depending on the product system, I’d use the appropriate curing method for the gel layers before rubbing in the pigment. A no-wipe top coat is often useful for chrome applications, followed by another sealing layer if the product instructions call for it.
The preparation matters more than it might seem because chrome will emphasize every bump underneath it. I’d carefully refine the nail surface, apply the base color evenly, cure it, and then work the chrome powder into the surface with a sponge applicator. I’d brush away excess pigment around the cuticle and seal the edges carefully so the metallic finish stays crisp.
I see gold chrome as the manicure equivalent of putting on one really good accessory. It can transform a simple outfit without requiring any additional nail art. For holidays, parties, weddings, or nights when I simply want something glamorous, I’d happily let the gold do all the talking.
Emerald Green Glitter With Delicate Metallic Accents
This emerald manicure goes bold in the best possible way. The nails are long and sharply tapered, covered in sparkling green pigment that shifts beautifully as the light moves. Fine metallic lines wrap around selected nails, while small raised dots add another layer of texture. The combination of saturated green, glitter, and metallic detailing gives the set an almost jewel-like quality.
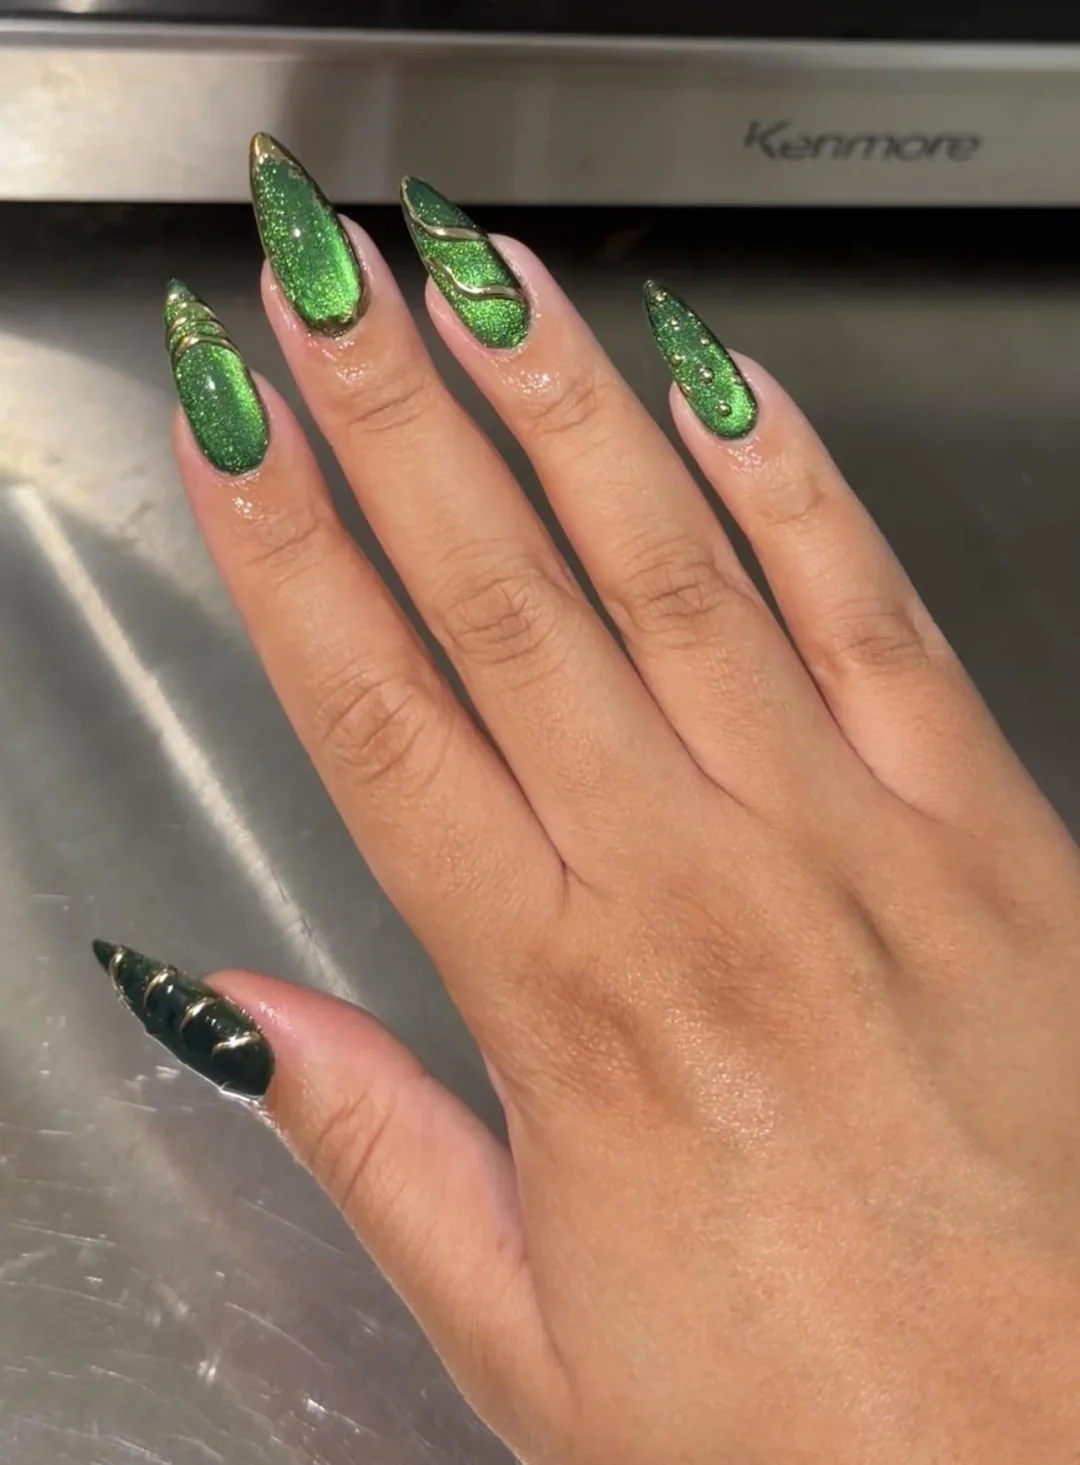
I’d use a rich emerald-green glitter gel as the primary color, plus a metallic gold or silver gel for the fine lines and small embellishments. A glossy top coat would help preserve the sparkle and smooth out the surface. For the tiny raised dots, I’d use a dotting tool or small metallic nail-art beads.
I’d first establish the pointed shape and make sure the structure is strong enough for the length. After applying the green glitter base, I’d cure it before adding the metallic details. I’d keep the line work relatively sparse on a few nails so the glitter remains the visual focus, then finish with a high-shine top coat.
I wouldn’t call this a shy manicure, and that is precisely why I like it. Sometimes the whole point of a nail appointment is to leave with something that feels completely different from your usual routine. I’d save emerald glitter for a party, concert, holiday gathering, or any moment when a little extra sparkle feels exactly right.
Deep Teal Oval Nails With A Glassy High-Shine Finish
Deep teal is one of those colors that can look almost black in low light and reveal its blue-green character the moment it catches a reflection. These oval-shaped nails use that quality beautifully, with a rich teal polish covering the entire nail in a smooth, glossy layer. There is no additional artwork, so the depth of the color becomes the entire story. I especially like how the shorter oval shape keeps such a dark shade looking polished rather than severe.
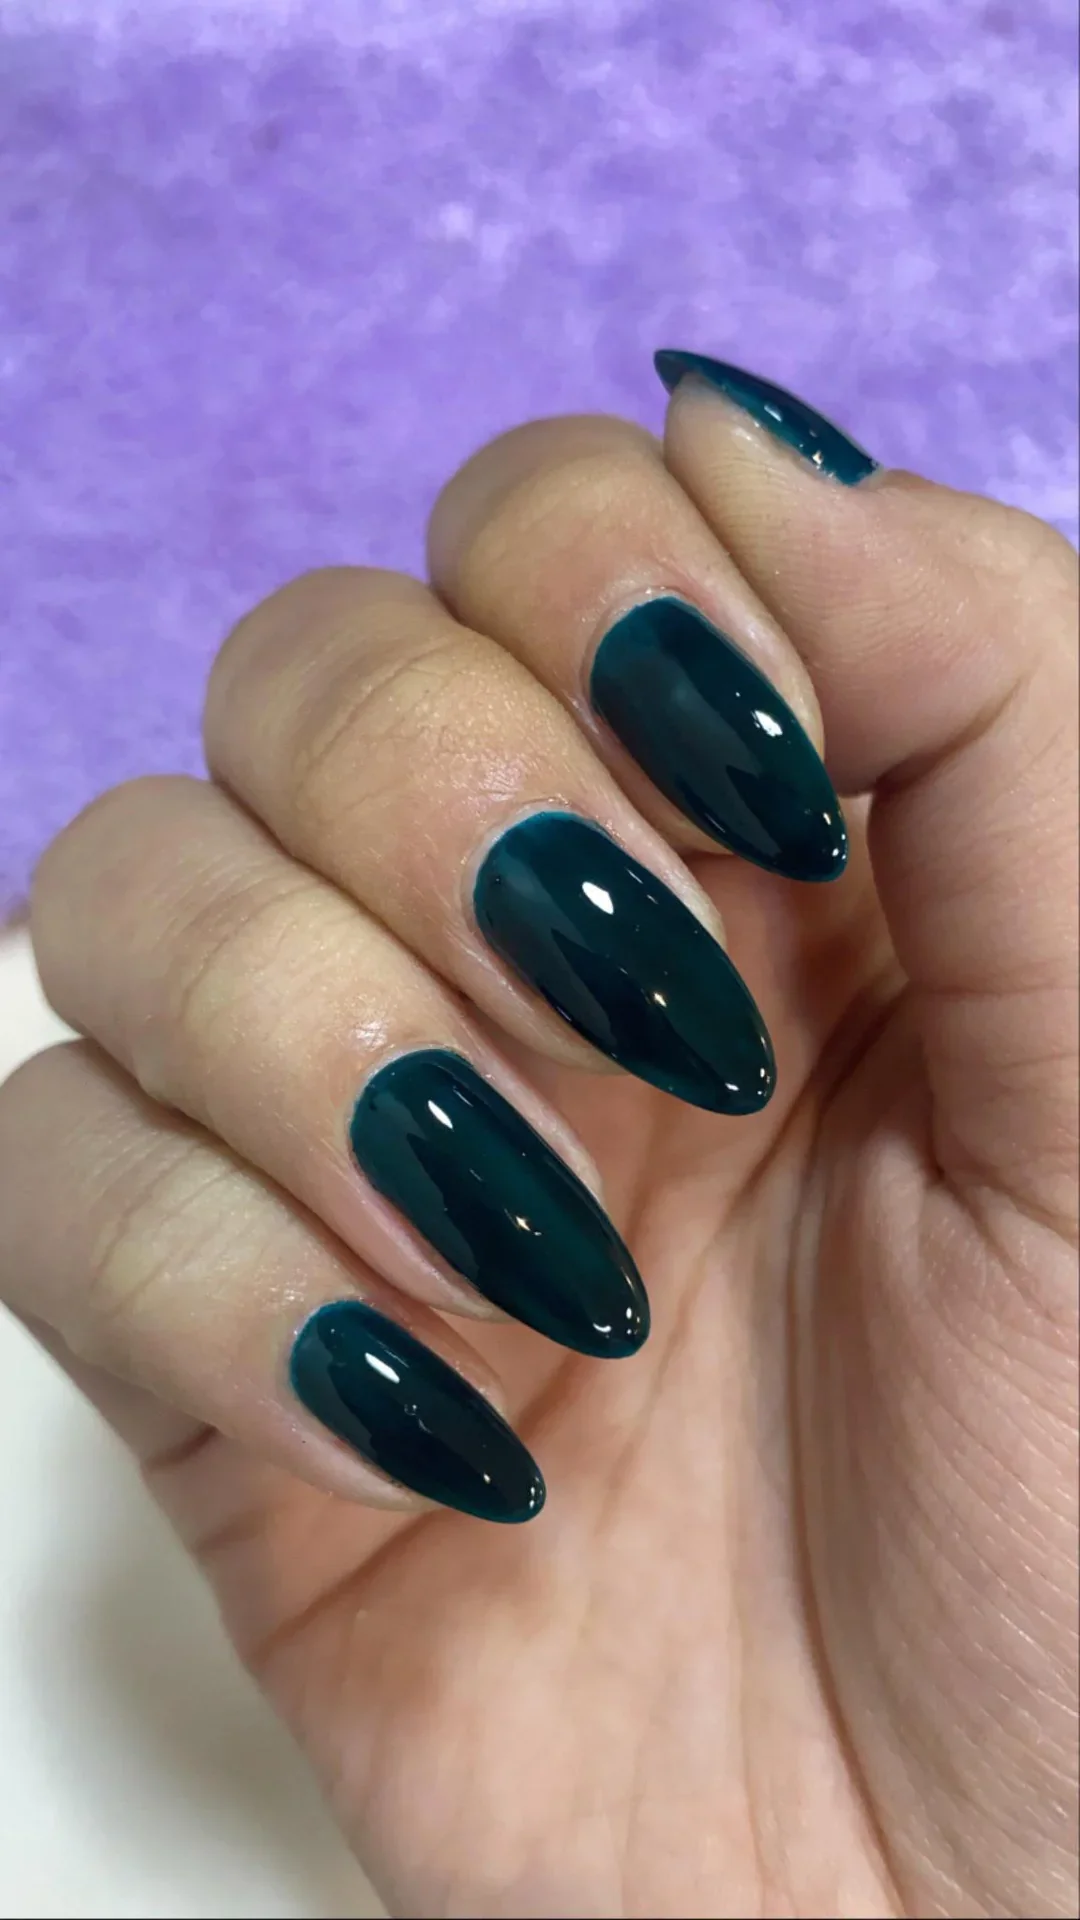
I’d choose a highly pigmented deep teal or blue-green gel polish and pair it with a glossy top coat. A slightly sheer version could create a more layered effect, but for this particular mood I prefer strong opacity. A good ridge-filling base can also be useful if I want the final surface to look perfectly smooth under the reflective top coat.
I’d prepare and shape the nails into a soft oval, then apply a thin base layer before building the teal in two controlled coats. Dark polish can pool near the cuticles, so I’d leave a tiny margin and use a clean-up brush if necessary. After curing the color, I’d finish with a glossy top coat and cap the free edge for a seamless result.
Soft Lavender With Dreamy Multicolor Accents
I love how this manicure balances a quiet lavender base with translucent, watercolor-like details. The nails have a soft almond shape with slightly rounded points, while the thumb and one additional nail carry a clean lavender cream finish. The accent nails are sheer and milky, layered with blurred washes of pale pink, lavender, cool blue, and muted green. Tiny touches of gold foil peek through the color, giving the design a subtle sparkle without taking away from its airy quality. It feels almost like a pastel sunset captured under glass, which makes it especially appealing for a relaxed summer manicure.
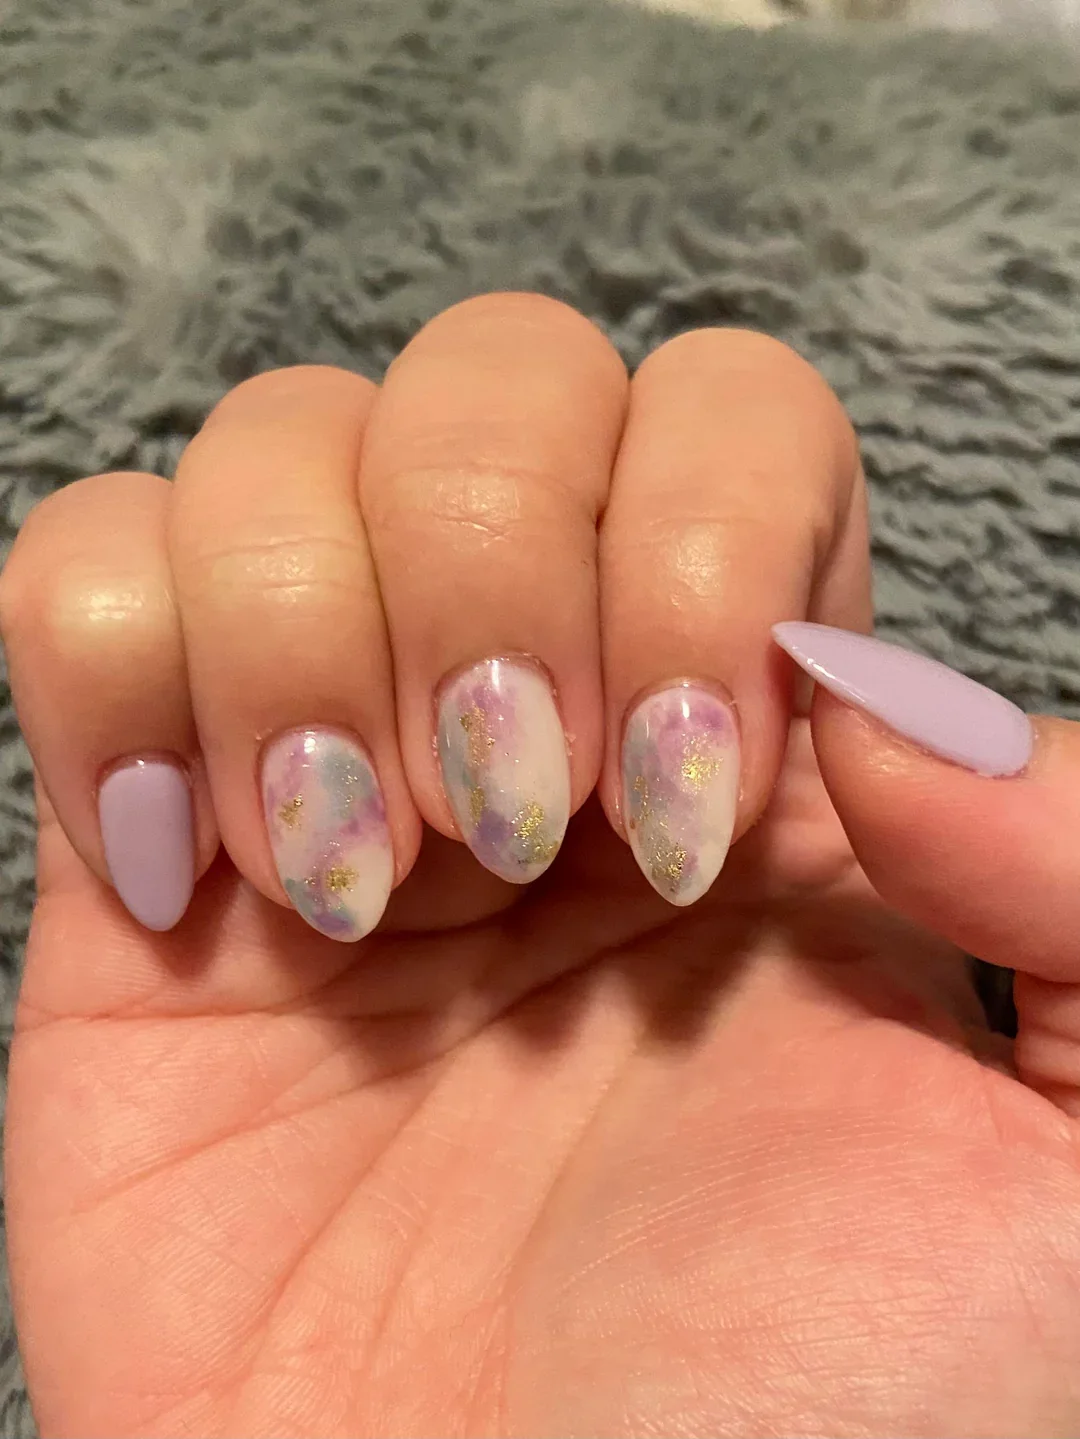
For a similar result, I would start with a sheer milky nude or translucent ivory gel polish and keep a soft lavender cream shade nearby for the solid nails. The watercolor effect works best with highly pigmented gel colors diluted or applied very lightly, so I would reach for pastel pink, lavender, pale blue, and sage tones rather than opaque versions. A few irregular pieces of gold foil add that beautiful floating shimmer, and a glossy top coat pulls everything together. Brands such as OPI, Gelish, DND, and The GelBottle have plenty of shades that can be mixed and layered to create this kind of finish.
At home, I would shape the nails first and apply a thin sheer base before curing. For the accent nails, I would place tiny amounts of the pastel colors onto the surface with a fine brush or sponge, allowing the shades to overlap slightly rather than creating defined blocks. Once the color is cured, I would add a few small pieces of gold foil and seal everything with a high-shine top coat. The trick is restraint. If every section becomes heavily colored, the translucent quality disappears, and that is exactly what makes this manicure so pretty.
I would choose this style when I want my nails to feel feminine but not overly sweet. The lavender solid nails give the manicure enough structure for everyday wear, while the watercolor accents keep it interesting when I look closer. I could easily see this working with white linen, pale denim, soft knits, or a simple summer dress. Sometimes the most memorable manicure is the one that whispers rather than shouts.
Deep Burgundy With Romantic Swirls
There is something wonderfully moody about combining translucent nude nails with deep burgundy artwork. Here, the almond shape creates an elegant canvas for curling lines, delicate floral-inspired motifs, tiny hearts, and glossy wine-colored sections. Some nails are almost completely covered in a rich burgundy shade, while others leave a nude or blush base visible around the decorative details. The contrast makes the manicure feel intricate without looking overloaded. I especially like the way the darker color follows the natural curves of the nails, creating movement instead of rigid geometry.
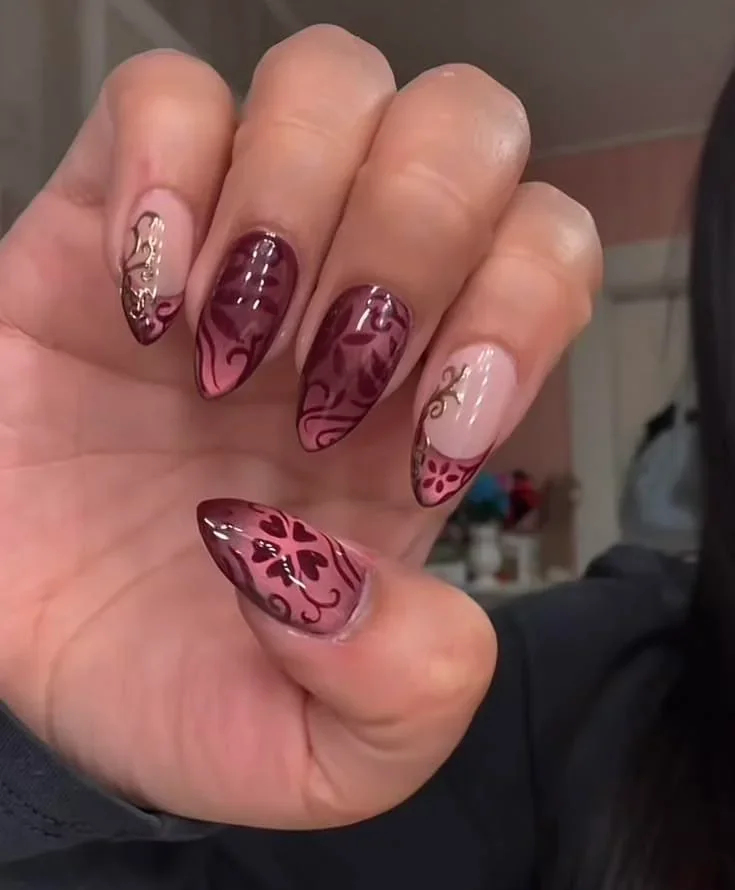
I would use a sheer pink-beige gel as the foundation and a deep wine, merlot, or burgundy gel for the artwork. A very fine liner brush is essential for those narrow curls and ornamental lines, while a dotting tool can help create the tiny heart and petal-like details. A glossy top coat is the finishing touch because the design relies heavily on contrast between the soft nude base and reflective burgundy surface. OPI, CND, Gelish, and DND all offer deep red families that can be adjusted depending on whether I want the result to lean more berry, plum, or classic wine.
The easiest way for me to approach this design would be to work nail by nail instead of trying to reproduce every detail identically. After curing the nude base, I would sketch the larger burgundy shapes with a liner brush, then add the swirls and tiny decorative elements once the main color is secure. I would cure between layers so the lines stay crisp and do not spread. A final glossy layer makes the burgundy look deeper and gives the manicure that almost lacquered appearance.
This is the kind of manicure I would save for the moment when I want my nails to have a little attitude. It feels romantic, artistic, and slightly mysterious, but the nude sections keep it from becoming too heavy. If summer evenings are starting to inspire richer colors, this is an easy way to introduce burgundy without committing to ten fully dark nails. One glance at those tiny hearts and swirls, and suddenly a basic outfit feels much more intentional.
Sheer Pink With Silver Micro French Details
Minimalism gets a delicate upgrade with this sheer pink manicure, where fine metallic edging replaces a traditional French tip. The nails are short-to-medium and softly rounded, giving the design a polished everyday shape. A couple of accent nails feature a milky white base with a tiny starburst detail, while the remaining nails carry barely-there pink color outlined with thin silver curves. Small crystals or metallic embellishments appear sparingly, adding dimension without turning the manicure into full-on sparkle. It is clean, refined, and surprisingly versatile.
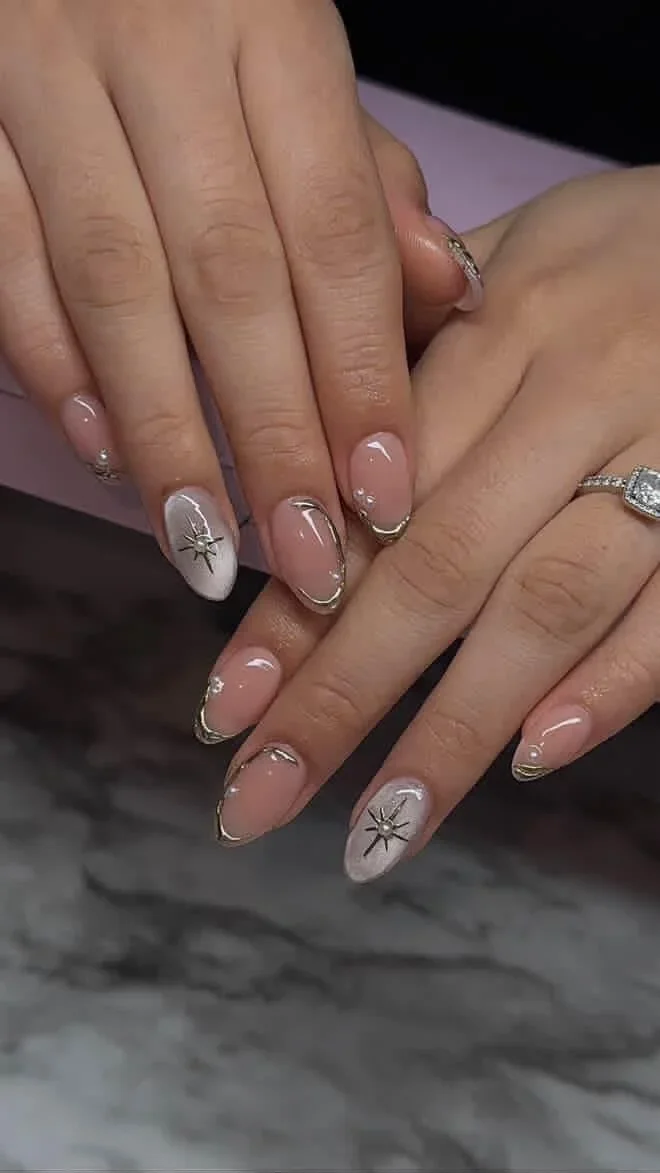
I would keep the product list simple here: a sheer blush-pink gel, a translucent milky white, a silver metallic gel or chrome liner, and a glossy top coat. For the starburst accent, I would use a very fine detailing brush and, if desired, a few tiny rhinestones or nail crystals. The beauty of this look is that it does not need a complicated palette. The silver provides enough contrast against the soft pink to make the details visible while preserving the delicate mood.
To recreate it, I would apply the sheer pink base in thin layers, curing each one before adding the metallic work. Using a fine liner brush, I would trace a narrow curved line along the outer edge of selected nails, keeping the thickness as consistent as possible. On the accent nails, I would build the milky white center and then draw a small star-like motif with silver. Once everything is cured, I would finish with a glossy top coat, making sure the edges are properly sealed.
I would happily wear this one when I need a manicure that works with almost everything. It has enough detail to feel special, yet it does not compete with jewelry, prints, or a bold outfit. The little metallic accents also catch the light beautifully when the hands move, which is one of those details that looks even better in real life. If I wanted an elegant summer manicure without going completely plain, this would be near the top of my list.
Sheer Nude With Metallic Floral Accents
Soft nude polish becomes much more interesting when delicate metallic floral details are layered over it. This manicure uses a rounded almond shape and a translucent pink-beige base that allows the natural nail to remain part of the look. Several nails feature fine botanical-style outlines with small pink, mauve, and muted metallic petals, while others have tiny gold and rose-toned accents near the tips. The result feels decorative but still light because the background remains almost completely sheer. Even the embellishment is thoughtfully spaced, so the nails never lose their elegant appearance.
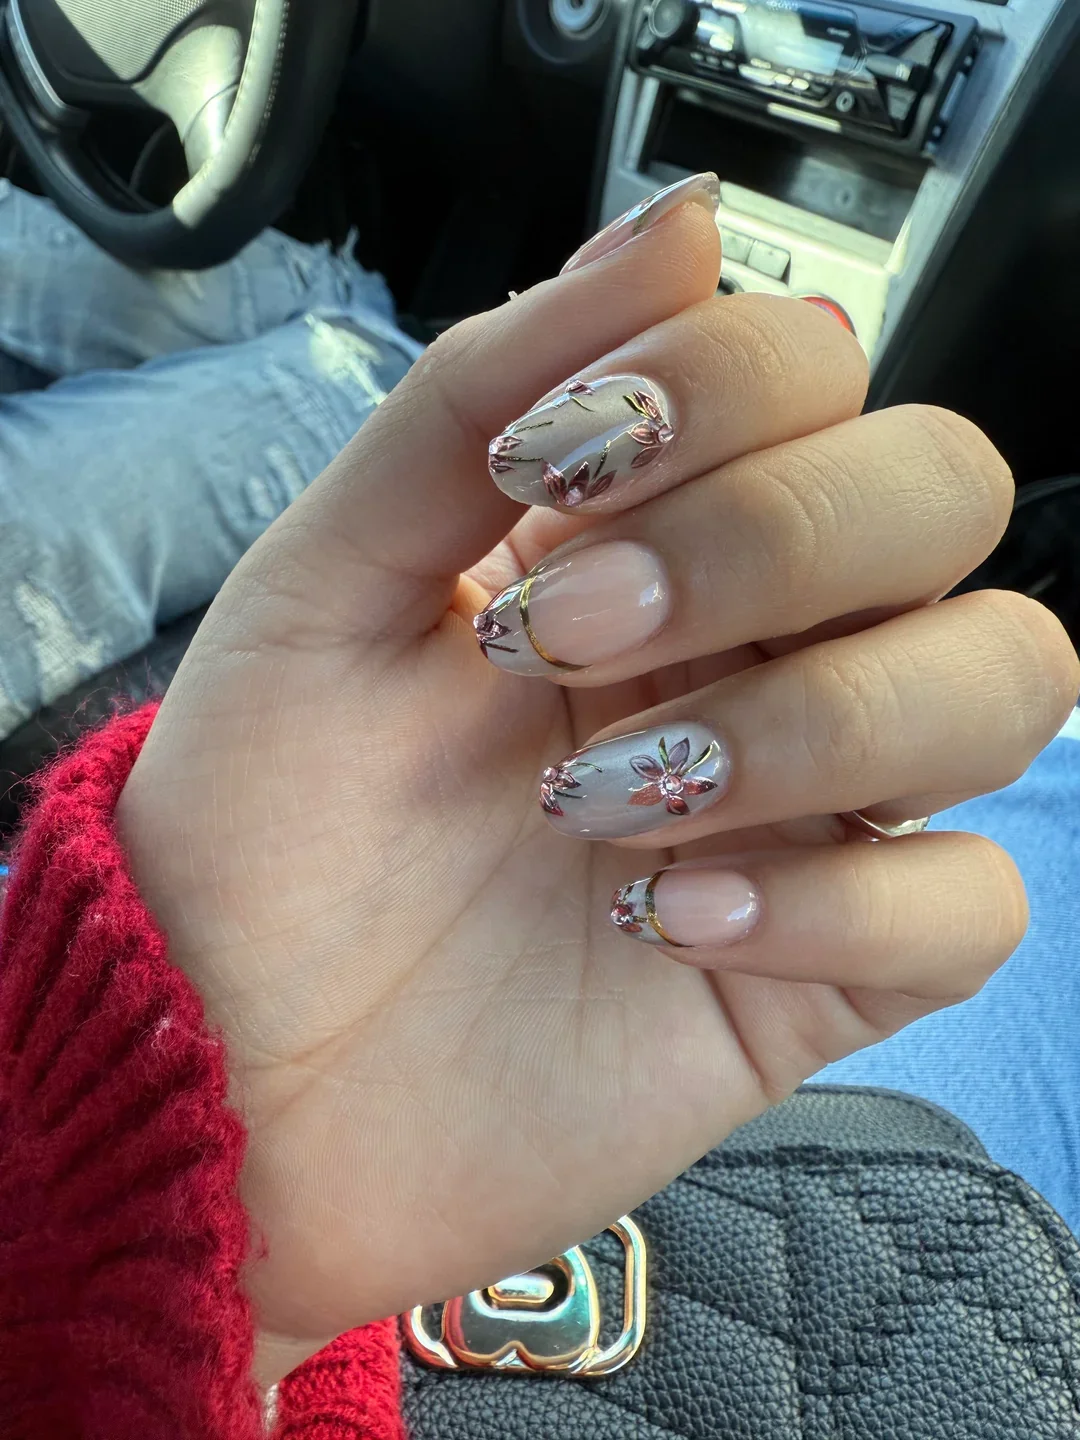
For this style, I would choose a translucent nude-pink gel, a thin metallic gold or rose-gold polish, and muted mauve or dusty pink shades for the floral details. A precision liner brush makes it easier to create the fine stems and outlines, while a tiny detail brush can handle the petals. Small metallic flakes or flat embellishments can be added if I want more dimension. I would definitely finish with a glossy top coat because the shine helps the sheer base look smooth and makes the metallic elements catch the light.
I would begin with careful cuticle preparation and a thin layer of sheer nude color. Once cured, I would add the floral outlines with a very fine brush, concentrating the artwork toward the center or side of each selected nail rather than covering the entire surface. Then I would fill a few petals with muted color and add tiny metallic touches around the design. I like leaving some empty space between the motifs; that negative space is what keeps the manicure feeling modern instead of overly ornate.
The best nail trends are the ones that make you excited to look down at your hands. From delicate blush pinks and milky whites to rich browns, vivid magenta, and sparkling purple, there is no shortage of beautiful ways to refresh your manicure. I love that this season makes room for both understated elegance and playful details, so you can choose a look that feels genuinely like you. Which shade will you try first? Sometimes, a fresh manicure is all it takes to give an everyday look a little extra energy.

