
A new season is the perfect excuse to refresh your manicure, especially when a few small details can completely change the mood of your look. But which nail art designs feel fresh enough to try now without becoming a trend you’ll regret two weeks later? From glossy cherry reds and deep burgundy to soft pinks, playful animal prints, and dreamy pastel blends, this season’s ideas offer something for every mood. I’m especially drawn to designs that balance personality with wearability, so they can work just as beautifully with jeans and a sweater as they do with an evening outfit. Whether you love a quiet neutral manicure or prefer a little sparkle and intricate detail, there’s plenty of inspiration to save for your next appointment. So, which trendy nail art design will make it onto your must-try list this season?
This season, I’m especially drawn to designs that balance polish with a little attitude. Some are wonderfully simple, while others give me that “okay, I need to try this” feeling the second I see them. Here are the styles I would save to my Pinterest board and take with me to my next nail appointment.
Glossy Cherry Red With a Playful Line Art Twist
I love how a saturated cherry-red manicure can instantly make the hands look polished, confident, and a little flirtatious without needing complicated nail art. The nails have a softly rounded shape with a short-to-medium length, while the bright red finish creates an almost lacquered effect. What makes the design more interesting is the tiny black line-art illustrations placed on a few accent nails. I like that contrast: the color does all the talking from a distance, while the miniature drawings reward a closer look.
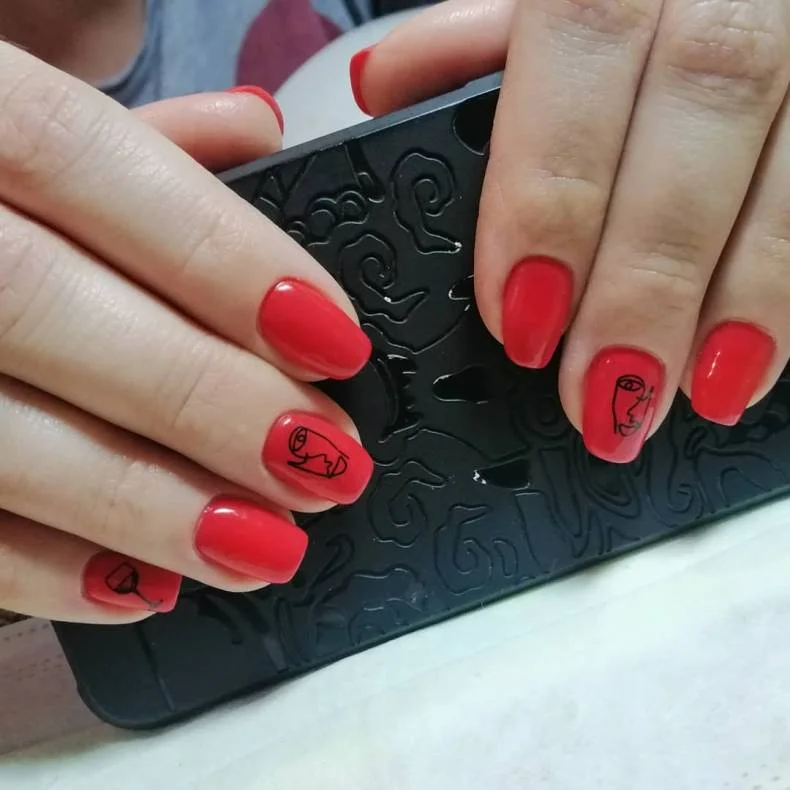
For a similar result, I would start with a rich true-red gel polish rather than an orange-red shade. OPI Big Apple Red, CND Shellac Wildfire, or a comparable classic cherry red would give me the right color family. For the artwork, I would use a very fine black nail-art liner and finish everything with a high-shine top coat. The tools are minimal, which is part of the appeal.
I would shape and buff the nails first, then apply a thin base coat and two controlled layers of red, curing each layer if I’m using gel. Once the color is completely smooth, I would add the little black illustrations with a liner brush. I would keep the drawings intentionally simple rather than trying to make them perfectly detailed. A thin top coat seals the design and brings back that glassy shine.
I would wear this manicure when I want something classic with a wink. The red works beautifully with denim, black, cream, and even autumn leather, while the tiny illustrations keep it from feeling too traditional. There is something very fun about looking down at an otherwise sophisticated manicure and discovering a tiny bit of personality hiding on the accent nails.
Deep Burgundy With a Dramatic Long Square Shape
I always associate deep burgundy nails with that first moment when the season starts feeling more sophisticated. Here, the long square shape gives the manicure a distinctly glamorous silhouette, while the dark wine-red polish makes the overall effect richer and moodier. Most of the nails have a glossy burgundy finish, but one glittering accent nail adds dimension without interrupting the color story. I especially like the elongated shape because it makes the fingers look visually longer.
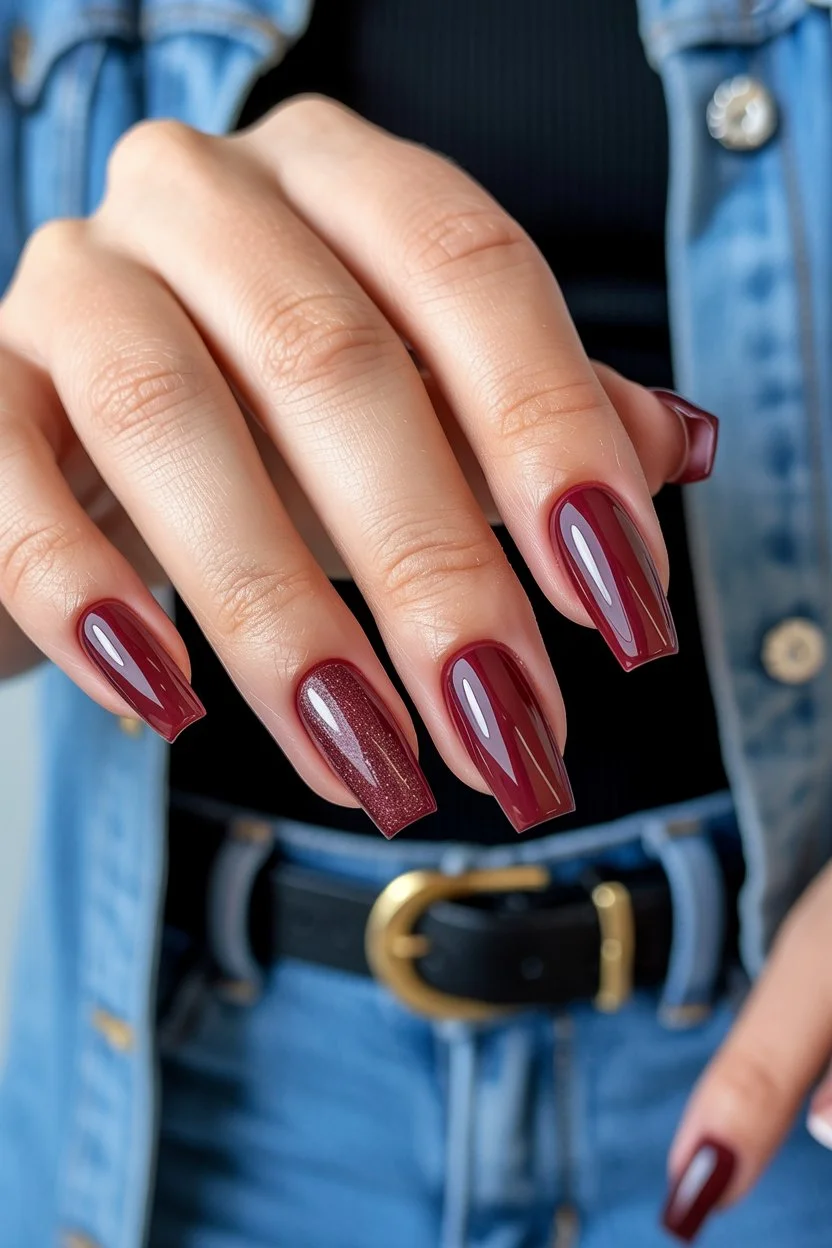
I would reach for a deep merlot, oxblood, or blackened cherry gel polish for this look. Essie Gel Couture in a similarly wine-inspired shade can work for a regular-polish version, while Gelish, OPI, or CND offer plenty of deep red families for gel manicures. For the accent, I would choose a fine burgundy glitter that stays close to the base color rather than introducing a completely different shade.
I would carefully create the square shape with slightly softened corners so the nails retain their sharp appearance without looking overly severe. After the base coat, I would apply two thin coats of burgundy and cure between layers when necessary. On the accent nail, I would layer the glitter over the same color family before adding a glossy top coat to every nail.
I would save this design for the part of the year when sweaters, denim, boots, and darker accessories start coming back into rotation. It has enough drama for an evening out but still feels wearable during the day. If I wanted one manicure to make a basic black outfit feel instantly more intentional, this would be high on my list.
Soft Pink With Delicate Black Lace Details
I’m a big fan of manicures that look delicate at first glance and reveal their personality only when you look closer. This soft pink design does exactly that. The nails are kept relatively short with a rounded-square silhouette and a muted, almost powdery pink base. A few accent nails feature intricate black lace-inspired artwork concentrated toward the tips and sides. The combination feels feminine without being overly sweet, thanks to the graphic black detailing.
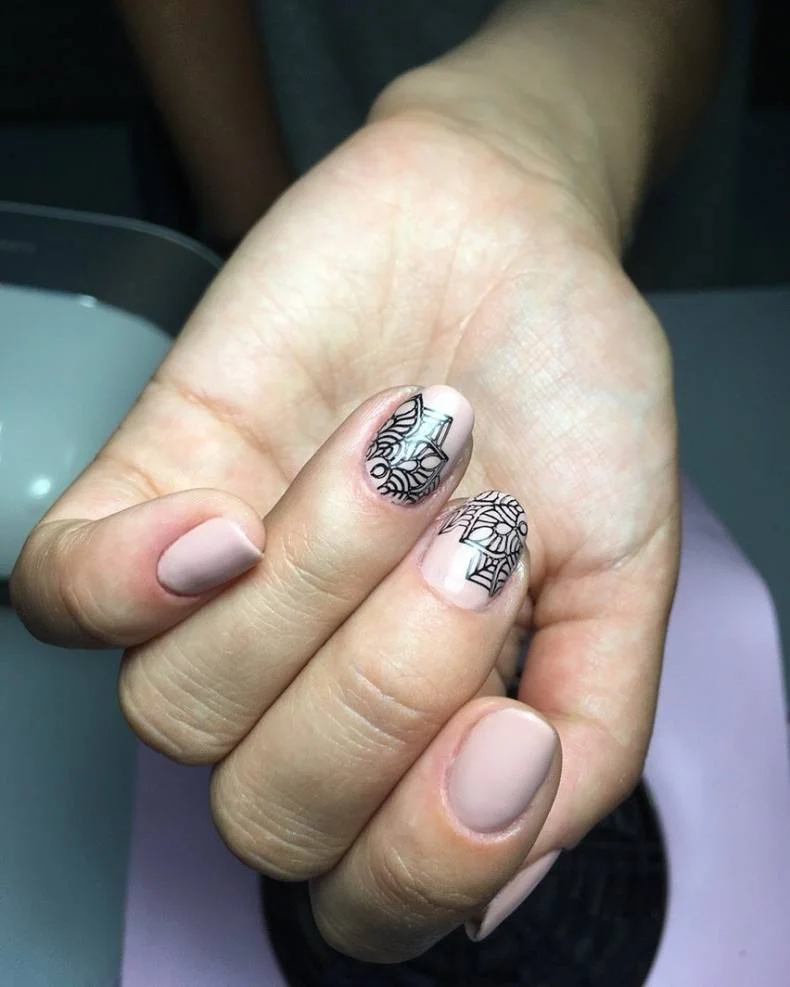
For the base, I would choose a milky blush or pale pink shade with a soft finish. OPI Bubble Bath, Essie Ballet Slippers, or a similar sheer pink would give me that understated background. I would use black stamping polish or highly pigmented black gel paint for the lace pattern, along with a fine liner brush if I wanted to draw the details by hand.
I would begin with a neat manicure and a thin layer of pink polish, building it until the nail plate looked softly blurred rather than completely opaque. Once dry or cured, I would add the black pattern to just a couple of nails. I would avoid covering the entire manicure because the negative space around the design is what makes it feel modern. A glossy top coat would finish the look beautifully.
I would choose this style when I wanted nail art that could still pass as elegant and understated. It would work surprisingly well with a blazer, a knit dress, or simple gold jewelry. And honestly, I like the idea of keeping the artwork on only a few nails because it makes the manicure feel more curated and less like I tried to fit every trend onto one hand.
Glossy Taupe for a Quiet Luxury Manicure
There are days when I want my manicure to say absolutely nothing dramatic and still look incredibly put together. This glossy taupe design is exactly that mood. The long square shape creates structure, while the warm muted brown-pink color gives the nails a sophisticated neutral finish. The polish is completely glossy, with no glitter, decoration, or competing accent shade. Somehow, that restraint makes the manicure feel expensive.
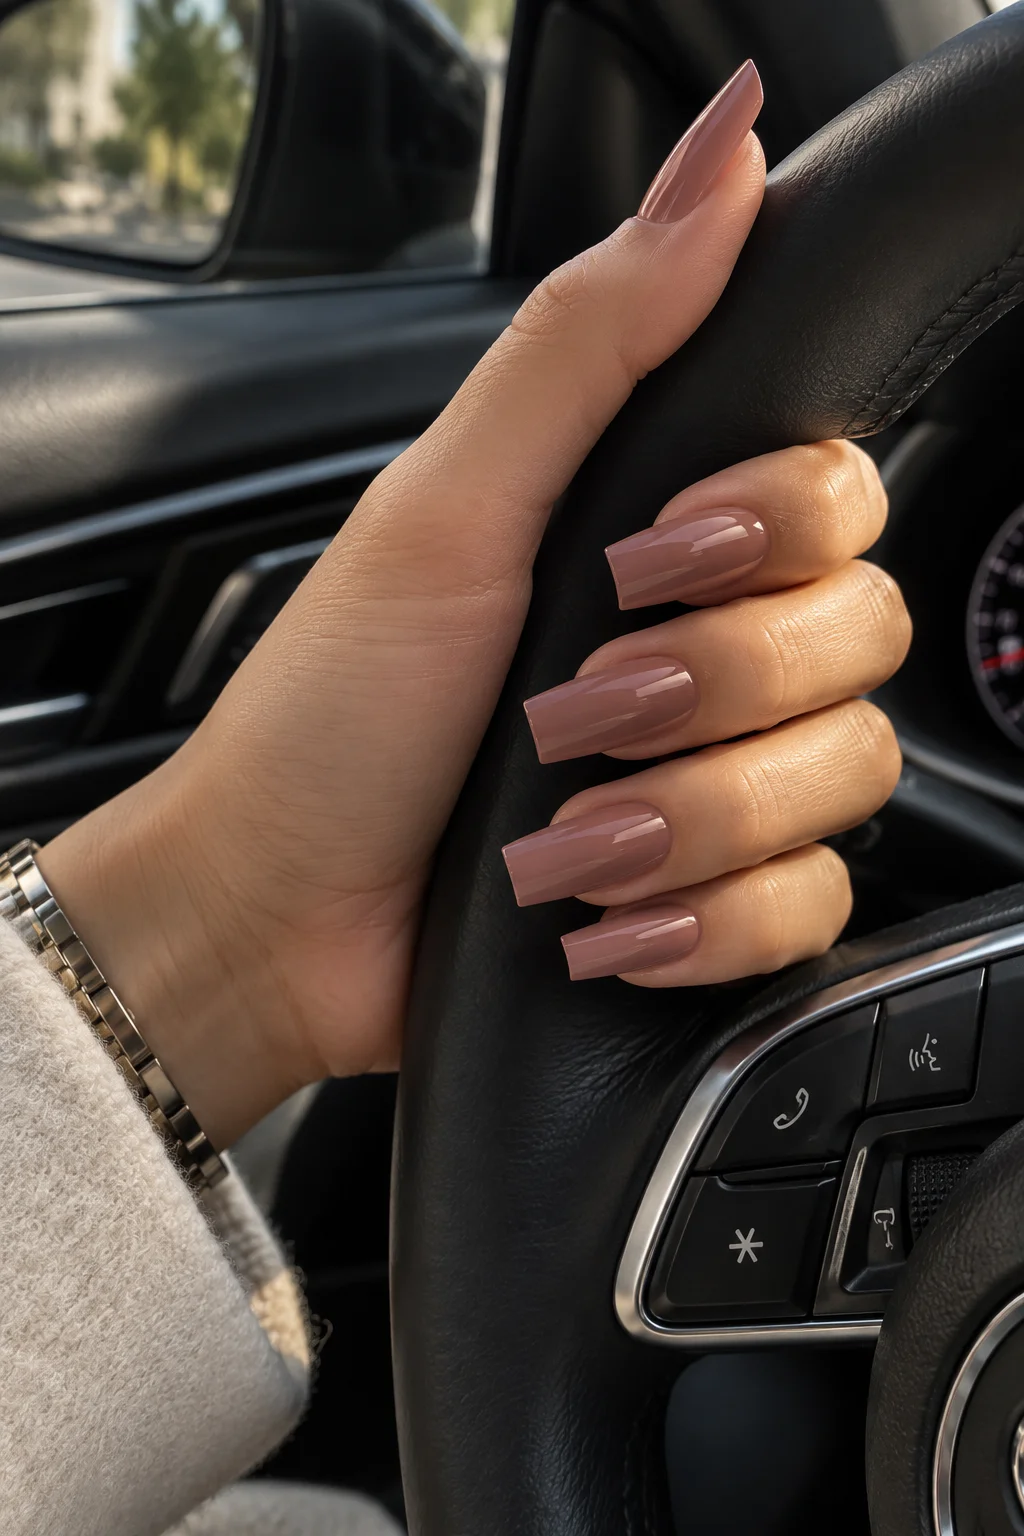
I would look for a warm taupe with mauve or caramel undertones rather than a flat gray-beige. OPI Tiramisu for Two, CND Vinylux Field Fox, or another creamy neutral in the same family would be a good starting point. I would also keep a smoothing base coat and a particularly glossy top coat on hand because the shine is essential to this look.
I would shape the nails into a clean square with gently softened corners, smooth the surface, and apply a thin base coat. Two thin layers of taupe should create the desired opacity without making the polish look heavy. I would take extra care around the cuticle line because a neutral shade leaves very little room for messy edges. After the final coat, I would add a glossy top coat and let everything set properly.
I keep coming back to shades like this because they make getting dressed incredibly easy. They work with denim, cream knits, camel coats, black basics, and almost every metal in my jewelry box. When I want my nails to look polished for several weeks without feeling tied to one particular outfit, this is the kind of neutral I choose.
Blush Pink With Mini Leopard Accents
I love animal print most when it is used as an accent rather than allowed to take over the entire manicure. Here, a delicate blush-pink base covers most of the nails, while selected nails feature an abstract leopard pattern in black. The nails have a natural rounded shape, and the soft pink background keeps the print surprisingly wearable. The result feels playful, but not loud.
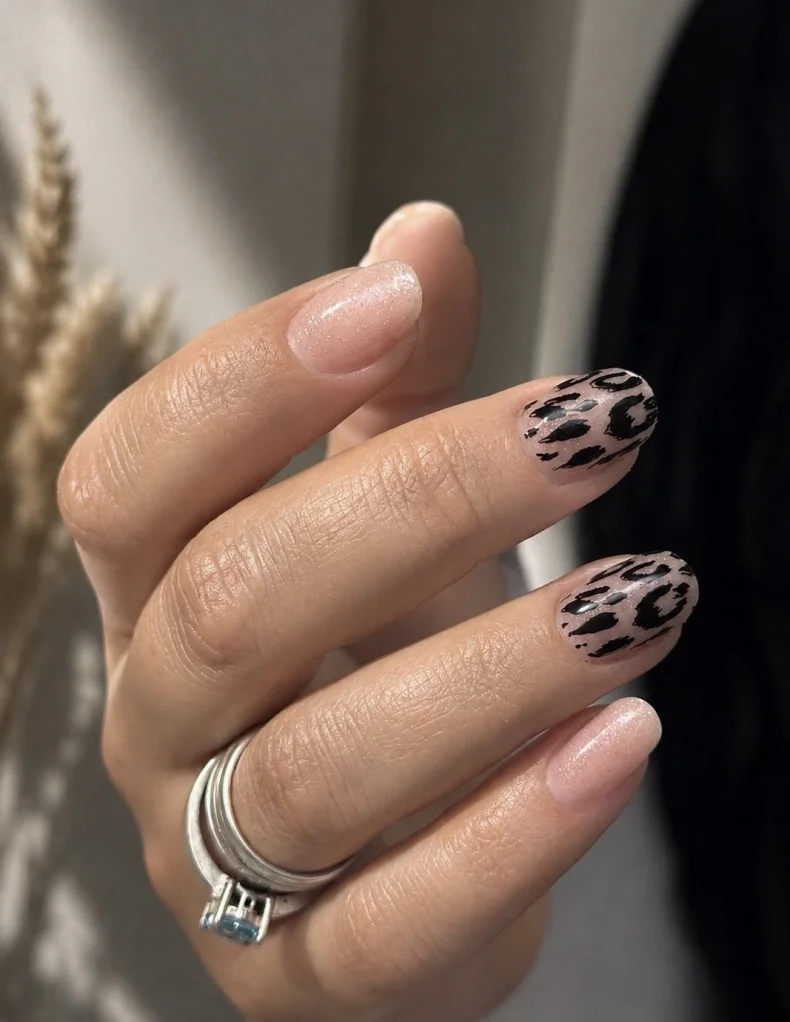
I would use a sheer blush-pink polish as the foundation and a true black polish for the spots. A small detailing brush or dotting tool would make the leopard pattern much easier to control. I would also keep a neutral beige or slightly deeper nude nearby if I wanted to add variation inside the spots instead of leaving them completely black.
I would paint the pink base first and let it become fully dry before adding the animal pattern. For the leopard accents, I would place irregular black marks rather than perfect circles, leaving plenty of the pink base visible between them. I find that slightly imperfect spots actually look more convincing and modern. One final layer of top coat would smooth everything together.
I would especially wear this manicure during the transition into fall, when animal prints naturally start appearing again in clothing and accessories. It would look fantastic with a denim jacket or black boots, but I could still wear it with a simple white tee without feeling overdressed. That balance is what makes the design so easy to love.
Pastel Ombre With an Icy Shimmer Finish
This manicure feels like a soft-focus version of the season rather than a bold statement. The nails are long and almond-shaped, creating an elegant tapered silhouette, while the base begins with a translucent pink nude. The color gradually shifts toward cool pastel blue, lavender, and pink at the tips, with a subtle iridescent shimmer catching the light. I like how the colors melt into one another instead of appearing as separate blocks.
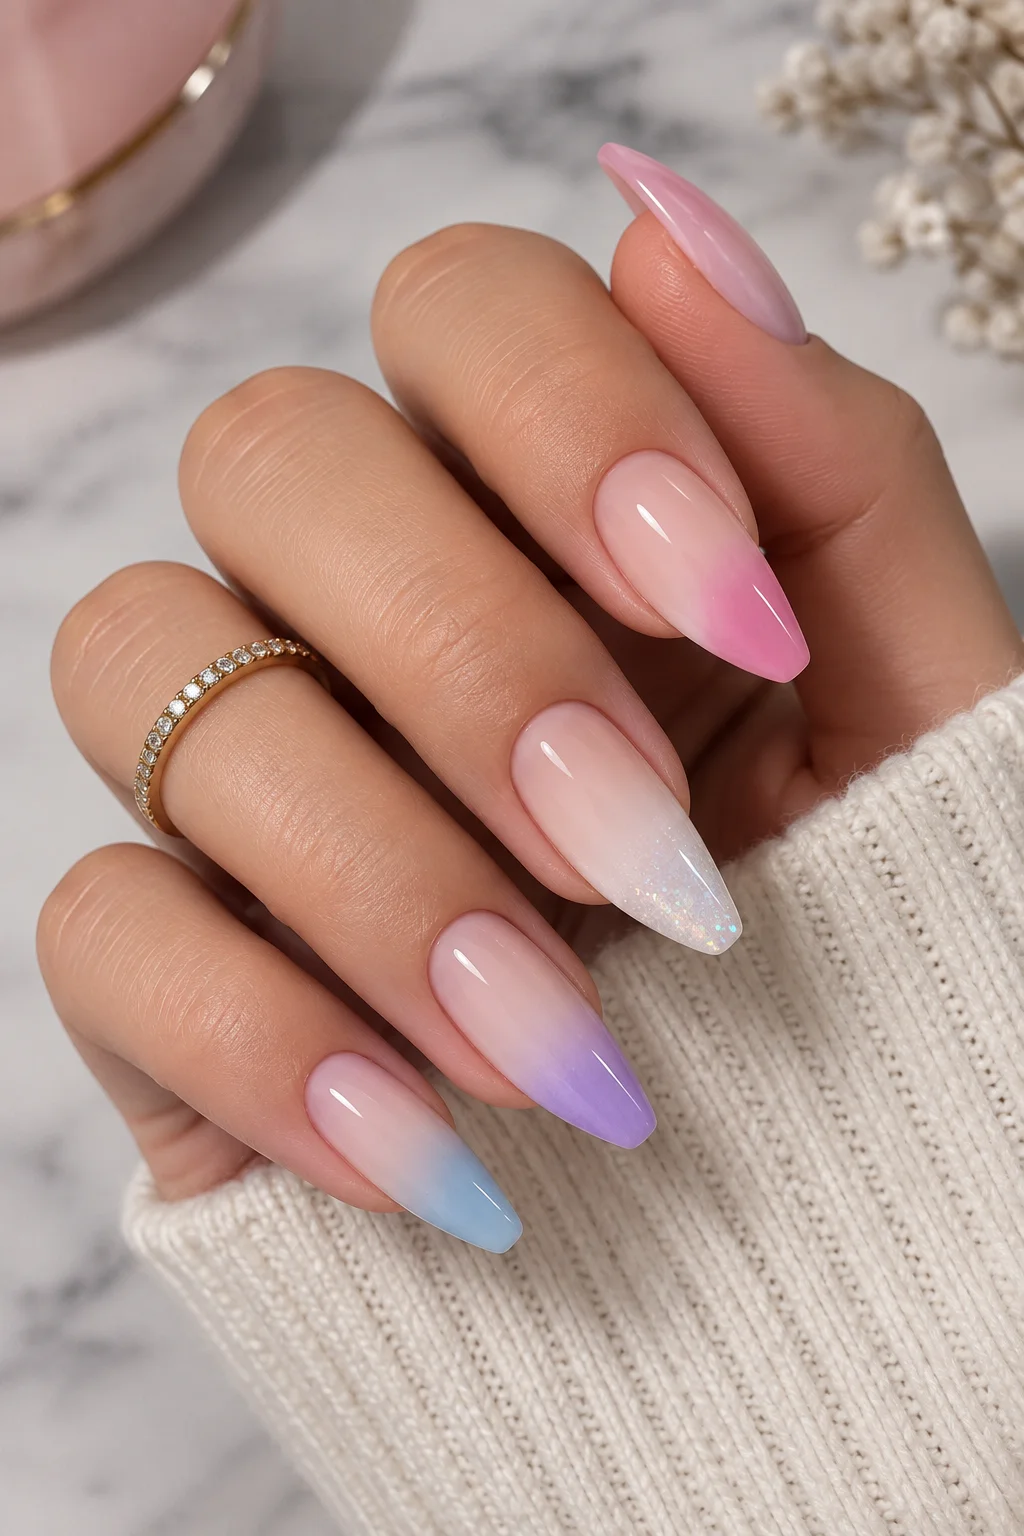
I would use a sheer pink builder or gel base followed by pastel gel colors in lavender, baby blue, and soft pink. Brands such as Gelish, OPI, and Kiara Sky have plenty of pastel shades that can be blended for this effect. For the sparkling finish, I would choose an ultra-fine iridescent chrome or glitter powder rather than chunky glitter.
I would build the almond shape first, then create the sheer pink foundation. I would blend the pastel shades gradually toward the tips with a sponge or soft blending brush, keeping the transition hazy. After curing, I would add the shimmer very lightly so the color remains visible underneath. A smooth glossy top coat would give the finished manicure that almost glass-like quality.
I would pick this design when I wanted something romantic but not predictable. The cool pastel palette makes it especially pretty for early fall days when I’m not quite ready to give up lighter colors, while the shimmer adds just enough sparkle for evening. It feels dreamy without crossing into overly sugary territory.
Blush Pink Geometry With Tiny Crystal Accents
I like this manicure because it proves that pink does not have to mean ultra-feminine or overly decorative. The base is a soft translucent pink, while each nail receives minimal geometric white lines that curve and intersect across the surface. Tiny metallic or crystal accents appear at selected points, giving the design a subtle jewelry-like flash. The square shape keeps everything crisp and modern.
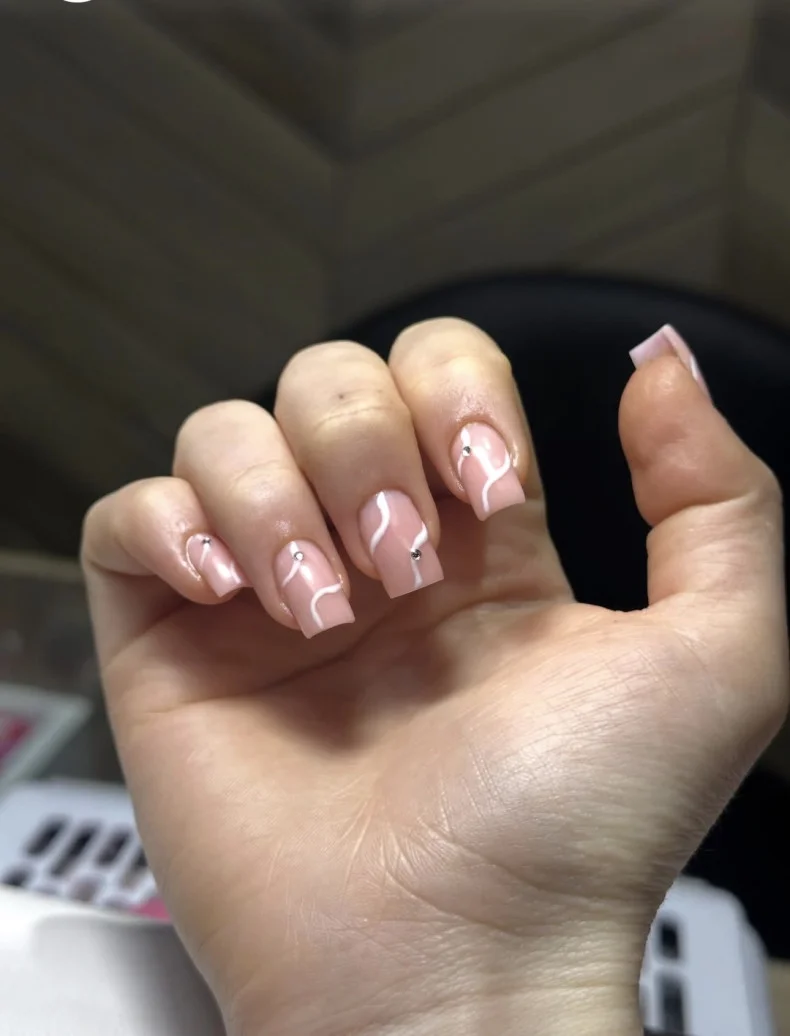
I would choose a pale blush gel polish with a slightly translucent finish, a crisp white liner gel, and a few tiny silver or clear crystals. A detail brush with a very fine tip would be the most important tool here because the lines need to stay delicate. I would also use nail adhesive or a small amount of builder gel to secure the embellishments.
I would start with the pink base and make sure it is perfectly smooth before adding the white lines. Rather than copying an identical pattern onto every nail, I would vary the curves slightly while keeping the same visual language. Once the artwork is cured, I would place the tiny crystals at selected intersections and seal the surrounding area carefully with top coat.
I would wear this one when I wanted a manicure that felt special but still appropriate for everyday life. The design has enough detail to catch attention when I’m holding a coffee cup or reaching for my phone, yet it stays quiet enough for the office. That is my favorite kind of nail art: the kind that looks considered rather than complicated.
Glossy Pink With a Soft Gold Detail
I would describe this manicure as the polished, pretty option I could wear almost anywhere. The nails have a rounded almond shape and a glossy pink finish, with a few milky-white accent nails decorated with a thin irregular band of gold foil near the base. The contrast between creamy white, translucent pink, and warm gold creates a soft luxury effect without making the manicure feel overly formal.
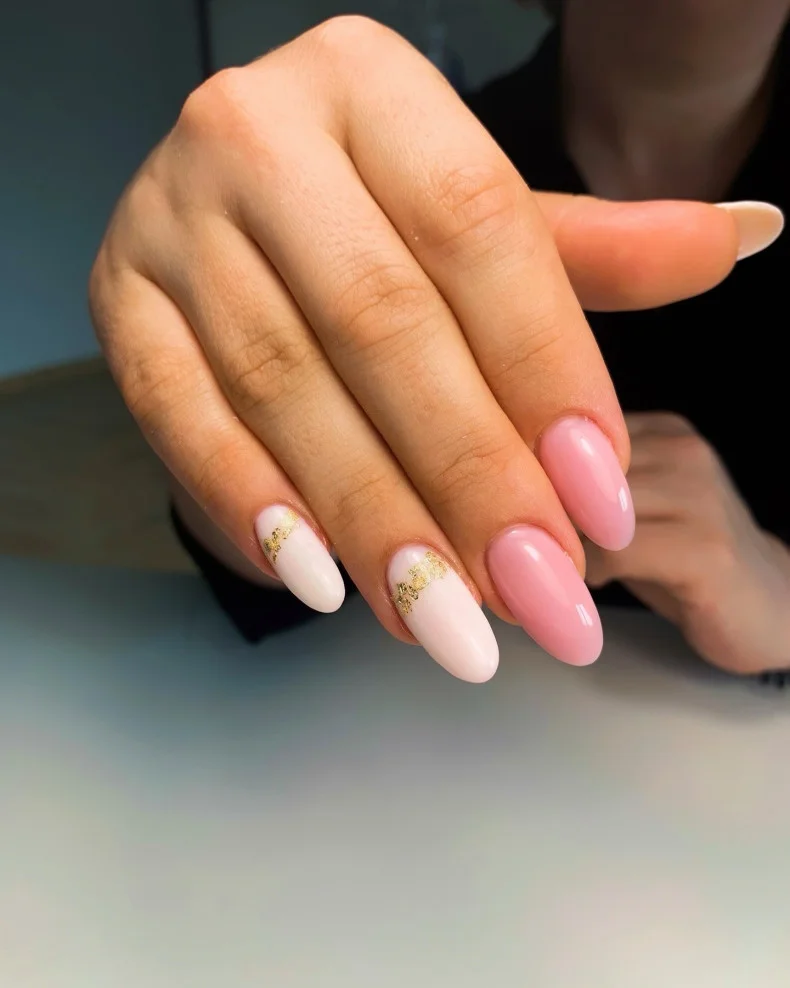
For the pink nails, I would choose a creamy blush shade with enough opacity to look fresh and glossy. The white accents need a soft milky polish rather than a stark paper white, while small pieces of gold foil provide the decorative detail. OPI, Essie, CND, and Gelish all have shades that could be mixed and matched to create this palette, so I would focus more on the undertones than on finding an exact product.
I would shape the nails into a softly tapered almond and apply the pink and milky-white base colors separately. After the white accents are cured, I would place tiny irregular fragments of gold foil across the nail near the lower third, keeping the placement intentionally loose. I would avoid making the gold line perfectly symmetrical because the slight variation gives it a more effortless finish. A generous glossy top coat would lock everything in.
I keep this type of manicure in mind whenever I want my hands to look instantly groomed without committing to heavy nail art. The pink is easy, the gold adds a little glow, and the almond shape gives the whole look an elegant finish. As the season moves toward cooler days, I could see this pairing beautifully with cream sweaters, gold jewelry, and soft neutral layers. It is understated, but definitely not boring.
Chocolate-Tipped Elegance With a Fine Gold Edge
I keep coming back to this combination when I want long nails to feel polished rather than overly dramatic. The shape is a sleek lipstick-style silhouette with a sharply angled free edge, and the manicure pairs a sheer blush-nude base with deep chocolate-brown tips. A whisper-thin metallic gold line separates the two shades, giving the design a jewelry-like finish without making it look busy. The glossy surface is important here because it lets the brown look almost like polished lacquer, while the translucent base keeps everything light enough for everyday wear.
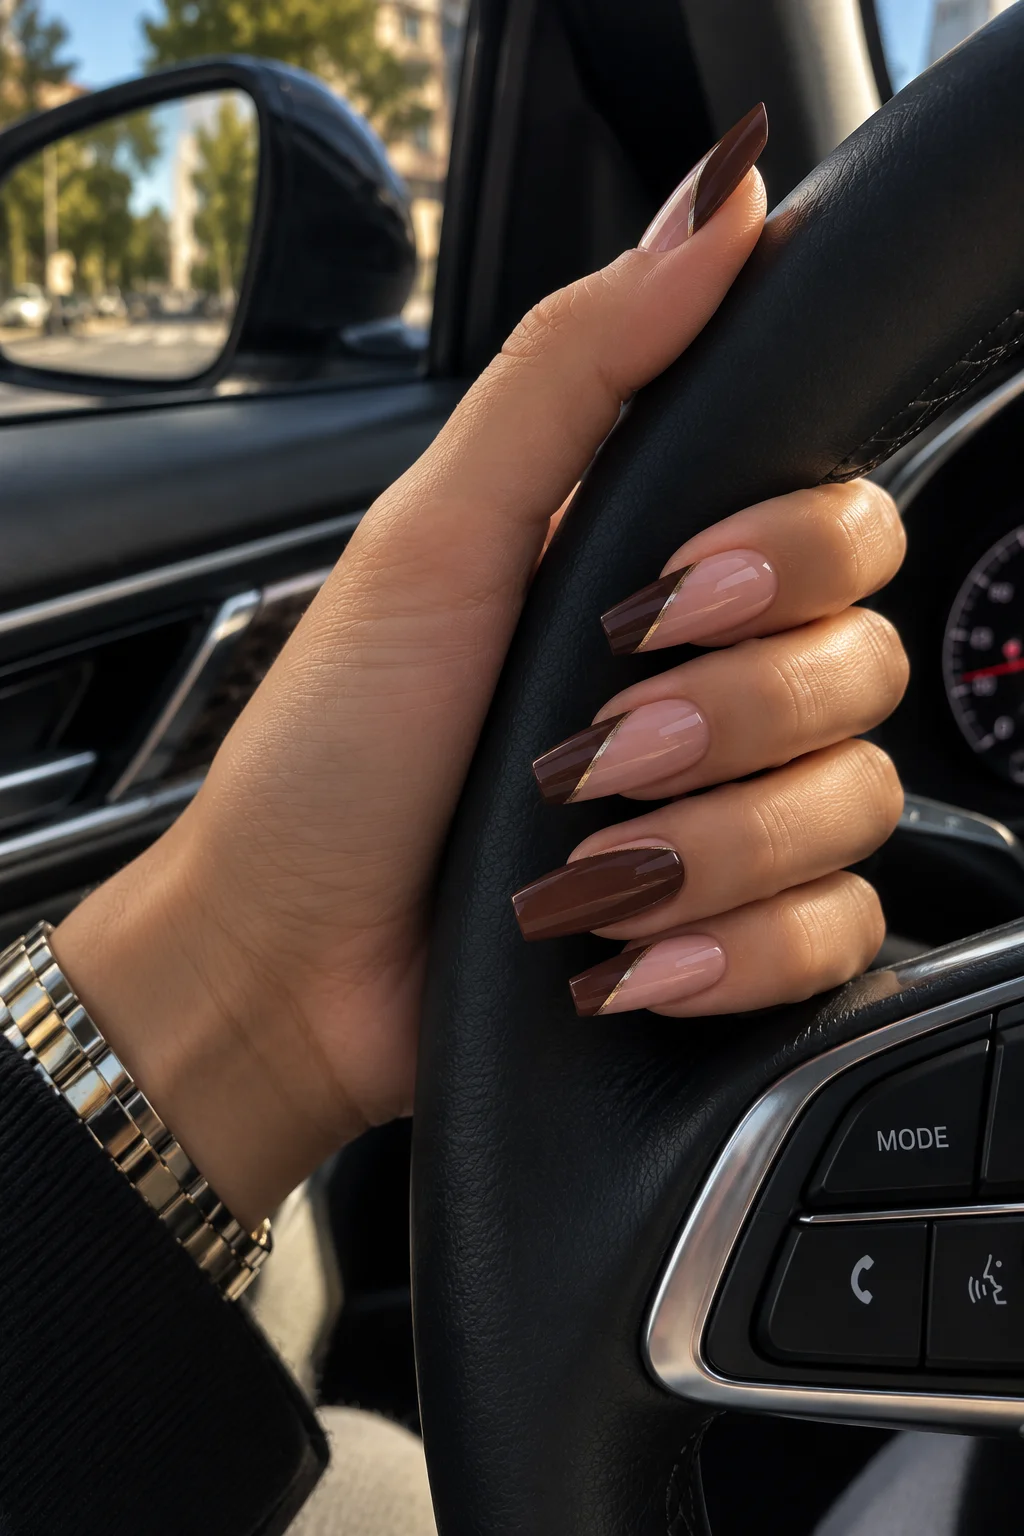
To recreate it, I would start with a sheer pink-nude gel such as OPI GelColor Bubble Bath or a similar neutral that blends naturally with the skin. For the tips, a rich espresso or dark chocolate gel works beautifully, while a fine gold striping gel or metallic liner creates that delicate border. I would also keep a high-shine top coat nearby because this design really comes alive under a glassy finish. The contrast of warm brown and soft pink feels especially lovely as the season shifts toward richer fall wardrobes.
At home, I would shape the nails first, paying close attention to that diagonal lipstick edge so each nail has a consistent direction. After applying the nude base and curing it, I would paint the chocolate section along the angled tip, cure again, and then use a very fine brush to trace the gold line where the colors meet. A thin coat of glossy top coat seals everything and softens the transitions visually. The trick is patience: the gold detail is tiny, so I would rather build it slowly than try to make one perfect stroke in a hurry.
I love how this manicure manages to look expensive without shouting for attention. It would work with black knitwear, camel coats, denim, or even a simple white shirt, which makes it one of those designs I could actually keep on for weeks without getting bored. If you usually think brown nails are too autumnal, this blush base changes the whole mood.
Black and White Graphic Nails With a Playful Edge
Sometimes I want my manicure to have a little personality before I have even picked out an outfit. This black-and-white design does exactly that, combining pointed nails with an illustrated mix of tiny symbols, doodles, crowns, hearts, and playful linework. Some nails are predominantly black, others are white, and the artwork shifts from finger to finger rather than following one strict pattern. That slight unpredictability is what makes the set feel youthful and editorial instead of overly coordinated.
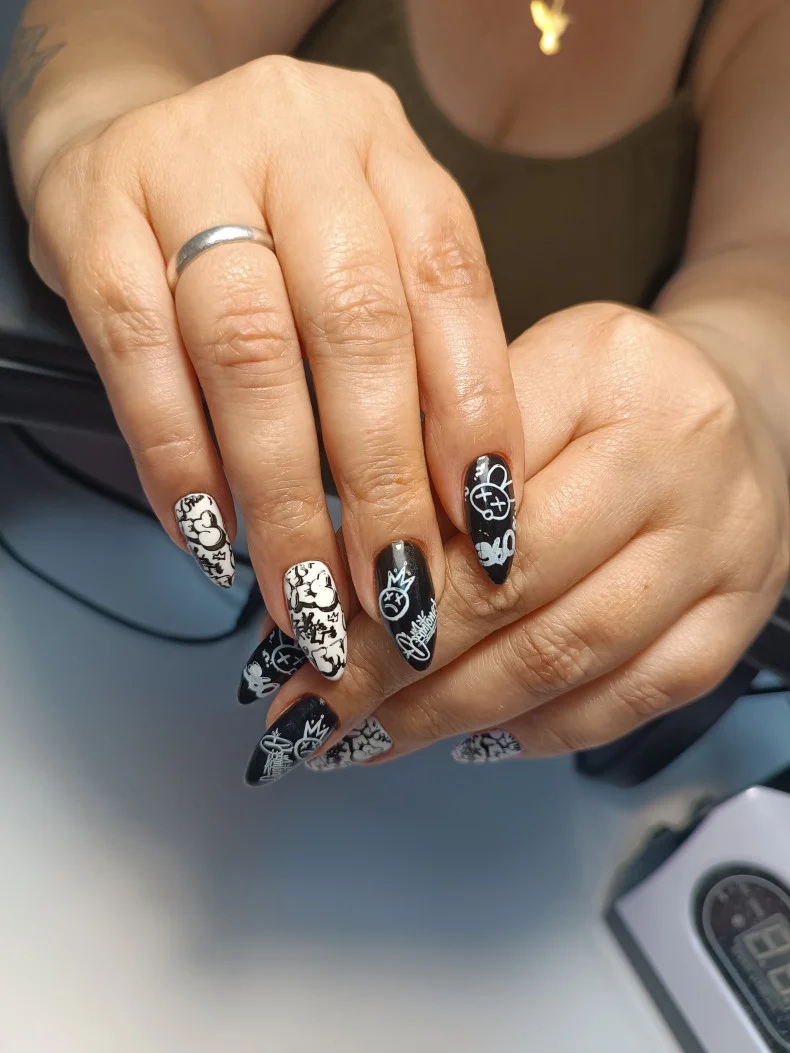
For this kind of nail art, I would use an opaque black gel, a clean white gel, and several ultra-fine nail-art brushes or detail pens. A neutral base can be useful beneath the artwork, particularly if I want some of the nails to have a softer background. The tiny illustrations need a strongly pigmented white and black so that the lines stay crisp rather than disappearing into the base. A glossy top coat would finish the set, although a matte top coat could make the doodles look even more graphic.
I would begin by filing the nails into a pointed shape and applying a thin base layer. Once the black and white backgrounds are cured, I would add the illustrations with a very small brush, working one symbol at a time. I would not try to copy every detail perfectly; the charm comes from the hand-drawn quality. For anyone doing this at home, stamping plates or nail-art decals can make the process much easier while keeping the same black-and-white attitude.
I would wear this when a classic French manicure feels far too predictable. There is something wonderfully rebellious about tiny drawings scattered across otherwise polished nails. And because the palette is only black and white, the design can work with almost anything in the closet, from a leather jacket to a plain gray sweatshirt.
Soft White French With a Delicate Floral Accent
This is the manicure I would choose when I want my nails to look fresh, feminine, and quietly romantic. The short-to-medium rounded-square shape keeps the look practical, while the translucent milky base has the faintest shimmer running through it. Crisp white French tips add definition, and one accent nail carries a tiny floral composition with soft pink petals and delicate green details. It is understated, but not boring, which is a surprisingly difficult balance to get right.
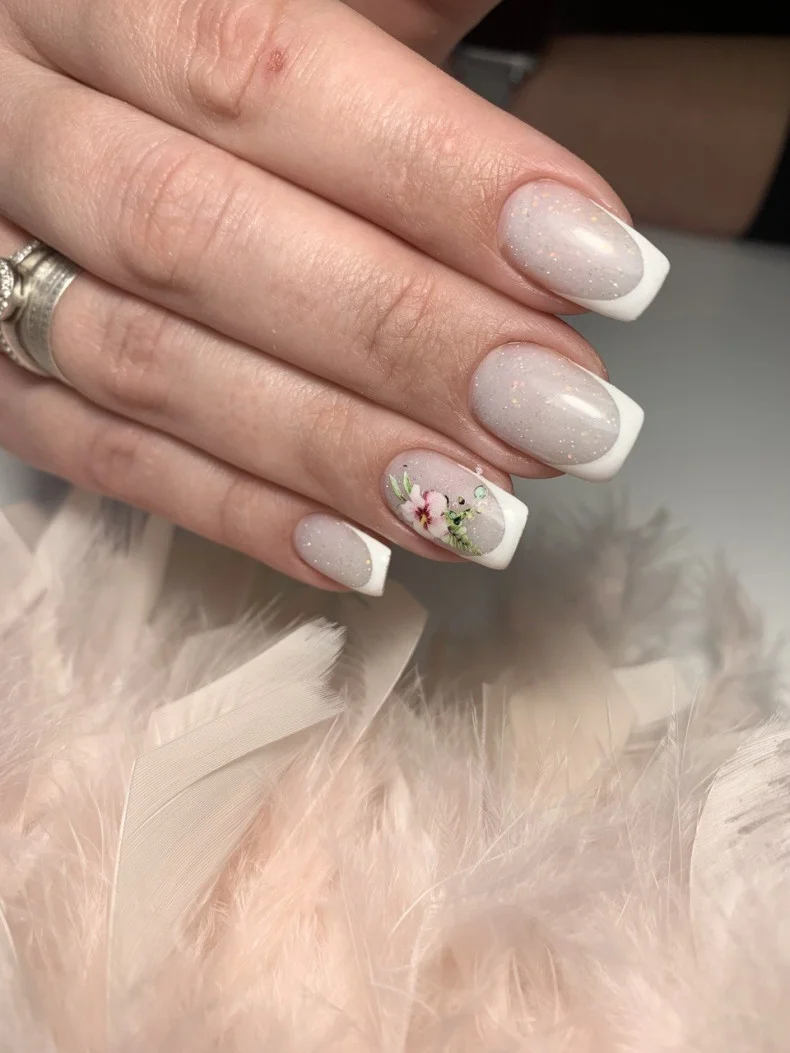
I would reach for a milky white or sheer ivory gel polish, followed by a classic bright-white French shade. OPI Funny Bunny, for example, can create a soft translucent effect, while a highly pigmented white works better for the tips. For the floral accent, I would use a fine liner brush with tiny amounts of blush pink, muted green, and perhaps a touch of white or gold. The shimmer should stay subtle; chunky glitter would take away from the airy quality of the manicure.
I would prepare the nails into a softly squared shape, apply the sheer base, and cure it before creating the French tips. On the accent nail, I would keep the flowers small and slightly asymmetrical, placing them off-center so they feel delicate rather than stamped into a rigid pattern. Once the artwork is dry or cured according to the product instructions, I would finish the entire set with a glossy top coat. A little cuticle oil afterward makes a surprisingly big difference to the final effect.
This is the kind of manicure I could see myself wearing to a summer wedding, a weekend brunch, or simply during one of those stretches when I want everything to feel a little prettier. The tiny floral detail gives the classic French manicure a seasonal twist without turning it into full-on floral overload. Sometimes less really does do more.
Cherry Red Texture for a Little Drama
Red nails never really leave the conversation, but this version gives the classic shade a darker, more textured personality. The nails are short and softly rounded, making the bold color much easier to wear day to day. Over the vivid red base sits a black, irregular pattern that resembles delicate lace, cracked lacquer, or a fine animal-inspired texture. The result has a slightly mysterious quality, especially against the black clothing and sparkling accessories surrounding the manicure.
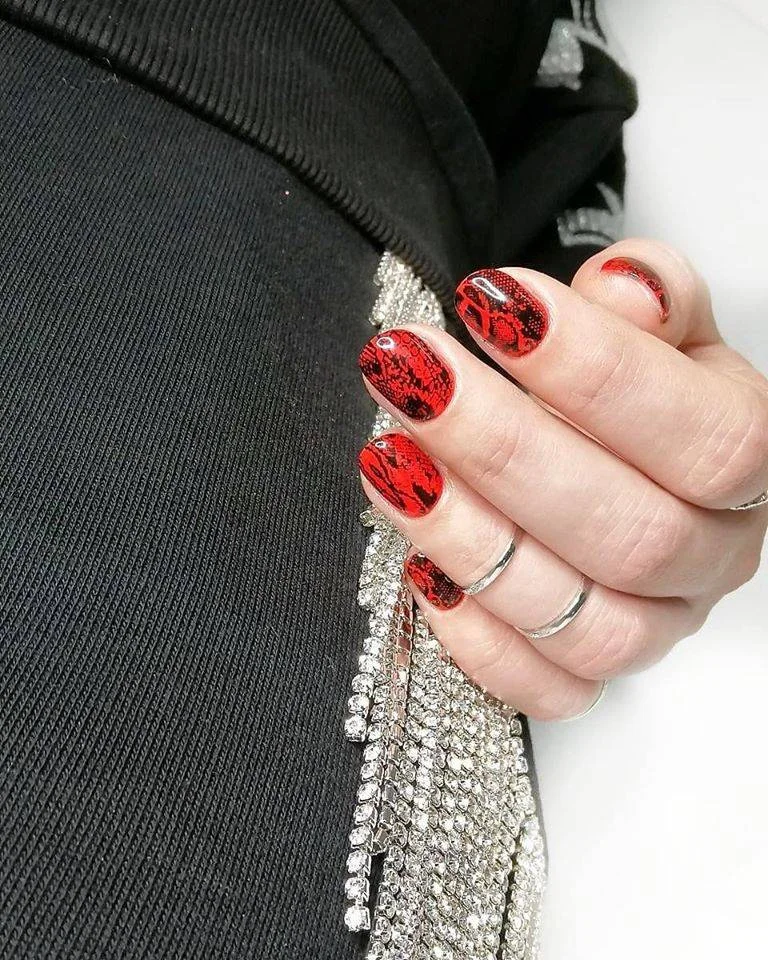
I would use a saturated cherry-red gel as the foundation and a highly pigmented black polish or stamping color for the pattern. A stamping plate with lace, snakeskin, or abstract crackle motifs could simplify the artwork considerably. If I were painting the pattern by hand, I would choose an ultra-fine liner brush and a very thin black gel. The final layer should be glossy if I want the red to look almost jewel-like, although a velvet or satin top coat could create an interesting alternative.
After shaping and prepping the nails, I would apply two thin layers of red, curing each one properly. The black detail comes next, and I would intentionally vary the density so every nail does not look mechanically identical. Once the pattern is finished, a generous glossy top coat smooths the surface and intensifies the red. I always prefer thin layers for a design like this because thick polish can make short nails look heavier.
I love this one for evenings when I want something stronger than a simple red manicure. It has that little flash of attitude that works beautifully with silver jewelry, black denim, or a sharp blazer. If your usual red feels too predictable, adding a dark graphic texture is an easy way to give it a completely different personality.
Chrome Pink and Blue With a Futuristic Glow
There is something almost liquid about this chrome manicure. The nails have a long almond shape with softly pointed ends, and the metallic finish moves between pink, lavender, and electric blue depending on the light. Instead of using separate colors on each nail, the shifting chrome effect creates the illusion of one continuous iridescent palette. It feels playful, futuristic, and made for catching sunlight through a car window or flashing under evening lights.
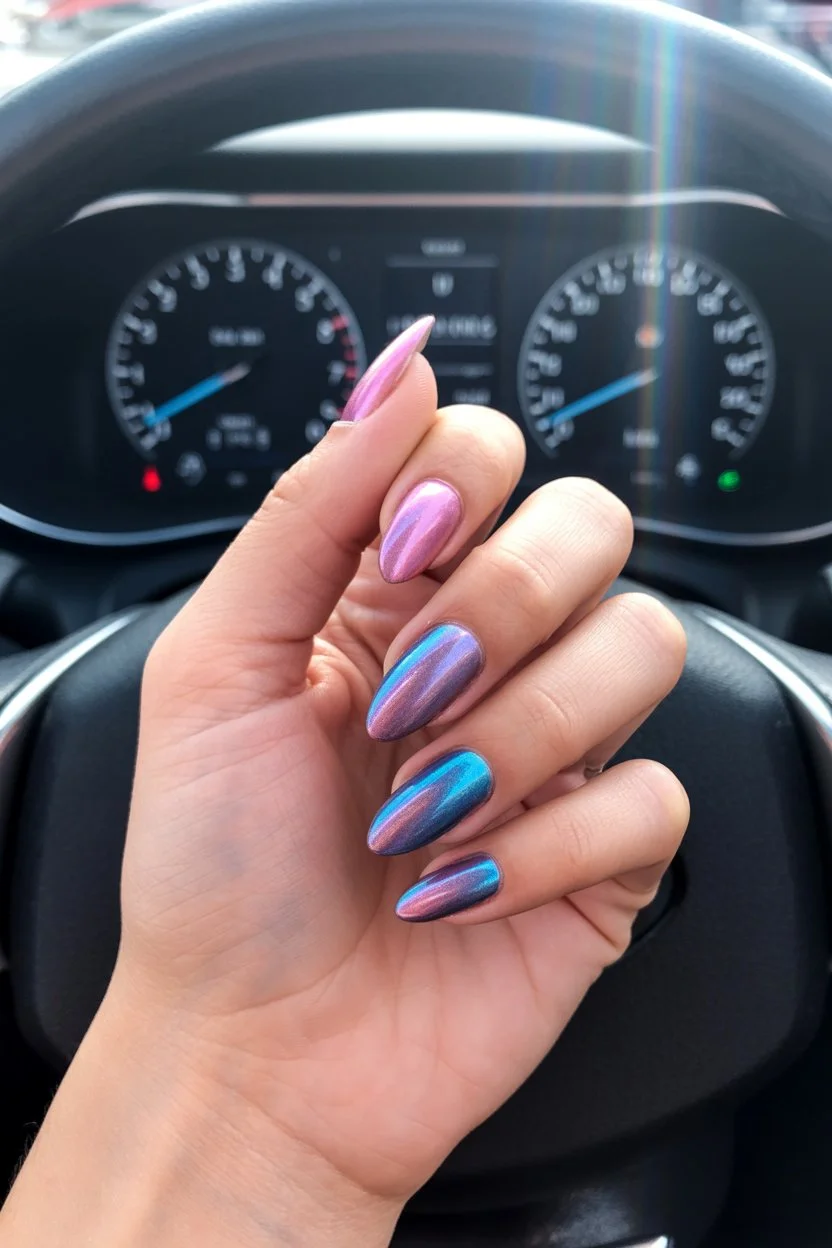
I would create the effect over a smooth nude or pale pink gel base, then apply a multichrome or aurora chrome powder with pink, violet, and blue reflections. Products such as OPI Chrome Effects powders or similar professional-style chrome pigments can give that reflective finish when applied over the correct no-wipe top coat. I would also use a soft applicator sponge and a glossy top coat to lock in the metallic surface. The smoother the underlying manicure, the more spectacular the chrome will look.
I would first refine the almond shape and make sure the surface is completely even. After applying and curing the base color, I would use the chrome powder sparingly and buff it over the nail until the reflective effect becomes even. The powder should be sealed carefully around the free edge because that is where lifting can begin first. I would finish with a glossy top coat and avoid overworking the surface, since too much rubbing can dull the reflective effect.
This is definitely one of my choices when I want my manicure to feel like an accessory. It catches attention without relying on rhinestones or elaborate artwork, and the color changes depending on the lighting, which makes it fun to look at throughout the day. For summer, I especially like how the blue flashes keep the pink from feeling overly sweet.
Powder Blue French With a Graphic Black Outline
A traditional French manicure gets a surprisingly cool update here with powder-blue tips, black curved outlines, and tiny black dots placed near the corners of the design. The base remains sheer and pink-toned, so the manicure still has that clean French foundation, but the blue instantly makes it feel more contemporary. The long square shape adds even more structure, turning a familiar French tip into something sharper and more graphic.
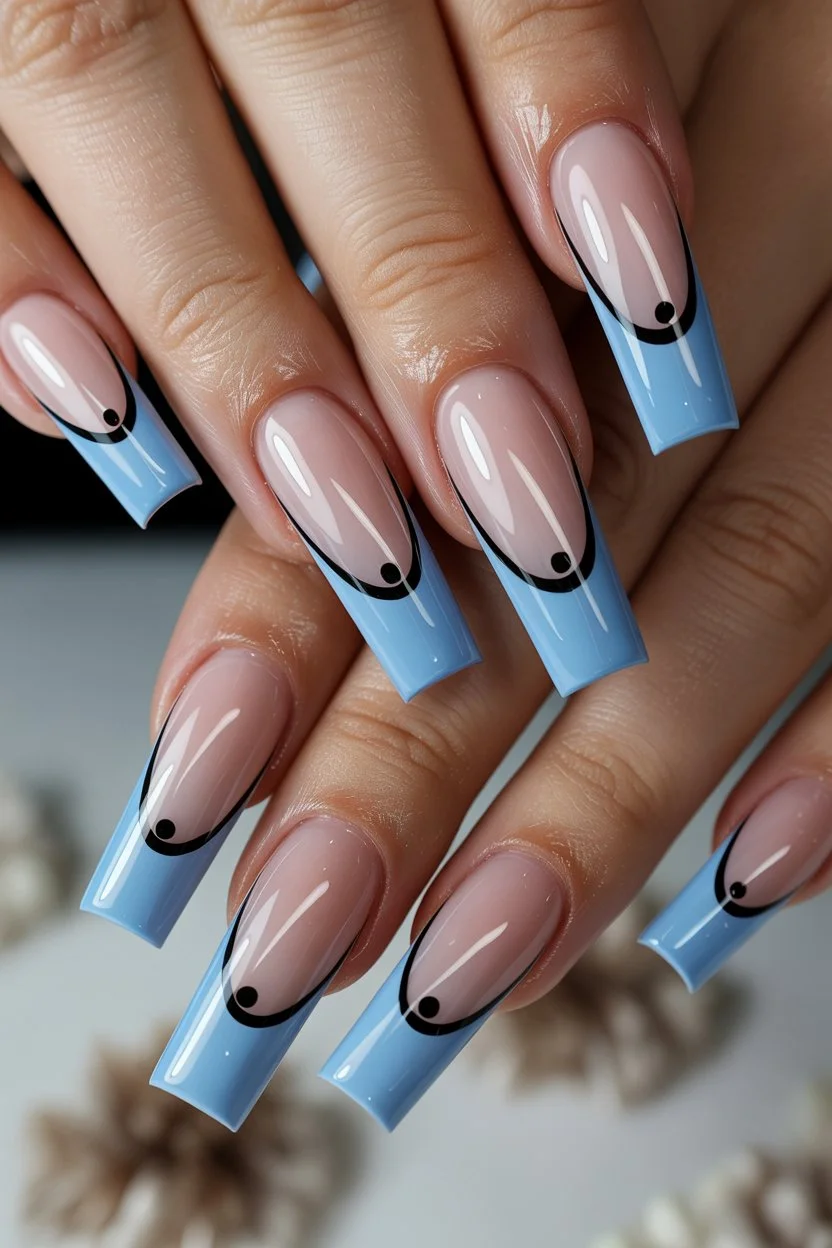
For the base, I would choose a translucent pink-beige gel that allows the natural nail to remain visible. A soft pastel blue gel creates the statement tip, while a black nail-art gel gives enough pigment for the thin outline and dots. A fine detail brush is essential because the black line needs to stay narrow and smooth. I would finish with a high-gloss top coat to emphasize the contrast between the glossy nude base and the cool blue edge.
I would start by shaping the nails into a clean square with slightly softened corners. After the nude base is cured, I would paint the blue tips, making sure their width stays consistent across the hand. Then I would outline the lower edge with black and add the tiny dots using a dotting tool or the tip of a fine brush. This is one of those designs where measuring by eye and stepping back between nails helps tremendously.
I like that this manicure feels distinctly seasonal without leaning into obvious beach motifs. The powder blue brings a cool, airy quality that looks beautiful with white, denim, pale gray, and soft summer neutrals. And if I were tired of classic white French tips but still wanted something polished, this would be an easy yes.
Olive Green and Gold With a Modern Luxe Finish
Deep olive is one of those colors I never underestimate. Here, it is paired with a soft nude base, elongated square nails, and flowing gold lines that curve around the green sections. Some nails carry a solid olive tip, while others use the color more sparingly, creating an elegant negative-space effect. The gold detailing ties everything together and gives the manicure a subtle luxury feel without covering the entire nail in metallic polish.
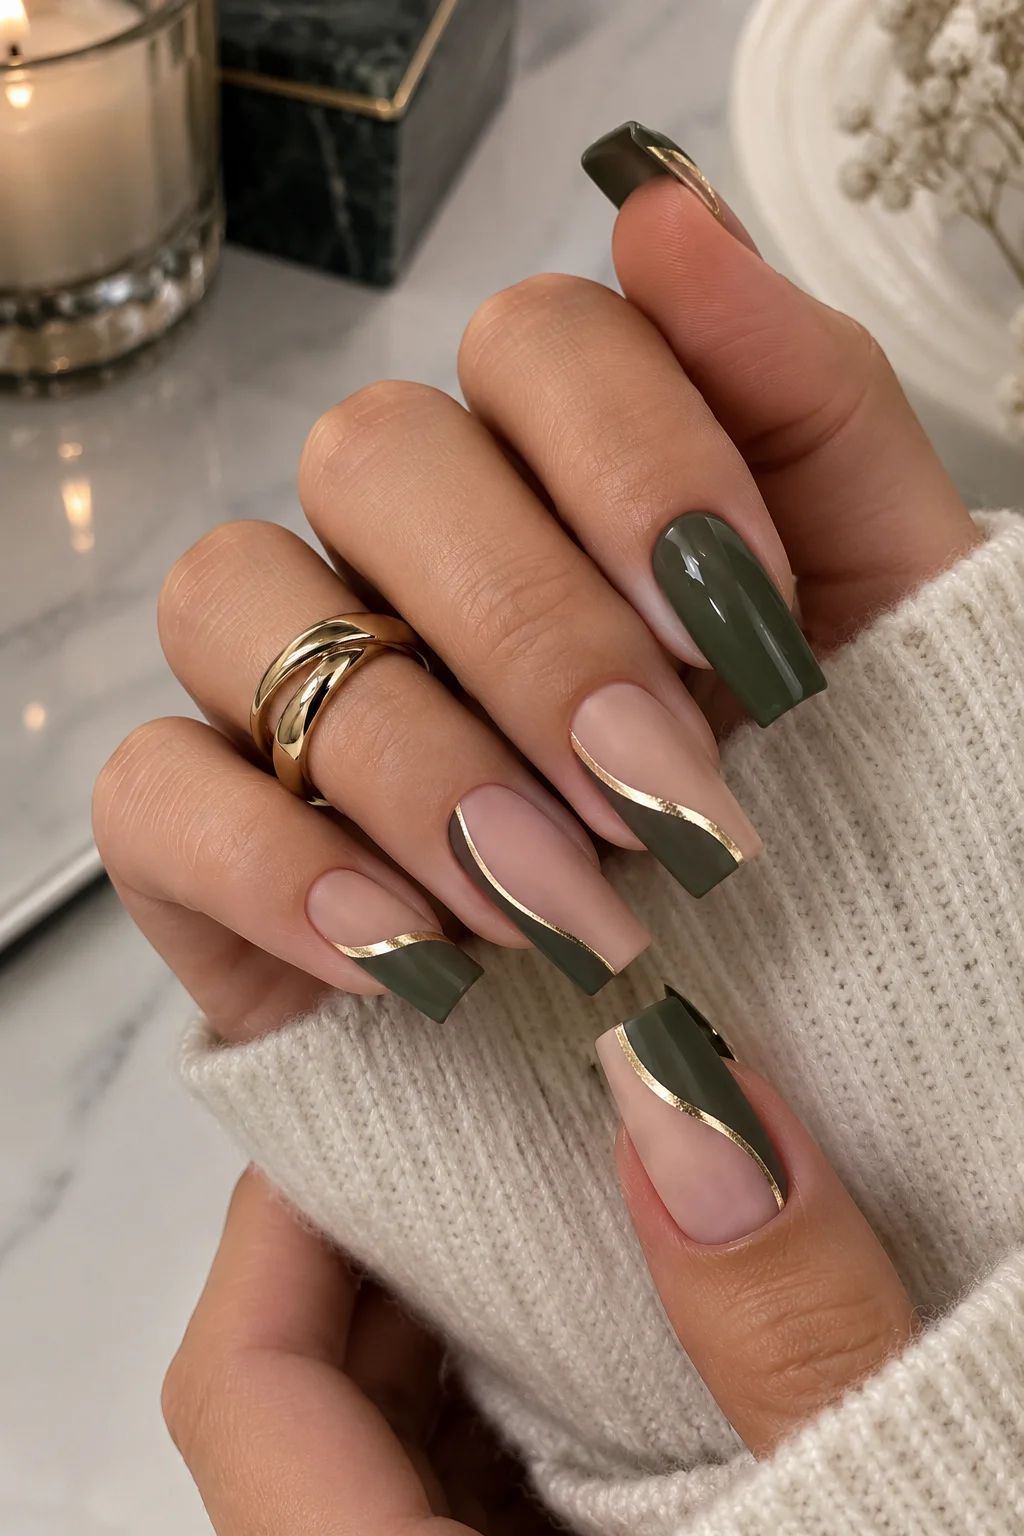
I would use a muted olive or forest-green gel with a creamy nude base. A thin metallic gold liner is the key product because the curved borders need to look precise but delicate. Brands such as Essie Gel Couture or OPI have shades that can be adapted to this palette, while a dedicated gold striping gel gives more control for the decorative lines. I would also keep a high-gloss top coat on hand to make the olive look rich and dimensional.
The easiest way for me to approach this design would be to establish the nude base first and cure it completely. I would then map out the olive sections with a fine brush, keeping the shapes slightly curved rather than perfectly geometric. Once cured, I would trace the borders with gold, following the natural movement of each shape. The important part is not rushing the curves; I would rather create several short controlled strokes than one shaky line.
This feels like a perfect bridge between summer polish and early-fall sophistication. The olive works beautifully with cream sweaters, gold jewelry, denim, and warm neutrals, so I could easily carry the manicure into a new season. There is also something about that muted green that makes the hands look instantly more put together.
Smoky Gray Nails With a Vintage Botanical Detail
For a quieter mood, I would go straight to this soft smoky-gray manicure. The nails are short and rounded, which keeps the overall look practical and understated, while two accent nails feature intricate white botanical artwork. The gray itself has a cool, slightly muted quality rather than looking stark or metallic. It is the kind of manicure that feels almost vintage, especially when the floral details are paired with the soft neutral background.
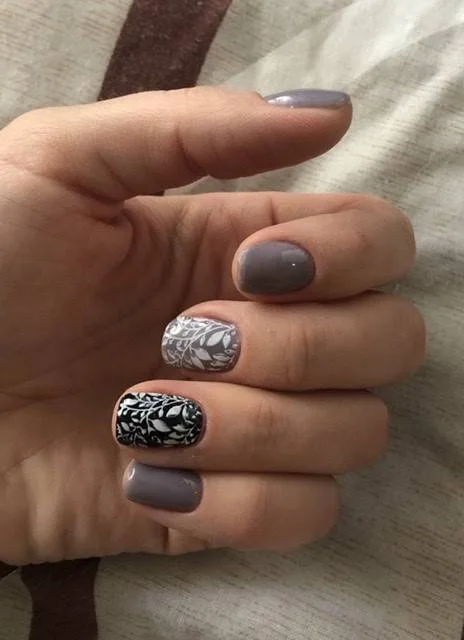
I would start with a medium smoky-gray polish that has a creamy finish rather than a strong shimmer. For the accent nails, I would use an opaque white nail-art gel and an ultra-fine detailing brush. A stamping plate with botanical or lace motifs would also work if freehand painting is not your thing. Because the design is delicate, I would keep the top coat glossy and smooth so the white artwork remains crisp.
After preparing the nails and applying the gray base, I would choose only a couple of nails for the botanical decoration. I would paint the white leaves and floral shapes in thin layers, allowing each detail to stay visible instead of filling the entire nail. The remaining nails can stay completely gray, which gives the artwork room to breathe. Once everything is cured, one even layer of top coat brings the set together.
I find this palette especially appealing when I want something polished but not obviously trendy. It works beautifully with denim, oatmeal knits, silver jewelry, and soft neutral layers, and the shorter length makes it much easier for everyday life. Sometimes the manicure I end up loving most is the one that quietly fits into everything else I wear.
Mocha Mauve Nails With a Delicate Metallic Accent
I love the quiet richness of this manicure because it manages to feel polished without looking overly done. The nails have a soft almond shape with a medium length, and the palette moves between creamy nude pink and a deep mauve-brown that feels especially chic when the weather starts cooling down. Two accent nails carry a fine layered metallic design, almost like loose threads brushed across the surface. That little flash of texture keeps the manicure from becoming predictable.
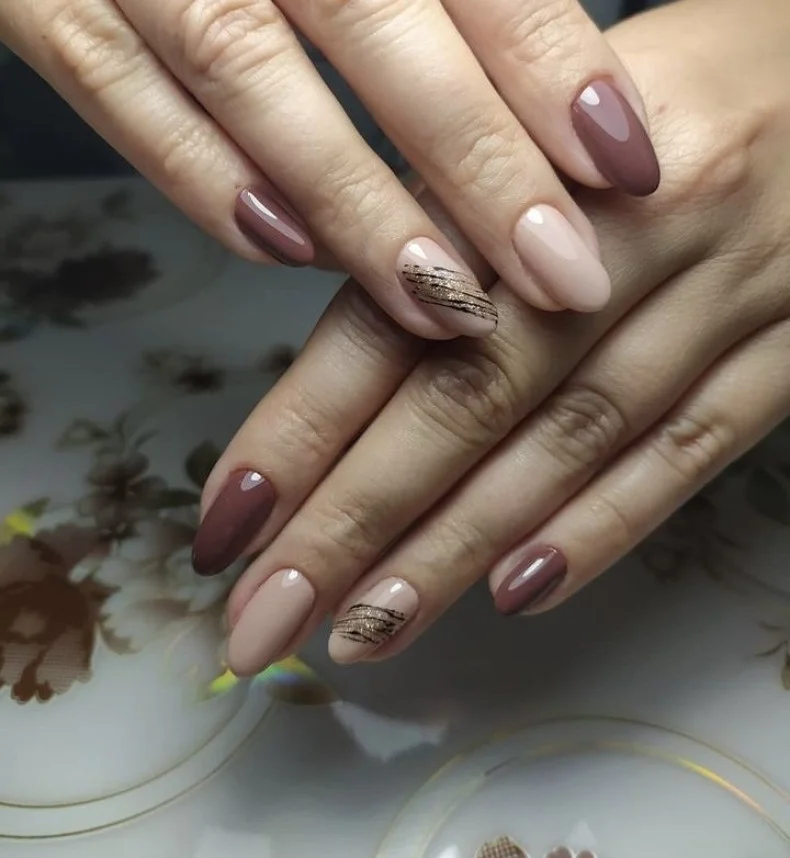
For this look, I would reach for a sheer milky nude such as OPI Funny Bunny or a similar soft pink-beige, paired with a glossy muted plum-brown polish. The metallic accent needs a very thin gold or bronze striping polish, plus a fine nail-art brush. I would keep everything glossy rather than matte because the reflective finish makes the darker shade look richer and gives the neutral nails that clean, expensive-looking glow.
I would start by shaping every nail into the same almond silhouette and smoothing the surface carefully. After a base coat, I would apply the nude shade to the accent nails and the deeper mauve to the others, building the color in thin layers. Once the base is completely dry, I would draw several irregular, slightly curved metallic lines across the accent nails rather than trying to make them perfectly symmetrical. A glossy top coat finishes everything and softens the contrast.
This is the kind of manicure I would choose when I want something that works with practically everything in my closet. Denim, cream knits, chocolate brown, black, even a little leopard print—it all makes sense with these colors. And honestly, that is the beauty of a muted palette: you get a little drama without having to coordinate your entire outfit around your fingertips.
Sheer Pink Nails Blooming Into a Garden-Inspired French
There is something wonderfully fresh about a translucent pink base fading into brighter pink tips. The shape here is softly square with gently rounded corners, giving the manicure a practical everyday feel while leaving plenty of room for the floral artwork. White botanical outlines drift across the nails, while pink flowers appear concentrated near the tips. I especially like how the artwork remains delicate instead of covering the entire nail.
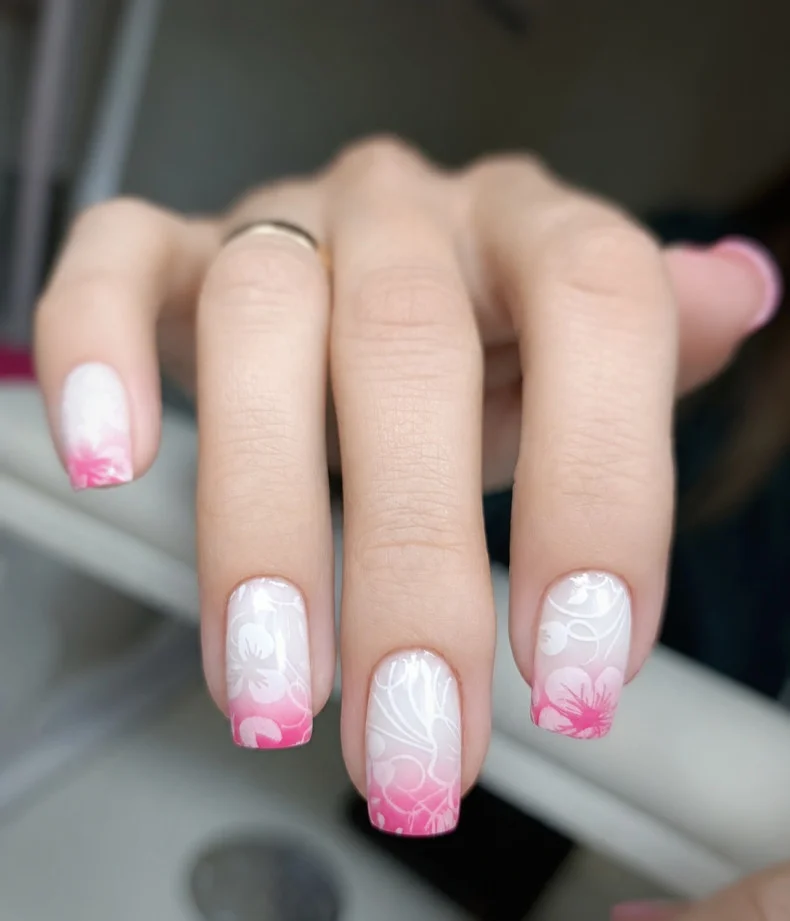
I would use a sheer white or milky-pink base, a soft bubblegum pink for the tips, and a crisp white liner gel for the flowers and leaves. A tiny detail brush is essential for those fine botanical curves. If I wanted the pink gradient to look especially soft, I would use a sponge to build the color gradually rather than painting one opaque stripe at the free edge.
At home, I would begin with two thin layers of the translucent base, letting each layer settle before adding the pink. I would sponge or softly blend the pink toward the tips, then use the liner brush to add loose flowers, petals, stems, and curved leaves. I would not obsess over making every flower identical—slight variation actually makes botanical nail art look more natural. A generous layer of glossy top coat brings out the watery, fresh finish.
This feels like a manicure for someone who wants her nails to look cheerful without shouting for attention. I could easily wear it during a sunny weekend, a vacation, or one of those early-season days when I am not quite ready to let go of lighter colors. The little floral details do most of the talking, and that is exactly why I find them so charming.
Mauve Almonds With Butterfly Line Art
A rich dusty mauve makes the foundation here, and I think the color is what gives this manicure its instant sophistication. The nails are long, sleek almonds, with most of them covered in a glossy mauve polish while selected nails receive a translucent pink base and delicate black butterfly line art. The contrast is subtle but striking: solid color on one nail, airy artwork on the next, then back to solid color again.
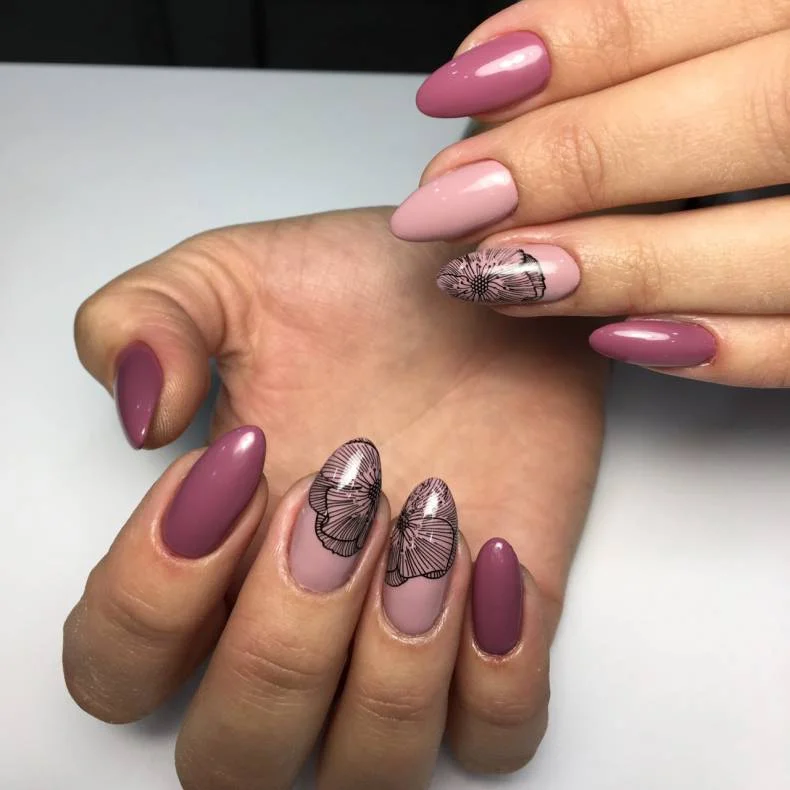
I would choose a creamy mauve-plum gel polish with a high-shine finish, along with a sheer blush base for the accent nails. For the butterflies, I would use black stamping polish or a highly pigmented black nail-art gel and an ultra-fine brush. A glossy top coat is important here because it makes the mauve look almost jewel-like and keeps the line work crisp.
I would shape the nails first, paying attention to keeping both sides of each almond balanced. After applying the base colors, I would create the butterfly wings with very fine radiating lines, building the design from the center outward. The trick is to leave enough negative space around the artwork. Too many lines can make the butterflies look heavy, while a lighter hand gives them that almost lace-like quality.
I keep coming back to designs like this when I want something feminine but not sugary. The mauve has enough depth for cooler days, while the butterflies keep the manicure from feeling too serious. It is a nice reminder that seasonal nail art does not always have to rely on obvious motifs—sometimes one tiny butterfly is enough to change the whole mood.
Blush Nails With Red Petals and Fine Graphic Lines
This manicure takes a much softer route, beginning with a translucent blush-pink base that lets the natural nail color subtly show through. The tips feature delicate curved sections of warm red-orange, while a few nails are decorated with tiny red floral details and ultra-thin black lines. The almond shape elongates the fingers beautifully, and the artwork is positioned so that the nail still feels light and open.
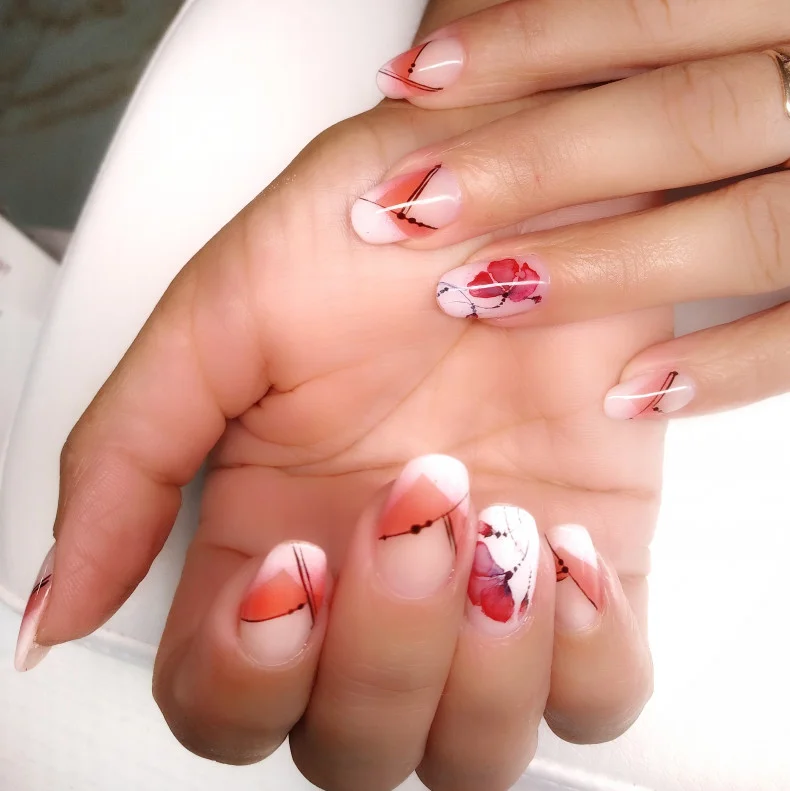
I would keep the palette intentionally narrow: sheer pink, warm tomato red, a little black, and plenty of glossy clear top coat. A fine liner brush would handle the graphic lines, while a small detail brush could create the loose petals. I would avoid a bright white base because the slightly transparent pink gives this particular combination a much softer finish.
My approach would be to establish the sheer pink base first and then add the red curved shapes at the tips with a small brush. Once those are dry, I would draw the fine black lines, keeping them slightly imperfect and organic. The tiny flowers can be built with a few irregular red strokes rather than a complicated illustration. I would seal everything with a glossy top coat, being careful not to drag the artwork.
I love this one for days when I want a manicure that feels put together but still has personality. It would look beautiful with a simple white shirt, a red lip, or even a neutral sweater where the tiny red details become the unexpected pop. Have you noticed how one small color repeated on your nails and lips can make an entire look feel intentional?
Hot Pink Nails With a Single Painted Blossom
Bright pink immediately changes the energy, and this manicure leans into that playful side without going overboard. The nails are short-to-medium rounded ovals with a juicy glossy pink covering most of the set. One white accent nail breaks up the color and features a small pink flower with a dark center and thin green-black stem. It is simple, but that one decorative nail gives the manicure a surprisingly finished look.
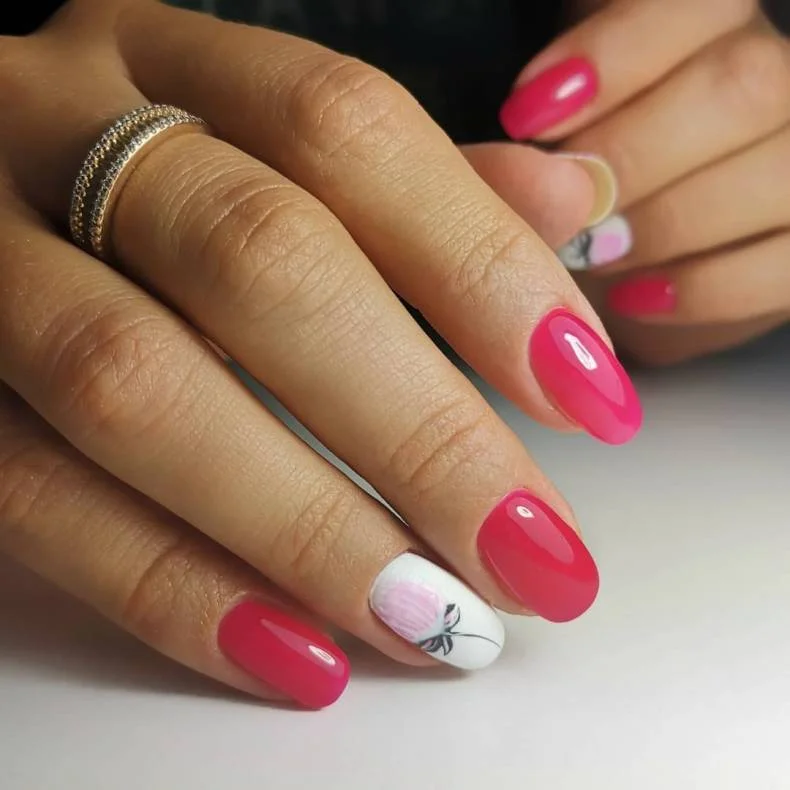
I would choose a saturated hot-pink polish with a jelly-like shine and a soft white cream for the accent nail. For the flower, I would use a pale blush pink, a slightly stronger pink for definition, and a tiny amount of dark green or black for the stem. A detail brush and dotting tool are enough to recreate the design without collecting an entire nail-art kit.
I would paint the pink nails first, then apply the white base to the accent nail. Once it has dried, I would place a few small dots for the petals and pull them gently toward the center to create a flower shape. A thin curved stroke becomes the stem, and a tiny dot in the center gives the flower definition. Two layers of glossy top coat make the pink look almost glassy.
This is my pick when I want a little more fun. Hot pink can sometimes feel like a summer-only color, but I actually like it as a bright contrast against denim, charcoal, cream, or even a black blazer. The trick is keeping the rest of the design restrained. One flower is enough; there is no need to turn the whole garden into a bouquet.
Milky White Nails With Flowing Gold Lines
This manicure is all about movement. The nails have a long, softly squared shape with a milky white base that looks almost like porcelain. Thin metallic-gold lines travel vertically and curve gently across each nail, creating an abstract pattern that feels architectural without becoming severe. Some nails have one winding line, while others carry two or three, which gives the set a deliberately organic rhythm.
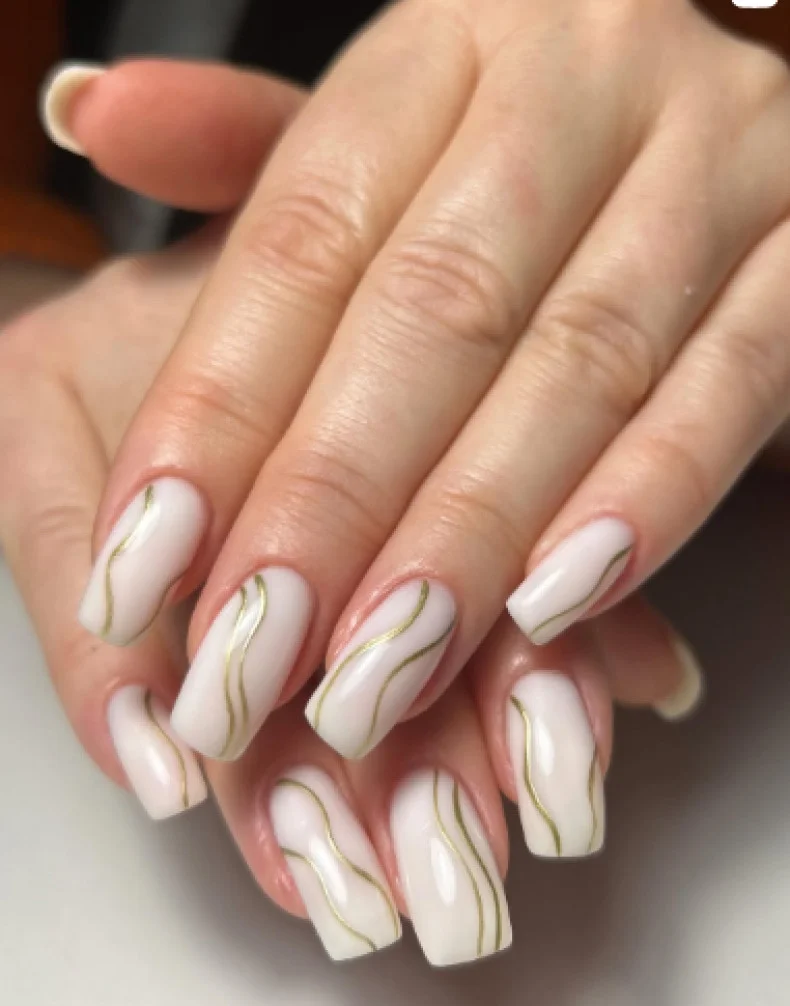
For the base, I would choose a creamy translucent white rather than an opaque stark white. OPI Funny Bunny or a similar milky shade would give the right softness. The gold can come from a metallic striping polish or a fine gold gel liner, and I would finish with a high-shine top coat to make the lines look almost foil-like.
The application is surprisingly approachable if I take my time. I would shape the nails evenly, apply the milky base, and let it cure completely before starting the gold work. Then I would use a very fine liner brush to draw long, fluid curves from near the cuticle toward the tip, varying their direction and spacing. I would resist the temptation to correct every tiny wobble—the beauty of this design is in those imperfect, flowing lines.
This is one of those manicures I would save for a special outfit, but it is not limited to formal occasions. The creamy base keeps it wearable, while the gold adds just enough polish for dinner, a celebration, or a dressed-up weekend. It also has that lovely quality where you notice something different every time your hand moves.
Deep Plum Nails With a Graphic White Accent
Deep plum is having its moment here, and I am completely on board. The nails are short rounded ovals with a rich, glossy burgundy-plum polish covering nearly the entire set. One accent nail is coated in the same deep shade but carries crisp white geometric lines that cross over one another. The result feels modern and slightly moody, especially against the soft texture of the sweater styling.
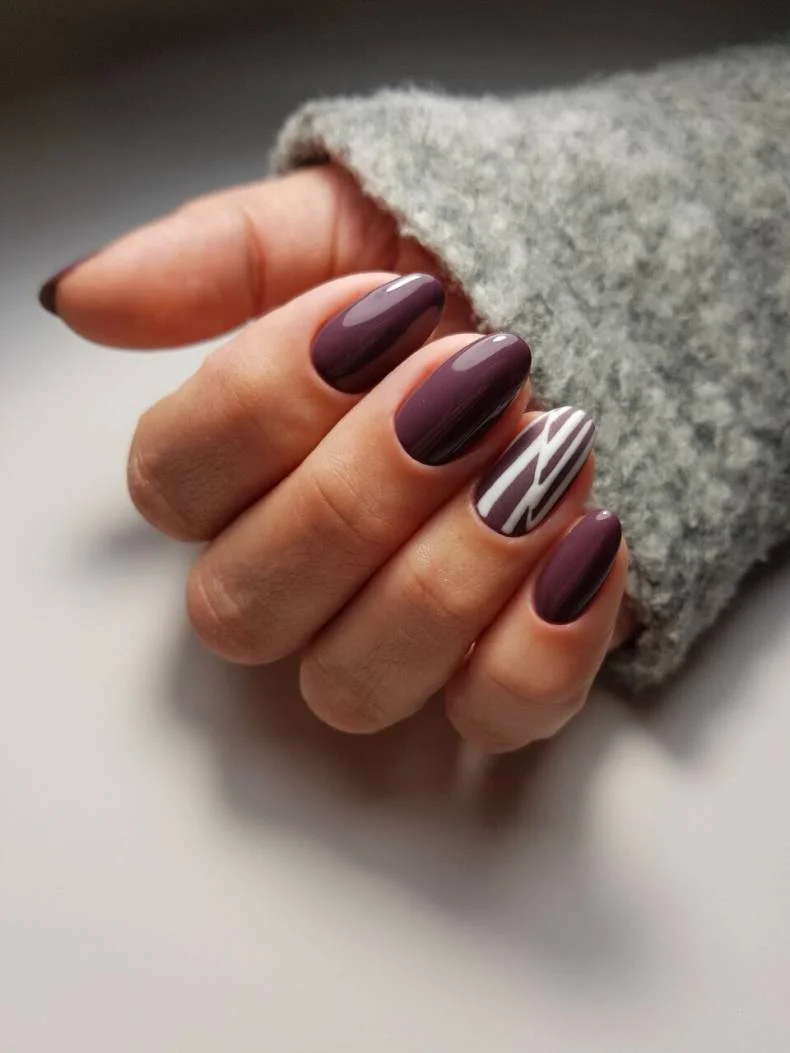
I would look for a dark plum polish with strong pigmentation and a creamy finish rather than a shimmer. A bright white nail-art gel or striping polish will create the graphic accent, and a fine liner brush will make the lines much easier to control. If the plum is very dark, I would use a good base coat underneath to help prevent staining and make removal easier later.
I would apply two thin coats of plum, allowing each to dry or cure properly before adding the accent. For the geometric detail, I would map out a few intersecting diagonal lines rather than covering the entire nail with a complicated pattern. The white should remain crisp and relatively sparse. Once everything is set, I would apply a glossy top coat over the entire manicure for that smooth, lacquered finish.
I would wear this when I want my nails to feel a little moodier without going completely black. Plum works beautifully as the season shifts toward richer wardrobe colors, and the white graphic detail keeps it from becoming too heavy. Sometimes the simplest manicure is the one that makes me want to pull on a cozy sweater, add a few rings, and call the look finished.
This season’s nail art is all about finding the sweet spot between fresh trends and your own personal style. I love how a simple change in color, shape, shimmer, or tiny detail can make an everyday manicure feel completely new. Whether you lean toward rich burgundy, soft blush, playful animal print, or dreamy pastel shades, there’s no need to follow every trend to the letter. Pick the design that makes you want to look at your hands a little more often. After all, the best manicure is the one that feels like you—but just a little more polished.

